1. Introduction
This manual provides detailed instructions for the installation, operation, and maintenance of your Vtopek 7-inch Motorcycle CarPlay Android Auto Screen. Please read this manual thoroughly before using the product to ensure proper function and safety. Keep this manual for future reference.
2. Safety Information
- Always prioritize road safety. Do not operate the device in a manner that distracts you from driving.
- Ensure all connections are secure and properly insulated to prevent electrical hazards, especially in wet conditions.
- Mount the device securely to prevent it from detaching during operation.
- Do not attempt to disassemble or modify the device. Refer all servicing to qualified personnel.
- The device is IP67 waterproof; however, avoid prolonged submersion or high-pressure water jets.
3. Package Contents
Verify that all items are present in the package:
- 1 x Vtopek 7-inch Motorcycle CarPlay Screen
- 1 x Mounting Bracket Kit
- 1 x Power Cable (ACC+12V and Ground)
- 1 x GPS Antenna
- 1 x Wired Remote Control
- 1 x 4K Front Camera
- 1 x 1080P Rear Camera
- 1 x 64GB TF Card
- 1 x User Manual

Image 3.1: The Vtopek 7-inch Motorcycle CarPlay Android Auto Screen shown with its main components including the display, mounting hardware, GPS antenna, remote, dual cameras, and 64GB TF card.
4. Setup
4.1 Mounting the Device
- Attach the U-shaped reinforced bracket to your motorcycle's handlebar. Ensure it is securely fastened and positioned for optimal viewing without obstructing your view of the road or controls.
- Mount the 7-inch display unit onto the bracket. The bracket allows for 360-degree rotation to adjust the viewing angle.

Image 4.1: The Vtopek 7-inch screen mounted on a motorcycle handlebar, demonstrating its placement and visibility.
4.2 Wiring and Power Connection
- Connect the power cable to your motorcycle's ACC+12V power source and ground. Ensure proper polarity. The device supports DC12V-24V input.
- Connect the GPS antenna to the designated port on the main unit.
- Connect the wired remote control to its port for easy access to functions.
4.3 Camera Installation
- Install the 4K front camera at the front of your motorcycle, ensuring a clear, unobstructed view of the road ahead.
- Install the 1080P rear camera at the rear of your motorcycle, providing a clear view of the road behind.
- Route the camera cables securely, avoiding moving parts and heat sources. Connect them to the corresponding ports on the main unit.

Image 4.2: A diagram illustrating the wiring connections for the main unit, cameras, and power supply.
4.4 TF Card Insertion
Insert the provided 64GB TF card into the designated slot on the main unit. This card is essential for dash cam recording.
5. Operating Instructions
5.1 Powering On/Off
The device will power on automatically when your motorcycle's ignition is turned on (ACC+12V connection). To power off, turn off the ignition.
5.2 Screen Features
The 7-inch IPS touchscreen offers a resolution of 1560x720p and up to 1000 nits brightness for clear visibility in various lighting conditions. The integrated sun visor further enhances readability.

Image 5.1: The 7-inch HD IPS touchscreen displaying navigation, mounted on a motorcycle handlebar.
5.3 Wireless CarPlay and Android Auto
The device supports wireless CarPlay and Android Auto for seamless smartphone integration.
- CarPlay Requirements: An iPhone with iOS 6 or later. Ensure CarPlay system and voice control are enabled on your iPhone.
- Android Auto Requirements: A phone that supports 5 GHz Wi-Fi and runs Android 11 or higher. Ensure the Android Auto app is updated to the latest version.
- Connection: Pair your smartphone with the CarPlay screen via Bluetooth and Wi-Fi. Follow the on-screen prompts for initial setup.

Image 5.2: Examples of the Wireless CarPlay and Android Auto interfaces displayed on the screen.
5.4 Dual Bluetooth Connectivity
The device features dual Bluetooth for enhanced audio management:
- Pair the CarPlay screen with your smartphone.
- Connect your Bluetooth headset or helmet communication system to the CarPlay screen. This allows for hands-free calls and music playback directly through your headset.
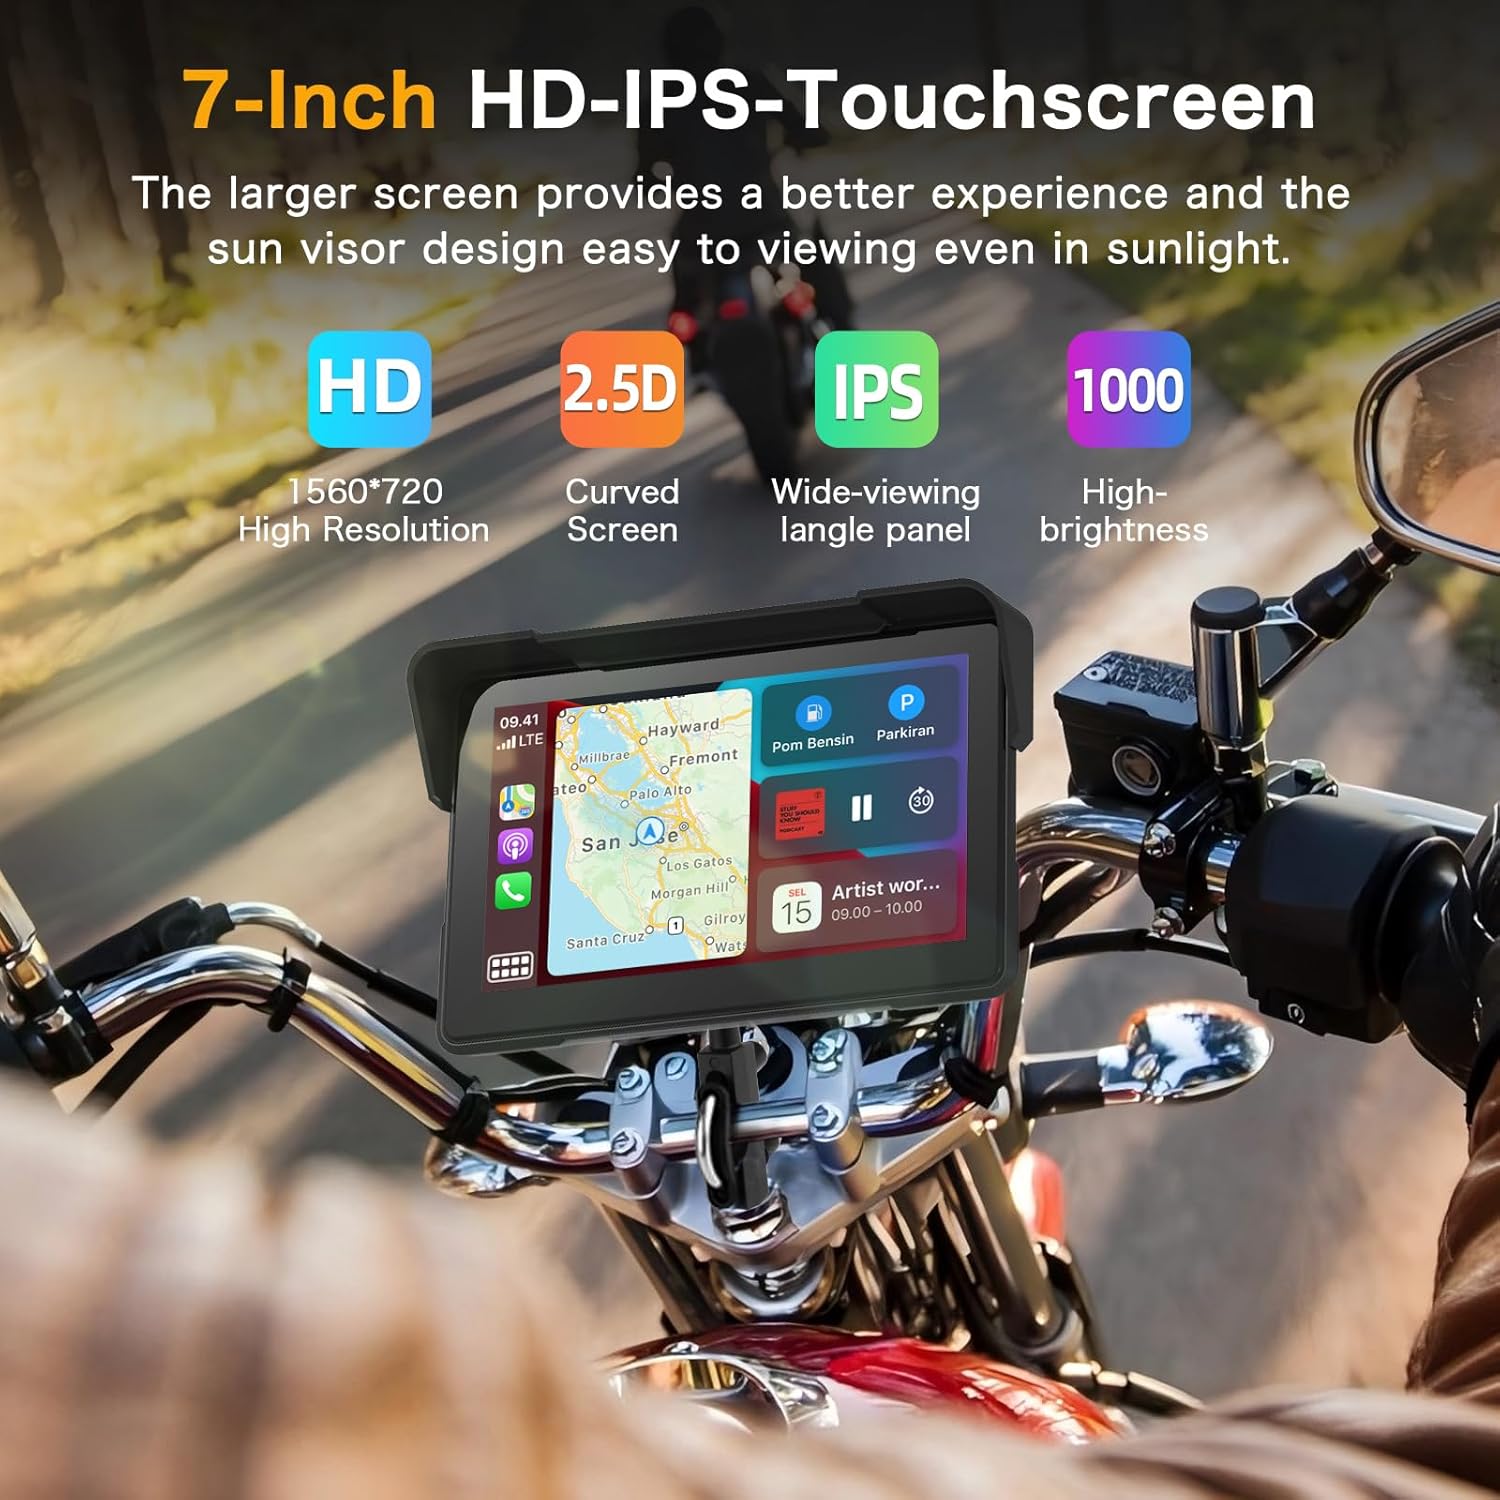
Image 5.3: A visual representation of the dual Bluetooth connectivity, showing the screen connecting to a smartphone and a Bluetooth headset/helmet.
5.5 Voice Control
Utilize voice assistants like Siri (for iOS) or Google Assistant (for Android) for safe, hands-free operation. This allows you to navigate, play music, and make calls without touching the screen.
Image 5.4: A motorcycle rider using voice commands for navigation, demonstrating hands-free operation.
5.6 Dash Cam (DVR) Features
The integrated dual cameras provide comprehensive recording capabilities:
- Front Camera: 4K UHD resolution with a 150° ultra-wide angle.
- Rear Camera: 1080P AHD resolution with a 150° ultra-wide angle.
- Loop Recording: Automatically overwrites older files when the TF card is full, ensuring continuous recording.
- Split-Screen Display: View front and rear camera feeds simultaneously on the screen.
- HDR Technology: Enhances image quality for clear and detailed recordings, even at night.

Image 5.5: The screen displaying simultaneous views from the 4K front camera and 1080P rear camera, highlighting the dual recording capability.
5.7 WiFi-App Control
Connect the device to your smartphone via Wi-Fi to use the dedicated app. This allows you to:
- Preview live camera feeds.
- Download recorded videos to your phone.
- Share videos directly from the app.

Image 5.6: A smartphone screen showing the app interface for managing dash cam recordings and sharing content.
5.8 Real-time Display
The screen can display real-time information relevant to your ride, including:
- Speed
- Mileage
- Altitude
- Compass

Image 5.7: The screen showing real-time riding data such as speed, altitude, and compass, enhancing situational awareness.
6. Maintenance
6.1 Cleaning the Screen
Use a soft, lint-free cloth to gently wipe the screen. For stubborn smudges, slightly dampen the cloth with water or a screen-safe cleaner. Avoid abrasive materials or harsh chemicals.
6.2 Waterproof Design
The device features an IP67 waterproof rating, making it resistant to dust and water immersion up to 1 meter for 30 minutes. This ensures optimal performance in various weather conditions, including heavy rain.

Image 6.1: The Vtopek screen mounted on a motorcycle, demonstrating its waterproof capability during rain.
7. Troubleshooting
7.1 CarPlay/Android Auto Connectivity Issues
- Compatibility: Ensure your smartphone meets the minimum requirements (iOS 6+ for CarPlay, Android 11+ with 5GHz Wi-Fi for Android Auto).
- Specific Phone Models: Note that compatibility may be limited with certain Samsung (Note/S series), Huawei, and Xiaomi models. Verify your phone's wireless CarPlay/Android Auto support before purchase.
- Connection Steps: Re-attempt pairing via Bluetooth and Wi-Fi. Ensure both are enabled on your phone and the device.
7.2 Dash Cam Recording Problems
- TF Card: Ensure the 64GB TF card is properly inserted and not full. The loop recording function should manage space automatically.
- Formatting: If issues persist, try formatting the TF card through the device settings.
- Power Supply: Verify stable power supply to the device.
7.3 General Device Malfunctions
- Restart: Turn off your motorcycle's ignition and restart it to power cycle the device.
- Firmware: Check the manufacturer's website for any available firmware updates.
8. Specifications
| Feature | Specification |
|---|---|
| Brand | Vtopek |
| Model Name | Vtopek MotoCarplay |
| Screen Size | 7 Inches |
| Screen Resolution | 1560x720p |
| Screen Brightness | Up to 1000 nits |
| Front Camera | 4K UHD, 150° wide angle |
| Rear Camera | 1080P AHD, 150° wide angle |
| Connectivity | Bluetooth, Wi-Fi (5GHz for Android Auto) |
| Storage | 64GB TF Card (included) |
| Power Input | DC12V-24V |
| Waterproof Rating | IP67 |
| Mounting Type | Handlebar Mount |
9. Warranty and Support
Your Vtopek MotoCarplay device comes with a 1-year warranty from the date of purchase. Additionally, Vtopek provides lifetime technical assistance.
If you encounter any issues or require support, please contact Vtopek customer service. Refer to the contact information provided with your product packaging or on the official Vtopek website.
