Roinvou 8 Core 4G+64G
Roinvou 8 Core 4GB+64GB Android Radio User Manual for Dodge Caliber 2006-2012
Model: 8 Core 4G+64G
1. Introduction
This manual provides detailed instructions for the installation, operation, and maintenance of your Roinvou 8 Core 4GB+64GB Android Radio. This unit is specifically designed for Dodge Caliber models manufactured between 2006 and 2012. Please read this manual thoroughly before installation and use to ensure proper functionality and to avoid damage.
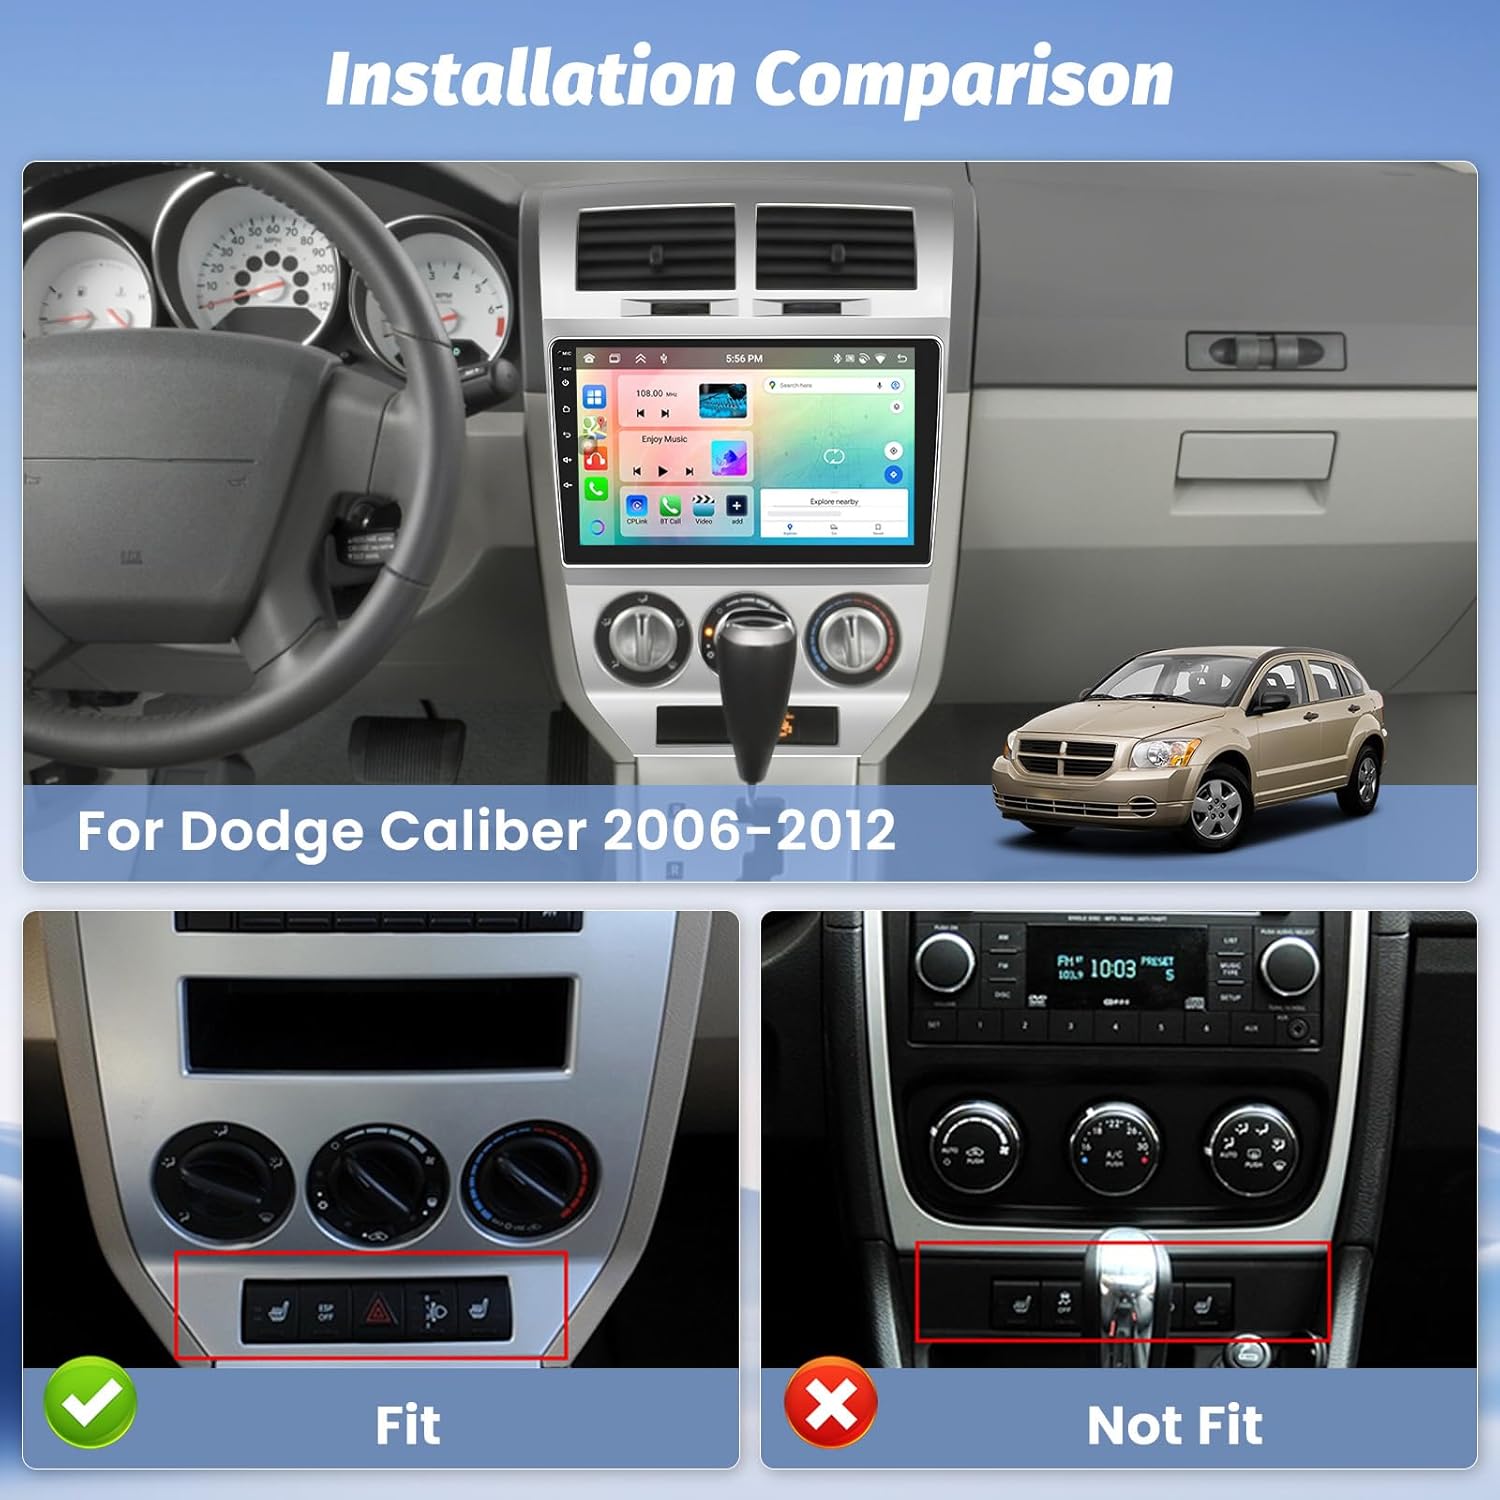
2. Compatibility
This car stereo is compatible with Dodge Caliber vehicles from model years 2006 to 2012. Before purchasing and installing, verify the year, dimensions, and shape of your vehicle's center console to ensure a proper fit. If you are uncertain about compatibility, consult with a professional or the manufacturer.
3. What's in the Box
The package includes the following components:
- Roinvou Android Car Stereo for Dodge Caliber
- 1 x Power Cable
- 1 x Radio Antenna
- 1 x Canbus Decoder
- 1 x RCA Harness
- 1 x GPS Antenna
- 1 x AHD Backup Camera
- 1 x External Microphone
- 1 x Rear Camera Input Cable
- 2 x USB Cables
- 1 x Installation Tool

4. Setup and Installation
Professional installation is recommended. Disconnect the vehicle's battery before beginning any electrical work.
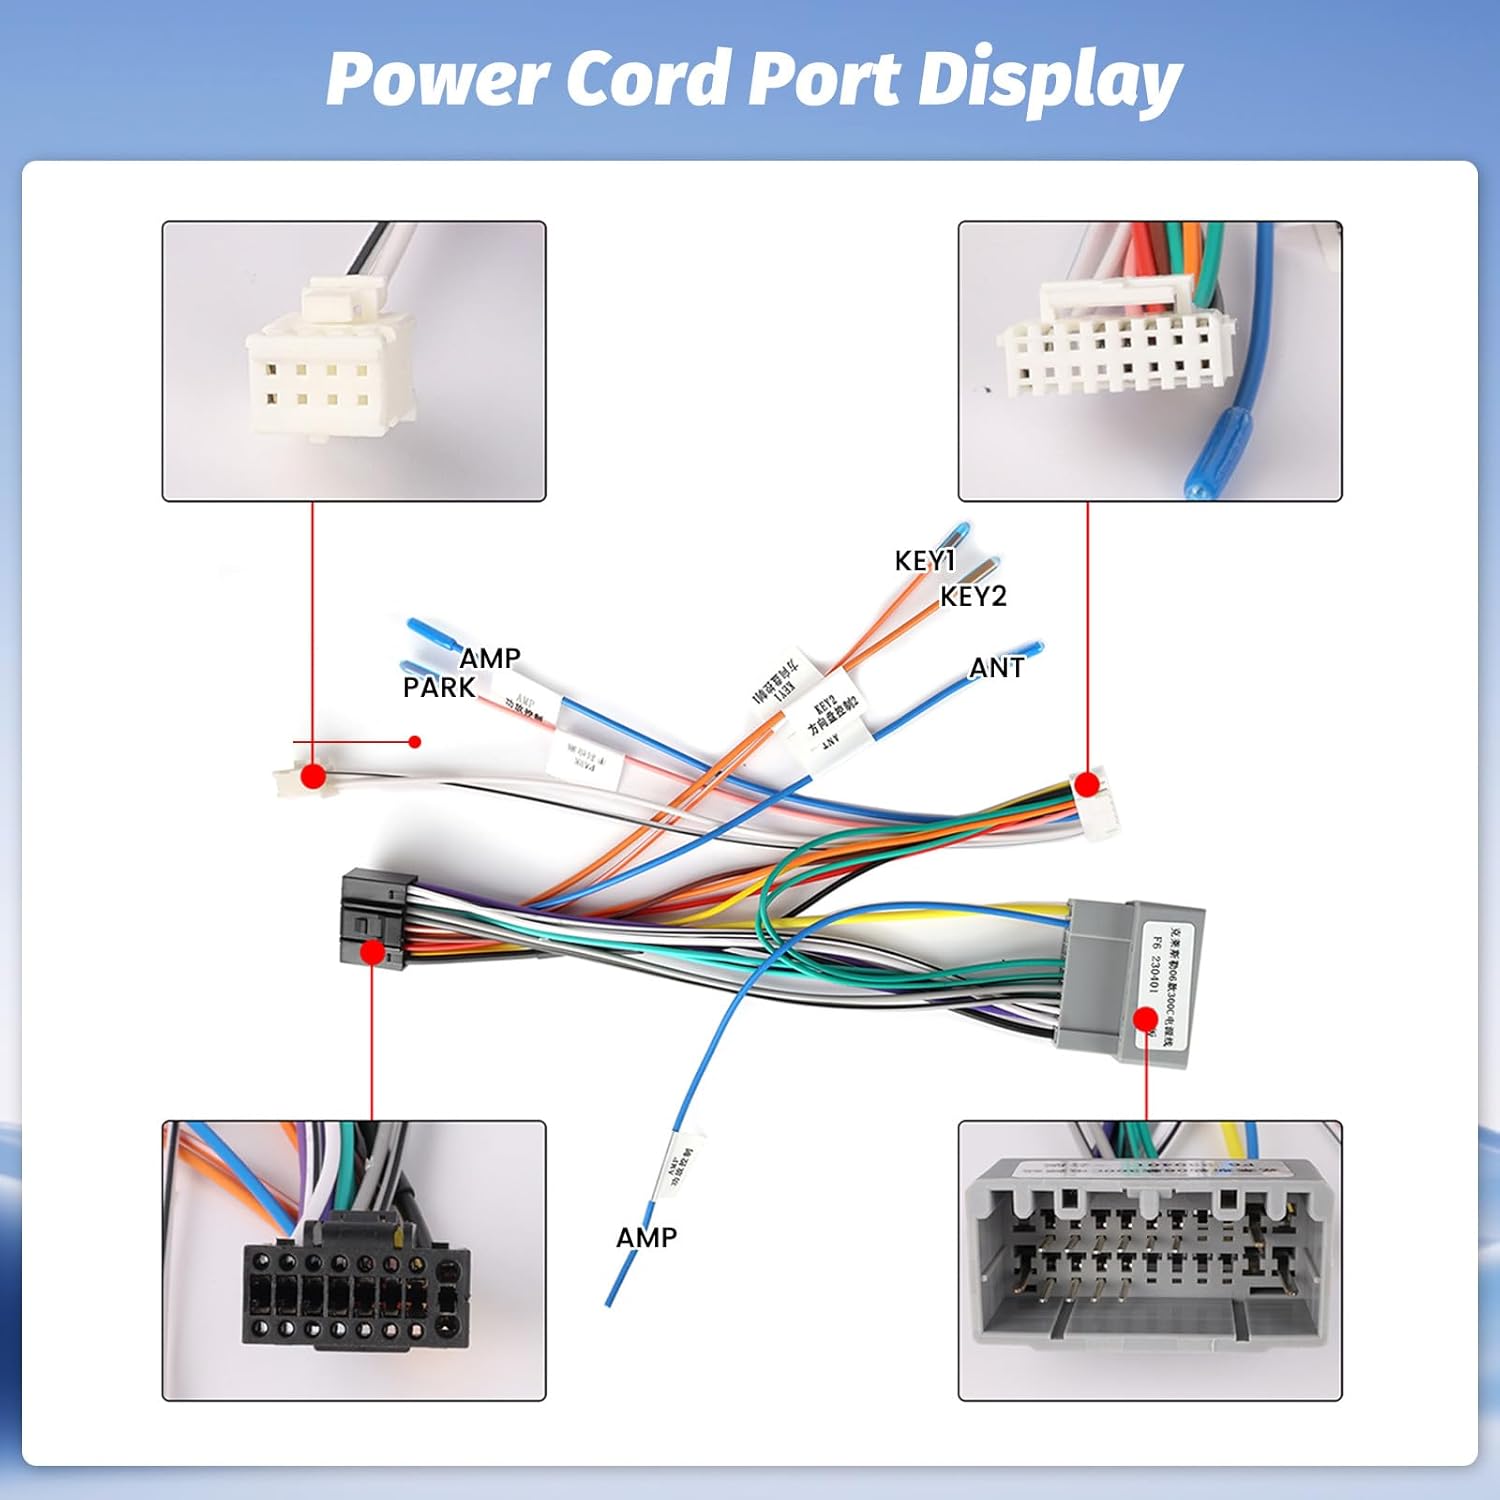
4.1 Wiring Connections
Carefully connect the provided power cable, radio antenna, RCA harness, and other necessary cables to the corresponding ports on the head unit and your vehicle's wiring harness. Ensure all connections are secure to prevent intermittent issues.
4.2 Backup Camera Installation
Install the AHD backup camera at the rear of your vehicle. Connect the camera's video output to the 'Rear Camera Input' cable on the head unit. Connect the camera's power wire to the vehicle's reverse light circuit and the ground wire to a suitable chassis ground. This ensures the camera activates automatically when the vehicle is in reverse.

4.3 GPS Antenna Placement
Mount the GPS antenna in a location with a clear view of the sky, typically on the dashboard or under the windshield, to ensure optimal satellite signal reception for navigation.
5. Operating Instructions
5.1 Powering On and Initial Setup
After installation, reconnect the vehicle's battery. The unit should power on automatically with the vehicle's ignition. Follow the on-screen prompts for initial setup, including language selection and time zone settings.
5.2 Display and User Interface
The unit features a 10.1-inch HD IPS touchscreen with a resolution of 1280x720. Navigate the interface by touching icons and swiping. The display offers wide viewing angles and an anti-glare coating for visibility in various lighting conditions.

5.3 Wireless CarPlay and Android Auto
Connect your iPhone or Android smartphone wirelessly or via USB to access Apple CarPlay or Android Auto. This allows for hands-free calls, navigation, music streaming, and access to compatible apps directly from the head unit's display. Use voice commands via Siri or Google Assistant for convenience.

5.4 Mirror Link
The Mirror Link function allows you to mirror your smartphone's screen onto the head unit's display. This feature supports both wireless and wired connections, enabling you to view content from your phone directly on the larger screen.
5.5 GPS Navigation and WiFi
The unit includes built-in GPS with support for offline maps. Connect to a 5G WiFi network for online navigation, app downloads, and streaming services. The system provides accurate positioning and route guidance.

5.6 Bluetooth 5.0
Utilize Bluetooth 5.0 for stable and fast wireless connections. Pair your smartphone for hands-free calling and audio streaming. The system supports phone contacts synchronization and call history.
5.7 FM/RDS Radio
Access your favorite radio stations with the built-in FM/RDS tuner. RDS (Radio Data System) provides additional information such as station name and song title where available.
5.8 Audio Equalizer (32-band EQ)
Customize your audio experience with the integrated 32-band equalizer. Adjust frequency levels to match your preferences and vehicle acoustics for optimal sound quality.

5.9 Steering Wheel Control (SWC)
The unit supports your vehicle's original steering wheel controls. After installation, configure the SWC settings in the unit's menu to map functions like volume, track change, and mode selection to your steering wheel buttons.

5.10 Backup Camera Display
When the vehicle is shifted into reverse, the display automatically switches to the backup camera view, providing a clear image with parking guidelines to assist with safe maneuvering.
6. Specifications
Key technical specifications of the Roinvou Android Radio:
| Feature | Specification |
|---|---|
| System | Latest Android System |
| Memory | 4GB RAM + 64GB ROM |
| Processor | 8 Core |
| Internet Access | WiFi (5G supported) |
| Bluetooth Version | 5.0 |
| Sound Equalizer | DSP 32EQ |
| Radio | FM/RDS |
| Screen Resolution | 1280*720 |
| CarPlay & Android Auto | Wireless and Wired Support |
| Mirror Link | Wireless and Wired Support |
| External Microphone | Supported |
| Steering Wheel Control | Supported |
| Power Output | 4*45W |
| Audio Format Support | APE/FLAC/WAV/MP3/WMA etc. |
| Video Format Support | MKV/RMVB/AVI/MP4/MDV etc. |
| Item Weight | 2.03 Kilograms |

7. Maintenance
To ensure the longevity and optimal performance of your Roinvou Android Radio, follow these maintenance guidelines:
- Cleaning the Screen: Use a soft, lint-free cloth to gently wipe the touchscreen. Avoid abrasive cleaners or harsh chemicals that could damage the display.
- Software Updates: Periodically check for available software updates from the manufacturer to ensure you have the latest features and bug fixes.
- Environmental Conditions: Avoid exposing the unit to extreme temperatures, direct sunlight for prolonged periods, or excessive moisture.
- Cable Connections: Ensure all cables remain securely connected. Loose connections can lead to intermittent functionality.
8. Troubleshooting
If you encounter issues with your Roinvou Android Radio, refer to the following common troubleshooting steps:
- No Power: Check all power cable connections. Ensure the vehicle's ignition is on and the fuse for the radio is not blown.
- No Sound: Verify speaker connections. Check volume levels and ensure the mute function is not activated. Confirm audio output settings in the system menu.
- GPS Signal Loss: Ensure the GPS antenna is properly installed and has a clear view of the sky. Move the vehicle to an open area if signal is weak.
- Bluetooth Connection Issues: Ensure Bluetooth is enabled on both the head unit and your smartphone. Delete previous pairings and attempt to re-pair the devices.
- CarPlay/Android Auto Not Connecting: Check USB cable integrity if using a wired connection. Ensure your phone's operating system is up to date. Restart both the head unit and your phone.
- Backup Camera Not Displaying: Verify the camera's power and video connections. Ensure the vehicle is in reverse. Check camera settings in the unit's menu.
- Touchscreen Unresponsive: Perform a system reset if possible (refer to the device settings for reset options). If the issue persists, contact customer support.
9. Warranty Information
The Roinvou Android Radio comes with a 1-Year Warranty from the date of purchase. This warranty covers manufacturing defects and malfunctions under normal use. It does not cover damage caused by improper installation, misuse, accidents, or unauthorized modifications. Please retain your proof of purchase for warranty claims.
10. Customer Support
For further assistance, technical support, or warranty inquiries, please contact Roinvou customer service. You can typically find contact information on the product packaging or the official Roinvou website. For Amazon purchases, you can also reach out to the seller directly through the Amazon platform.

Ask a question about this manual
Ask about setup, troubleshooting, compatibility, parts, safety, or missing instructions. Manuals+ will review the question and use this page’s manual context to help answer it.