
Introduction
Thank you for choosing the Nereusfwater Toilet Fill Valve Kit & Canister Flush Valve. This kit is designed to replace common toilet components, offering quiet operation, water efficiency, and compatibility with Kohler GP1229656 AquaPiston single-flush systems. This manual provides essential information for safe installation, operation, maintenance, and troubleshooting to ensure optimal performance of your toilet system.
Product Overview
This kit includes a universal toilet fill valve and a canister flush valve component. Both are constructed from high-strength POM, PP, and ABS materials for durability and resistance to wear and aging.
Key Features:
- Universal Fill Valve: G3/4" inlet, adjustable height from 8 to 13 inches.
- Canister Flush Valve: Compatible with GP1229656 and AquaPiston single-flush systems.
- Silent Quick Fill: Designed for minimal noise during water refill.
- Powerful Flush: Restores original flushing power, addressing weak flushing.
- Durable Materials: Made from POM, PP, and ABS for pressure resistance and anti-aging properties.
- Integrated Filter: Removable filter in the inlet prevents impurities from entering the tank.
- Water-Saving Design: Knob-style water level adjustment for precise control and reduced water consumption.
- High-Sealing Performance: Flush valve prevents leaks and continuous water flow.
Components Included:
- Toilet Fill Valve
- Canister Flush Valve
- Refill Tube
- Chain
- Filter

Image: All components of the Nereusfwater Toilet Fill Valve Kit and Canister Flush Valve.

Image: Side-by-side view of the fill valve and canister flush valve.
Safety Information
Always turn off the water supply to the toilet before beginning any installation or maintenance. Wear appropriate personal protective equipment, such as gloves and eye protection. If you are unsure about any step, consult a qualified plumber. Do not use excessive force when tightening connections to avoid damaging components or plumbing.
Setup and Installation
Installation of the Nereusfwater Toilet Fill Valve Kit and Canister Flush Valve is designed to be straightforward. No specialized tools are required.
Installation Steps:
- Turn off Water Supply: Locate the shut-off valve behind or near the toilet and turn it clockwise until the water flow stops. Flush the toilet to empty the tank.
- Remove Old Components: Disconnect the water supply line from the bottom of the old fill valve. Unscrew the mounting nut from the old fill valve and remove it from the tank. Remove the old flush valve by twisting or unlatching it from its base.
- Install New Canister Flush Valve: Place the new canister flush valve into the toilet tank, ensuring it seats properly on the flush valve opening. Secure it according to its design (usually a twist-lock or clip mechanism). Attach the chain to the flush lever.
- Adjust Fill Valve Height: The fill valve features a telescopic design for adjustable height. Adjust the height of the fill valve to fit your toilet tank, typically ensuring the top of the fill valve is below the tank's overflow tube.
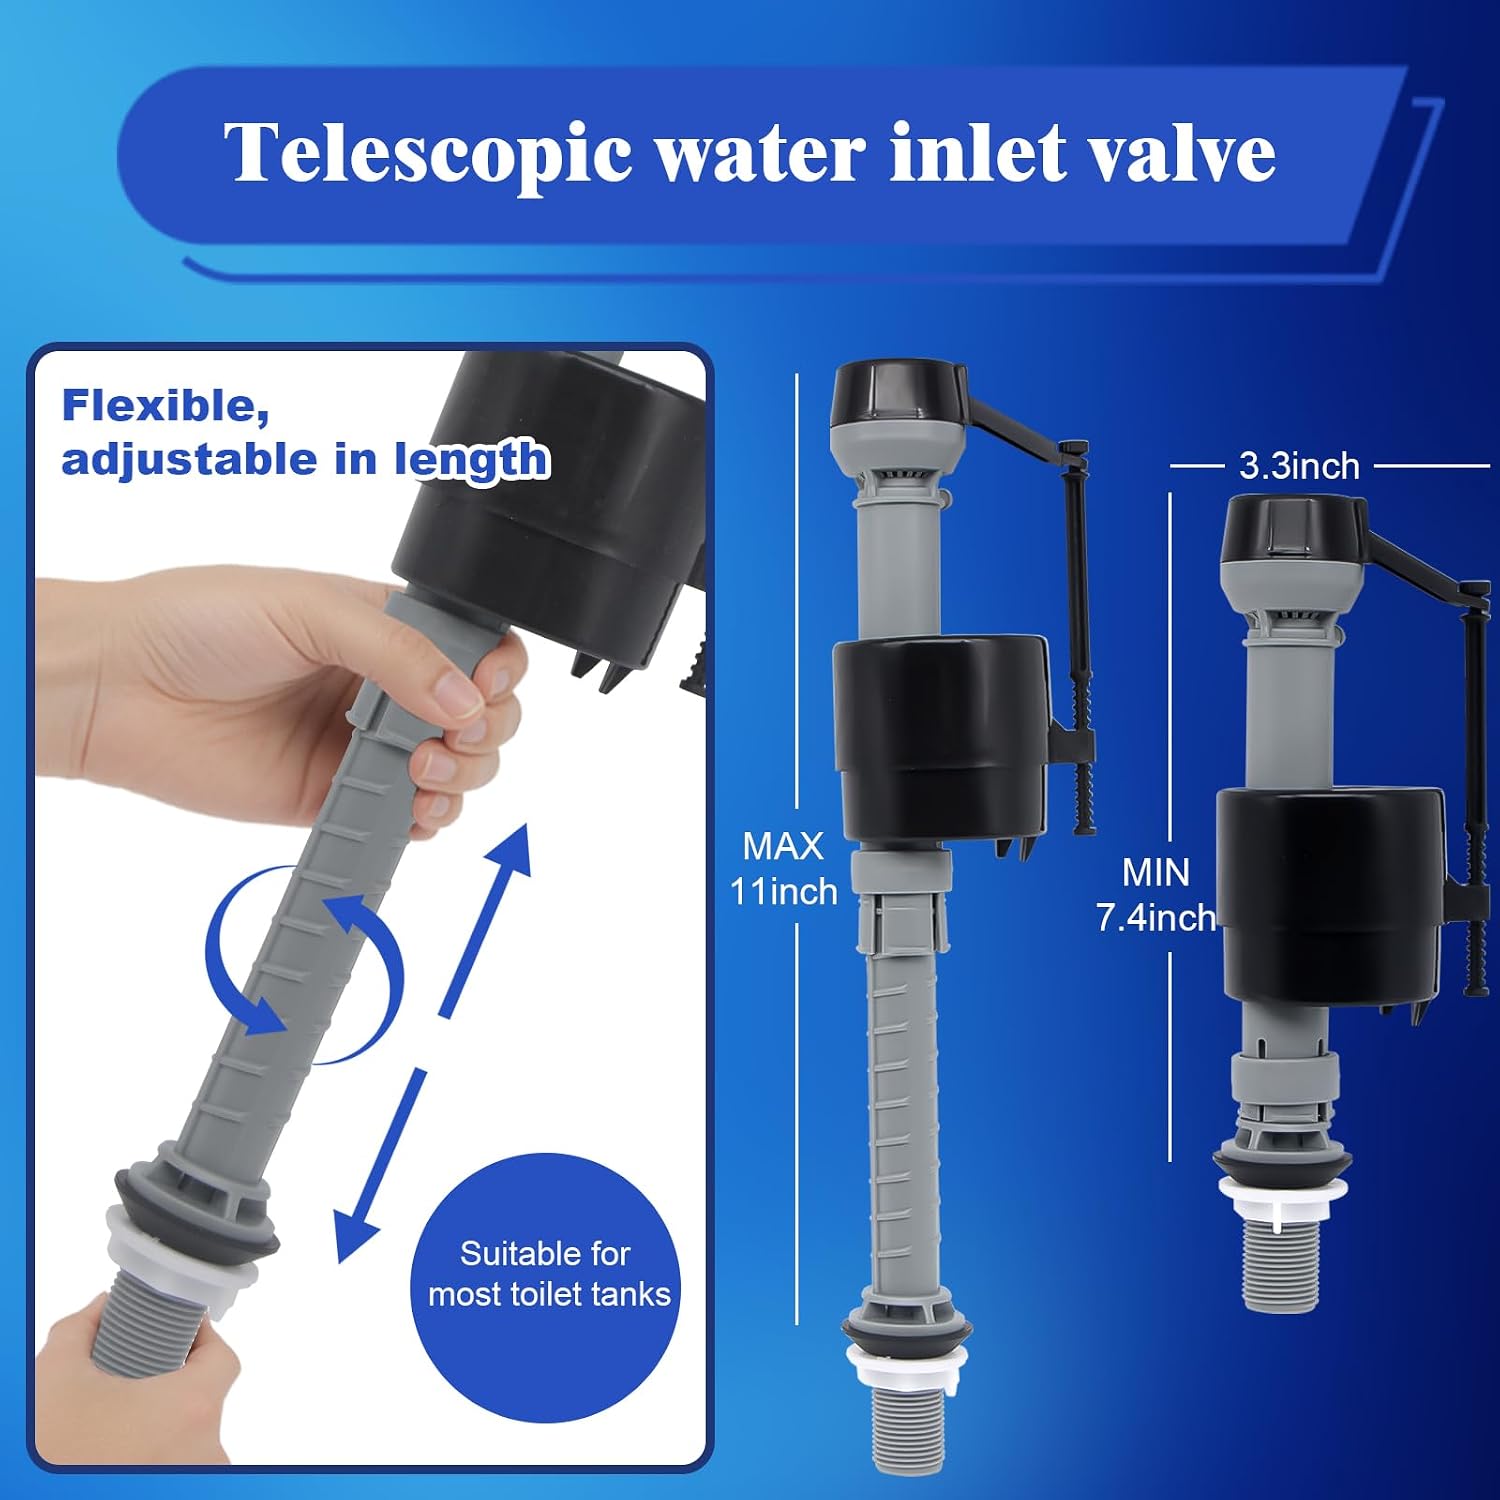
Image: Adjusting the telescopic height of the fill valve.
- Install New Fill Valve: Insert the new fill valve into the hole at the bottom of the toilet tank. Secure it with the provided mounting nut, hand-tightening only. Do not overtighten.
- Connect Refill Tube: Attach one end of the refill tube to the fill valve's refill port and the other end to the overflow tube of the flush valve.
- Reconnect Water Supply: Reconnect the water supply line to the bottom of the new fill valve. Hand-tighten the connection, then use a wrench for a quarter turn if necessary, being careful not to overtighten.
- Turn on Water Supply: Slowly turn the water supply valve counter-clockwise to restore water flow to the toilet tank. Check for leaks around all connections.
- Test Flush: Allow the tank to fill, then flush the toilet to ensure proper operation and water level.

Image: The fill valve and flush valve installed inside a toilet tank.
Video: An instructional video demonstrating the installation of the Canister Flush Valve Repair Kit and Toilet Fill Valve.
Operating Instructions
The Nereusfwater fill valve allows for precise water level adjustment to optimize flushing performance and water conservation.
Water Level Adjustment:
The fill valve features a knob for adjusting the water level in the toilet tank. This allows you to customize the water volume per flush.
- To Lower Water Level (Water Saving): Rotate the adjustment knob counter-clockwise. This reduces the amount of water in the tank, leading to better water-saving results.
- To Raise Water Level (Increased Flushing Power): Rotate the adjustment knob clockwise. This increases the water volume in the tank, enhancing flushing power.
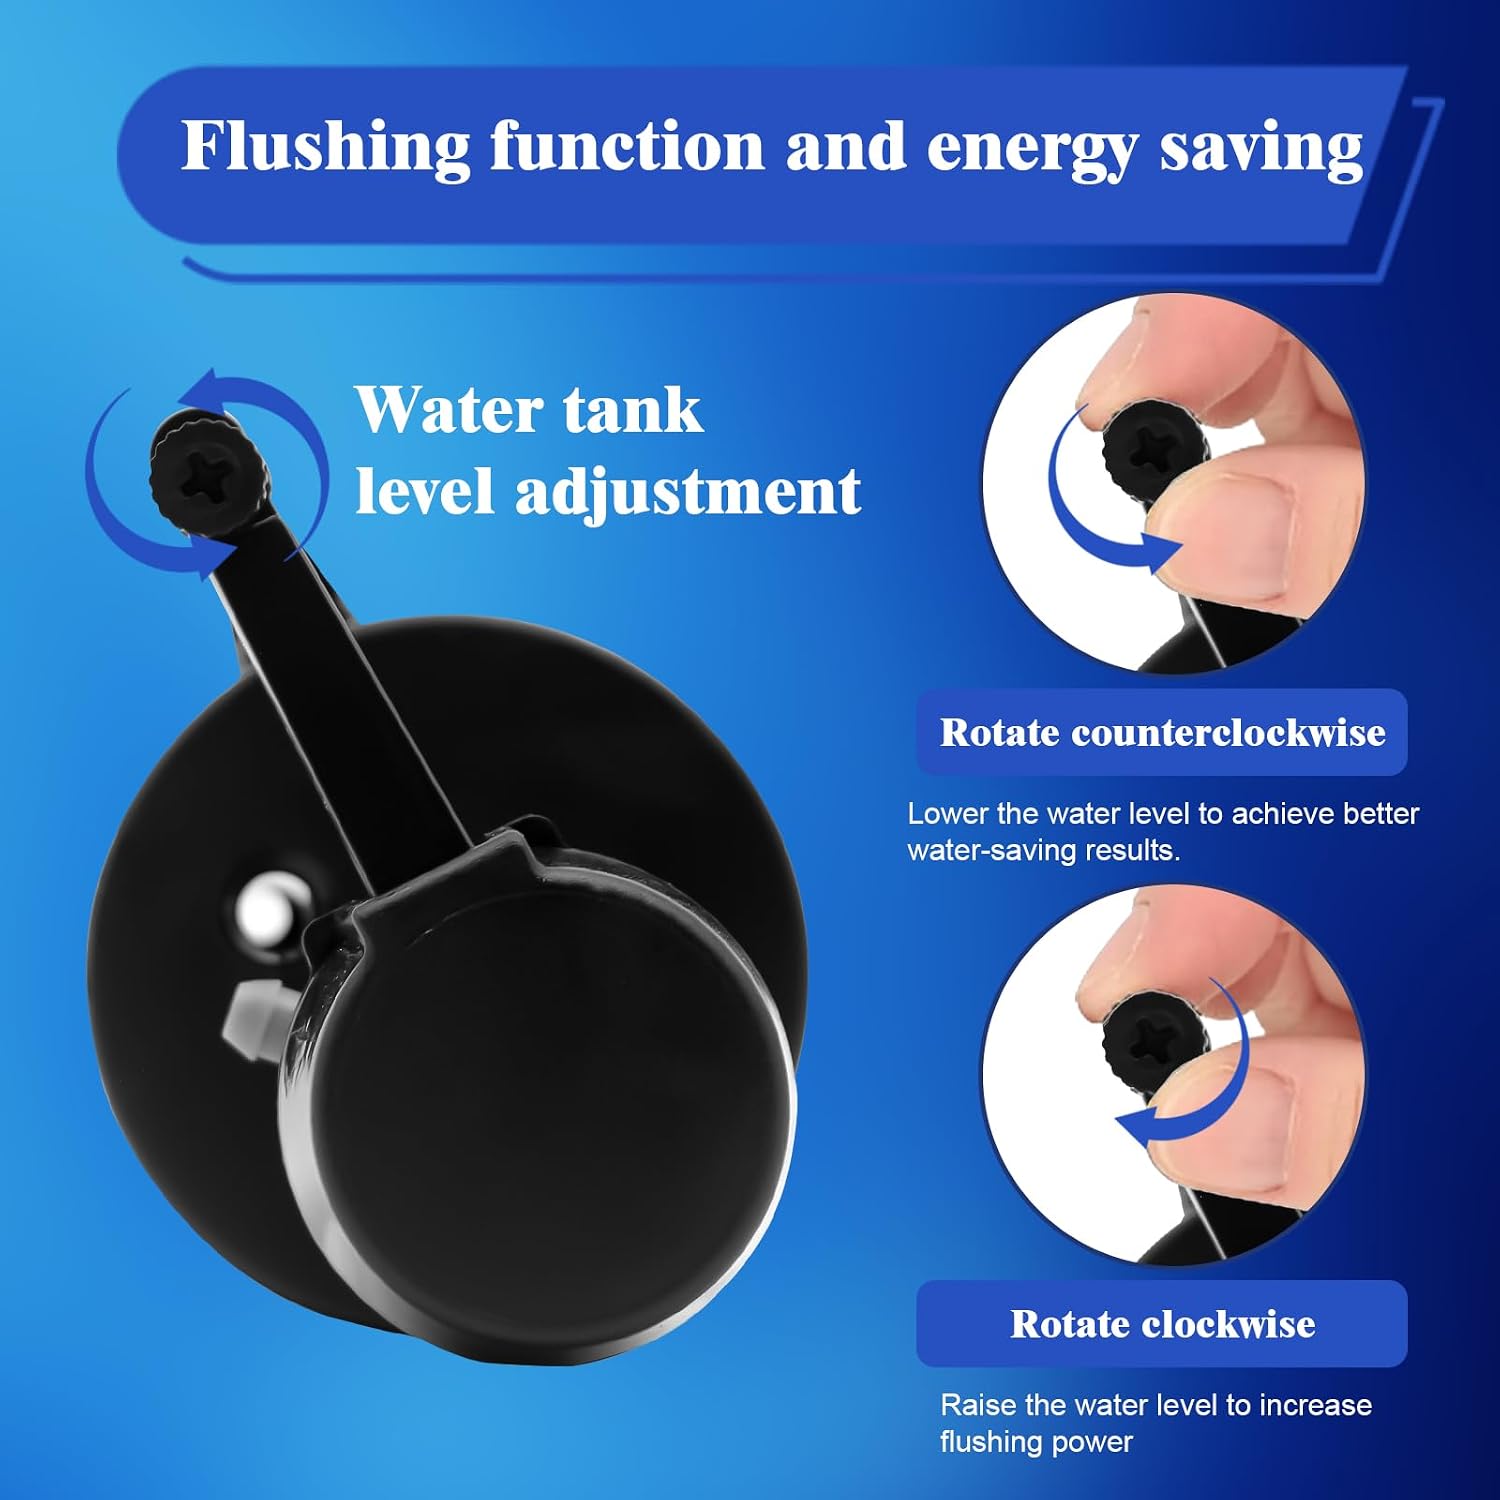
Image: Detail of the water tank level adjustment knob on the fill valve.
Maintenance
Regular maintenance ensures the longevity and efficient operation of your toilet components.
- Filter Cleaning: The fill valve includes a removable filter in the inlet. Periodically check and clean this filter to prevent blockages from impurities in the water, which can affect fill speed and valve lifespan. To clean, turn off the water supply, disconnect the supply line, and remove the filter for rinsing.
- Seal Inspection: Annually inspect the silicone V-seal ring and other seals for any signs of wear, cracking, or degradation. Replace seals if necessary to prevent leaks.
- General Cleaning: Keep the toilet tank interior clean to prevent mineral buildup or debris from interfering with the valve mechanisms.

Image: Close-up of the silicone V-seal ring and ABS locking for leak prevention.
Troubleshooting
Here are solutions to common issues you might encounter:
| Problem | Possible Cause | Solution |
|---|---|---|
| Slow Water Fill | Clogged inlet filter; low water pressure; kinked supply line. | Clean the fill valve's inlet filter. Check household water pressure. Ensure the supply line is not kinked. |
| Weak or Incomplete Flush | Water level too low; flush valve not opening fully; chain too long. | Adjust the fill valve to raise the water level. Ensure the flush valve is installed correctly and the chain has proper tension. |
| Continuous Water Flow / Leakage | Flush valve not sealing properly; fill valve not shutting off; worn seals. | Inspect the flush valve for debris or damage and ensure it seats correctly. Check the fill valve for proper shut-off. Inspect and replace any worn seals. |
| Noisy Fill | High water pressure; loose components. | Ensure the fill valve is securely installed. If noise persists, consider installing a water pressure regulator for your home. |
Specifications
| Attribute | Detail |
|---|---|
| Model Number | KLD-Z005 |
| Material | POM, PP, ABS |
| Fill Valve Inlet | G3/4" |
| Fill Valve Adjustable Height | 8-13 inches (approx. 203-330 mm) |
| Canister Flush Valve Compatibility | Kohler GP1229656, AquaPiston single-flush systems |
| Item Dimensions (L x W x H) | 10.8 x 3.5 x 2.7 inches (approx. 274 x 89 x 69 mm) |
| Number of Pieces | 2 (Fill Valve & Flush Column Kit) |

Image: Detailed dimensions of the flush valve and chain.
Warranty and Support
Nereusfwater products are manufactured to high-quality standards. For warranty information or technical support, please refer to the product packaging or contact Nereusfwater customer service through the retailer where the product was purchased. Please retain your proof of purchase for warranty claims.