1. Introduction
Thank you for purchasing the Netzu T338B 3-in-1 Digital Alarm Clock. This device is designed to provide clear time, date, and indoor temperature displays, along with an alarm function. Its compact design and adjustable features make it suitable for various indoor environments such as bedrooms, living rooms, and offices. Please read this manual carefully to ensure proper setup and operation.

Image 1.1: The Netzu T338B Digital Alarm Clock, showing its main display with time, temperature, and date.
2. Safety Information
- Do not expose the device to extreme temperatures, direct sunlight, or high humidity.
- Avoid dropping or subjecting the device to strong impacts.
- Use only the provided power adapter or a compatible one with the correct voltage.
- Keep out of reach of children.
- Do not attempt to disassemble or repair the device yourself. Contact customer support if service is required.
- Dispose of batteries properly according to local regulations.
3. Package Contents
Please check the package for the following items:
- Netzu T338B Digital Alarm Clock
- AC Power Cable (USB cable and wall adapter)
- User Manual
4. Product Features
- 3-in-1 Display: Shows time, date, and indoor temperature simultaneously.
- Adjustable Brightness: 4 levels of display brightness plus an OFF option.
- Adjustable Volume: 3 alarm volume levels.
- Snooze Function: Provides a 9-minute snooze duration.
- Time Format: Supports 12-hour and 24-hour time display.
- Temperature Unit: Displays temperature in Celsius (°C) or Fahrenheit (°F).
- Power Source: Corded electric (AC power) with battery backup for settings (2x AAA batteries, not included).
- Compact Design: Dimensions of 5.94"L x 1.3''W x 2.17"H, suitable for various spaces.
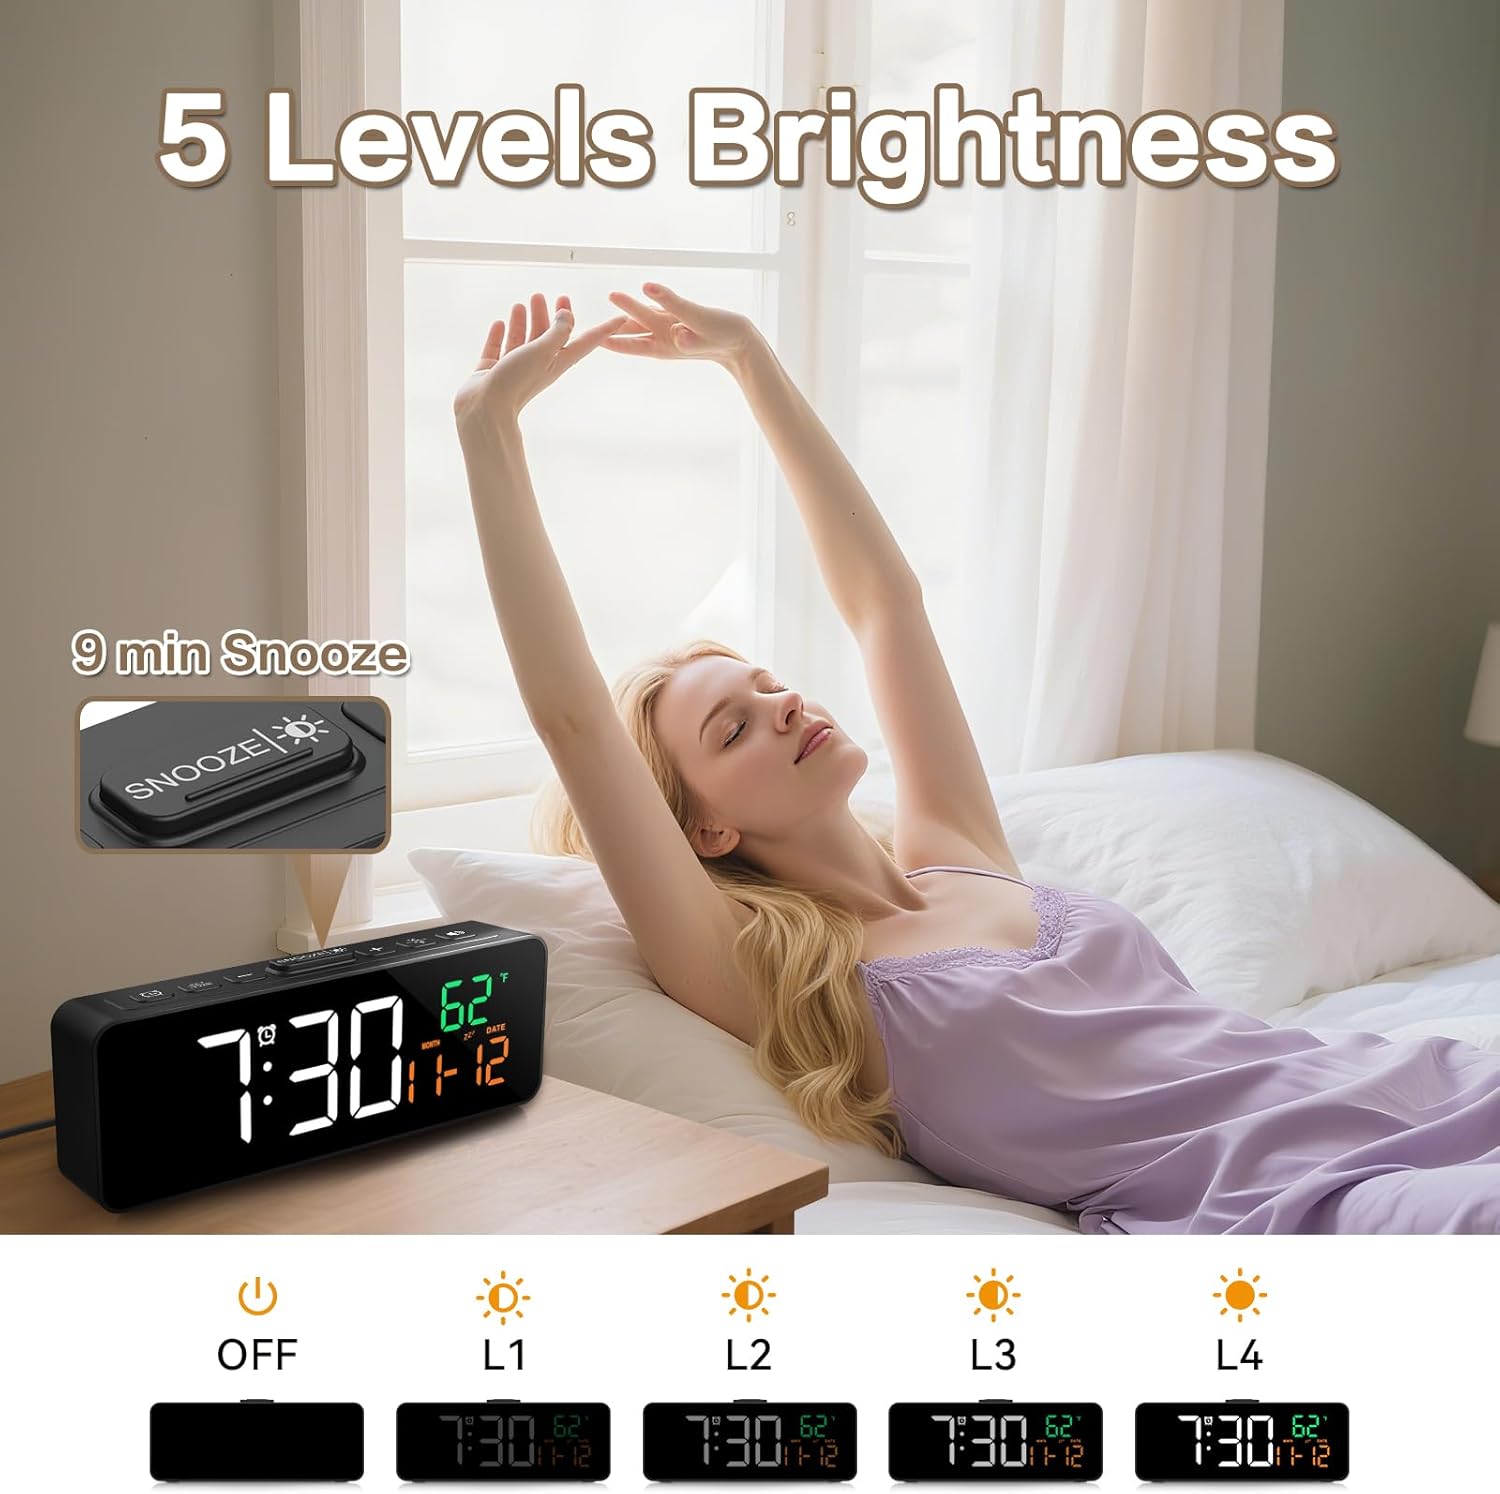
Image 4.1: The compact dimensions of the Netzu T338B Digital Alarm Clock, measuring 5.9 inches in length, 1.3 inches in width, and 2.17 inches in height.
5. Setup
5.1 Power Connection
- Connect the provided AC power cable to the DC 5V input port on the back of the clock.
- Plug the other end of the power cable into a standard wall outlet. The display will light up.
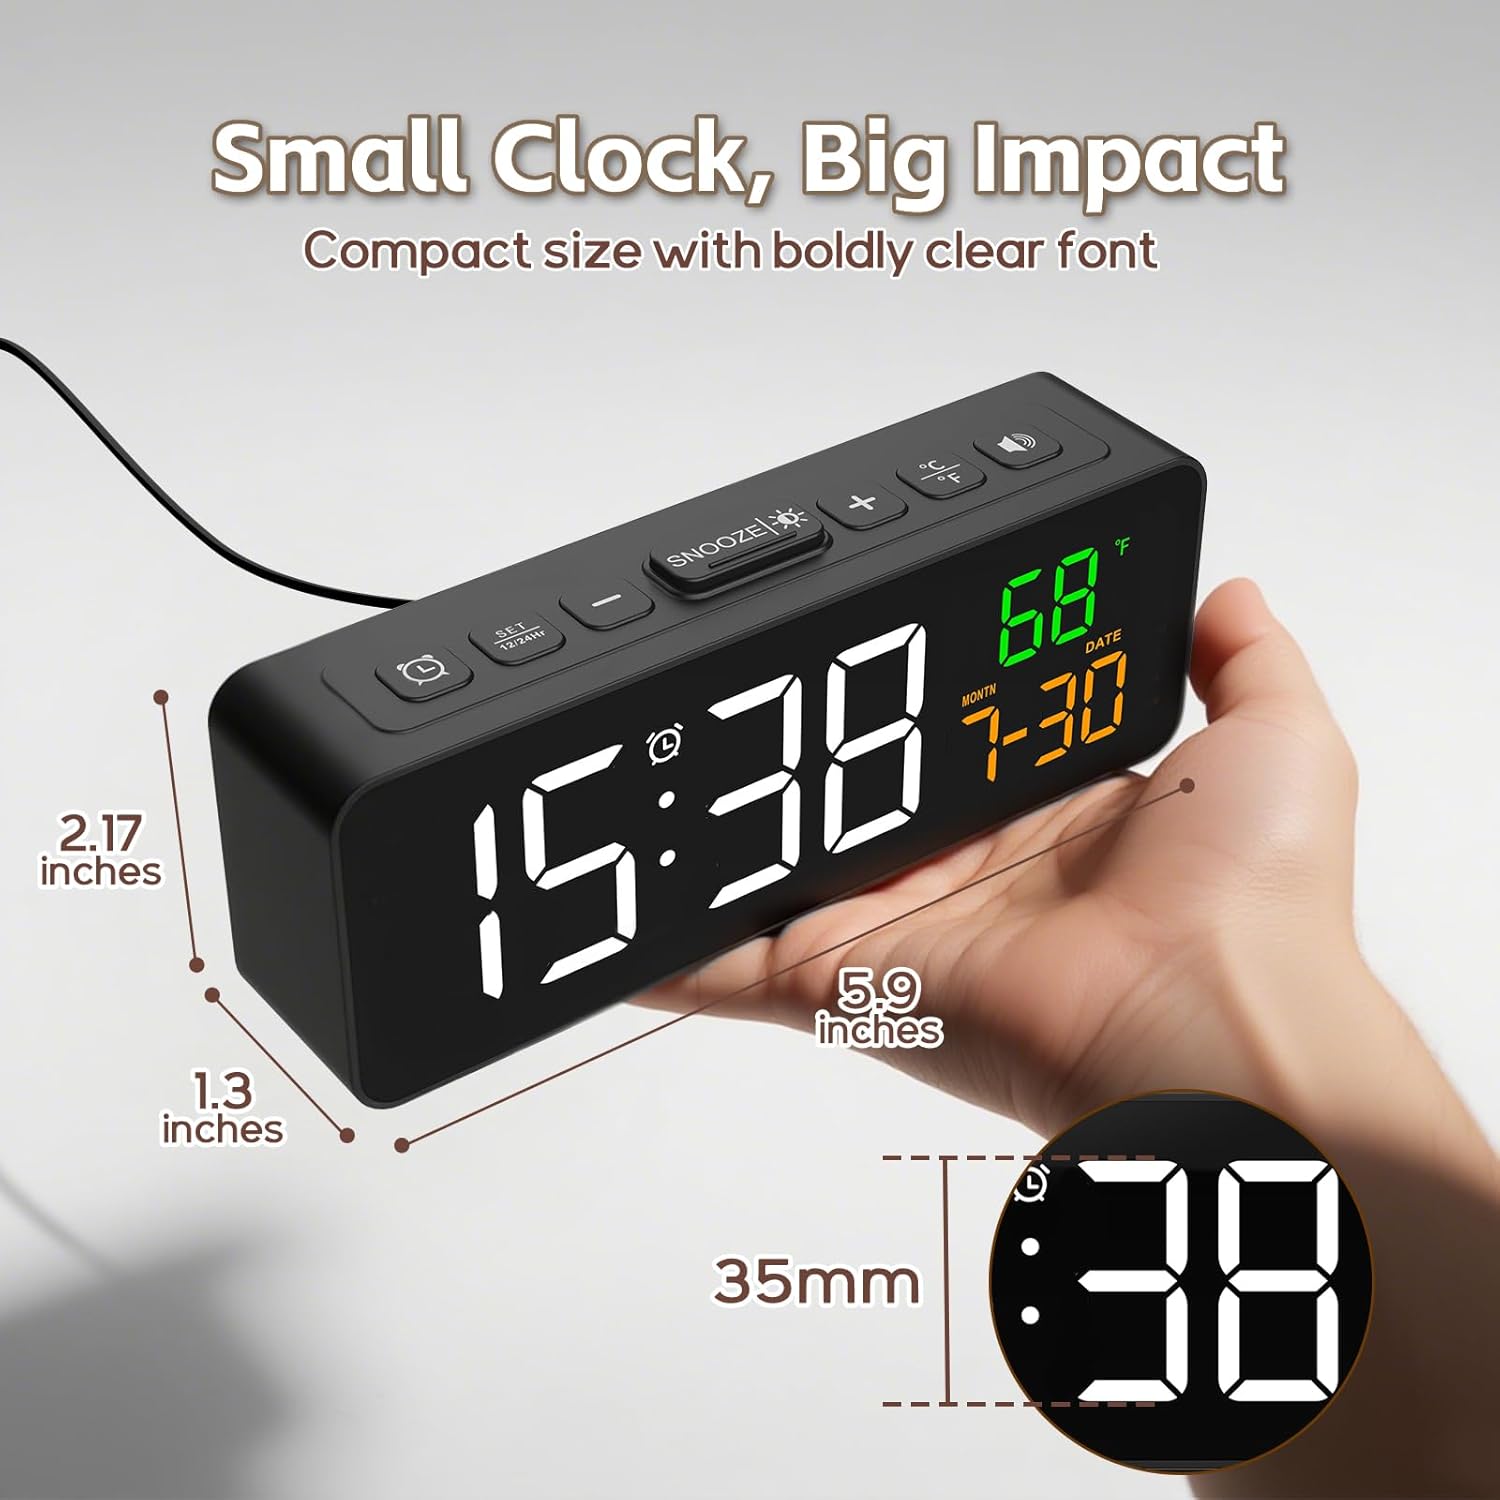
Image 5.1: The Netzu T338B Digital Alarm Clock connected to a power outlet via its plug-in cable.
5.2 Battery Installation (Backup)
For backup purposes, in case of a power outage, install 2 AAA batteries (not included) into the battery compartment on the back of the clock. These batteries will preserve your time and alarm settings but will not power the display or sound the alarm during a power interruption.
- Open the battery compartment cover on the back of the clock.
- Insert 2 AAA batteries, ensuring correct polarity (+ and -).
- Close the battery compartment cover securely.
6. Operating Instructions
6.1 Setting Time and Date
The clock displays time, month, and date. You can switch between 12-hour and 24-hour formats.

Image 6.1: The clock displaying time in both 12-hour (PM) and 24-hour formats.
- Press and hold the TIME SET button (usually marked with a clock icon) on the back or top of the clock until the hour digits flash.
- Use the + or - buttons to adjust the hour.
- Press TIME SET again to move to minute adjustment. Use + or - to adjust minutes.
- Continue pressing TIME SET to cycle through year, month, and date settings, adjusting each with + or -.
- Press TIME SET one last time or wait a few seconds for the settings to save and exit.
- To switch between 12/24-hour format, briefly press the TIME SET button when the time is displayed (not in setting mode).
6.2 Setting Temperature Unit
The clock can display temperature in Celsius or Fahrenheit.

Image 6.2: The clock displaying indoor temperature and the current month and date.
- Briefly press the °C/°F button (usually on the top or back) to toggle between Celsius and Fahrenheit.
6.3 Setting the Alarm
- Press and hold the ALARM SET button (usually marked with an alarm clock icon) until the alarm hour digits flash.
- Use the + or - buttons to adjust the alarm hour.
- Press ALARM SET again to move to minute adjustment. Use + or - to adjust alarm minutes.
- Press ALARM SET one last time or wait a few seconds to save the alarm time.
- To activate or deactivate the alarm, briefly press the ALARM ON/OFF button (often the same as ALARM SET or a dedicated button). An alarm icon will appear on the display when activated.
6.4 Adjusting Brightness
The display has 4 brightness levels and an OFF mode.

Image 6.3: Visual representation of the clock's five brightness settings: OFF, L1 (lowest), L2, L3, and L4 (highest).
- Briefly press the BRIGHTNESS button (often the SNOOZE button or a dedicated sun icon) to cycle through the brightness levels: L4 > L3 > L2 > L1 > OFF > L4.
6.5 Adjusting Alarm Volume
There are 3 adjustable alarm volume levels.

Image 6.4: The clock displaying an alarm time with an illustration of three distinct volume levels (L01, L02, L03) for the alarm sound.
- While the alarm is sounding, or during alarm setup, press the VOLUME button (often the + or - button when in alarm mode) to cycle through the 3 volume levels.
6.6 Using the Snooze Function
- When the alarm sounds, press the SNOOZE button (usually a large button on top) to temporarily silence the alarm for 9 minutes.
- The alarm will sound again after 9 minutes.
- To turn off the alarm completely, press any other button on the clock (e.g., ALARM SET, TIME SET).
7. Maintenance
- Clean the clock's surface with a soft, dry cloth. Do not use abrasive cleaners or solvents.
- Ensure the ventilation openings (if any) are free from dust and debris.
- If storing the clock for an extended period, remove the AAA backup batteries to prevent leakage.
8. Troubleshooting
| Problem | Possible Cause | Solution |
|---|---|---|
| Display is blank. | No power connection. | Ensure the AC power cable is securely plugged into the clock and a working wall outlet. |
| Alarm does not sound during power outage. | Backup batteries only save settings, not power the alarm. | This is normal operation. The clock requires AC power for the display and alarm function. |
| Time/Date is incorrect. | Incorrectly set or power interruption without backup batteries. | Re-set the time and date following Section 6.1. Install fresh AAA batteries for backup. |
| Display is too dim/bright. | Brightness level needs adjustment. | Press the BRIGHTNESS button to cycle through levels (Section 6.4). |
| Alarm volume is too low/high. | Volume level needs adjustment. | Adjust the alarm volume during alarm setup or when it's sounding (Section 6.5). |
9. Specifications
- Brand: Netzu
- Model Number: T338B
- Display Type: Digital
- Power Source: Corded Electric (AC)
- Backup Power: 2 x AAA Batteries (not included, for settings only)
- Product Dimensions: 5.94" L x 1.3" W x 2.17" H
- Item Weight: 7.4 ounces
- Material: Plastic
- Special Features: Adjustable Brightness, Adjustable Volume, Snooze, Temperature Display, Date Display
- Indoor/Outdoor Usage: Indoor
10. Warranty and Support
Netzu products are designed for reliability and performance. For warranty information or technical support, please refer to the contact details provided on the product packaging or visit the official Netzu website. Please have your model number (T338B) and purchase information ready when contacting support.
