1. Introduction
Thank you for choosing the Fanbulous 42-Inch Flush Mount Ceiling Fan. This manual provides essential information for the safe installation, operation, and maintenance of your new ceiling fan. Please read these instructions thoroughly before installation and keep them for future reference.
This ceiling fan is designed for both indoor and outdoor use, featuring a quiet DC motor, 6 adjustable speeds, and a convenient remote control. Its flush mount design is ideal for low ceilings, ensuring stability and space efficiency.
2. Safety Information
Always follow basic safety precautions when installing and operating electrical appliances. Failure to do so may result in fire, electric shock, or personal injury.
- Ensure the power is turned off at the circuit breaker before installation or maintenance.
- All wiring must be in accordance with national and local electrical codes.
- The mounting structure must be capable of supporting the fan's weight (refer to specifications).
- Do not operate the fan if any part is damaged. Contact customer service for replacement parts.
- Keep hands, clothing, and other objects clear of the fan blades during operation.
- This fan is not waterproof. Avoid outdoor use in wind and rain.
3. Package Contents
Verify that all components are present before beginning installation:
- Fan Motor Assembly
- Fan Blades (5x)
- Mounting Bracket
- Downrod (various lengths may be included for ceiling height adjustment)
- Canopy
- Remote Control with Wall Mount
- Hardware Pack (screws, washers, wire nuts)
- Instruction Manual
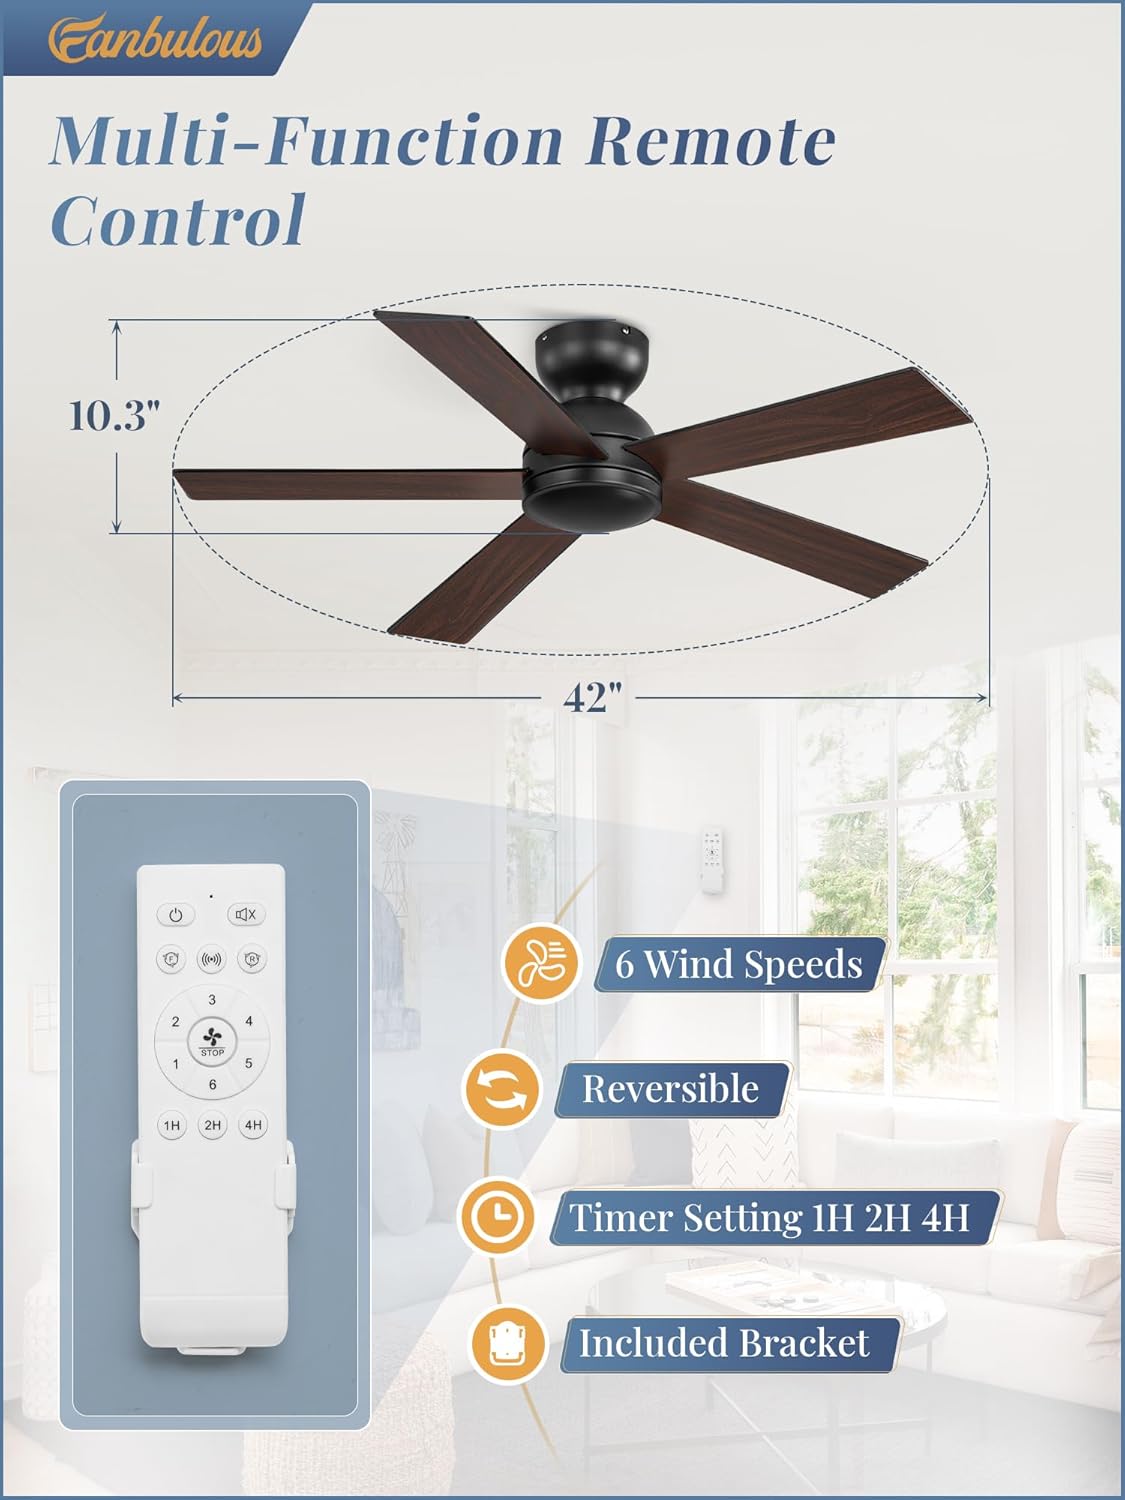
Figure 3.1: Overview of all included components.
4. Installation Instructions
Installation can typically be completed within an hour by non-professionals following these steps. Always ensure power is disconnected before starting.
- Prepare for Installation: Turn off power at the main circuit breaker. Ensure the existing electrical box is securely mounted and capable of supporting the fan's weight.
- Assemble Downrod (if applicable): Choose the appropriate downrod length for your ceiling height. Feed the fan's electrical wires through the downrod. Secure the downrod to the fan motor assembly.
- Attach Mounting Bracket: Secure the mounting bracket to the ceiling electrical box using the provided screws. Ensure it is firmly attached.
- Hang Fan Assembly: Carefully lift the fan motor assembly and hook it onto the mounting bracket. This allows for hands-free wiring.
- Perform Electrical Connections: Connect the fan's wires to the household wiring according to the wiring diagram in your detailed manual. Typically, this involves connecting live, neutral, and ground wires. Ensure all connections are secure with wire nuts.
- Secure Fan to Mounting Bracket: Once wiring is complete, carefully tuck the wires into the electrical box and secure the fan motor assembly to the mounting bracket with the remaining screws.
- Install Canopy: Slide the canopy up to the ceiling and secure it to cover the mounting bracket and wiring.
- Attach Fan Blades: Secure each of the five fan blades to the motor housing using the provided screws. Ensure they are tightly fastened.

Figure 4.1: Attaching a fan blade during installation.
5. Operating Instructions
Your Fanbulous ceiling fan comes with a multifunctional remote control for convenient operation. Insert 2 AAA batteries (not included) into the remote before use.
- Power On/Off: Press the power button to turn the fan on or off.
- Speed Control: Select from 6 adjustable fan speeds (1-6) to customize airflow. Speed 1 is the lowest, and Speed 6 is the highest.
- Reversible Function: Use the reverse button on the remote to switch between forward (summer mode) and reverse (winter mode) rotation. Forward rotation creates a cooling breeze, while reverse rotation circulates warm air upwards.
- Timer Setting: Set the fan to operate for 1, 2, or 4 hours using the dedicated timer buttons. The fan will automatically turn off after the set time.

Figure 5.1: Remote control features and fan dimensions.
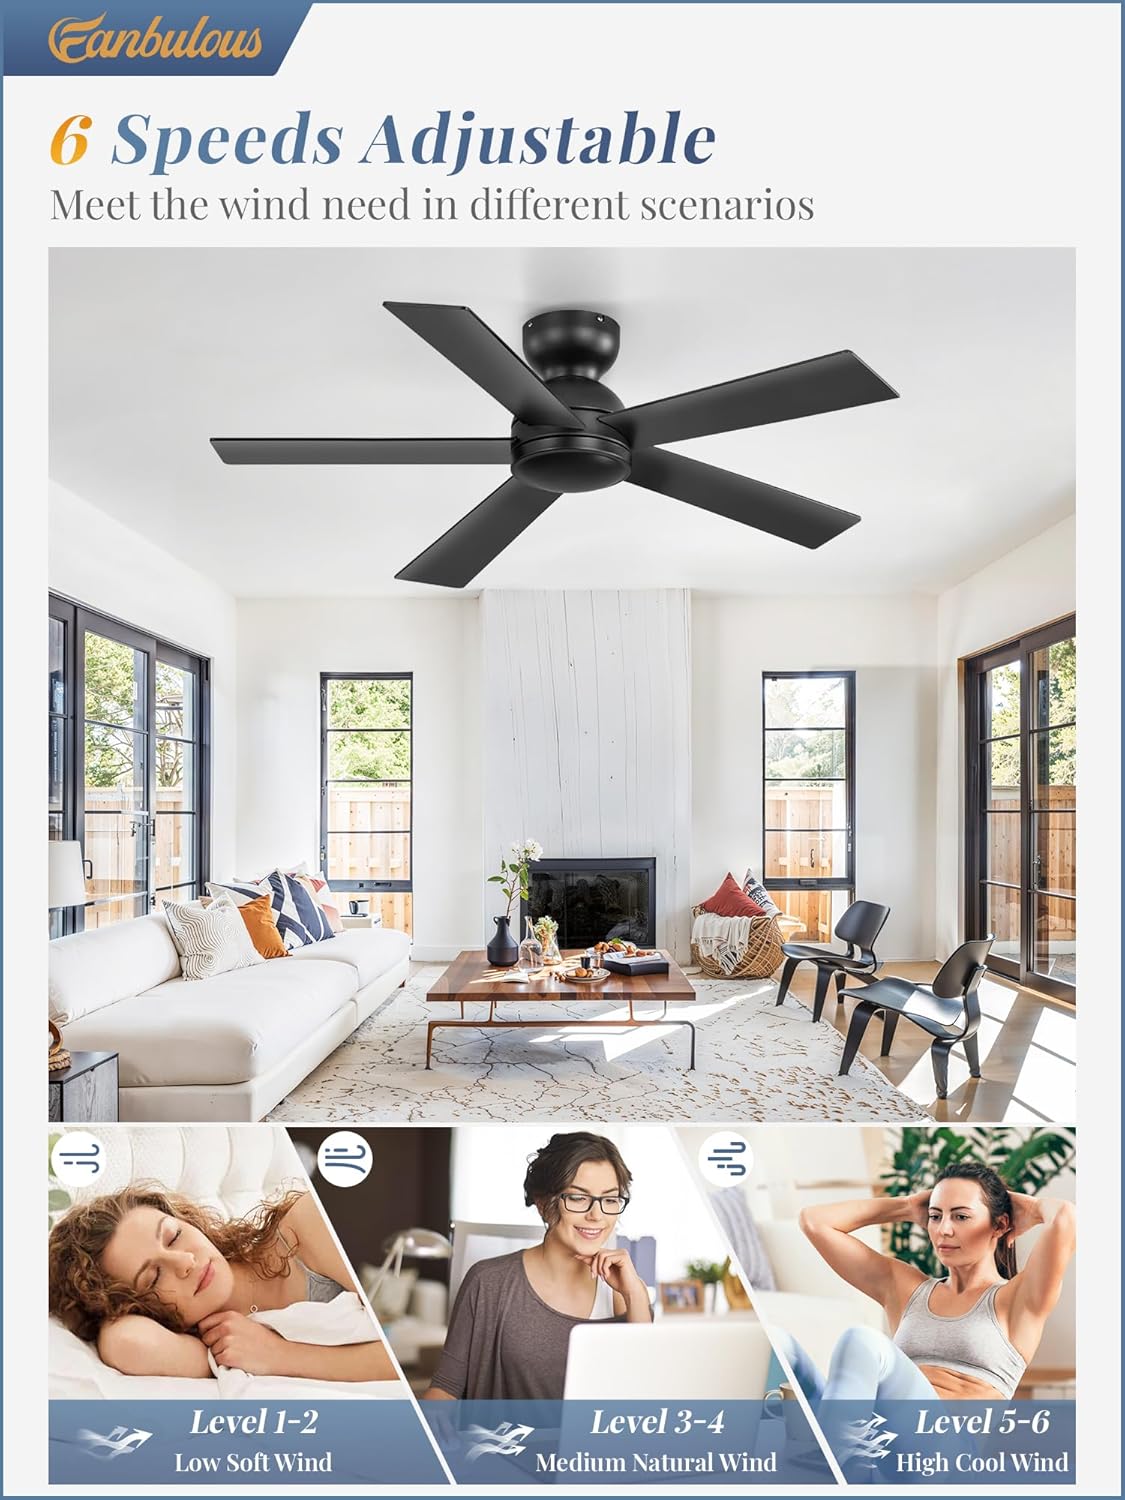
Figure 5.2: Visual representation of 6-speed adjustment.
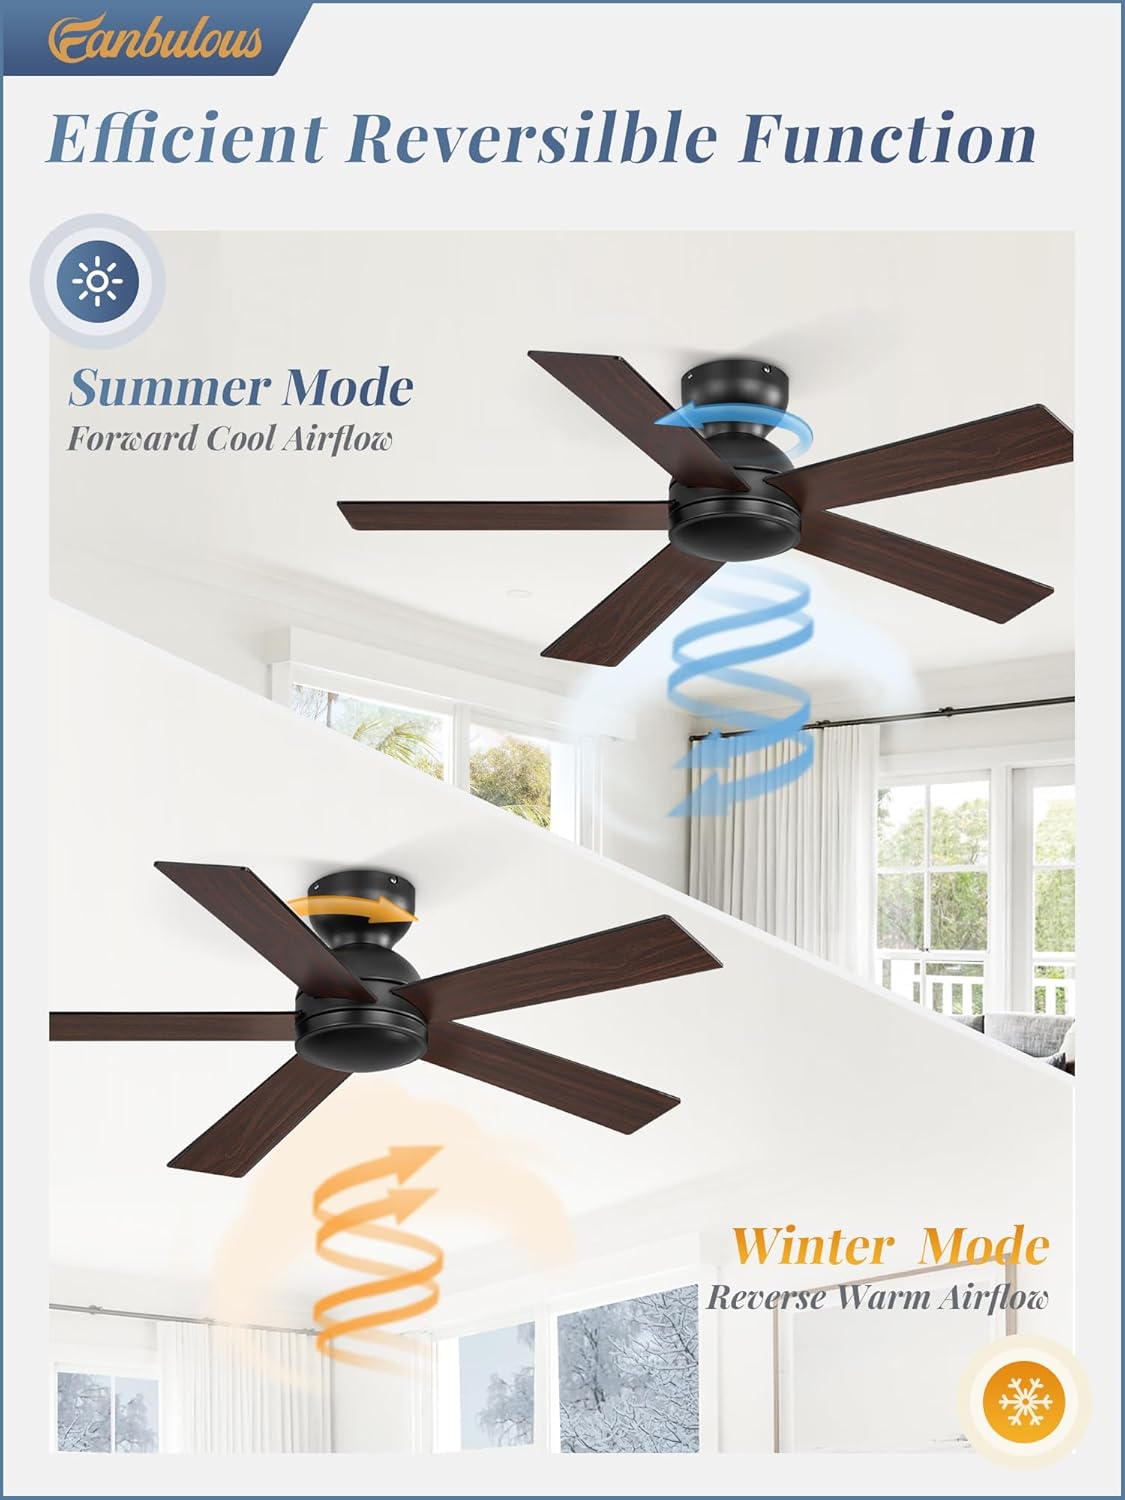
Figure 5.3: Reversible function for seasonal use.
6. Maintenance
Regular maintenance ensures optimal performance and longevity of your ceiling fan.
- Cleaning: Periodically wipe the fan blades and motor housing with a soft, damp cloth. Do not use abrasive cleaners or solvents.
- Tighten Fasteners: Check all screws and fasteners annually to ensure they are secure. Loose connections can cause noise and wobble.
- Blade Care: The dual-sided blades (black and wood grain) can be flipped to match your decor. Ensure they are clean and balanced.
7. Troubleshooting
If you experience issues with your fan, refer to the following common problems and solutions:
| Problem | Possible Cause | Solution |
|---|---|---|
| Fan does not start | No power, loose wiring, remote battery dead | Check circuit breaker, verify wiring connections, replace remote batteries. |
| Fan wobbles | Loose blades, unbalanced blades, loose mounting bracket | Tighten blade screws, use balancing kit (not included), ensure mounting bracket is secure. |
| Noisy operation | Loose screws, motor issue, fan not level | Check and tighten all screws, ensure fan is level. If motor noise persists, contact support. |
| Remote not working | Dead batteries, incorrect pairing, obstruction | Replace batteries, re-pair remote (refer to detailed manual), ensure clear line of sight. |
For issues not listed here or if solutions do not resolve the problem, please contact Fanbulous customer service.
8. Specifications
- Brand: Fanbulous
- Model Name: F-TY48XX-1X0X
- Product Dimensions: 42"D x 40"W x 10.24"H
- Color: Black
- Material: Engineered Wood
- Electric Fan Design: Ceiling Fan
- Power Source: DC
- Mounting Type: Flush Mount
- Number of Blades: 5
- Number of Speeds: 6
- Noise Level: 30 Decibels
- Wattage: 30 watts
- Voltage: 120 Volts
- Indoor/Outdoor Usage: Indoor, Outdoor
- Control Method: Remote
- Special Features: Reversible Function, Timer (1H/2H/4H)

Figure 8.1: Quiet DC Motor and energy efficiency.

Figure 8.2: Fan installed in an outdoor patio setting, with a note about water exposure.
9. Warranty and Support
Fanbulous is committed to providing excellent customer service. For any questions, concerns, or assistance with your product, please contact our 24-hour customer service team. Refer to your purchase documentation for specific warranty details.