1. Introduction
This manual provides detailed instructions for the installation, operation, and maintenance of your ORICO Daisy-Chain 5-Bay Hard Drive Enclosure, Model 9958C3. This device is designed to expand your storage capacity for 3.5-inch SATA hard drives, offering high-speed data transfer and flexible expansion options. It functions as a Direct Attached Storage (DAS) solution, connecting directly to your computer via USB.

Figure 1.1: Front view of the ORICO 5-Bay Hard Drive Enclosure.
2. Package Contents
Please verify that all items listed below are included in your package. If any items are missing or damaged, please contact ORICO customer support.
- 1 x ORICO 5-Bay Daisy Chain Hard Drive Enclosure
- 1 x Screwdriver
- 1 x Power Cable
- 1 x Data Cable (USB-C to USB-C)
- 1 x Screw Pack
- 1 x User Manual

Figure 2.1: Included accessories and components in the product package.
3. Product Features
- Daisy Chain Expansion: Supports up to 22TB 3.5-inch SATA hard disks per bay, with a maximum total capacity of 110TB for a single enclosure. Expand storage up to 330TB by daisy-chaining up to 3 devices.
- High-Speed Connectivity: Features a 10Gbps USB 3.2 Gen 2 interface, facilitating efficient processing of large data volumes, suitable for video editing and other demanding tasks.
- Individual Disk Management: Equipped with 5 independent disk slots, supporting single disk ejection for convenient replacement and upgrade without interrupting other active disk slots.
- Integrated Power Supply: Built-in 150W power supply ensures stable data transfer during multi-disk operations, eliminating the need for external power adapters.
- Efficient Heat Dissipation: Constructed with an aluminum alloy metal shell and an 80mm cooling fan, combined with front and rear airflow design, to maintain stable operation under high load.
- Plug and Play: No additional drivers required for installation. Compatible with mainstream operating systems.
- Smart Sleep Mode: Automatically enters hibernation after 10 minutes of inactivity to reduce hard drive wear and power consumption.

Figure 3.1: High-speed data transmission capability.
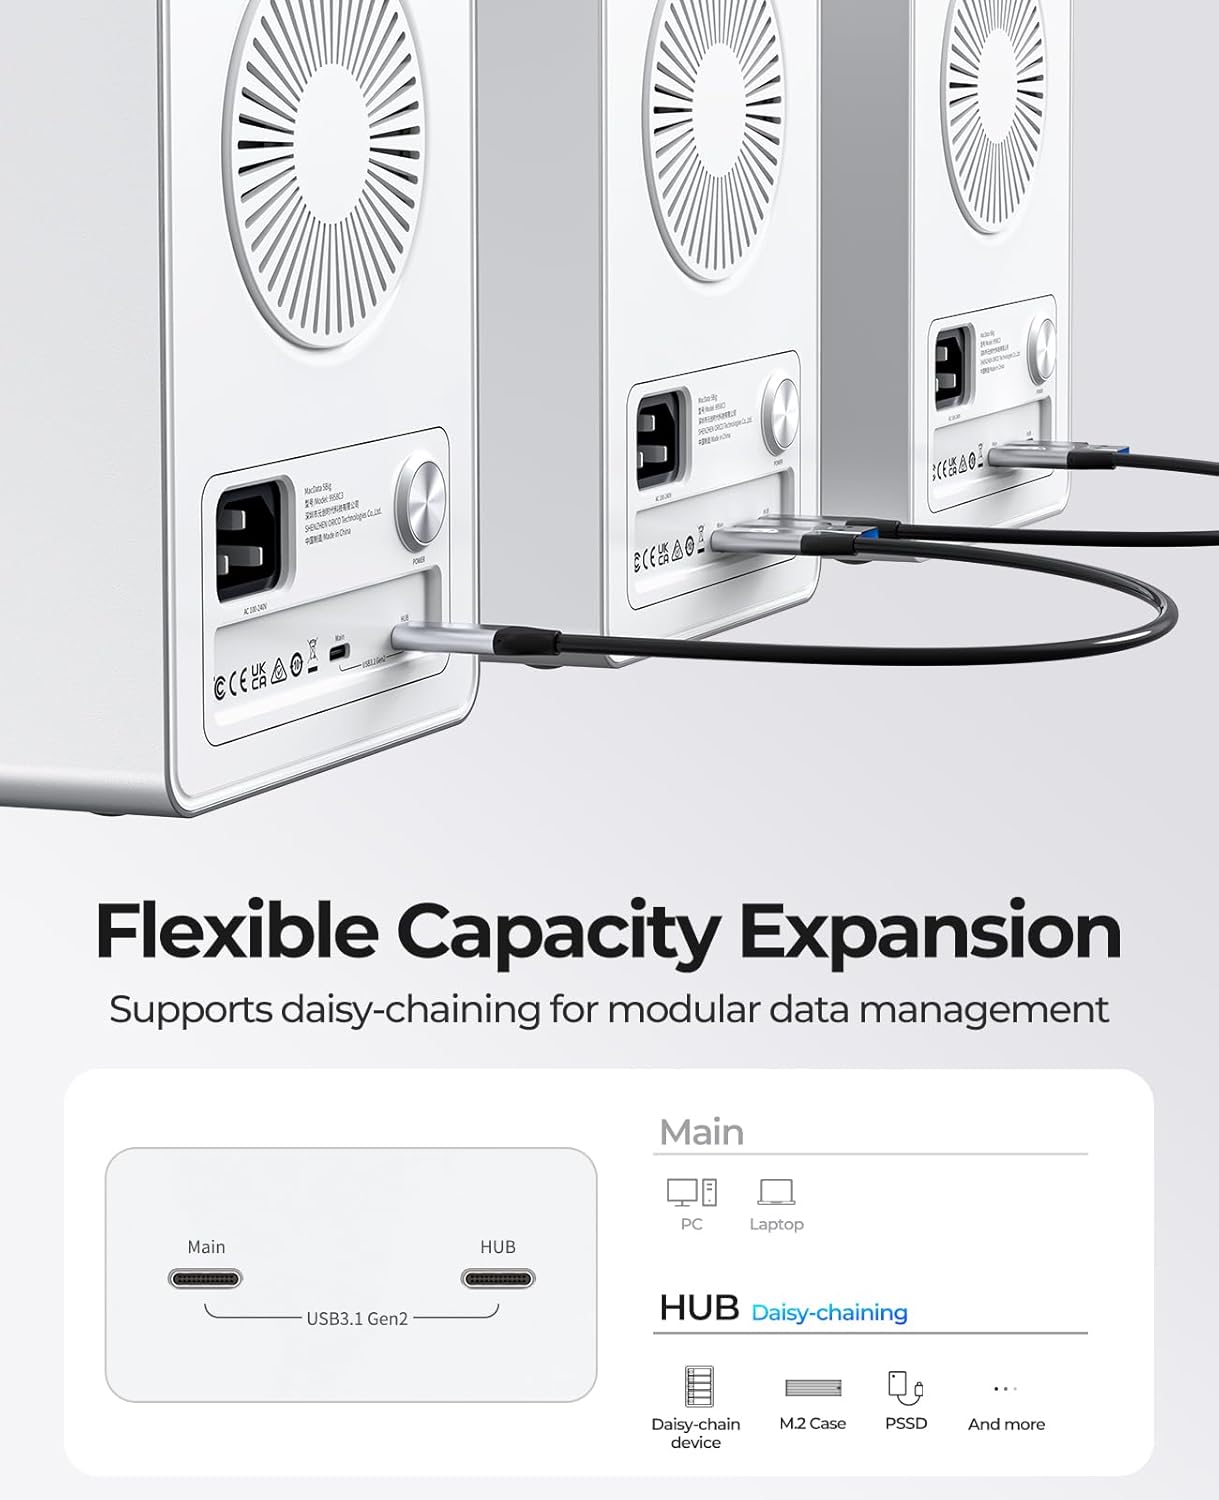
Figure 3.2: Daisy-chaining multiple units for expanded storage.

Figure 3.3: Clarification that the device is a Direct Attached Storage (DAS), not Network Attached Storage (NAS).
4. Setup
4.1 Hard Drive Installation
Follow these steps to install your 3.5-inch HDDs or 2.5-inch SSDs/HDDs into the enclosure.
- Open the Tray: Press the door button located on the left side of the drive bay to release and pull out the drive tray.
- Install Drive:
- For 3.5-inch HDD: Place the HDD into the tray and secure it using the provided screws through the fixing holes.
- For 2.5-inch SSD/HDD: Place the SSD/HDD into the tray and secure it using the provided screws through the fixing holes that align with the drive.
- Insert Tray: Slide the loaded drive tray back into the hard disk cabinet until it clicks securely into place.

Figure 4.1: Step-by-step guide for installing hard drives.
4.2 Connecting to Your Computer
- Ensure all hard drives are securely installed in the enclosure.
- Connect the power cable to the enclosure and then to a power outlet.
- Connect the provided USB-C to USB-C data cable from the enclosure's 'Main' port to a compatible USB 3.2 Gen 2 port on your computer.
- Power on the enclosure using the power button. Your operating system should detect the drives automatically.
5. Operating Instructions
5.1 Drive Access and Management
Once connected, the installed hard drives will appear as individual disks on your computer. You can manage them using your operating system's disk management tools (e.g., Disk Management in Windows, Disk Utility in macOS) for formatting, partitioning, or creating software RAID configurations.
5.2 Daisy-Chaining Multiple Enclosures
To expand your storage further, you can daisy-chain up to three ORICO 9958C3 enclosures. Connect the 'HUB' port of the first enclosure to the 'Main' port of the second, and so on. Ensure each enclosure is independently powered.
5.3 Smart Sleep Mode
The enclosure features a smart sleep mode that activates after 10 minutes of inactivity. This conserves power and reduces wear on the hard drives. Drives will automatically spin up when accessed again.

Figure 5.1: Smart Sleep Mode for power saving and drive longevity.
6. Maintenance
6.1 Heat Dissipation
The aluminum alloy casing and 80mm cooling fan are designed for optimal heat dissipation. To ensure efficient cooling, place the enclosure in a location with adequate airflow and avoid blocking the front and rear ventilation holes.

Figure 6.1: Rear view highlighting the cooling fan and ventilation.
6.2 Cleaning
Periodically clean the exterior of the enclosure with a soft, dry cloth. Do not use liquid cleaners or aerosols directly on the device. Ensure the ventilation areas are free from dust buildup.
7. Troubleshooting
- Drives Not Appearing:
- Ensure the enclosure is powered on and the data cable is securely connected to both the enclosure and your computer.
- Check your computer's disk management utility to see if the drives are detected but uninitialized or unformatted.
- Try rebooting the ORICO enclosure and your computer.
- Slow Transfer Speeds:
- Verify that your computer's USB port supports USB 3.2 Gen 2 (10Gbps). Connecting to a slower USB port will limit speeds.
- Note that actual transfer speeds are limited by the SATA III protocol, typically up to 6Gbps, even with a 10Gbps USB interface.
- Ensure the data cable is not damaged and is properly connected.
- RAID Configuration Issues (if using software RAID):
- This enclosure is a JBOD (Just a Bunch Of Disks) device, meaning it presents individual drives to your computer. Any RAID configuration must be managed via software on your operating system.
- Refer to your operating system's documentation for software RAID setup and management.
- RAID 5 Disk Replacement (if configured via software):
- If a disk fails in a software RAID 5 array, the enclosure's indicator light for that bay may turn red.
- To replace a faulty drive: Eject the device from your computer and power down the enclosure. Replace the faulty hard drive with a new one of equal or larger capacity. Reconnect and power on the enclosure. Use your RAID management software to initiate the rebuild process. Hot-swapping is not supported for RAID rebuilds; always power down the enclosure first.
8. Specifications
| Feature | Description |
|---|---|
| Model Number | 9958C3 |
| Brand | ORICO |
| Compatible Devices | Desktop |
| Hard Disk Form Factor | 3.5 Inches |
| Hardware Interface | USB 3.2 Gen 2 (10Gbps) |
| Material | Aluminum |
| Color | Silver |
| Item Weight | 10.43 pounds |
| Package Dimensions | 13.54 x 12.99 x 8.54 inches |
| Manufacturer | SHENZHEN ORICO TECHNOLOGIES CO.,LTD |
9. Compatibility
The ORICO 9958C3 enclosure is designed for broad compatibility with various operating systems and devices.
- Compatible Systems: Windows, macOS, Linux
- Compatible Devices: Laptops, iMac, PC, Mac Mini, Tablets (with appropriate USB-C connectivity)

Figure 9.1: Universal compatibility across various platforms and devices.
10. Warranty and Support
For warranty information, technical support, or any inquiries regarding your ORICO product, please refer to the official ORICO website or contact their customer support directly. Keep your purchase receipt for warranty claims.
ORICO Support Team:
Email: supports@orico.com.cn