1. Introduction
This manual provides detailed instructions for the safe and efficient operation of your VEVOR Electric Honey Extractor. Please read this manual thoroughly before assembly, operation, or maintenance to ensure proper use and to prevent damage to the unit or injury to yourself.
The VEVOR Electric Honey Extractor is designed for efficient honey removal from honeycomb frames using centrifugal force. This 6-frame model is suitable for home or small-scale beekeeping operations.

Image 1.1: VEVOR Electric Honey Extractor with honey flowing into a jar.
2. Safety Instructions
Always adhere to the following safety guidelines to prevent personal injury or damage to the equipment:
- Ensure the extractor is placed on a stable, level surface before operation.
- Do not operate the extractor with a damaged power cord or plug.
- Keep hands and loose clothing away from moving parts during operation.
- Always disconnect the power supply before cleaning, maintenance, or when the unit is not in use.
- Do not allow children or untrained individuals to operate the extractor.
- The transparent lid is equipped with a safety switch that stops the motor when opened. Do not bypass this safety feature.
- Wear appropriate protective gear, such as gloves and eye protection, during honey extraction.
- Ensure the honey gate is closed before starting the extraction process to prevent spills.
3. Package Contents
Verify that all components are present and undamaged upon unpacking. If any parts are missing or damaged, contact VEVOR customer service.

Image 3.1: Included accessories and parts for the honey extractor.
- Transparent Lid × 1
- Instruction Manual × 1
- Stand Mounting Screws × 6
- Supporting Washers × 6
- Screws for Securing Lid × 9
- Plastic Honey Drain (with Sealing Ring and O-Ring) × 1
- Stand (3 Upper, 3 Lower Supports) × 1
4. Setup and Assembly
Follow these steps to assemble your honey extractor:
- Attach the Legs: Securely fasten the three upper and three lower stand supports to the main drum using the provided stand mounting screws and supporting washers. Ensure all connections are tight for stability.
- Install the Honey Gate: Insert the plastic honey drain (honey gate) into the designated opening at the bottom of the drum. Ensure the sealing ring and O-ring are correctly positioned to prevent leaks.
- Mount the Motor Assembly: Place the motor assembly onto the top of the drum, aligning it with the pre-drilled holes. Secure it with the appropriate screws.
- Attach the Transparent Lid: Position the transparent lid over the drum and secure it using the lid securing screws. Ensure the lid's safety switch mechanism aligns correctly with the motor unit.
- Adjust Height: The extractor features adjustable legs. Adjust the leg height to a comfortable working level, ensuring the unit remains stable. The adjustable height range is 26-33.8 inches (66-86 cm).

Image 4.1: Adjustable height feature of the honey extractor.

Image 4.2: Honey extractor with the honey gate in the closed position.
5. Operating Instructions
Follow these steps for effective honey extraction:
- Prepare Honeycomb Frames:

Image 5.1: Removing honeycomb frames from the hive.
Remove mature honeycomb frames from your beehive. Ensure the frames are fully capped with honey.

Image 5.2: Uncapping the honeycomb using a specialized tool.
Use a suitable uncapping tool to remove the wax cappings from both sides of the honeycomb frames. This allows the honey to be extracted.
- Load Frames:

Image 5.3: Loading a honeycomb frame into the extractor basket.
Carefully place up to six medium honeycomb frames into the extractor basket. For balanced operation, distribute the frames evenly, especially if not all six slots are used. This minimizes vibration during spinning.

Image 5.4: The extractor is designed to process 6 medium frames simultaneously.
- Start Extraction:

Image 5.5: Motor and stepless speed control panel.
Close the transparent lid securely. The extractor features an automatic safety design that stops spinning when the lid is open. Connect the power cord. Use the stepless speed adjustment knob to gradually increase the spinning speed from 0 to 100 RPM. Start at a lower speed and gradually increase to prevent damage to the frames and ensure efficient honey removal. The 140W motor provides sufficient power for extraction.
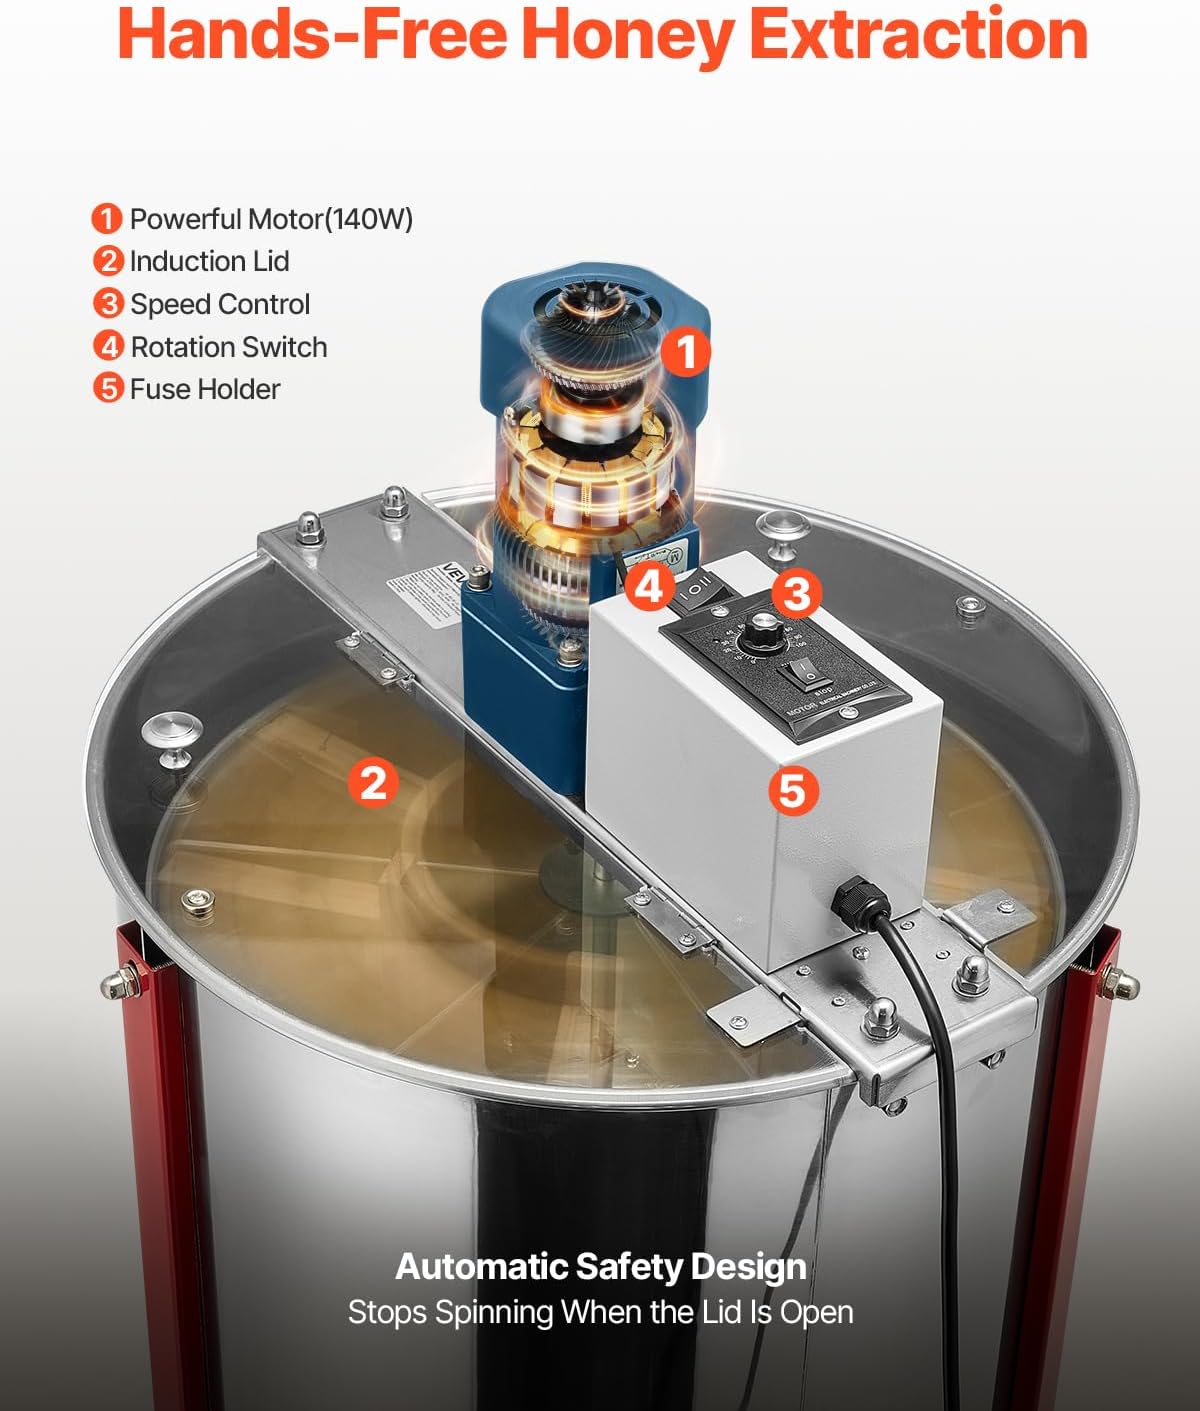
Image 5.6: Key components of the hands-free honey extraction system.

Image 5.7: Transparent lid allows monitoring of the extraction process.
- Collect Honey:

Image 5.8: Collecting extracted honey from the outlet.
Once extraction is complete, turn off the motor and allow the basket to stop spinning. Place a suitable container (e.g., a bucket or jar) under the honey gate. Open the honey gate to allow the extracted honey to flow out. The conical bottom design ensures minimal honey residue remains in the drum.

Image 5.9: The in-house developed honey flow outlet for smooth honey collection.
6. Maintenance
Regular cleaning and maintenance will prolong the life of your honey extractor:
- Cleaning: After each use, disconnect the power. Remove the frames and the internal basket. Rinse the drum, basket, and honey gate with warm water. Avoid using harsh chemicals or abrasive materials that could scratch the stainless steel. Ensure all honey residue is removed.
- Drying: Thoroughly dry all components before storage to prevent rust and bacterial growth.
- Storage: Store the extractor in a clean, dry place, away from direct sunlight and extreme temperatures.
- Inspection: Periodically inspect the power cord, plug, and all moving parts for any signs of wear or damage. Replace any damaged components immediately.
7. Troubleshooting
If you encounter issues with your VEVOR Electric Honey Extractor, refer to the following common problems and solutions:
| Problem | Possible Cause | Solution |
|---|---|---|
| Motor does not start. |
|
|
| Excessive vibration during operation. |
|
|
| Honey leaks from the gate. |
|
|
If the problem persists, contact VEVOR customer support for assistance.
8. Specifications

Image 8.1: Product specifications and dimensions.
| Feature | Detail |
|---|---|
| Model | HE-18C-6E-US |
| Frame Capacity | 6 Medium Frames |
| Motor Power | 140W |
| Speed Range | 0-100 RPM (Stepless Adjustment) |
| Maximum Honey Capacity | 39.68 lbs / 18 kg |
| Material | Stainless Steel |
| Product Weight | 44.31 lbs / 20.1 kg |
| Product Dimensions (L x W x H) | 18.5 x 19.88 x 33.46 inches (470 x 505 x 850 mm) |
| Adjustable Height Range | 26-33.8 inches (66-86 cm) |
| Protection Level | IP20 |
| Compatible Hive Foundation Size | Medium Frame: 19.09 x 6.30 inches (485 x 160 mm) |
9. Warranty and Support
VEVOR products are designed for durability and performance. For warranty information, product support, or to purchase replacement parts, please visit the official VEVOR website or contact their customer service department. Keep your purchase receipt as proof of purchase for warranty claims.
VEVOR Customer Service: Refer to your product packaging or the official VEVOR website for the most current contact information.


