BOSS VE-22
Boss VE-22 Vocal Effects and Looper Pedal Instruction Manual
Model: VE-22 | Brand: BOSS
1. Introduction
The BOSS VE-22 is an advanced vocal multi-effects processor designed for singers seeking high-quality vocal processing, real-time harmonies, and creative effects. This manual provides comprehensive instructions for setting up, operating, maintaining, and troubleshooting your VE-22 unit, ensuring you can maximize its potential for live performance and studio recording.
2. Important Safety Information
To ensure safe operation and prevent damage, please read and adhere to the following safety guidelines:
- Power Supply: Use only the specified AC adapter (PSA series) or compatible power supply. Using an incorrect power supply can cause fire, electric shock, or malfunction.
- Ventilation: Do not block ventilation openings. Ensure adequate airflow around the unit to prevent overheating.
- Moisture: Do not expose the unit to rain, moisture, dripping, or splashing. Keep liquids away from the unit.
- Foreign Objects: Do not insert any foreign objects into the unit's openings.
- Handling: Avoid strong impacts or dropping the unit. Do not disassemble or modify the unit.
- Cleaning: Clean only with a dry cloth. Do not use liquid cleaners or aerosols.
- Placement: Place the unit on a stable, level surface. Avoid placing it near heat sources or in direct sunlight.
3. Package Contents
Verify that all items listed below are included in your package:
- BOSS VE-22 Vocal Effects and Looper Pedal
- Power Supply (AC adapter)
- 10ft Instrument Cable
- Patch Cable
- Guitar Picks (Assorted)
- Austin Bazaar Polishing Cloth
- Owner's Manual (this document)

Image: The complete Boss VE-22 bundle, showcasing the vocal effects pedal along with its included power supply, various cables, guitar picks, and a polishing cloth.
4. Product Overview
4.1 Front Panel Controls
The front panel of the VE-22 features intuitive controls for real-time vocal processing:
- Phones/Line Knob: Adjusts the volume for headphones or line output.
- LCD Display: A bright color LCD (320 x 240 pixels) provides visual feedback for settings, effects, and parameters.
- Memory Knob (Enter/Push): Selects and confirms memory presets.
- Write Button: Saves current settings to a memory location.
- Exit Button: Returns to the previous screen or cancels an operation.
- Menu Button: Accesses the main menu for deeper settings and utilities.
- Dynamics Knob (Push Twice): Controls vocal dynamics.
- Harmony Knob: Adjusts harmony parameters and levels.
- Effect Knob: Controls various vocal effects.
- Echo Knob: Adjusts echo and reverb parameters.
- On/Off/Push/Turn/Type/Edit Knobs: Multi-function knobs for detailed parameter editing.
- Bypass Footswitch: Toggles effects bypass.
- Loop Footswitch (Hold): Activates the looper function.
- Memory/Manual Footswitch: Switches between memory and manual modes.

Image: A top-down view of the Boss VE-22 Vocal Performer, highlighting its display, control knobs, and footswitches.

Image: A detailed view of the Boss VE-22's vibrant color LCD display, showing harmony settings and effect parameters.

Image: A close-up of the Boss VE-22's main control knobs for Harmony, Effect, and Echo, along with the footswitches for Bypass, Loop, and Memory/Manual.
4.2 Rear Panel Connections
The rear panel provides all necessary audio and control connections:
- MIC Input (XLR): Connect your microphone here. Supports phantom power.
- MIC SENS (Min/Max): Adjusts the input sensitivity for your microphone.
- Phantom Power Switch: Enables/disables 48V phantom power for condenser microphones.
- OUTPUT (L/MONO, R XLR): Connect to a mixer, PA system, or audio interface.
- PHONES/LINE OUT (Stereo Mini Jack): Connect headphones or a line-level device.
- AUX IN (Stereo Mini Jack): Connect an external audio player for backing tracks.
- CTL 1, 2/EXP Jack: Connect an optional footswitch or expression pedal for expanded control.
- USB-C Port: Connect to a computer for audio recording/playback and data transfer.
- DC IN Jack: Connect the included AC adapter.
- POWER ON/OFF Switch: Turns the unit on or off.
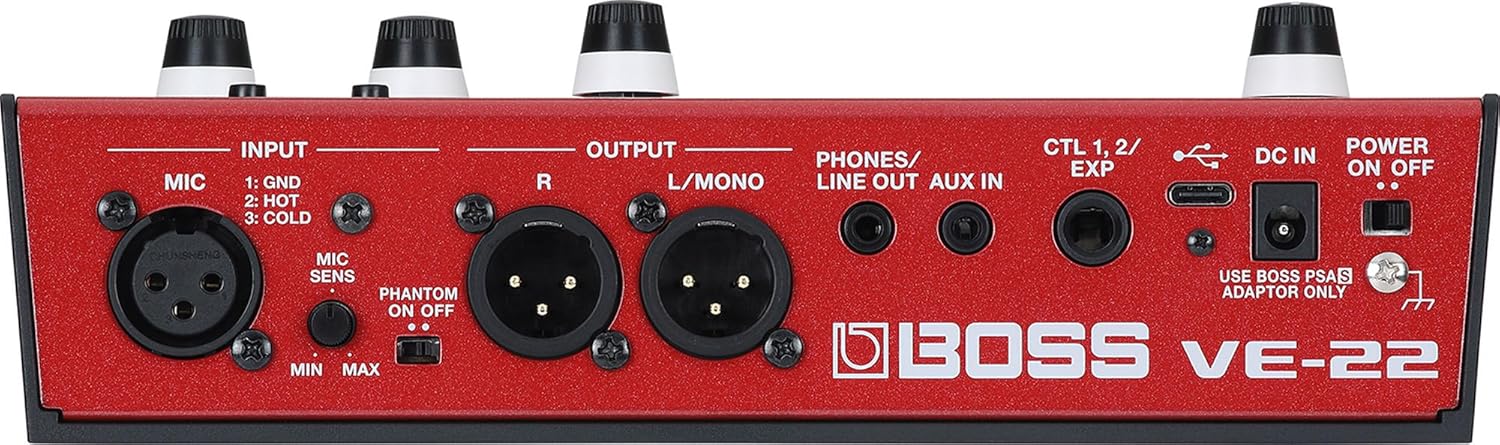
Image: The rear panel of the Boss VE-22, displaying its various input and output connections including XLR, AUX, USB-C, and power input.
5. Setup
5.1 Power Connection
The VE-22 can be powered by the included AC adapter or by four AA batteries (not included).
- Using the AC Adapter: Connect the AC adapter to the DC IN jack on the rear panel, then plug it into a standard AC outlet.
- Using Batteries: Open the battery compartment on the bottom of the unit. Insert four AA batteries, ensuring correct polarity. Close the compartment securely.

Image: A user's hands are shown inserting AA batteries into the dedicated battery compartment located on the underside of the Boss VE-22 pedal.
5.2 Connecting Your Microphone
Connect your microphone to the MIC INPUT (XLR) on the rear panel. If using a condenser microphone that requires phantom power, ensure the Phantom Power switch is set to ON. Adjust the MIC SENS knob to an appropriate level for your microphone and vocal volume.
5.3 Connecting to Audio Outputs
Connect the OUTPUT (L/MONO, R XLR) jacks to your mixer, PA system, or audio interface. For stereo output, use both L/MONO and R jacks. For mono output, use only the L/MONO jack. You can also connect headphones to the PHONES/LINE OUT jack for monitoring.
5.4 Connecting External Devices
Use the AUX IN jack to connect an external audio player (e.g., smartphone, MP3 player) for playing backing tracks. The USB-C port allows connection to a computer for audio recording, playback, and potential firmware updates.

Image: A person is shown using the Boss VE-22, which is connected to a laptop, indicating its use in a recording or production setup.
6. Operating Instructions
6.1 Powering On/Off
To power on the unit, slide the POWER ON/OFF switch on the rear panel to the ON position. To power off, slide it to the OFF position.
6.2 Display Navigation and Basic Controls
The color LCD display shows current settings and parameters. Use the Memory knob to scroll through presets and press it to select. The Write, Exit, and Menu buttons provide navigation and access to deeper settings. The multi-function knobs (Harmony, Effect, Echo) allow for quick adjustments of their respective parameters.
6.3 Vocal Effects
The VE-22 offers a wide range of vocal effects. Use the dedicated knobs and the multi-function knobs to dial in your desired sound:
- Harmony: Select harmony types and set the song key. Adjust voicing and levels using the Harmony knob and associated multi-function knobs.
- Effect: Control various vocal effects such as distortion, modulation, and special effects.
- Echo: Adjust delay and reverb parameters to add space and depth to your vocals.
- Dynamics: Use the Dynamics knob to control compression and other dynamic processing.
6.4 Looper Function
The built-in looper allows you to create vocal loops for practice or performance:
- Record: Press and hold the Loop footswitch to start recording.
- Play: Press the Loop footswitch again to stop recording and start playback.
- Overdub: While playing, press the Loop footswitch to overdub new layers.
- Stop: Press the Loop footswitch twice to stop playback.
- Clear: Hold the Loop footswitch to clear the current loop.
6.5 Memory Management
The VE-22 allows you to save and recall your customized vocal settings:
- Saving Settings: After adjusting parameters, press the Write button. Follow the on-screen prompts to select a memory location and confirm.
- Recalling Settings: Use the Memory knob to browse through saved presets. Press the Memory knob to load a selected preset.
- Memory/Manual Mode: The Memory/Manual footswitch toggles between recalling saved presets and operating in manual mode, where knob positions directly reflect the sound.
7. Maintenance
Proper maintenance ensures the longevity and optimal performance of your VE-22.
- Cleaning: Wipe the unit with a soft, dry cloth. Do not use abrasive cleaners, waxes, or solvents.
- Storage: When not in use for extended periods, store the unit in a dry, cool place away from direct sunlight and extreme temperatures. Remove batteries if storing for a long time to prevent leakage.
- Battery Replacement: Replace all four AA batteries simultaneously when the low battery indicator appears on the display or when the unit's performance degrades.
8. Troubleshooting
If you encounter issues with your VE-22, refer to the following common problems and solutions:
| Problem | Possible Cause | Solution |
|---|---|---|
| No sound output. | Incorrect cable connections, low volume, incorrect input/output settings. | Check all cable connections (microphone, outputs). Ensure volume knobs (Phones/Line, mixer) are up. Verify correct input selection on connected devices. |
| Effects are not applied. | Effects bypassed, effect levels set to zero, incorrect memory selected. | Ensure the Bypass footswitch is not engaged. Check the Harmony, Effect, and Echo knob levels. Verify you are in the correct memory preset or manual mode. |
| Unit does not power on. | Power supply issue, dead batteries. | Ensure the AC adapter is securely connected and plugged into a working outlet. If using batteries, replace them with fresh ones. |
| Harmony tracking is inaccurate. | Incorrect key setting, poor microphone technique, excessive background noise. | Verify the song key setting on the VE-22 matches the music. Ensure clear vocal input to the microphone. Reduce background noise if possible. |
9. Specifications
| Feature | Specification |
|---|---|
| Model | VE-22 |
| Item Weight | 2.2 pounds |
| Product Dimensions | 6 x 9 x 3 inches (6"L x 9"W x 3"H) |
| Power Supply | AC Adapter (PSA series) or 4 x AA batteries |
| Display | Graphic color LCD (320 x 240 dots) |
| Sample Rate | 48 kHz |
| DA Conversion | 32 bits |
| Processing | 32-bit floating point |
| Effects Types | 39 types |
| Memories | 99 (User) + 50 (Preset) |
| Phrase Loop Time | 37 seconds |
| Inputs | MIC IN (XLR), AUX IN (Stereo Mini Jack) |
| Outputs | OUTPUT (L/MONO, R XLR), PHONES/LINE OUT (Stereo Mini Jack) |
| Control | CTL 1, 2/EXP Jack, USB-C Port |
| UPC | 840262257732 |
10. Warranty and Support
BOSS products are manufactured to high quality standards and come with a limited warranty. For detailed warranty information, product registration, and technical support, please visit the official BOSS website or contact your local BOSS distributor. Keep your purchase receipt as proof of purchase for warranty claims.
For further assistance, you may also refer to the BOSS Store on Amazon.
Ask a question about this manual
Ask about setup, troubleshooting, compatibility, parts, safety, or missing instructions. Manuals+ will review the question and use this page’s manual context to help answer it.