Introduction
This manual provides comprehensive instructions for setting up, operating, and maintaining your Zivron Wireless Indoor Outdoor Weather Station, Model EM3354A. Learn about its features including accurate temperature and humidity monitoring, weather forecasting, atomic clock synchronization, and moon phase display. Please read this manual thoroughly before use to ensure proper operation and longevity of your device.
What's in the Box
- Weather Station Main Unit
- Remote Sensor (1 unit included)
- Power Adapter
- User Manual
Key Features
- 7.5'' HD Color Display Screen: Offers comfortable colors, clear display, and a wide viewing angle. Displays temperature, humidity, time, date, and weather. Adjustable five brightness levels.
- Multifunctional Atomic Clock: Automatically synchronizes with standard time signals. Supports seven North American time zones and automatic Daylight Saving Time (DST) updates. Features dual alarm functions and a snooze function.
- High Accuracy and Rapid Response Speed: Advanced sensing technology and intelligent algorithms ensure accurate and swiftly refreshed data for indoor and outdoor conditions.
- Wireless Weather Forecast Station: Predicts weather within an 8-12 mile radius based on barometric pressure trends. Continuously calibrates using 7-10 days of data for enhanced accuracy.
- 3-Channel Indoor and Outdoor Monitoring: Supports up to 3 remote sensor connections for simultaneous temperature and humidity monitoring in multiple locations.
- Flexible Power Options: Can be powered by the included power adapter or batteries (not included). Also supports USB ports.
- Note on Battery Power: When running on battery power only, the display stays off to save power. Touch the top button to wake the display for 15 seconds. When using the power adapter, the display stays on (except during RCC signal searches). For best results, use the adapter with backup batteries installed.
Product Overview
Familiarize yourself with the main unit and remote sensor components.
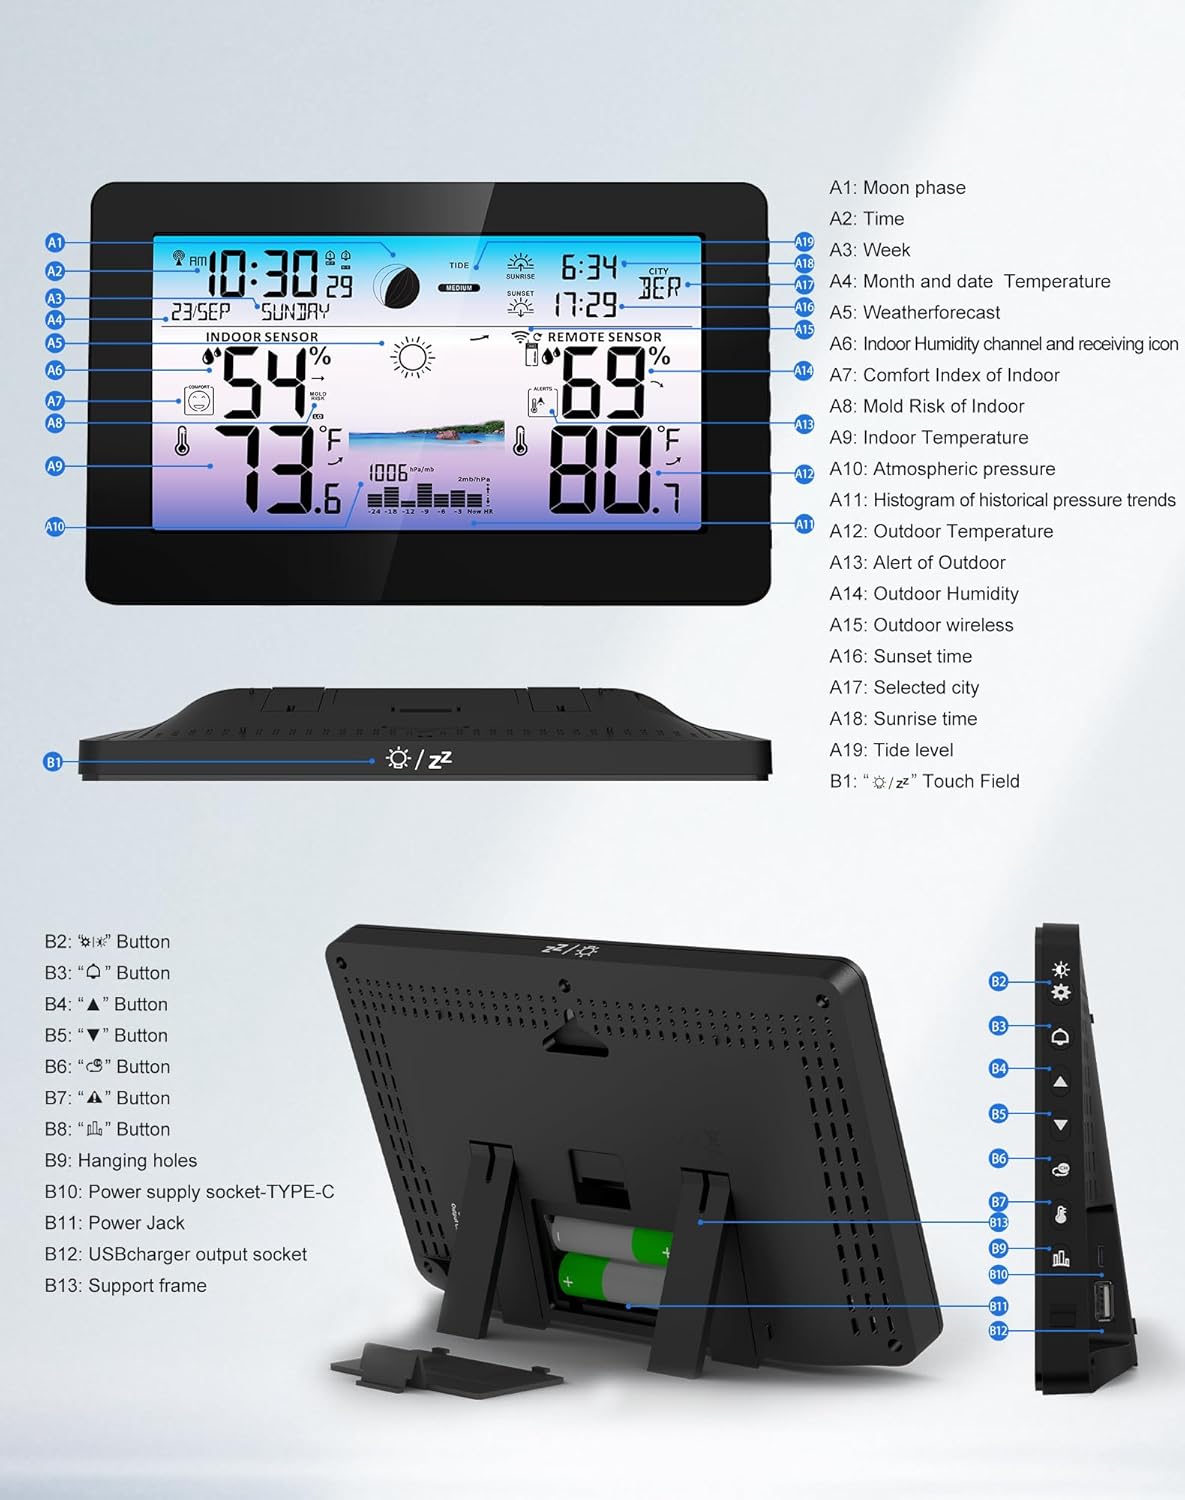
Figure 1: Main Unit and Remote Sensor Components
This diagram illustrates the various buttons and display areas on the main weather station unit and the remote sensor. Key labels include Moon phase, Time, Week, Month and date, Weather forecast, Indoor humidity, Comfort Index of Indoor, Mold Risk of Indoor, Indoor Temperature, Tide level, Atmospheric pressure, Histogram of historical pressure trends, Outdoor Temperature, Outdoor Humidity, Outdoor wireless, Sunset time, Selected city, Sunrise time, and various control buttons (Light, Settings, Alarm, Up, Down, Channel, Alerts, Pressure, History, USB/Power, Support frame).
Setup Instructions
Follow these steps to set up your Zivron Weather Station for the first time.
1. Powering the Main Unit
- Insert 2 AA batteries (not included) into the battery compartment on the back of the main unit. These serve as backup power.
- Plug the included power adapter into the main unit and then into a power outlet. The display will light up for 3 seconds, and you will hear a beep.
- The station will begin detecting temperature and humidity.

Figure 2: Main Unit Power Options
The main unit can be powered via the DC adapter (included) or 2x AA batteries (not included) for backup. The image shows the power adapter connected and the battery compartment.
2. Setting Up the Remote Sensor
- Open the battery cover of the remote sensor and insert 2 AA batteries (not included).
- Select a channel (1, 2, or 3) using the switch inside the battery compartment. Ensure this matches the channel selected on the main unit (if changing from default).
- Press the TX button on the sensor to transmit the signal and connect to the main unit.
- Place the remote sensor in your desired outdoor location, ensuring it is protected from direct sunlight and rain for accurate readings.

Figure 3: Remote Sensor Placement
The remote sensor, shown next to the main unit, should be placed outdoors in a suitable location to transmit temperature and humidity data wirelessly.
3. Automatic Time Synchronization (Atomic Clock)
Once the main unit connects to the remote sensor, it will automatically begin searching for the WWVB signal to set the time and date. This process may take up to 7 minutes, during which the backlight will dim to prevent interference. The screen will light up normally once the signal is successfully received.
- The default time zone is Pacific Time (-8). If you need to change the time zone, refer to the "Operating Instructions" section.
- To exit the WWVB search mode early, long-press the [UP] button.
Setup Video Guide
Video 1: How to Set Up Your Zivron Weather Station
This official seller video provides a step-by-step visual guide on how to set up your weather station, including battery installation, sensor pairing, and initial synchronization.
Video 2: Zivron Weather Station Setup Preview
A short preview video demonstrating the initial setup process for the Zivron Weather Station, focusing on key steps for quick installation.
Operating Instructions
This section details how to use the various functions of your weather station.
Display Overview
The 7.5-inch color HD display provides a clear overview of all weather data. You can adjust the brightness to suit your environment.
- Brightness Adjustment: Press the Light Bulb button on the side to cycle through 5 brightness levels (100%, 75%, 50%, 25%, 0% off).
- Viewing Angle: The display is optimized for clear viewing from various angles.

Figure 4: Adjustable Brightness Levels
The weather station offers five adjustable brightness levels for its display, allowing users to customize visibility based on ambient light conditions.
Setting Time and Date
The atomic clock automatically synchronizes. If manual adjustment is needed or for specific settings:
- Press and hold the MODE/SET button (gear icon) for 2 seconds to enter the time and settings mode. The first setting item will blink.
- Use the UP or DOWN buttons to change values. Press UP once to increase by 1; hold for 2+ seconds to fast increase. The same applies to DOWN for decreasing values.
- Press MODE/SET to confirm a selection and move to the next setting.
- Settings include: Key Tone & Beep (ON/OFF), Temperature Unit (°C/°F), Pressure Unit (hPa/mb / inHg), RCC (Radio Controlled Clock) (ON/OFF), DST (Daylight Saving Time) (ON/OFF), Time Zone (choose from 7 options: -4 to -10), Time Format (12HR/24HR), Set Time (Hour, Minute, Year, Month, Date), Weekday Language (English, French, Spanish, etc.), Pressure Calibration, and Initial Weather Setting.
- After 20 seconds of no button presses, settings are saved automatically, and the unit returns to standard mode. Alternatively, quickly press the SNOOZE/LIGHT button twice within 0.5 seconds to save immediately and return to standard mode.

Figure 5: Auto Calibrated Atomic Clock
The weather station's clock automatically synchronizes with the WWVB radio station time signal, supporting various North American time zones and adjusting for Daylight Saving Time.
Weather Forecast
The station calculates and predicts weather for the next 8-12 miles based on barometric pressure trends. It continuously calibrates for accuracy.

Figure 6: Weather Forecast Display
The display shows various weather icons (Sunny, Slightly Cloudy, Cloudy, Rainy, Stormy, Snowy) to indicate the predicted weather conditions.
Indoor and Outdoor Monitoring
The main unit displays indoor temperature and humidity, along with data from up to three remote sensors.
- Multiple Sensors: The weather station supports up to 3 remote sensors (one included). Additional sensors can be purchased separately.
- Comfort Indicator & Mold Risk: The display includes indicators for indoor comfort levels and potential mold risk based on humidity.
- Temperature Alerts: Set customizable alerts for indoor and outdoor temperatures. An alarm will sound if the temperature exceeds the set value.

Figure 7: Indoor and Outdoor Sensor Data
The main unit displays both indoor sensor readings and data from the remote outdoor sensor, including temperature and humidity.
Moon Phase and Tide Level
The weather station displays vivid moon phase patterns based on the calendar date and indicates the tide level.

Figure 8: Moon Phase Display
The display illustrates 12 different moon phases, providing astronomical information alongside weather data.
Alarm Functions
The weather station features dual alarm functions with a snooze option.
- Press and hold the ALARM button (bell icon) for 2 seconds to enter alarm setup. You can set two alarms: AL1 and AL2.
- Configure AL1 Hour, AL1 Minute, AL1 Repeat, AL1 Snooze Time. Repeat for AL2.
- Press MODE/SET to confirm and exit.
Specifications
| Feature | Detail |
|---|---|
| Brand | Zivron |
| Model Number | EM3354A |
| Display Type | 7.5" Color HD Display |
| Power Source | AC/DC Power Adapter or 2x AA Batteries (Main Unit), 2x AA Batteries (Remote Sensor) |
| Connectivity Technology | Wireless |
| Temperature Accuracy | ±1 °C |
| Product Dimensions | 8"D x 1.1"W x 5.1"H |
| Item Weight | 0.57 Kilograms (1.26 pounds) |
| Special Features | Large Color Display, Adjustable Brightness, Alarm, Atomic Clock, Customizable Alert, Weather Forecast, Moon Phase, Comfort Indicator, Mold Risk |
Troubleshooting
- No Display on Battery Power: The display is designed to turn off after 15 seconds to save power. Touch the top button to illuminate it for 15 seconds. For continuous display, use the power adapter.
- Incorrect Time/Date: Ensure the atomic clock (RCC) function is enabled in settings. Allow up to 7 minutes for initial synchronization. If issues persist, manually set the time zone and date.
- Remote Sensor Not Connecting:
- Check if batteries are correctly installed in the remote sensor.
- Ensure the channel switch on the remote sensor matches the selected channel on the main unit.
- Press the TX button on the remote sensor to re-transmit the signal.
- Verify the remote sensor is within range (typically up to 330 feet/100 meters in open air) and free from major obstructions.
- Inaccurate Readings:
- Ensure the remote sensor is not in direct sunlight or exposed to direct rain, which can affect accuracy.
- Allow the weather station to calibrate for 7-10 days for optimal weather forecast accuracy.
Warranty and Support
Zivron is committed to providing high-quality products and customer satisfaction.
- 30-Day Money Back Guarantee: If you are not satisfied with your purchase, you may be eligible for a full refund within 30 days.
- 24-Month Free Replacement/Repair: The product is covered by a 24-month warranty for free replacement or repair due to manufacturing defects.
- Customer Support: For any questions, issues, or support needs, please contact Zivron customer service.