Introduction
This manual provides detailed instructions for the setup, operation, and maintenance of your Hieasy 4MP 2.5K Dual-Band WiFi Window Dome Camera. Please read this manual thoroughly before using the product to ensure proper functionality and safety.

Image: Hieasy 4MP 2.5K Window Camera mounted on a window, displaying the mobile application interface with live monitoring and recording options, highlighting its dual-band WiFi capability and no monthly fees.
What's in the Box
Verify that all items listed below are included in your package:
- Camera Body
- 6.6/Ft Charging Cable
- Instruction Manual
- Power Adapter
- 32GB Micro SD Card

Image: All components included in the Hieasy 4MP 2.5K Window Camera package, including the camera body, power adapter, charging cable, instruction manual, and 32GB Micro SD card.
Setup
1. Prepare the Mounting Surface
Ensure the window surface where the camera will be mounted is clean and dry for optimal adhesion of the magnetic fixation system.
2. Attach the Mounting System
The camera features an innovative magnetic fixation system for quick installation. Peel off the protective film from the adhesive side of the mounting pad and firmly press it onto the desired spot on your window. Ensure the central opening aligns with your desired viewing area.
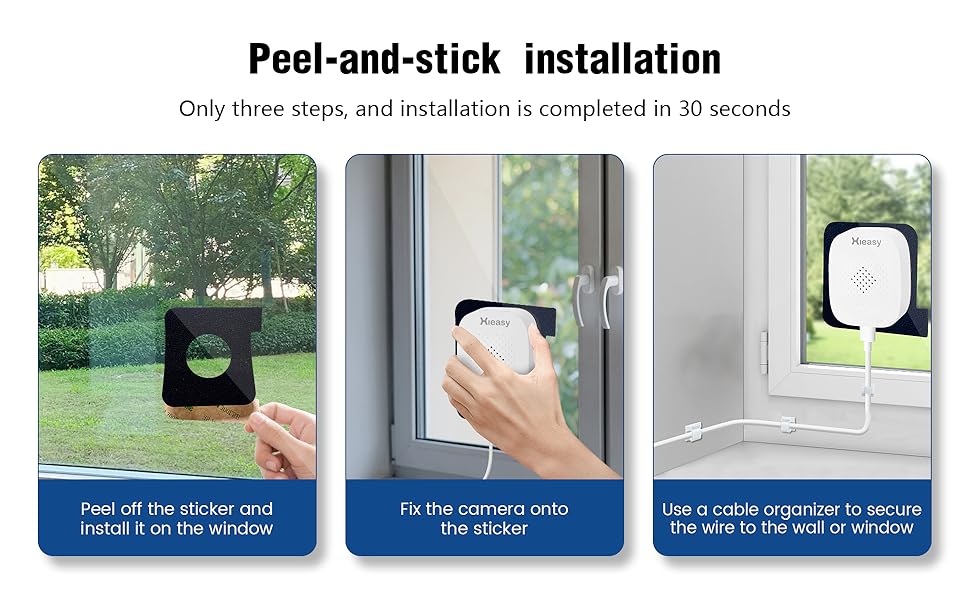
Image: Visual guide demonstrating the three simple steps for peel-and-stick installation of the Hieasy window camera onto glass.
3. Mount the Camera
Align the camera body with the magnetic mounting pad on the window. The camera will securely attach magnetically. The design allows for easy removal and reattachment without damaging the window frame.
4. Connect to Power
Connect the provided 6.6/Ft Charging Cable to the camera and then to the Power Adapter. Plug the Power Adapter into a suitable electrical outlet. The camera requires continuous power to operate as it does not have a built-in battery.
5. Download and Install the HiEasy App
Scan the QR code provided in the Instruction Manual or search for
Related Documents - X24
 |
HiEasy 4G AOV Camera User Manual A comprehensive user guide for the HiEasy 4G AOV Camera, covering app installation, device setup, alarm management, power settings, and troubleshooting. |
 |
4G AOV Camera User Manual - HiEasy App Setup User manual for the 4G AOV Camera, covering app installation, registration, device setup, and interface navigation using the HiEasy app. |
 |
AI Smart Camera Instruction Manual - HiEasy Comprehensive instruction manual for the HiEasy AI Smart Camera, covering setup, app usage, connection methods (WiFi, 4G), features like live view, recording, alarms, night vision, and troubleshooting. |
 |
HiEasy APP Series PTZ IP Camera Instruction Manual Comprehensive instruction manual for the HiEasy APP Series PTZ IP Camera, covering mobile app setup, PTZ controls, web interface operations, and PC software management. |
 |
HiEasy APP Series IP Camera Instruction Manual Comprehensive instruction manual for HiEasy APP Series IP Cameras, covering mobile app setup, PTZ controls, Windows PC web operations, and EasyVMS software management. |
 |
HiEasy Smart Camera Instruction Manual Comprehensive guide to setting up and operating the HiEasy Smart Camera, covering app download, account registration, Wi-Fi and 4G camera connection methods, live view, playback, sharing, recording storage, alarm management, night vision modes, and advanced PTZ controls. |
Ask a question about this manual
Ask about setup, troubleshooting, compatibility, parts, safety, or missing instructions. Manuals+ will review the question and use this page’s manual context to help answer it.