1. Introduction
Thank you for choosing the LVWIT GU10 2-Spot LED Ceiling Light. This manual provides essential information for the safe installation, operation, and maintenance of your new lighting fixture. Please read these instructions carefully before installation and retain them for future reference.
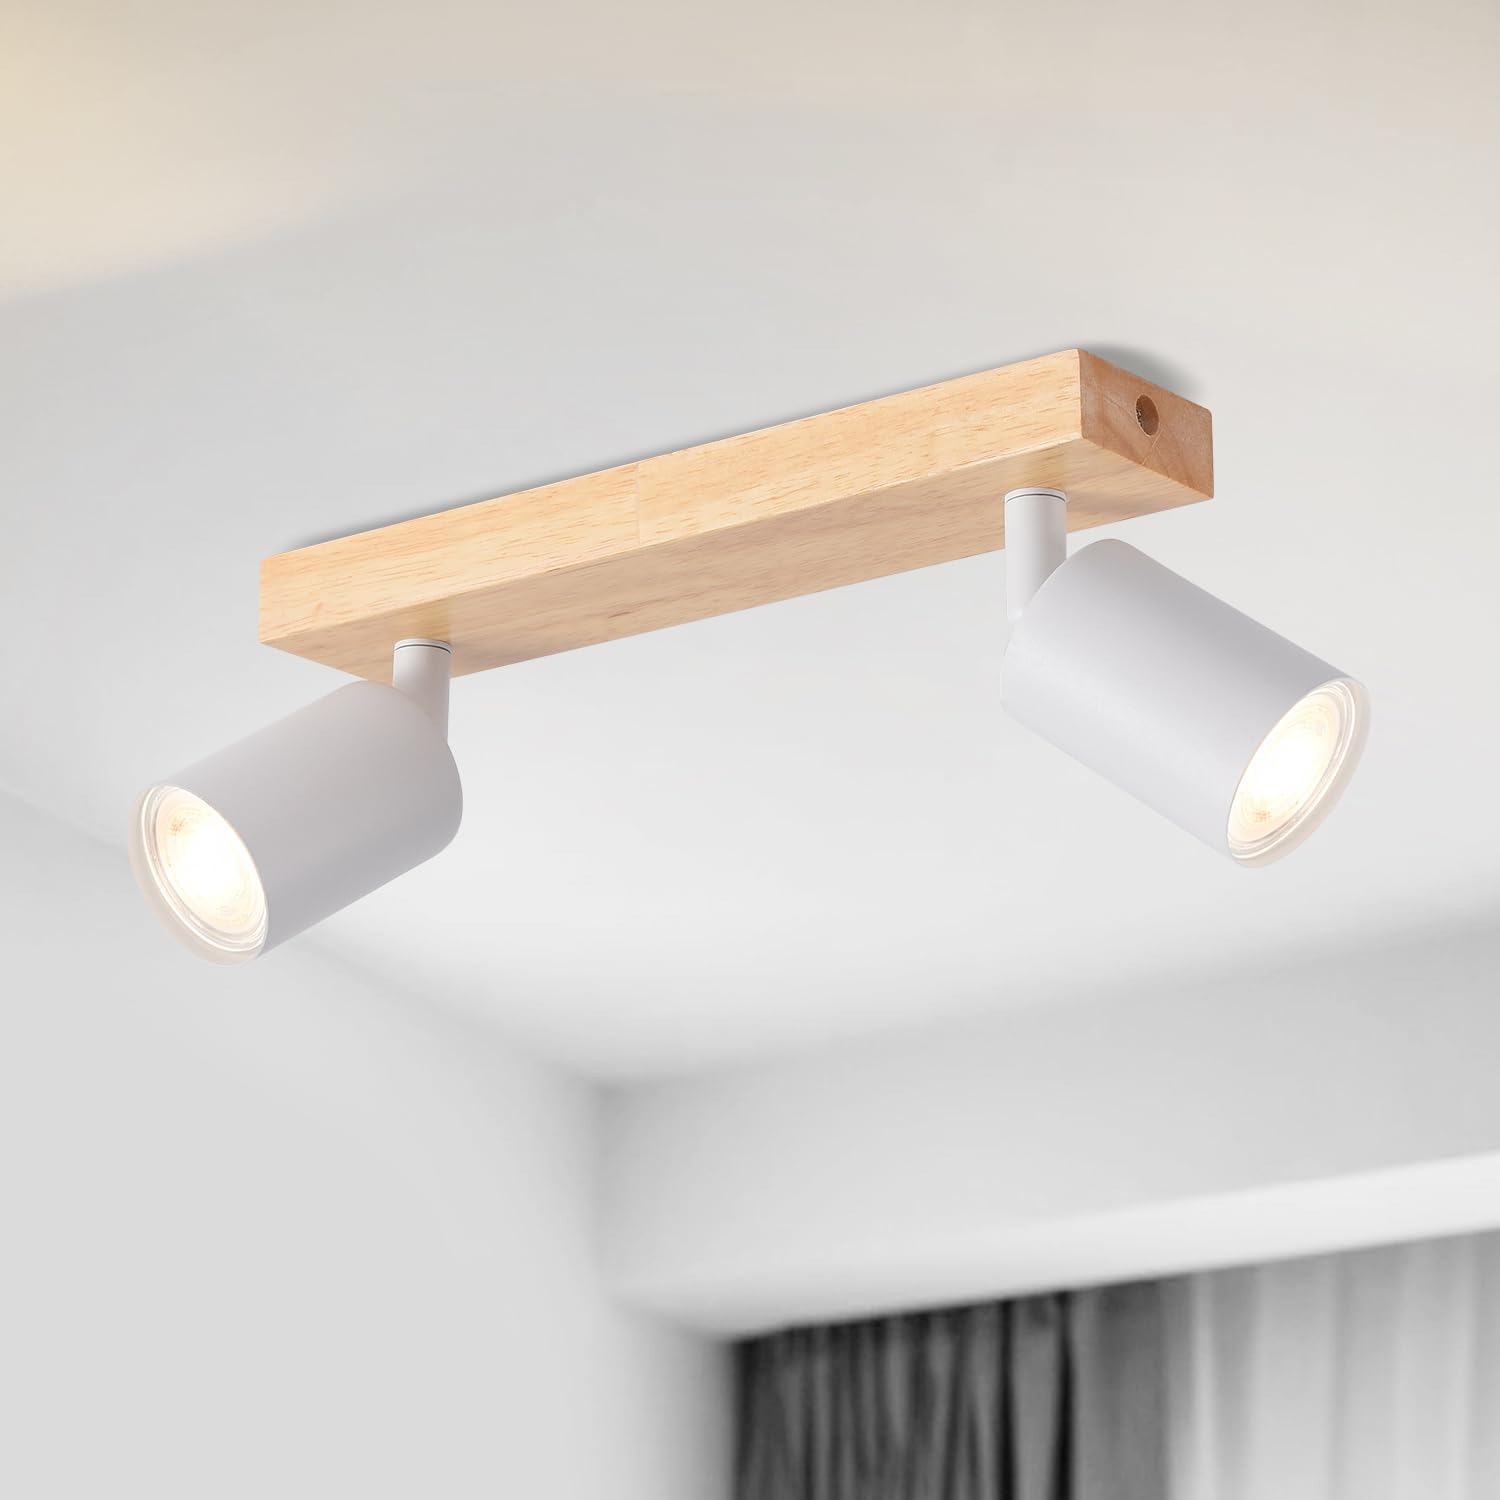
Front view of the LVWIT GU10 2-Spot LED Ceiling Light, featuring two adjustable white spot heads mounted on a natural wooden rectangular base.
2. Safety Information
- Electrical Safety: Installation must be performed by a qualified electrician or competent person. Always switch off the main power supply before commencing any electrical work.
- Voltage: Ensure the voltage supply matches the requirements specified on the product label.
- Indoor Use Only: This product is designed for indoor use (IP20 protection rating). Do not expose to water or high humidity.
- Bulb Type: Use only GU10 LED bulbs, with a maximum wattage of 40W per spot.
- Heat: Allow bulbs to cool before touching or replacing.
- Mounting: Ensure the mounting surface is capable of supporting the weight of the fixture.
3. Package Contents
Please check that all components are present and undamaged before installation:
- LVWIT GU10 2-Spot LED Ceiling Light fixture
- Mounting hardware (screws, wall plugs)
- Instruction Manual
Note: GU10 bulbs are not included and must be purchased separately.
4. Product Specifications
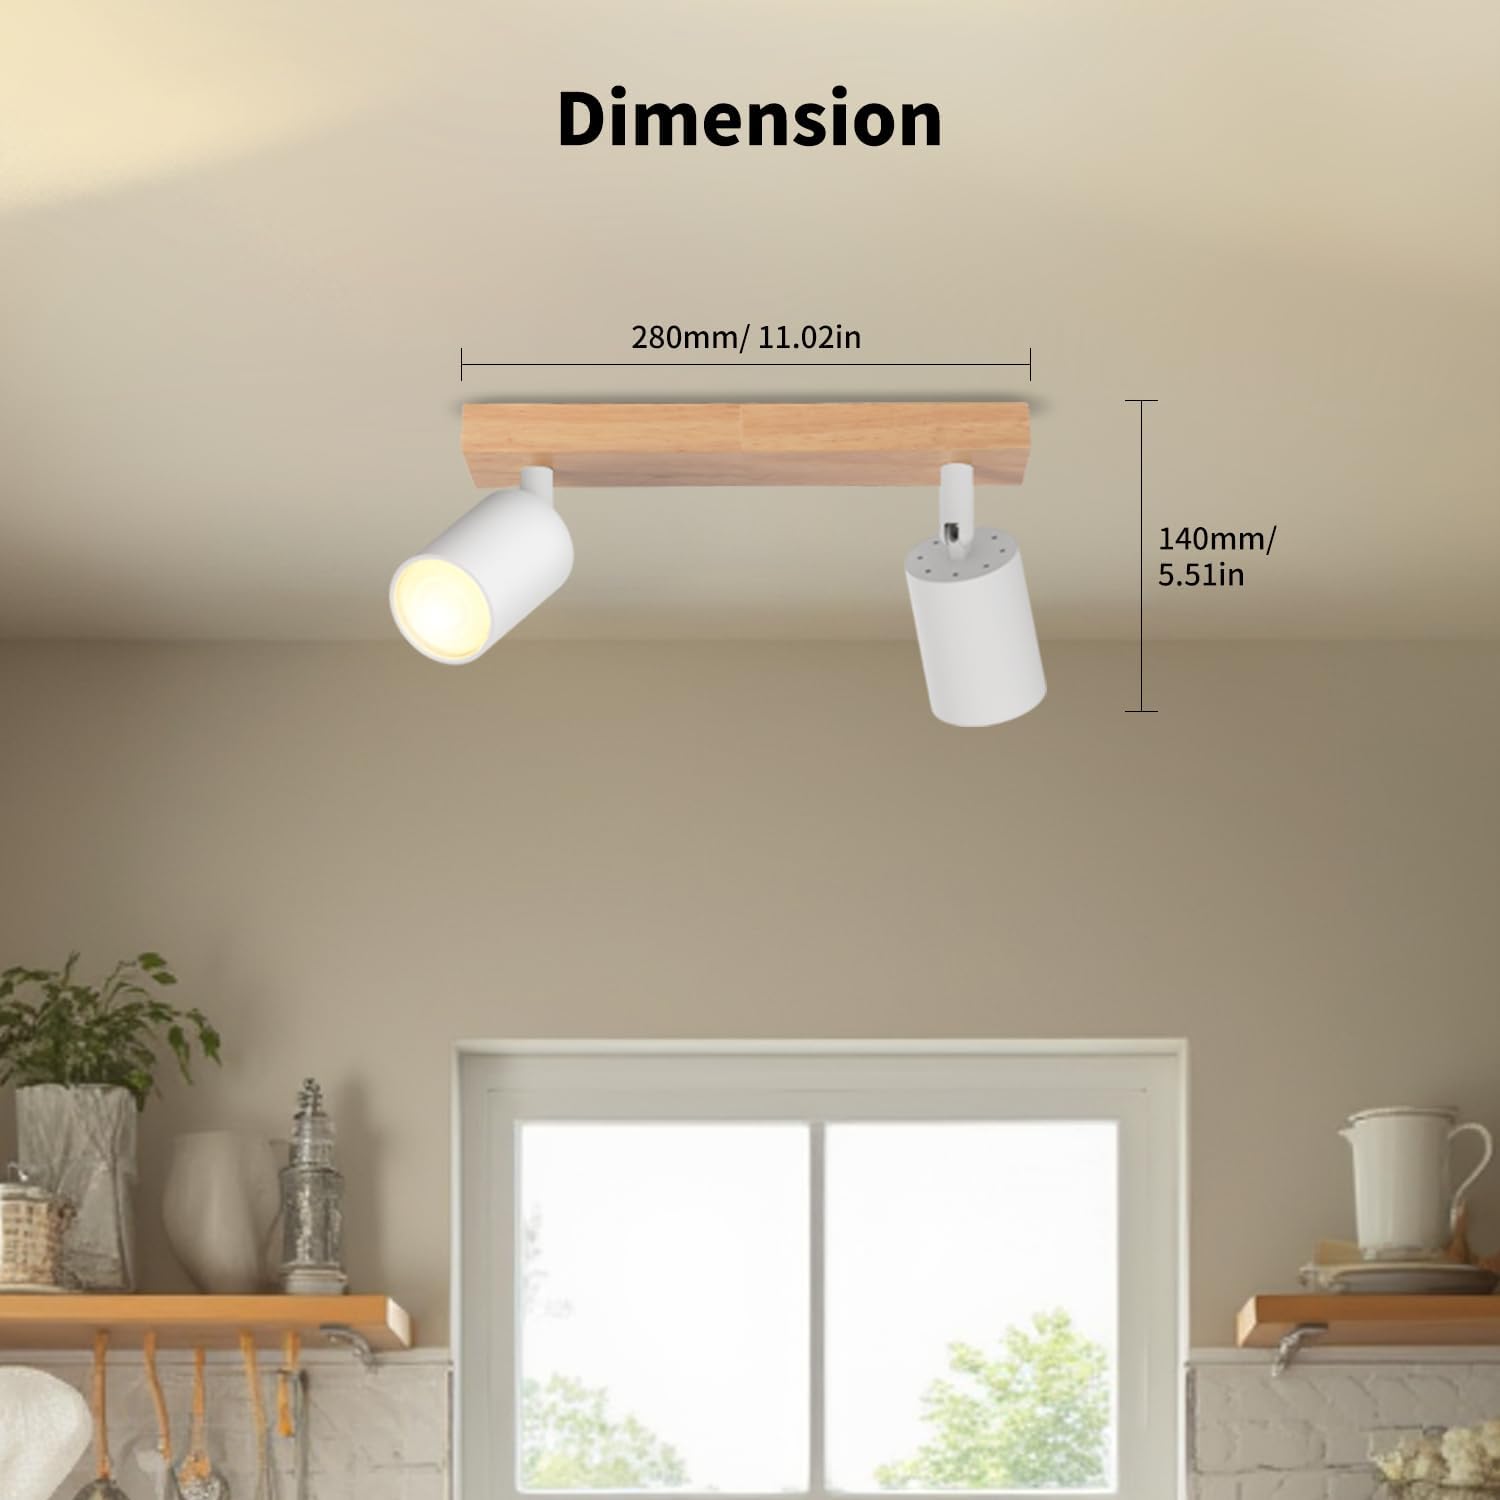
A visual representation of the ceiling light's dimensions, showing a length of 280mm (11.02 inches) and a height of 140mm (5.51 inches) from the ceiling.
| Feature | Specification |
|---|---|
| Brand | LVWIT |
| Model Number | EA1910897-02-RW |
| Color | White |
| Material | Aluminium, Wood, Metal |
| Product Dimensions | 28.6L x 6.3W x 9.2H cm (approx. 11.26L x 2.48W x 3.62H inches) |
| Bulb Type | GU10 LED (Bulbs not included) |
| Number of Bulbs | 2 |
| Max Wattage per Bulb | 40 Watts |
| Power Source | Hardwired |
| Control Method | Push Button (via wall switch) |
| Mounting Type | Ceiling Mount (Semi-flush) |
| Luminous Efficacy | 450 Lumens (per bulb, typical) |
| Energy Label | A+++ |
| Waterproof Level | IP20 (Non-waterproof) |

Detailed view highlighting key components: the GU10 bulb socket with a maximum capacity of 40W, the blend of wood and durable metal construction, and the design optimized for flexibility and efficient heat dissipation.

This image confirms the compatibility with GU10 bulbs and provides a size recommendation of 5cm diameter by 5.5cm height (1.96 inches diameter by 2.17 inches height) for optimal fit.
5. Installation Instructions
Important: Ensure the main power supply is switched off at the circuit breaker before starting installation.
- Preparation: Unpack all components and verify against the package contents list.
- Marking: Hold the mounting bracket against the ceiling at the desired installation location. Use a pencil to mark the positions for drilling.
- Drilling: Drill holes at the marked positions. Insert the provided wall plugs into the drilled holes.
- Mounting Bracket: Secure the mounting bracket to the ceiling using the provided screws.
- Wiring: Connect the household electrical wires to the terminal block on the fixture. Ensure correct polarity (Live, Neutral, Earth) as indicated. Secure all connections tightly.
- Fixture Attachment: Attach the main light fixture body to the mounting bracket, ensuring all wires are safely tucked inside and not pinched. Secure the fixture with the retaining screws.
- Bulb Installation: Insert GU10 LED bulbs into the lamp holders. This fixture is designed for easy, tool-free bulb installation.

This diagram provides a clear guide for installation, detailing how to attach the mounting bracket, connect the electrical wires, and insert the GU10 bulbs. It emphasizes the ease of the installation process.

A visual comparison highlighting the user-friendly, tool-free bulb installation method for this product, contrasting it with more complex installations that typically require additional tools.
6. Operating Instructions
Once installed and bulbs are inserted, restore power at the circuit breaker. The light can be operated using your standard wall switch. The spot heads are adjustable:
- Tilt: Each spot head can be tilted up to 180 degrees vertically.
- Swivel: Each spot head can be swiveled up to 350 degrees horizontally.
Adjust the spots to direct light precisely where needed, enhancing the ambiance or functionality of your space.

This image illustrates the flexible design of the spot heads, allowing for 180-degree vertical tilting and 350-degree horizontal swiveling to direct light as needed.

This graphic demonstrates the 350-degree swivel and 180-degree tilt of the light heads, and also showcases the natural aesthetic variations inherent in the wooden base, such as grain patterns and small knots.
7. Maintenance
- Cleaning: Disconnect power before cleaning. Wipe the fixture with a soft, dry cloth. Do not use abrasive cleaners or solvents, as these may damage the finish.
- Bulb Replacement: Ensure power is off and bulbs are cool before attempting to replace them. Gently twist the GU10 bulb counter-clockwise to remove, and clockwise to insert a new one.
- Inspection: Periodically check all connections and mounting points for tightness and signs of wear.
8. Troubleshooting
| Problem | Possible Cause | Solution |
|---|---|---|
| Light does not turn on | No power supply Faulty bulb Incorrect wiring | Check circuit breaker and wall switch Replace bulb Verify wiring connections (consult electrician if unsure) |
| Light flickers | Loose wiring connection Incompatible dimmer switch Faulty bulb | Check and tighten wiring connections Ensure dimmer is compatible with LED bulbs Replace bulb |
| Spots are difficult to adjust | Mechanism stiff | Apply gentle, even pressure. Do not force. |
9. Warranty and Support
This LVWIT product comes with a two-year warranty from the date of purchase, covering manufacturing defects. Please retain your proof of purchase for warranty claims.
For technical support, warranty claims, or any questions regarding your product, please contact LVWIT customer service through the retailer where you purchased the item.
10. Application Examples
The versatile design of the LVWIT GU10 2-Spot LED Ceiling Light makes it suitable for various indoor settings, providing both general and accent lighting.

The ceiling light is shown installed in a contemporary kitchen, demonstrating its aesthetic integration and how it provides effective lighting in a functional space.

The ceiling light is featured in a well-lit living room, illustrating its versatility and ability to complement various interior design styles.