ANXQQ KVM303DHUSA
ANXQQ KVM Switch User Manual
Model: KVM303DHUSA
Introduction
The ANXQQ KVM Switch is designed to provide seamless control of multiple computers from a single set of peripherals (keyboard, mouse, and monitors). This model supports up to three computers and three monitors, offering high-resolution video output up to 8K@60Hz via HDMI and 4K@144Hz via DisplayPort, along with four USB 3.0 ports for peripheral sharing. It is an ideal solution for users requiring efficient management of multiple workstations or gaming setups.

Image: Front and rear view of the ANXQQ KVM Switch, highlighting its compact design and various ports for connectivity.
Package Contents
Please check the contents of your package to ensure all items are present and undamaged:
- 1 x ANXQQ KVM Switch (3 Computers, 3 Monitors)
- 3 x USB 3.0 Cables (USB-A to USB-B)
- 1 x Wired Remote Control (1.5m)
- 1 x DC 12V Power Adapter
- 1 x User Manual
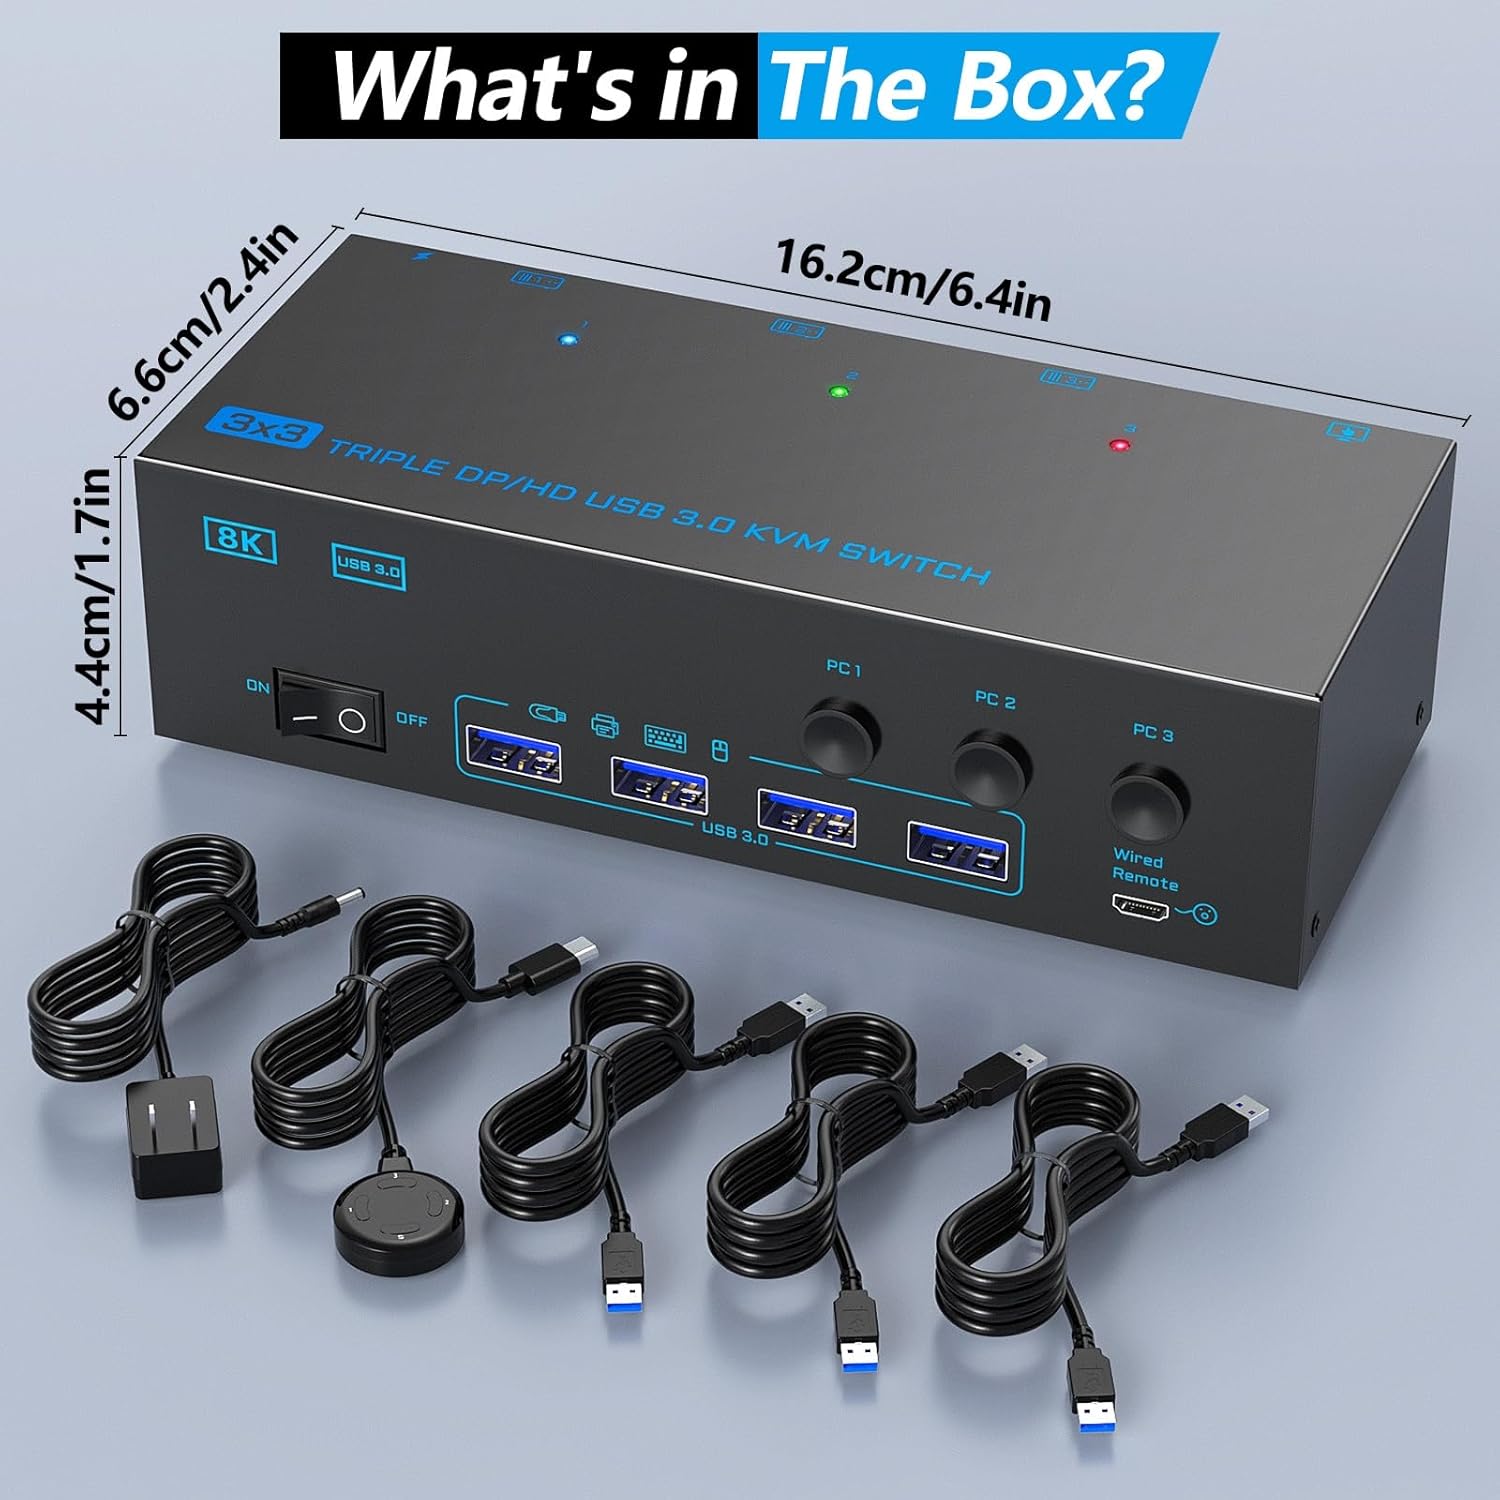
Image: All items included in the ANXQQ KVM Switch package, neatly arranged, including the KVM switch unit, cables, remote, and power adapter.
Product Features
- Triple Monitor Support: Control up to 3 computers with 3 monitors simultaneously. Supports 1 HDMI and 2 DisplayPort inputs per computer.
- High Resolution Output:
- DisplayPort: Supports resolutions up to 8K@30Hz and 4K@144Hz.
- HDMI: Supports resolutions up to 8K@60Hz and 4K@120Hz.

Image: Visual representation of enhanced display quality, comparing standard resolution with the KVM switch's high-resolution capabilities (8K@60Hz/4K@144Hz).
- USB 3.0 Hub: Features 4 USB 3.0 ports for sharing peripherals like keyboards, mice, printers, and USB drives with data transfer speeds up to 5Gbps.

Image: Diagram illustrating the ultra-fast 5Gbps data transmission speed of USB 3.0 compared to USB 2.0, emphasizing efficiency.
- Multiple Switching Methods: Easily switch between connected computers using the front panel buttons or the included 1.5-meter wired remote control.
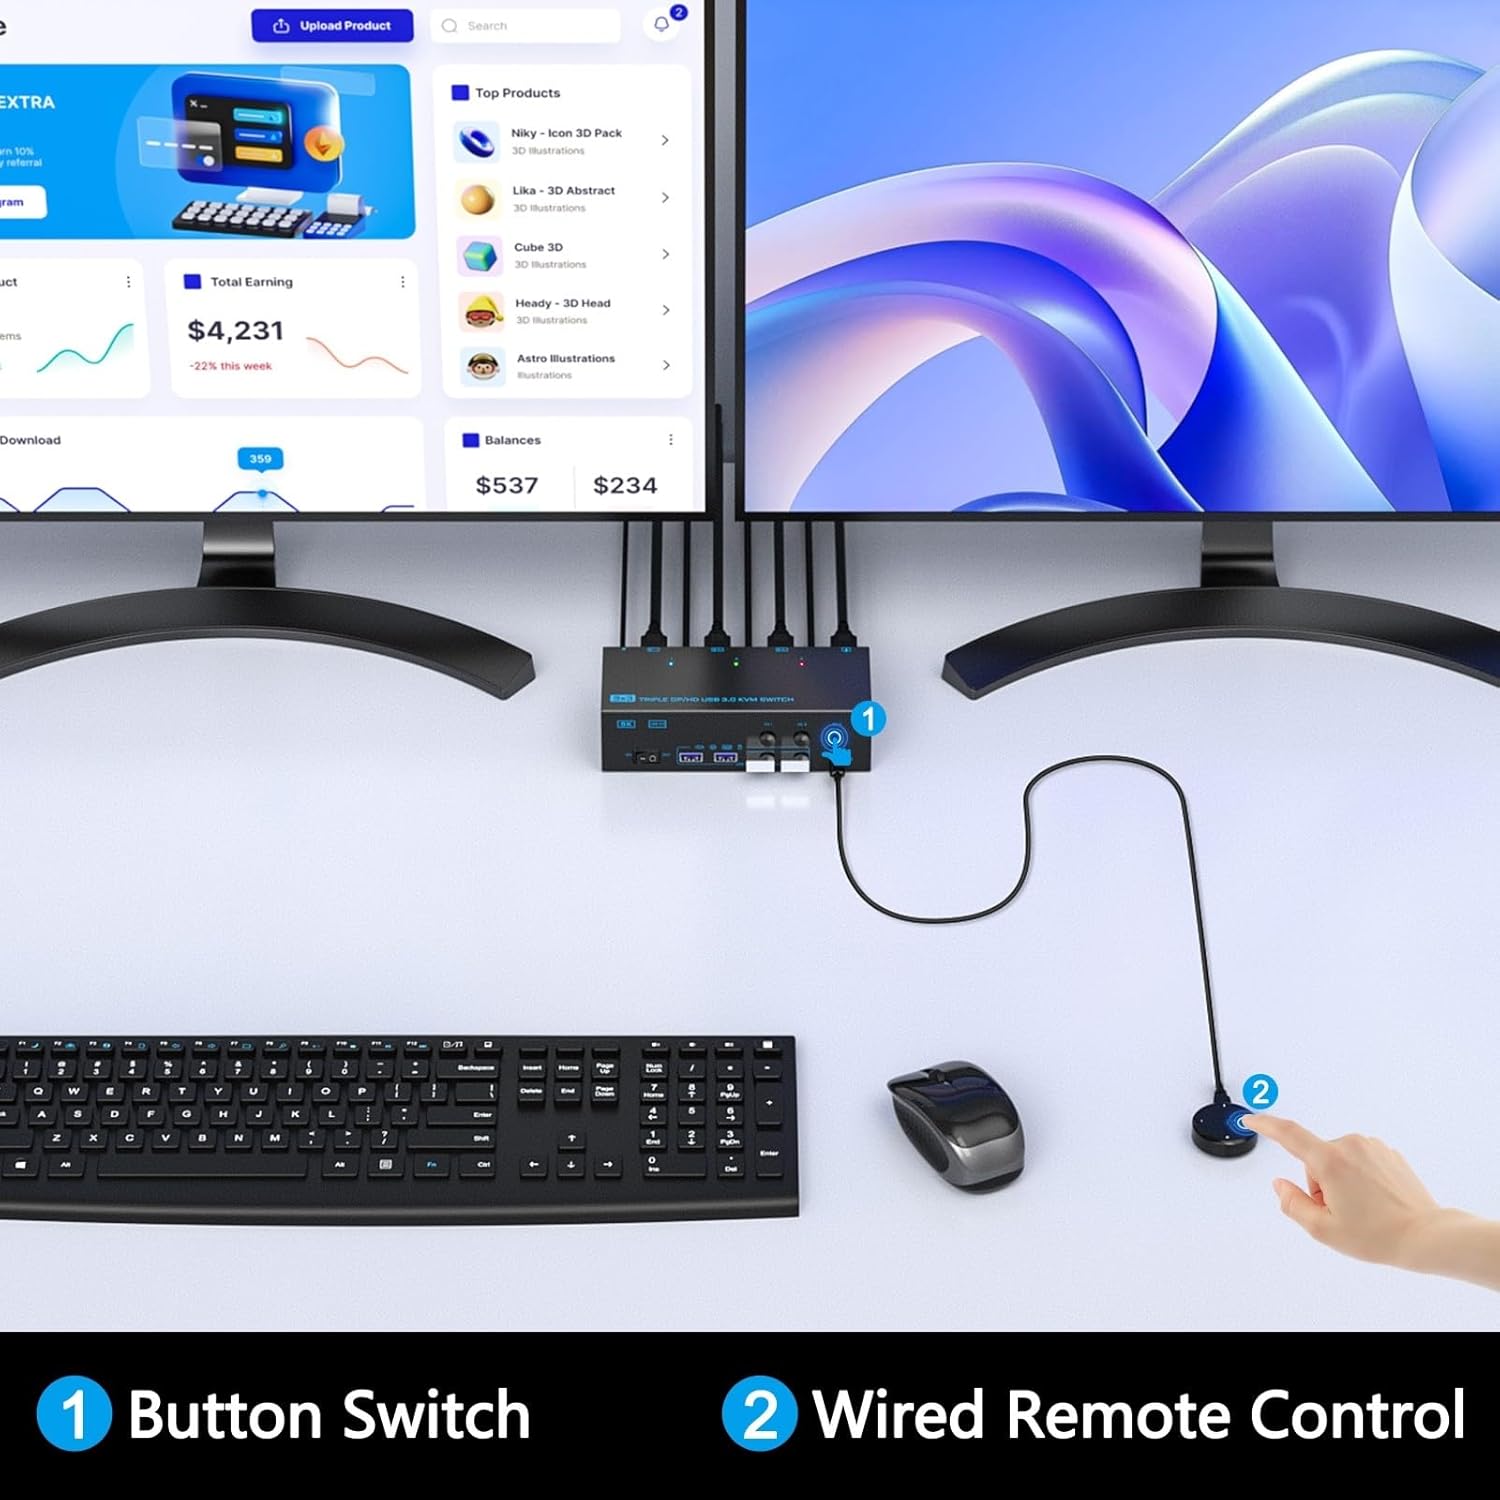
Image: Close-up of the KVM switch's front panel button and the wired remote control, showing the two primary methods for switching between computers.
- Broad Compatibility: Compatible with various operating systems including Windows, Mac OS, Chrome OS, and Linux. Supports devices like laptops, desktops, PS4, Raspberry Pi, and DVRs.

Image: Icons representing various compatible operating systems (Windows, Vista, Chrome OS, Mac OS, Linux) and a laptop, demonstrating the KVM switch's broad compatibility.
- LED Indicators: Clear LED indicators on the front panel show which computer is currently active (PC1-Blue, PC2-Green, PC3-Red).
- External Power Supply: Includes a DC 12V power adapter to ensure stable operation and sufficient power for connected devices.
Specifications
| Attribute | Detail |
|---|---|
| Model Number | KVM303DHUSA |
| Product Dimensions (L x W x H) | 8.66 x 5.91 x 1.97 inches (22 x 15 x 5 cm) |
| Weight | 1.98 Pounds (0.9 kg) |
| Video Inputs per Computer | 1 x HDMI, 2 x DisplayPort |
| USB Inputs per Computer | 1 x USB 3.0 (Type-B) |
| USB Peripheral Ports | 4 x USB 3.0 (Type-A) |
| HDMI Resolution Support | Up to 8K@60Hz, 4K@120Hz |
| DisplayPort Resolution Support | Up to 8K@30Hz, 4K@144Hz |
| USB Data Transfer Rate | 5Gbps (USB 3.0) |
| Power Supply | DC 12V (included) |
| Material | Aluminum |
| Operating Voltage | 5 Volts |
| Current Rating | 0.5 Amps |
Setup Guide
Follow these steps to properly set up your ANXQQ KVM Switch:
- Power Off Devices: Ensure all computers and monitors are powered off before making any connections.
- Connect Monitors to KVM:
- Connect your three monitors to the "Monitor A", "Monitor B", and "Monitor C" output ports on the KVM switch. Ensure you use the correct HDMI and DisplayPort cables for each monitor as required.
- Connect Computers to KVM: For each computer (PC1, PC2, PC3):
- Connect the HDMI output of your computer to the corresponding HDMI input (e.g., "INPUT A 1" for PC1) on the KVM switch.
- Connect the two DisplayPort outputs of your computer to the corresponding DisplayPort inputs (e.g., "INPUT B 1" and "INPUT C 1" for PC1) on the KVM switch.
- Connect one of the included USB 3.0 cables from a USB 3.0 port on your computer to the corresponding USB 3.0 input (e.g., "USB 3.0 INPUT A 1" for PC1) on the KVM switch. This connection is crucial for keyboard, mouse, and other USB peripheral sharing.
Note: Each computer requires 1 HDMI, 2 DisplayPort, and 1 USB 3.0 connection to the KVM switch. If your computer lacks any of these ports, a reliable adapter or docking station may be required.
- Connect Peripherals: Connect your keyboard, mouse, and any other USB 3.0/2.0 peripherals (e.g., printer, U disk) to the USB 3.0 Type-A ports on the front panel of the KVM switch.
- Connect Wired Remote (Optional): Plug the wired remote control into the dedicated "Wired Remote" port on the front of the KVM switch.
- Connect Power Adapter: Plug the DC 12V power adapter into the "DC/12V" port on the KVM switch, then plug the adapter into a power outlet.
- Power On: Power on the KVM switch using the ON/OFF switch, then power on your monitors and computers.

Image: A comprehensive diagram illustrating all necessary cable connections for the KVM switch, including computers, monitors, USB peripherals, and power supply.
Important Note: Before setting up, ensure your computers and graphics cards support multi-screen output (three independent displays). This KVM switch does not have EDID emulation, meaning displays may briefly disconnect when switching between computers.
Operating Instructions
Switching Between Computers
The ANXQQ KVM Switch offers two convenient methods for switching between connected computers:
- Front Panel Button Switch:
Press the corresponding "PC1", "PC2", or "PC3" button on the front panel of the KVM switch to select the desired computer. The LED indicator above the button will illuminate (Blue for PC1, Green for PC2, Red for PC3) to show the active computer.
- Wired Remote Control:
Use the included wired remote control to switch between computers. Press the button corresponding to the desired PC (1, 2, or 3) on the remote. This allows for flexible placement of the KVM switch while keeping control within reach.
Display Modes
The KVM switch supports various display configurations depending on your computer's capabilities. You can typically choose between Mirror Mode and Extended Mode:
- Mirror Mode: All three monitors display the same content. This is often used for presentations or duplicating a single display across multiple screens.
- Extended Mode: Each monitor acts as an independent display, extending your desktop across all three screens. This is ideal for multitasking and increasing workspace.
To switch between display modes on Windows, press Windows Key + P and select your preferred display option.

Image: Visual comparison of Mirror Mode (all monitors show the same content) and Extended Mode (desktop spread across multiple monitors), demonstrating display flexibility.
Troubleshooting
If you encounter issues with your KVM switch, please refer to the following common problems and solutions:
| Problem | Possible Cause / Solution |
|---|---|
| No display on monitors after switching. |
|
| Keyboard/Mouse not working. |
|
| Resolutions are not as expected (e.g., not 4K/8K). |
|
| Switching is slow or unresponsive. |
|
Maintenance
To ensure the longevity and optimal performance of your ANXQQ KVM Switch, follow these maintenance guidelines:
- Cleaning: Use a soft, dry cloth to clean the exterior of the KVM switch. Do not use liquid cleaners or aerosol sprays, as they may damage the device.
- Ventilation: Ensure the KVM switch is placed in a well-ventilated area to prevent overheating. Do not block any ventilation openings.
- Cable Management: Keep cables organized and untangled to prevent strain on ports and accidental disconnections.
- Storage: If storing the device for an extended period, disconnect all cables and store it in a cool, dry place away from direct sunlight and extreme temperatures.
- Power: Always use the provided power adapter. Disconnect power during electrical storms or when unused for long periods.
Warranty and Support
ANXQQ products are covered by a 12-month after-sales service from the date of purchase.
This warranty covers manufacturing defects and ensures product functionality under normal use. It does not cover damage caused by misuse, accidents, unauthorized modifications, or natural disasters.
For technical assistance, troubleshooting, product replacement, or any other support inquiries, please contact ANXQQ customer service. Our professional technical team is available to help you with any difficulties you may encounter.
Please refer to the contact information provided on the ANXQQ official website or the product packaging for the most up-to-date support channels.