1. Introduction
Thank you for choosing the Rimoody FHD 4 Channel Dashcam. This device is designed to provide comprehensive vehicle surveillance with its four cameras, offering 360-degree coverage around and inside your vehicle. Featuring 1080P resolution for the main camera and 480P for the others, night vision capabilities, loop recording, and a 24-hour parking monitor, this dashcam enhances your driving safety and provides crucial evidence in critical situations. Please read this manual carefully before installation and operation to ensure proper use and optimal performance.
2. Product Overview
2.1 Package Contents
The package includes the following items:
- Dash cam unit
- Power Cord
- Extended Line (for rear camera)
- Anti-slip Mats
- User Manuals
Note: A high-speed C10 TF card (up to 64GB) is required for recording and is not included in the package.
2.2 Device Layout and Buttons

Image: Product Button Details. This image illustrates the various components and buttons of the Rimoody dashcam, including the main HD lens, infrared lights, OK button, flip-up and flip-down buttons, switch, menu button, brackets, speakers, Type-C/AV/Bracket hole/TF card slot, and reset button.
- HD Lens: Main front camera.
- Infrared Light: For enhanced night vision.
- OK Button: Confirm selections or start/stop recording.
- Flip-up/Flip-down Buttons: Navigate menu options or adjust settings.
- Switch: Power on/off or switch modes.
- Menu Button: Access settings menu.
- Brackets: For mounting the dashcam.
- Speakers: For audio playback.
- Type-C/AV/Bracket hole/TF card slot: Various ports for connectivity and storage.
- Reset Button: To reset the device to factory settings.
3. Setup and Installation
Follow these steps for proper installation of your Rimoody dashcam.

Image: Installation Steps, Product Size & List. This image provides a visual guide for installing the dashcam, showing the steps from cleaning the windshield to connecting the power supply and rear camera. It also displays the product dimensions and included accessories.
- Step 1: Prepare the Windshield. Use a clean rag to wipe the glass surface where you intend to mount the dashcam. Ensure the area is free of dust and grease for secure adhesion.
- Step 2: Attach the Mounting Bracket. Secure the mounting bracket to the dashcam unit.
- Step 3: Mount the Dashcam. Remove the protective film from the adhesive on the mounting bracket and firmly stick it to the desired position on your windshield. Ensure the dashcam has a clear view of the road.
- Step 4: Connect and Pull the Rear Camera Cable. If using the rear camera, connect its cable to the main dashcam unit. Carefully route the cable along the vehicle's interior trim to the rear of the car.
- Step 5: Connect the Power Supply. Plug the power cord into the dashcam's power input and then into your vehicle's 12V power outlet (cigarette lighter socket).
- Step 6: Adjust and Verify. Adjust the angle of the dashcam and its side cameras to ensure optimal coverage. Power on the device and verify that all cameras are recording correctly and the display is functioning.
3.1 Inserting the TF Card
Locate the TF card slot on the dashcam. Insert a high-speed Class 10 (C10) TF card (maximum 64GB) with the contacts facing the correct direction until it clicks into place. Ensure the card is properly formatted within the dashcam's settings before first use.
4. Operating Instructions
4.1 Basic Operation
- Power On/Off: The dashcam will automatically power on and begin recording when your vehicle starts. It will power off automatically when the vehicle is turned off. You can also manually power it on/off using the power button.
- Recording: Once powered on, the dashcam automatically starts continuous loop recording.
- Menu Navigation: Use the "Menu" button to access settings. Use the "Flip-up" and "Flip-down" buttons to navigate through options and the "OK" button to confirm.
- Language Settings: The OSD (On-Screen Display) supports multiple languages including Chinese, English, French, German, Italian, Spanish, Russian, Polish, Dutch, Japanese, Korean, Portuguese, and Thai. Adjust this in the settings menu.
4.2 Key Features
4.2.1 4-Camera 360° Coverage
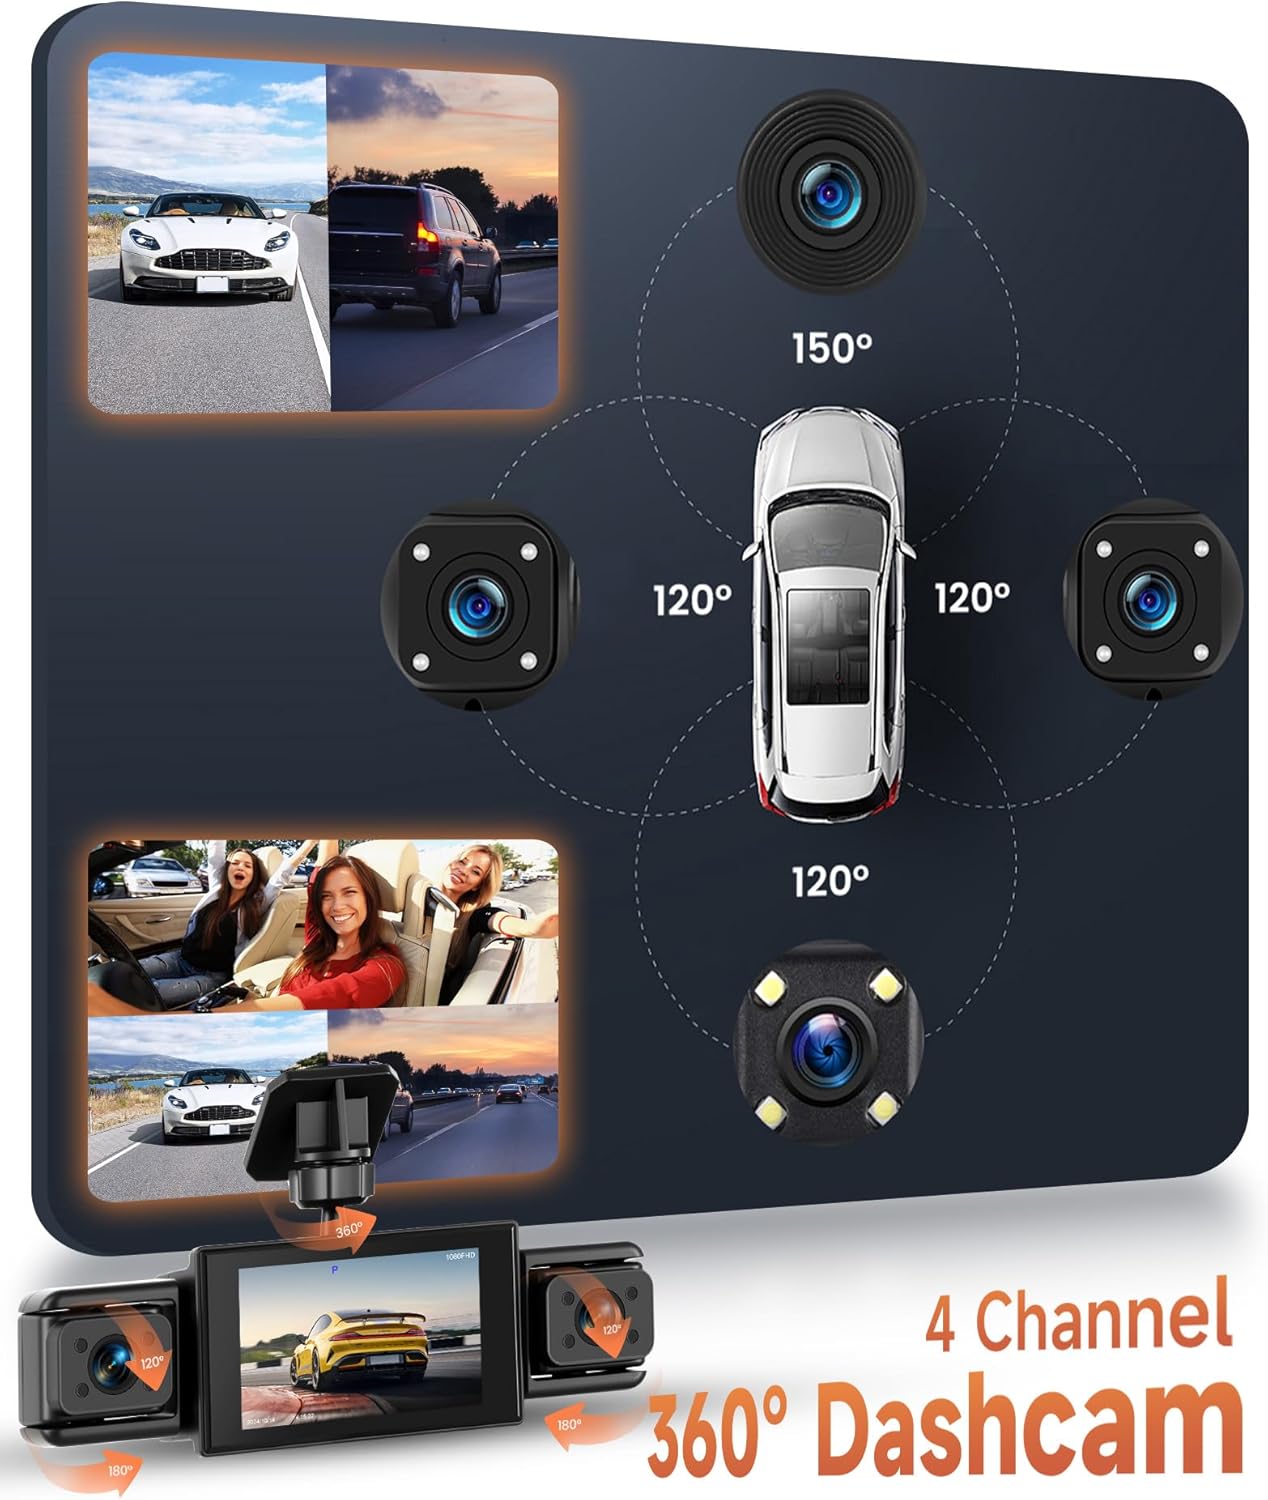
Image: 4 Channel 360° Dashcam. This diagram illustrates how the four cameras provide comprehensive 360-degree coverage around and inside the vehicle, capturing views from the front (150°), left (120°), right (120°), and interior (120°).
The dashcam features four cameras: one 1080P front camera and three 480P cameras for the rear, left, and right sides, as well as the interior. This setup ensures a 360-degree view, minimizing blind spots and providing extensive recording coverage. The angles of the three secondary lenses can be adjusted to capture specific details as needed.
4.2.2 Super Night Vision

Image: Super Night Vision. This image compares video quality with and without IR LEDs, demonstrating the enhanced clarity provided by the 8 IR LEDs for both exterior and interior views during low-light conditions.
Equipped with 8 infrared (IR) LEDs, this dashcam provides clear video and images even in low-light or nighttime conditions. This ensures that road conditions, license plates, and interior activities are clearly visible, enhancing safety during night driving.
4.2.3 Loop Recording

Image: Loop Video. This image visually represents the continuous recording feature, where older footage is overwritten by new footage once the memory card is full, ensuring uninterrupted recording.
The dashcam records video in a continuous loop. When the TF card reaches its storage limit, the oldest unlocked footage is automatically overwritten by new recordings. Important videos, such as those triggered by the G-sensor (impact detection), are locked and will not be overwritten.
4.2.4 24-Hour Parking Monitor
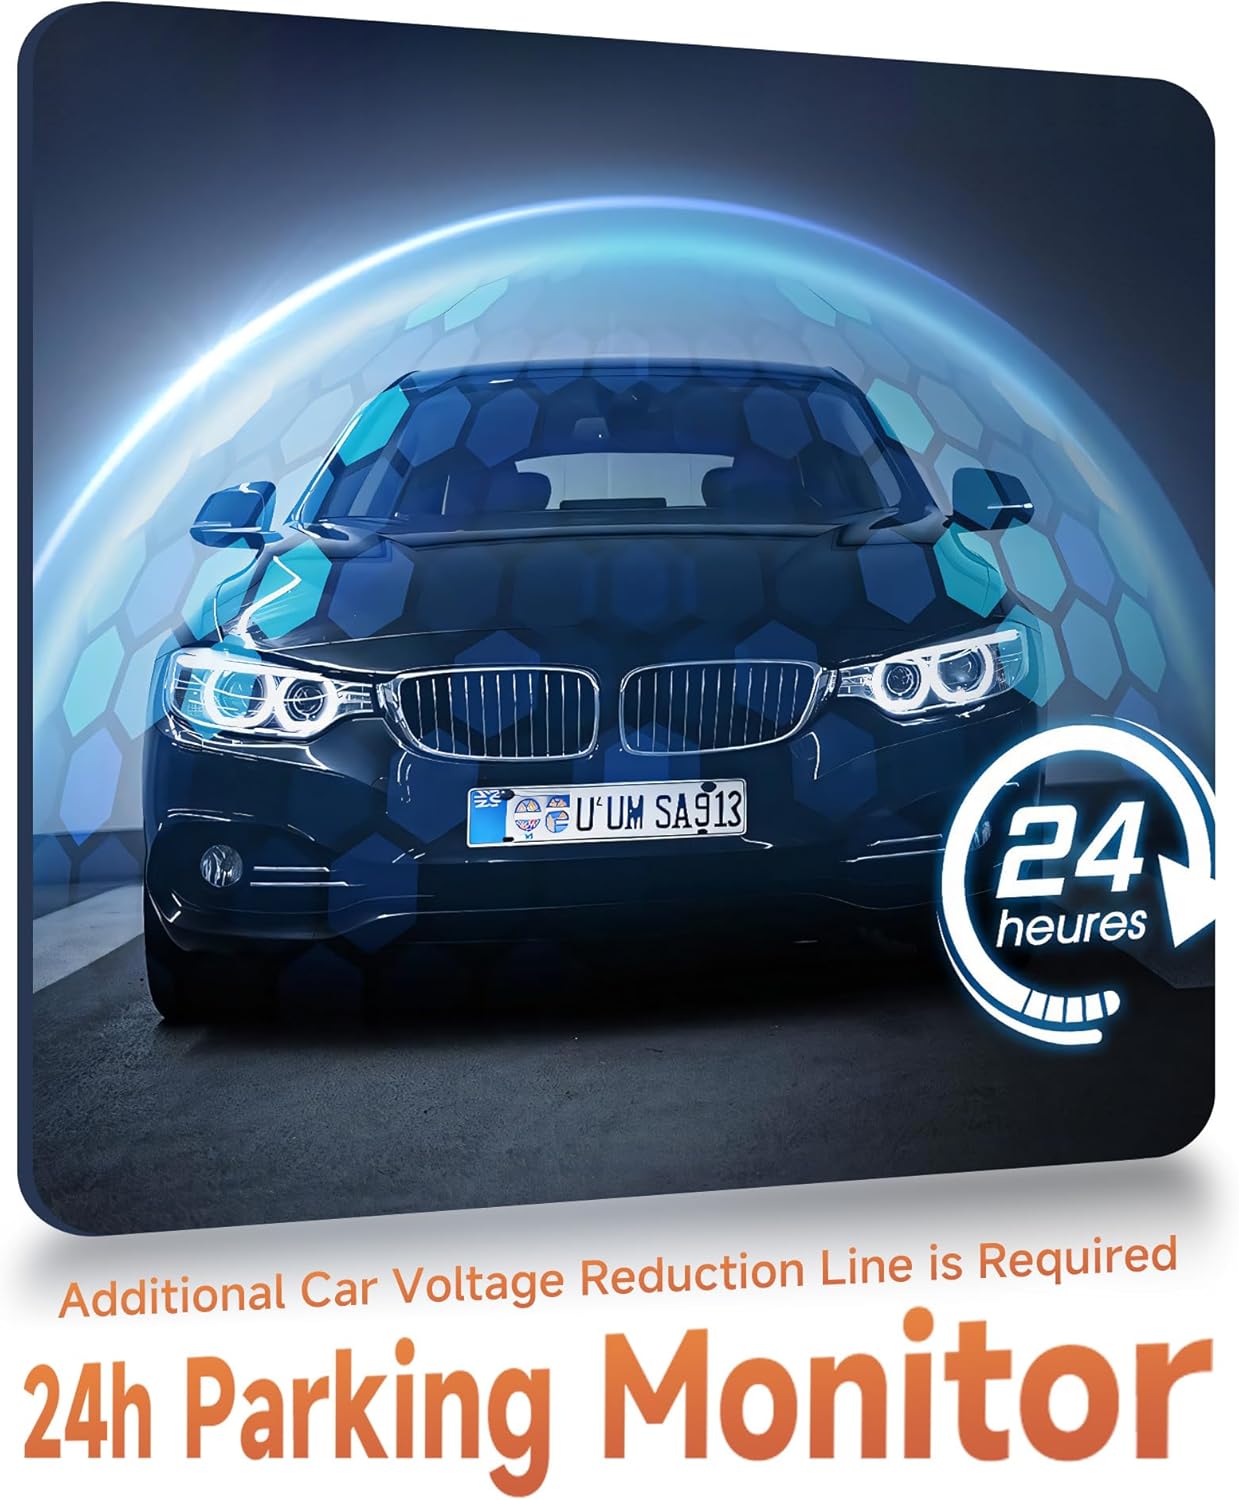
Image: 24h Parking Monitor. This image depicts a car in a parking garage with a glowing shield effect, symbolizing the continuous protection offered by the 24-hour parking monitor feature.
When enabled, the 24-hour parking monitor feature allows the dashcam to automatically turn on and record video if it detects vibrations or impacts while your car is parked. This provides surveillance even when the vehicle is off. Note: This function requires a continuous power supply, which may necessitate an additional car voltage reduction line (hardwire kit), not included in the standard package.
4.2.5 Reverse Assist
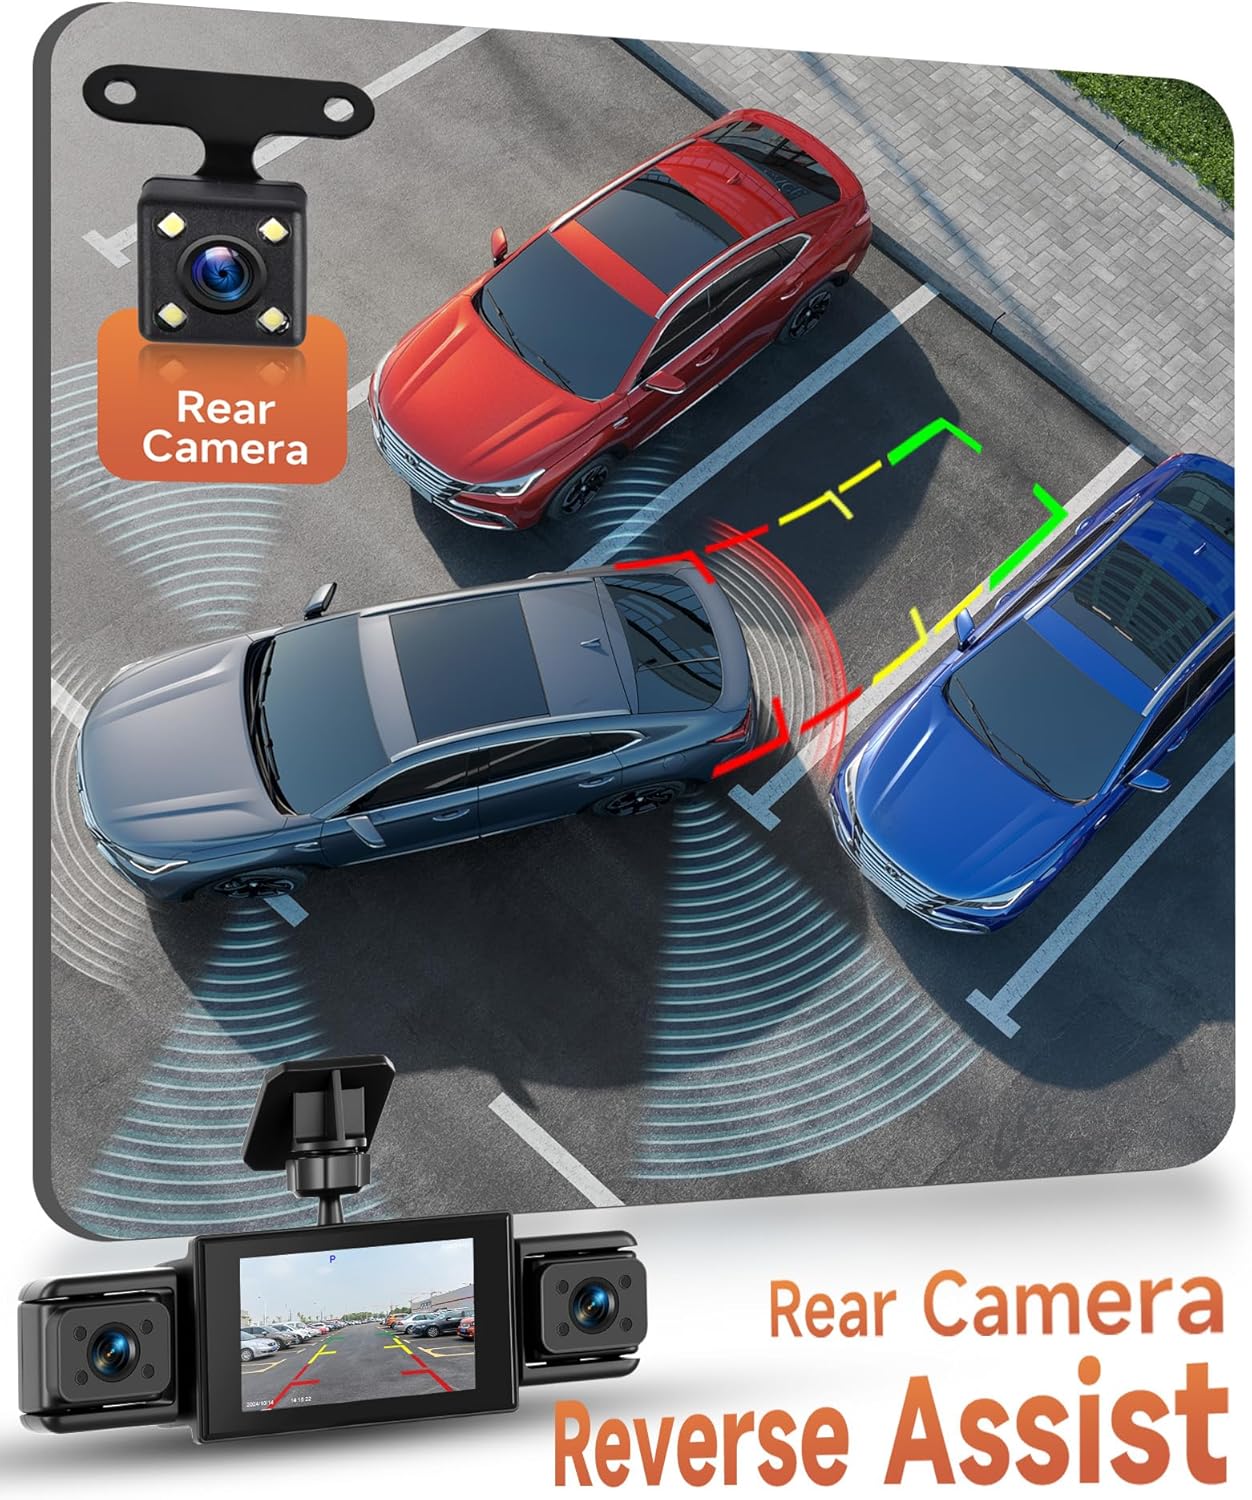
Image: Rear Camera Reverse Assist. This image shows a top-down view of cars parking, with the dashcam display showing a reverse camera view with guiding lines, indicating the reverse assist functionality.
When the rear camera is properly connected and the vehicle is put into reverse gear, the dashcam display will automatically switch to the rear camera view, showing parking guidelines to assist you in safe maneuvering.
5. Maintenance
- Clean Lenses: Regularly clean the camera lenses with a soft, lint-free cloth to ensure clear recording quality.
- Check TF Card: Periodically check the TF card for errors or corruption. It is recommended to format the TF card every 1-2 months to maintain optimal performance and prevent data loss.
- Firmware Updates: Check the manufacturer's website for any available firmware updates to improve performance and add new features.
- Operating Temperature: Avoid exposing the dashcam to extreme temperatures for extended periods, as this can affect battery life and device performance.
6. Troubleshooting
- Q: The dashcam does not turn on.
- A: Ensure the power cable is securely connected to both the dashcam and the vehicle's power outlet. Check if the vehicle's power outlet is functioning. Try a different power source if available.
- Q: The dashcam does not record or shows a "TF card error".
- A: Ensure you are using a high-speed Class 10 (C10) TF card. The maximum supported capacity is 64GB. Format the TF card within the dashcam's settings menu. If the issue persists, try a different TF card.
- Q: The video quality is poor, especially at night.
- A: Ensure all camera lenses are clean and free from dirt or smudges. Verify that the night vision feature is enabled in the settings. For optimal night vision, ensure no obstructions block the IR LEDs.
- Q: The dashcam's battery life is very short when unplugged.
- A: The internal battery is primarily for emergency power-off and short parking monitor events. For continuous 24-hour parking monitoring, an additional hardwire kit (car voltage reduction line) is required to provide constant power from the car battery.
- Q: The dashcam freezes or malfunctions.
- A: Try pressing the reset button (usually a small pinhole) with a thin object. If the problem persists, try formatting the TF card and restoring factory settings through the menu.
7. Specifications
| Feature | Detail |
|---|---|
| Brand | Rimoody |
| Model Name | Rimoody FHD 4 Channel Dashcam |
| Screen Size | 3-inch IPS Display |
| Camera Sensor | 1080P (main camera) |
| Video Resolution | 1080P + 3*480P (Front + 3 secondary cameras) |
| Video Format | AVI |
| Photo Format | JPG |
| Frame Rate | 30 FPS |
| Viewing Angle | 150 degrees (main), 120 degrees (secondary) |
| TF Card Support | Max 64GB, Class 10 high-speed (not included) |
| Special Features | 360-degree coverage, Night Vision (8 IR LEDs), 24H Parking Monitor, Loop Recording, Motion Detection, Reverse Assist |
| Compatible Peripherals | Cars, trucks, motorcycles |
| Dimensions (Product) | 7 x 14 x 10 cm (approx. 15P x 7l x 11H cm) |
| Weight | 410 grams |
| Display Type | LCD |
| Batteries Included | No |
| Installation Type | Windshield mount, rearview mirror mount |
8. Warranty and Support
For warranty information, please refer to the specific terms provided at the time of purchase or contact your retailer.
If you encounter any issues or have questions regarding the installation or operation of your Rimoody Dashcam, please contact Rimoody customer support. You can often find support contact details on the product packaging, the official Rimoody website, or through your purchase platform.
Visit the official Rimoody Store for more information: Rimoody Store