1. Introduction
This user manual provides essential information for the assembly, operation, maintenance, and troubleshooting of your HOMEFORT 30" Shoe Bench with Lift Top Storage. Designed for entryways, bedrooms, or hallways, this versatile bench offers both comfortable seating and practical storage solutions for shoes and other items. Please read this manual thoroughly before assembly and use to ensure safe and optimal performance.
2. Safety Information
Always adhere to the following safety guidelines to prevent injury or damage to the product:
- Ensure all parts are present and undamaged before beginning assembly. Do not proceed with assembly if any parts are missing or broken.
- Assemble the bench on a soft, clean surface to prevent scratches.
- Tighten all fasteners securely, but do not overtighten, as this may damage the material.
- Do not stand on the bench or use it as a step stool.
- Do not exceed the maximum weight capacity of 300 pounds for the seating surface.
- Keep small parts and packaging materials away from children and pets to prevent choking hazards.
- Periodically check all connections and fasteners to ensure they remain tight and secure.
3. Package Contents
Before assembly, verify that all components listed below are included in your package. If any parts are missing or damaged, please contact customer support.
| Component | Quantity |
|---|---|
| Bench Panels (Sides, Front, Back, Base) | Varies by design |
| Lift-Top Lid | 1 |
| Cushioned Seat | 1 |
| Cabinet Doors | 2 |
| Adjustable Shelf | 1 |
| Hardware Pack (screws, dowels, hinges, handles, etc.) | 1 set |
| Assembly Instructions | 1 |
4. Assembly
Assembly of the HOMEFORT Shoe Bench is designed to be straightforward. Please follow the detailed step-by-step instructions provided in the separate assembly guide included in your package. Common household tools such as a screwdriver and hammer may be required.
Assembly Tips:
- Organize all parts and hardware before you begin. Hardware is typically labeled for easy identification.
- Work on a flat, clean, and soft surface to prevent damage to the furniture.
- Do not fully tighten all screws until the entire unit is assembled, then go back and tighten them securely.
- Pay close attention to the orientation of panels as indicated in the assembly diagrams.

Figure 4.1: Detailed dimensions of the shoe bench, illustrating its compact design and internal storage capacity.

Figure 4.2: Overview of the shoe bench's features, including the lift-top hidden storage and adjustable shelving.
5. Operating Instructions (Usage)
The HOMEFORT Shoe Bench is designed for versatile use in various areas of your home.
5.1 Seating Function
The top of the bench features a comfortable, removable cushioned seat. This provides a convenient spot to sit while putting on or taking off shoes, or simply as an extra seating option in your entryway, bedroom, or living area.

Figure 5.1: The shoe bench serving as comfortable seating in an entryway.
5.2 Lift-Top Hidden Storage
The cushioned top lifts to reveal a spacious hidden storage compartment. This area is ideal for discreetly storing items such as umbrellas, hats, small bags, keys, or even blankets and socks, keeping your space tidy and organized.

Figure 5.2: The lift-top storage compartment, showcasing its capacity for various items.
5.3 Shoe Cabinet Storage
Below the lift-top, two cabinet doors open to reveal multiple shelves for shoe storage. The left shelf is removable and offers 2-level height adjustment, accommodating various shoe types, including boots and high heels. This design helps protect footwear from dust and keeps your entryway neat.
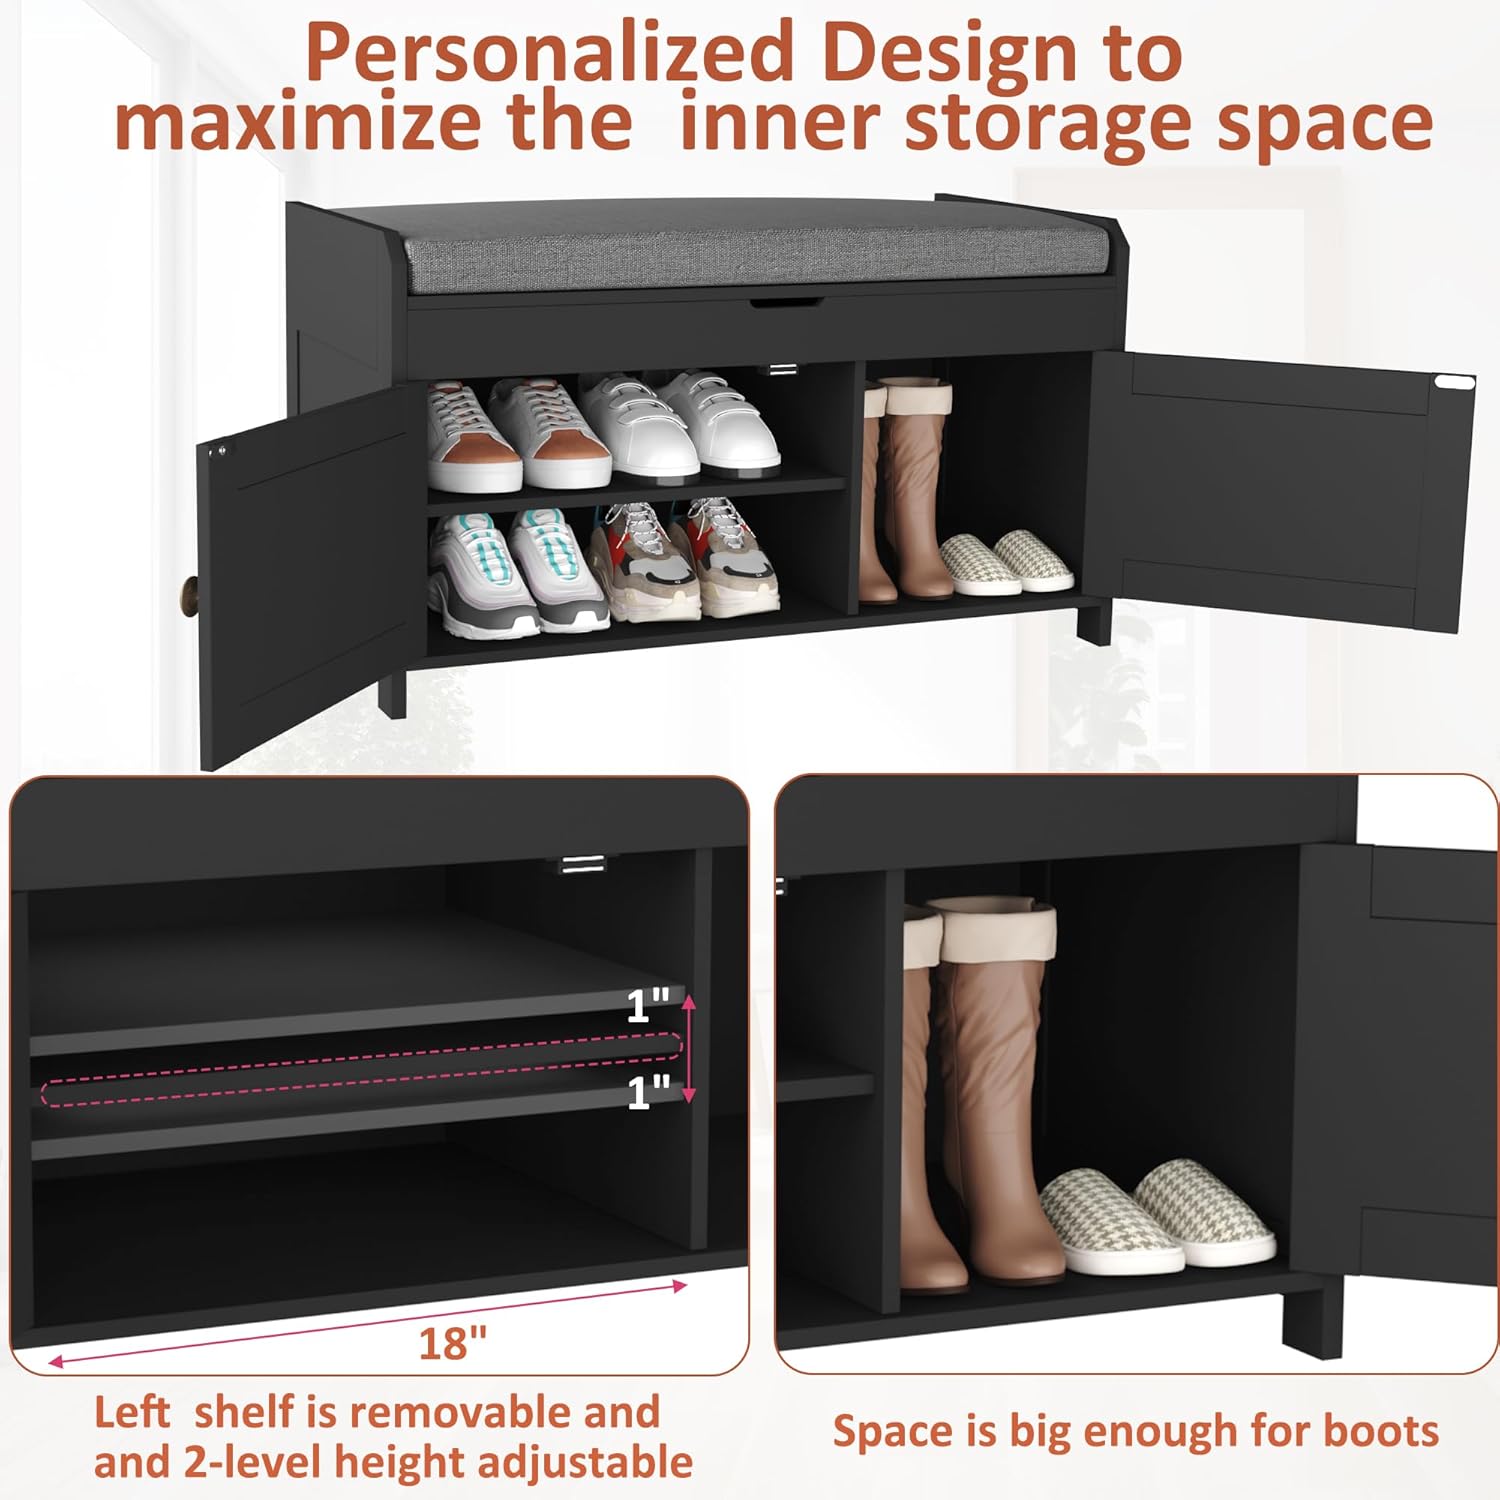
Figure 5.3: The adjustable shoe storage shelves within the cabinet.

Figure 5.4: The shoe cabinet with doors open, demonstrating storage for various footwear.
5.4 Product Overview Video
Video 5.1: An official product video showcasing the HOMEFORT Shoe Bench's features and its versatile use in different home environments.
6. Maintenance and Care
Proper care will extend the life and appearance of your shoe bench.
- Cleaning the Wood Surface: Wipe the engineered wood surface with a dry cloth to remove dust and dirt. Avoid using abrasive cleaners or harsh chemicals, as they may damage the finish.
- Cushion Care: The cushioned seat is covered by breathable linen fabric. The cushion is equipped with Velcro attachments, allowing it to be easily detached for cleaning or replacement. For minor spills, spot clean with a damp cloth and mild detergent. Allow to air dry completely.
- Regular Inspection: Periodically check all screws and fasteners to ensure they are tight. Retighten if necessary to maintain stability.
- Avoid Moisture: Do not expose the bench to excessive moisture or direct sunlight, which can cause warping or fading.
7. Troubleshooting
If you encounter any issues with your HOMEFORT Shoe Bench, refer to the following common problems and solutions:
| Problem | Possible Cause | Solution |
|---|---|---|
| Bench feels wobbly or unstable. | Loose fasteners; uneven assembly. | Ensure all screws and bolts are fully tightened. Disassemble and reassemble if necessary, ensuring all parts are correctly aligned. |
| Lift-top does not close properly or is misaligned. | Hinges incorrectly installed or damaged. | Check hinge alignment and ensure they are securely fastened. If hinges are damaged, contact customer support for replacements. |
| Cabinet doors do not close flush. | Hinges misaligned; frame not square. | Adjust the cabinet door hinges. Ensure the main bench frame is square and stable. |
| Missing parts upon unboxing. | Packaging error or transit damage. | Carefully check all packaging materials. If parts are genuinely missing, contact HOMEFORT customer support with your purchase details. |
8. Specifications
| Feature | Detail |
|---|---|
| Brand | HOMEFORT |
| Model Number | PG-02SB014A |
| Product Dimensions (D x W x H) | 15"D x 30"W x 18.1"H |
| Item Weight | 33.9 pounds |
| Maximum Weight Recommendation (Seating) | 300 Pounds |
| Material | Engineered Wood, Linen Fabric (Cushion) |
| Color | Black (as per current product variant) |
| Seating Capacity | 2 |
| Care Instructions | Wipe with Dry Cloth |
9. Warranty and Support
For warranty information, please refer to the documentation included with your purchase or contact HOMEFORT customer service directly. Keep your proof of purchase for any warranty claims.
Customer Support:
If you have any questions, require assistance with assembly, or need to report missing/damaged parts, please contact HOMEFORT customer support through the retailer where you purchased the product or visit the official HOMEFORT website for contact details.
For additional information and products, visit the HOMEFORT Store.