1. Safety Information
Please read and understand all safety warnings and instructions before operating the AWithZ P20B Spot Welder. Failure to follow these instructions may result in electric shock, fire, or serious injury.
- Eye Protection: Always wear appropriate eye protection (e.g., welding goggles or a welding helmet) to shield your eyes from sparks and intense light during welding operations.
- Ventilation: Ensure adequate ventilation in your workspace to disperse fumes and gases produced during welding.
- Electrical Safety: Do not operate the welder in wet conditions. Ensure the power supply is correctly grounded. Avoid touching live electrical parts.
- Battery Handling: Exercise caution when working with batteries. Lithium batteries can be volatile if mishandled. Do not short-circuit batteries.
- Flammable Materials: Keep flammable materials away from the welding area.
- Children and Pets: Keep the device and all accessories out of reach of children and pets.
2. Product Overview
The AWithZ P20B is a 14.5KW SuperCapacitor Spot Welder designed for efficient and precise welding of various battery types and metal sheets. It features both automatic and foot pedal operating modes, along with a wide range of adjustable settings.
Included Components:
- P20B Spot Welding Machine
- 15A Charger
- Foot Pedal (2m long)
- 3 Pairs of Replacement Welding Pins
- 5-meter Nickel Plated Sheet (0.15mm thickness)
- 18650 Battery Holder
- File
- Instruction Manual
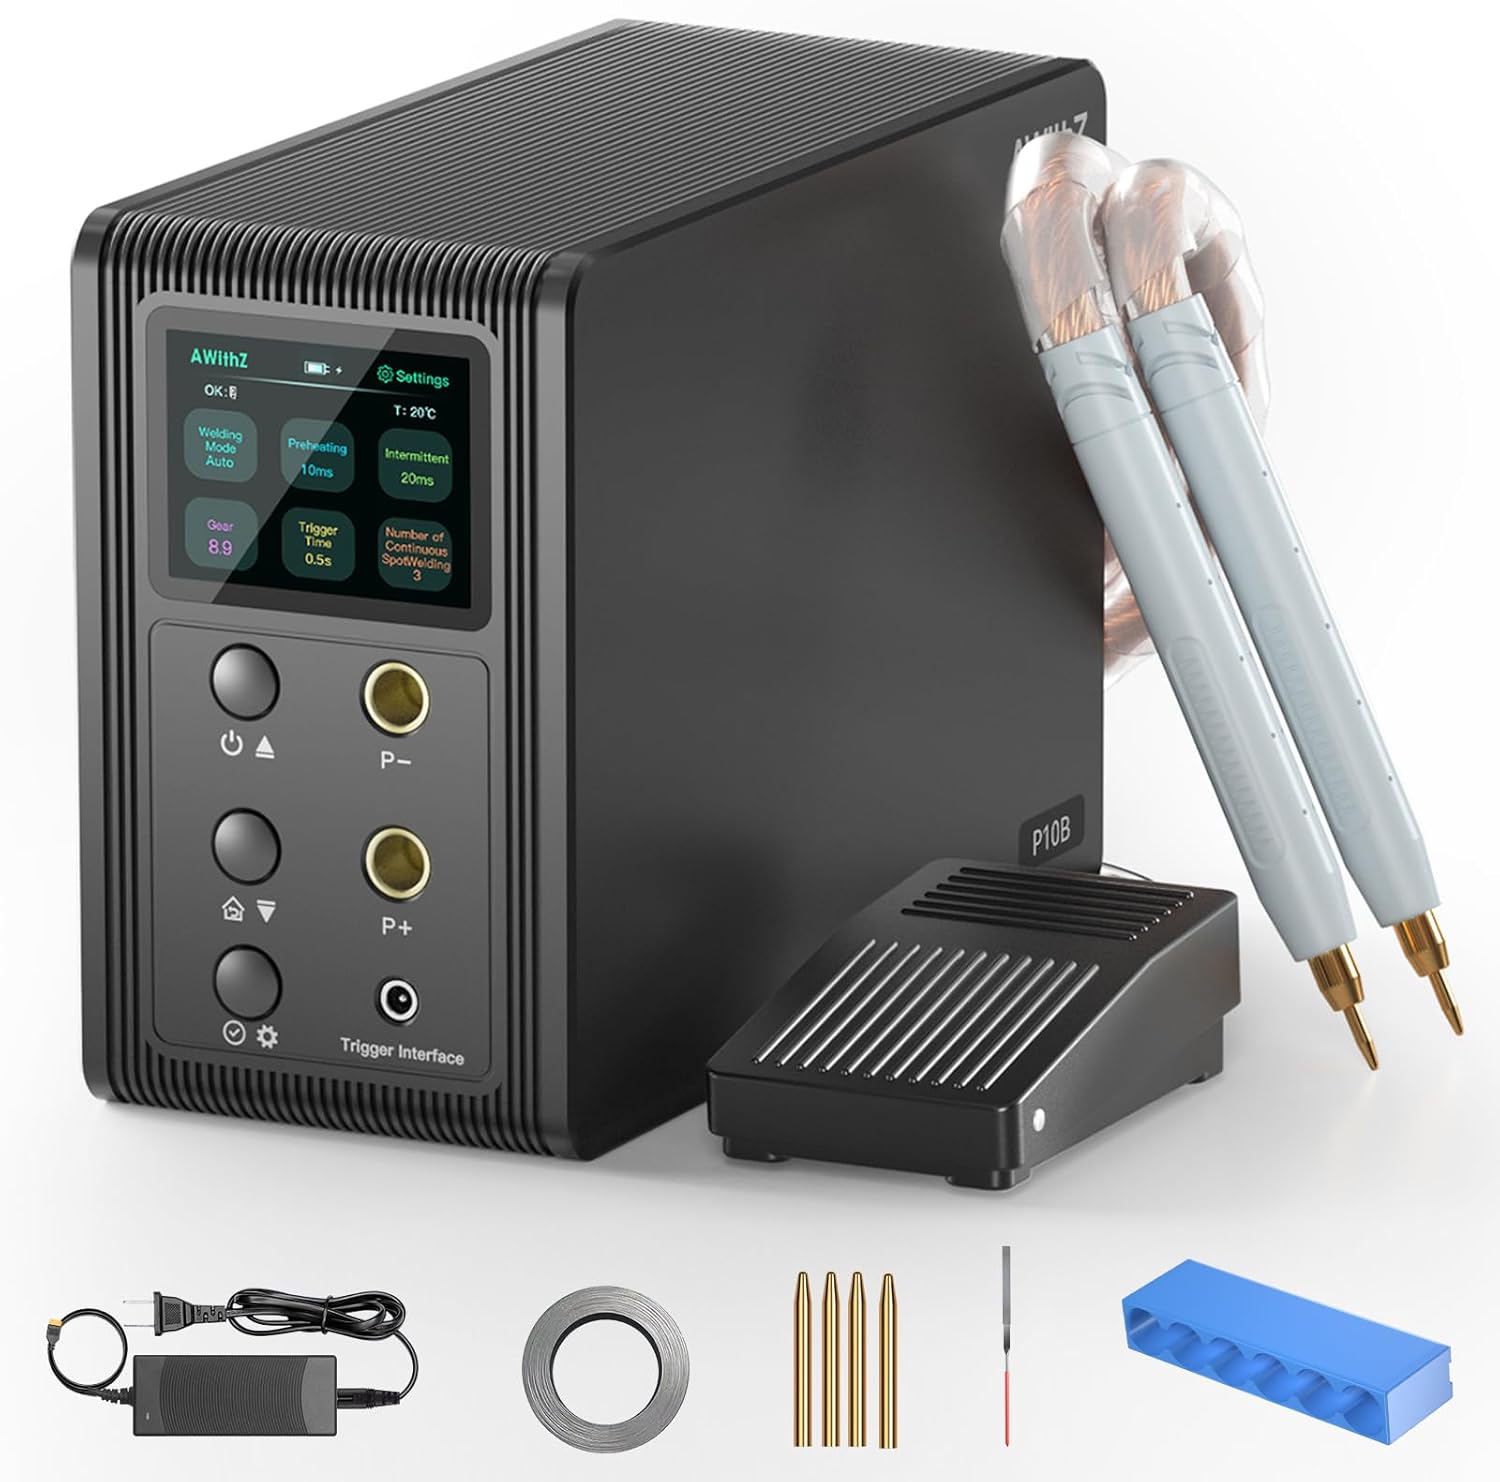
The main unit features a clear display and intuitive controls for adjusting welding parameters. The flexible welding pens allow for precise application, and the foot pedal provides enhanced control for intricate tasks.

3. Setup Instructions
Follow these steps to set up your AWithZ P20B Spot Welder for first use:
- Unboxing: Carefully remove all components from the packaging. Inspect for any damage.
- Connect Welding Pens: Insert the welding pens into the designated ports on the front panel of the spot welder. Ensure a secure connection.
- Connect Foot Pedal (Optional): If using the foot pedal mode, connect the foot pedal cable to the 'Trigger Interface' port.
- Initial Activation/Charging: Connect the spot welder to a 100-240V AC power supply using the provided 15A charger. The device requires approximately 5 minutes of charging to reach an 'OK' state for spot welding, indicated on the display screen.
- Prepare Welding Tips: Ensure the welding pins are clean and sharp. Use the provided file to sharpen them if necessary.

4. Operating Instructions
The AWithZ P20B offers flexible operation modes and precise control over welding parameters.
4.1. Selecting Welding Mode
The device supports two primary welding modes:
- Automatic Mode: Once the appropriate gear is selected, the device will automatically trigger a weld when the welding pens make contact with the material.
- Foot Pedal Mode: Provides manual control over the welding trigger. Step on the foot pedal to initiate a weld. This mode is ideal for precise positioning.

4.2. Adjusting Welding Parameters
The P20B features 999 adjustable gears, allowing fine-tuning for various materials and thicknesses. Parameters such as preheating time, interval, and continuous spot welding count can also be adjusted via the control panel.
- Gear Adjustment: Use the 'P-' and 'P+' buttons on the control panel to increase or decrease the welding power (gear).
- Material Compatibility: The welder is suitable for materials such as 0.6mm nickel plated sheet, 0.6mm stainless steel sheet, 0.6mm iron sheet, 0.3mm pure nickel sheet, and 0.2mm copper sheet. Adjust the gear setting according to the material and thickness.

4.3. Welding Process
Place the material to be welded on a stable, non-conductive surface. Position the welding pens firmly on the contact points. Initiate the weld using either the automatic trigger or the foot pedal, depending on your selected mode. Observe the weld quality and adjust settings as needed.
4.4. Battery Status
The device features a battery indicator on its display. It is recommended to keep the internal supercapacitors charged for optimal performance. The unit is powered by built-in super energy storage capacitors, not user-replaceable batteries for power.

5. Maintenance
Regular maintenance ensures the longevity and optimal performance of your spot welder.
- Welding Pin Replacement: The welding pens are designed with replaceable pins. If the pins become worn or damaged, gently pull them out and insert new ones. Three pairs of replacement pins are included.
- Pin Sharpening: Use the provided file to sharpen the tips of the welding pins when they become dull. This maintains welding precision.
- Cleaning: Keep the device and welding pens clean and free from debris. Use a dry cloth for cleaning.
6. Troubleshooting
If you encounter issues with your AWithZ P20B Spot Welder, refer to the following common troubleshooting tips:
- No Power: Ensure the charger is properly connected to both the device and a working power outlet. Check the power switch.
- No Weld Output: Verify that the welding pens are securely connected. Check the selected welding mode and gear settings. Ensure the device has completed its initial activation (displaying 'OK').
- Poor Weld Quality: Adjust the gear setting to match the material and thickness. Ensure welding pins are clean and sharp. Apply consistent pressure during welding.
- Overheating: While designed for stable operation, continuous high-gear use may cause the welding pen leads to warm up. Allow the device to cool down if excessive heat is observed.
7. Specifications
| Feature | Specification |
|---|---|
| Model Number | P20B |
| Manufacturer | AWithZ |
| Max Pulse Welding Power | 14.6KW |
| Input Voltage | 100-240V AC |
| Adjustable Gears | 999 |
| Welding Modes | Automatic, Foot Pedal |
| Compatible Materials | Nickel plated sheet (up to 0.6mm), Stainless steel sheet (up to 0.6mm), Iron sheet (up to 0.6mm), Pure nickel sheet (up to 0.3mm), Copper sheet (up to 0.2mm) |
| Welding Pen Lead Length | 60 cm |
| Item Weight | 2.53 kg |
| Parcel Dimensions | 24 x 21.9 x 14.6 cm |

8. Official Product Video
For a visual guide on the product's features and operation, please watch the official video below:
9. Warranty and Support
For warranty information, technical support, or service inquiries, please refer to the contact details provided with your purchase documentation or visit the official AWithZ website. Keep your purchase receipt as proof of purchase for warranty claims.