Introduction
This manual provides detailed instructions for the setup, operation, and maintenance of your PELADN HA-4 Mini PC. This compact desktop computer is equipped with an AMD Ryzen 7 7840HS processor, Radeon 780M graphics, 16GB DDR5 RAM, and a 512GB NVMe SSD, designed for efficient performance in business, entertainment, and light gaming applications.

Figure 1: Front view of the PELADN HA-4 Mini PC, showcasing its compact design and RGB light strip.
Package Contents
Please verify that all items are present in the package:
- PELADN HA-4 7840HS Mini PC
- HDMI Cable
- Power Adapter
- User Manual (this document)
- Mounting Bracket (for VESA mounting)
Product Overview
Internal Components
The PELADN HA-4 Mini PC features a well-engineered internal layout for optimal performance and cooling. Key components include the AMD Ryzen 7 7840HS processor, DDR5 RAM, and an NVMe SSD.

Figure 2: Exploded view illustrating the internal structure and components of the Mini PC.
Ports and Interfaces
The Mini PC offers a comprehensive range of ports for connectivity, including multiple USB ports, HDMI, and Type-C for versatile peripheral and display connections.
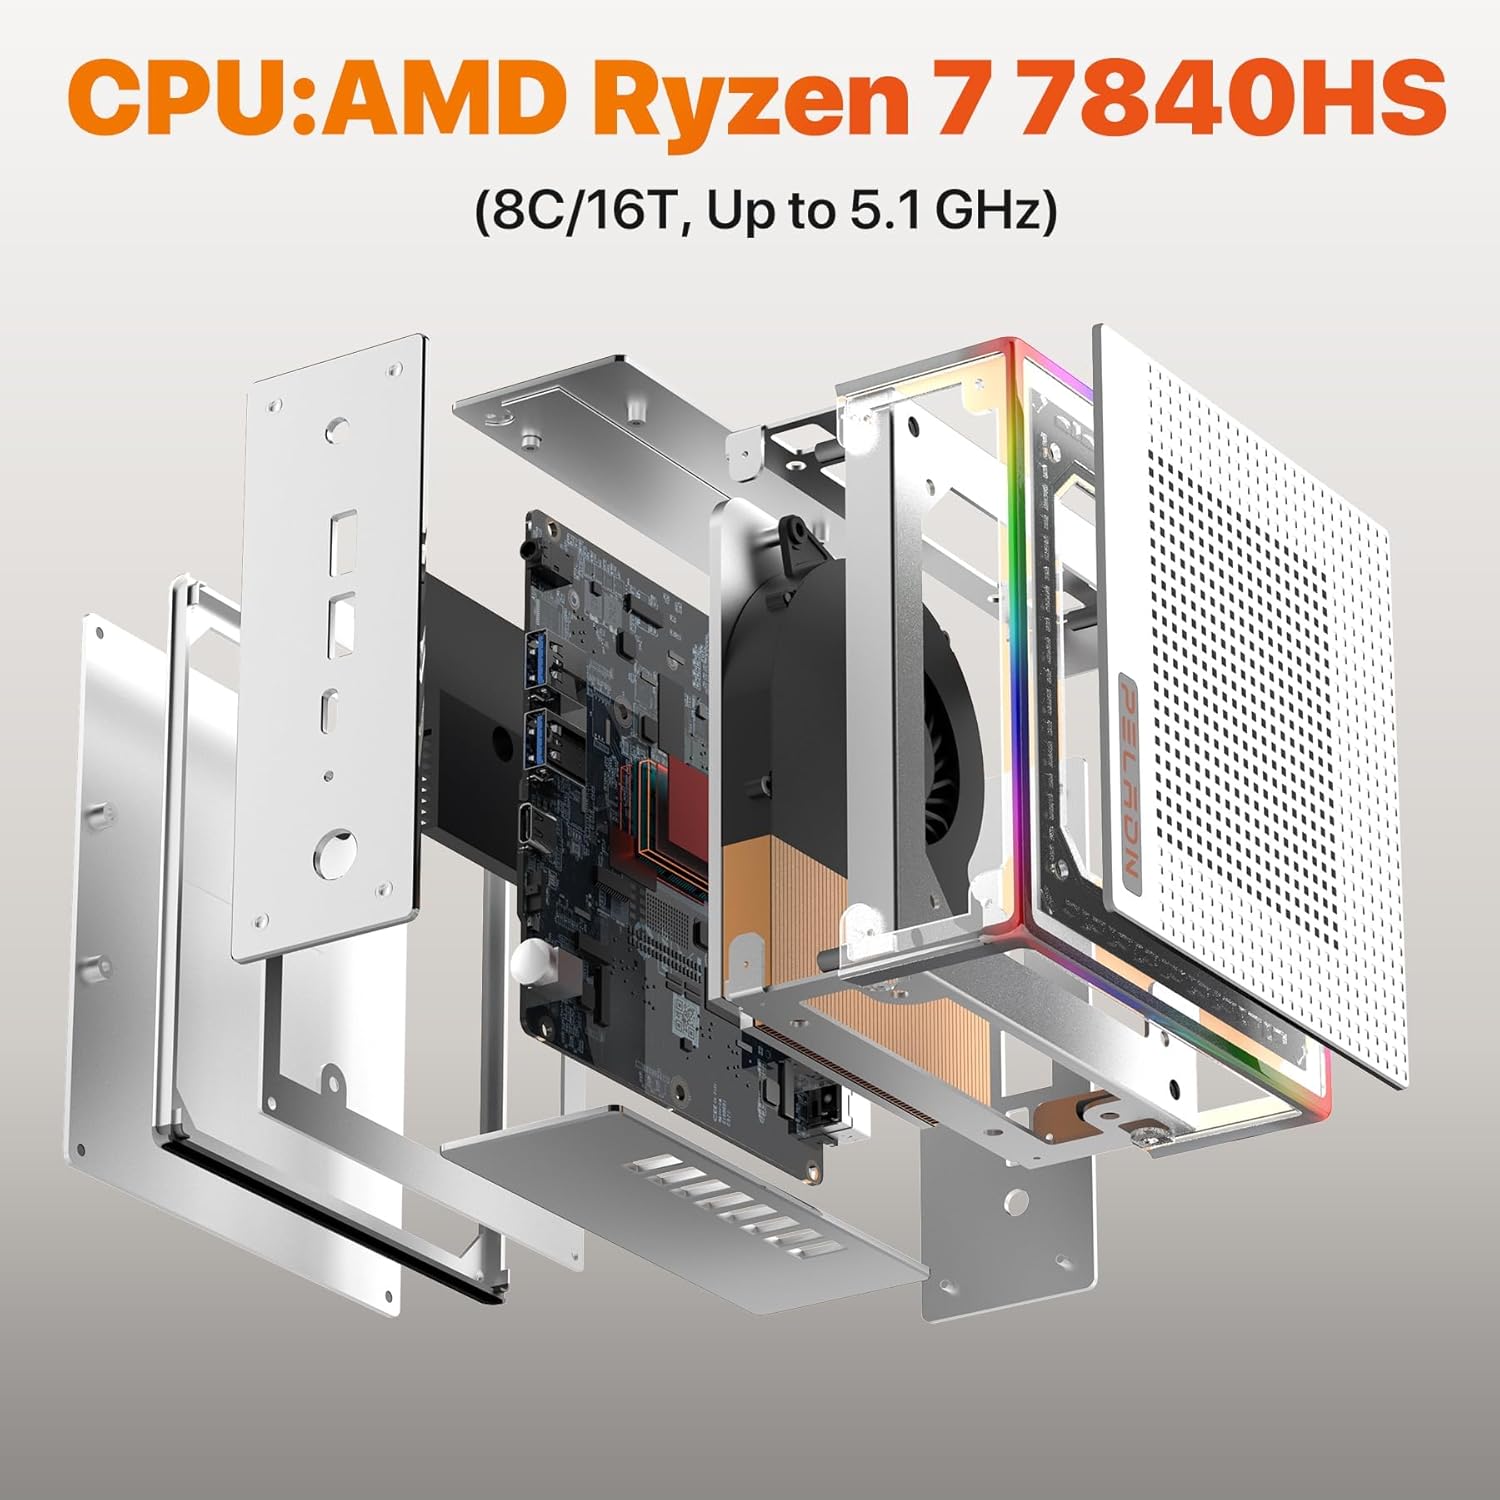
Figure 3: Detailed view of the Mini PC's front and rear ports, including USB, HDMI, Type-C, RJ45 LAN, and power input.
- Front Ports: Power Button, Reset Button, 2x USB 3.2, Earphone Jack.
- Rear Ports: DC 19V Power Input, 2x USB 2.0, 2x HDMI 2.0, 1x RJ45 LAN (1000Mbps), 1x Type-C (USB 4.0, 40 Gbps).
RGB Lighting
The PELADN HA-4 features a 64-color RGB light strip on its shell. A button at the rear of the machine allows users to cycle through three different modes: breathing, single-color constant light, and off.

Figure 4: Visual representation of the various RGB lighting modes available on the Mini PC.
Setup
- Connect Peripherals: Connect your keyboard, mouse, and other USB devices to the available USB ports.
- Connect Display: Use an HDMI cable to connect your monitor(s) to the HDMI ports on the Mini PC. For triple display setup, utilize both HDMI ports and the USB-C 4.0 port with a compatible adapter/cable.
- Connect Power: Plug the power adapter into the DC 19V input port on the Mini PC, then plug the adapter into a power outlet.
- Power On: Press the Power Button located on the front of the Mini PC.
- Initial Setup: Follow the on-screen instructions to complete the operating system setup.
VESA Mounting
The included VESA mount allows you to attach the Mini PC to the back of a compatible monitor, saving desk space.
- Fix the mounting bracket to the Mini PC using the provided screws.
- Fix the bracket to the back of your display using the appropriate VESA mounting holes and screws.

Figure 5: Instructions for VESA mounting the Mini PC to a monitor.
Operating Instructions
Power On/Off
- To Power On: Press the Power Button once.
- To Shut Down: Use the operating system's shutdown function. Alternatively, press and hold the Power Button for 5 seconds for a forced shutdown (use only when necessary).
RGB Light Control
The RGB light strip can be controlled via the button located at the rear of the device. Press the button to cycle through the available modes: breathing, single-color constant light, and off.
Triple Display Setup
The Mini PC supports up to three 4K@60Hz displays simultaneously using its two HDMI 2.0 ports and one USB-C 4.0 port. Connect your monitors and configure display settings within your operating system.

Figure 6: Example of a triple display setup connected to the Mini PC.
Maintenance
- Cleaning: Regularly clean the exterior of the Mini PC with a soft, dry cloth. Use compressed air to clear dust from ventilation openings. Ensure the device is powered off and unplugged before cleaning.
- Ventilation: Ensure adequate airflow around the Mini PC. Do not block the ventilation holes.
- Software Updates: Keep your operating system and drivers updated to ensure optimal performance and security.
- Storage: Avoid placing heavy objects on the Mini PC. Store it in a cool, dry environment away from direct sunlight and extreme temperatures.
Troubleshooting
- No Power / System Not Starting:
- Ensure the power adapter is securely connected to both the Mini PC and a working power outlet.
- Verify the power outlet is functional by plugging in another device.
- Try a different power outlet if available.
- No Display Output:
- Check that the HDMI or USB-C cable is securely connected to both the Mini PC and the monitor.
- Ensure the monitor is powered on and set to the correct input source.
- Try a different display cable or monitor if possible.
- Slow Internet Speed (Wi-Fi):
- Ensure the Mini PC is within range of your Wi-Fi router.
- Check for obstructions between the Mini PC and the router.
- Update your Wi-Fi drivers.
- Consider connecting via Ethernet cable to the RJ45 LAN port for a stable wired connection.
- Incorrect Default Language:
- Access the operating system's language settings and change the display language to your preference.
- If the issue persists or the system is unusable, a reinstallation of the operating system with the correct language pack may be required.
Specifications
| Feature | Detail |
|---|---|
| Brand | PELADN |
| Model Name | HA-4 Ryzen 7 7840HS |
| CPU Model | AMD Ryzen 7 7840HS (8 Cores/16 Threads, up to 5.1 GHz) |
| Graphics Coprocessor | Radeon 780M (12-core GPU, 2200MHz) |
| RAM Memory | 16 GB DDR5 (5600 MHz, upgradeable to 64GB) |
| Storage | 512 GB M.2 2280 NVMe SSD (PCIe Gen 4.0) |
| Operating System | OS (as shipped) |
| Connectivity | WiFi 6, Bluetooth 5.2, 1000Mbps Ethernet (RJ45 LAN) |
| Video Output | 2x HDMI 2.0, 1x USB Type-C 4.0 (Supports Triple 4K@60Hz Displays) |
| USB Ports | 2x USB 3.2, 2x USB 2.0, 1x USB Type-C 4.0 |
| Power Consumption | 45 Watts (Max 54W TDP) |
| Dimensions | Approximately 5.3 x 5.0 x 2.0 inches |
| Additional Features | 64-color RGB light strip, VESA mount support |
Warranty and Support
The PELADN HA-4 Mini PC comes with a 1-year free warranty. For technical assistance or customer support, please refer to the contact information provided with your purchase or visit the official PELADN website. All Mini PCs have obtained FCC, CE, and RoHS certifications.


