1. Important Safety Instructions
Always observe basic safety precautions when using this power tool to reduce the risk of fire, electric shock, and serious personal injury.
1.1 General Power Tool Safety Warnings
- Work Area Safety: Keep work area clean and well lit. Cluttered or dark areas invite accidents. Do not operate power tools in explosive atmospheres, such as in the presence of flammable liquids, gases or dust. Power tools create sparks which may ignite the dust or fumes.
- Electrical Safety: Avoid body contact with earthed or grounded surfaces such as pipes, radiators, ranges and refrigerators. There is an increased risk of electric shock if your body is earthed or grounded.
- Personal Safety: Always wear eye protection. Use safety glasses, goggles, or a face shield. Wear hearing protection when operating the tool for extended periods. Dress properly. Do not wear loose clothing or jewelry. Keep your hair, clothing and gloves away from moving parts.
- Tool Use and Care: Do not force the power tool. Use the correct power tool for your application. The correct power tool will do the job better and safer at the rate for which it was designed. Disconnect the plug from the power source and/or the battery pack from the power tool before making any adjustments, changing accessories, or storing power tools.
2. Product Overview
The VEVOR 20V Portable Band Saw Kit (Model BW2110) is designed for efficient and precise cutting of various materials. It features a brushless motor, variable speed control, and a compact design for portability.
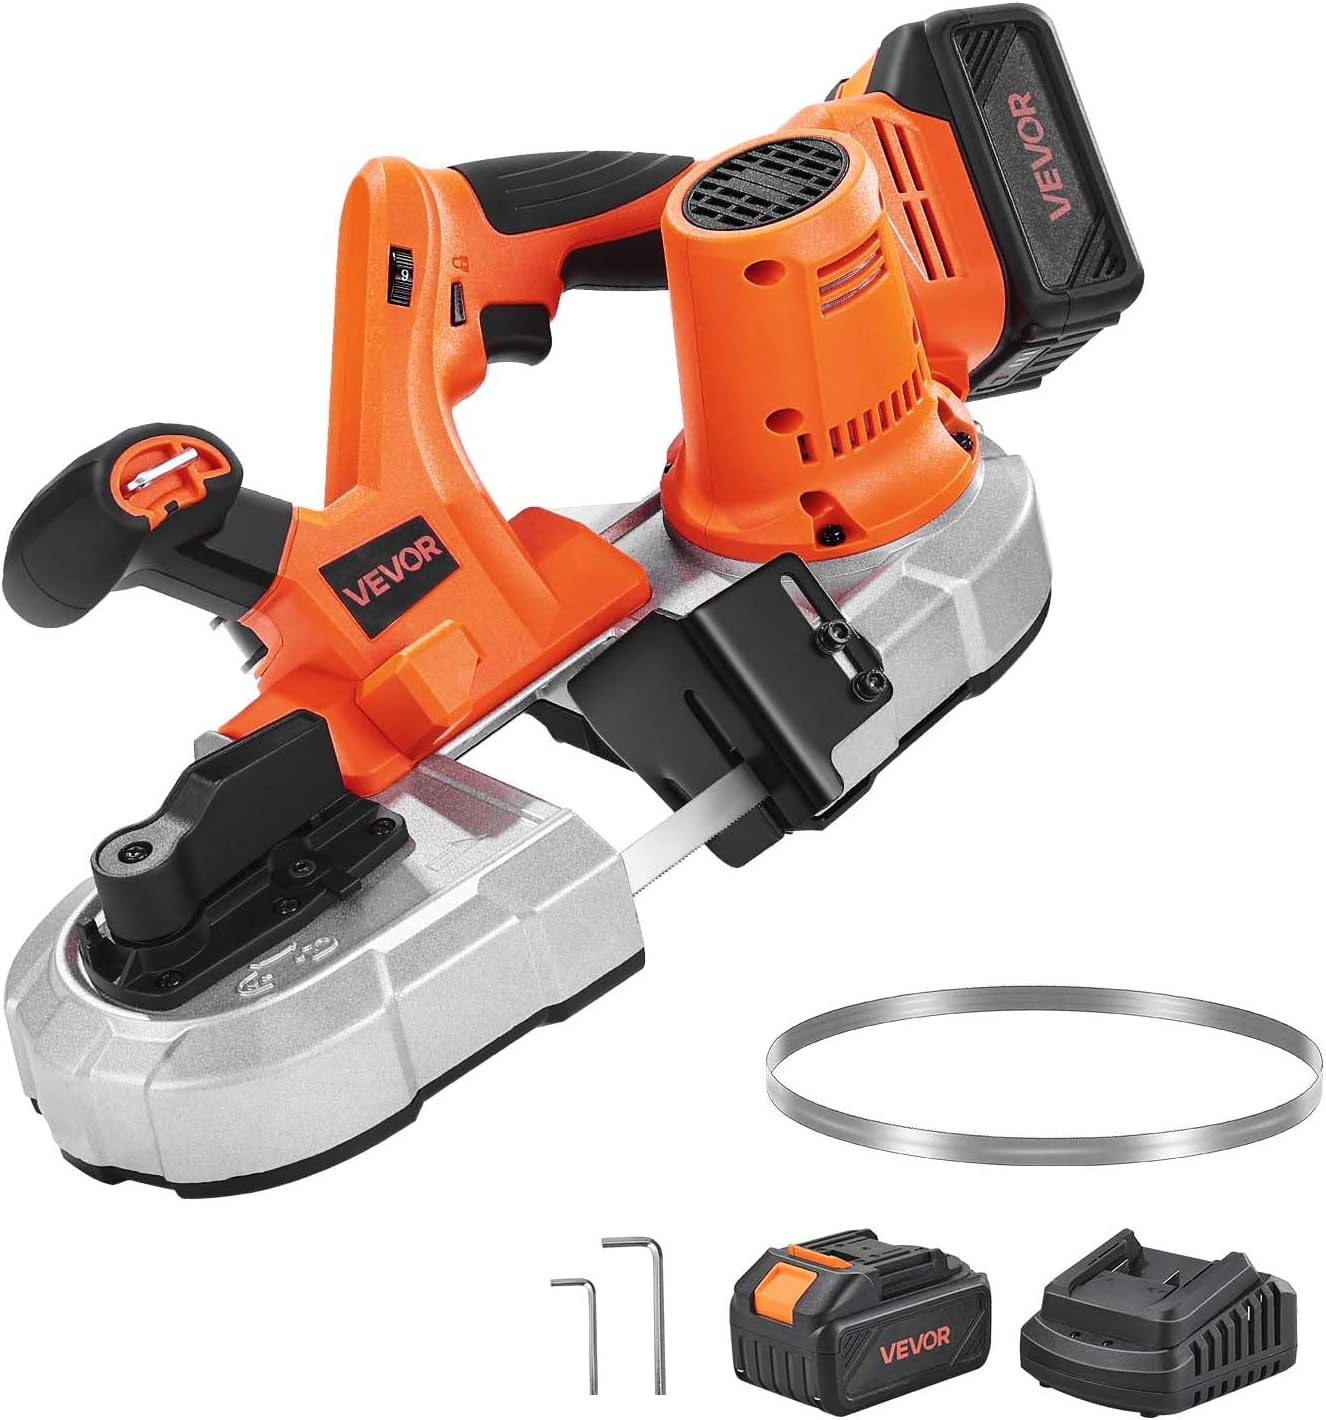
Figure 2.1: VEVOR 20V Portable Band Saw Kit, showing the main unit, battery, charger, and spare blade.
2.1 Key Features
- 2.56-Inch Deep Cut: Capable of cutting up to 2.56 x 2.56 inches (65 x 65 mm), suitable for small and precise cutting tasks.
- Brushless Motor: A robust 360W brushless motor ensures fast, smooth cuts with minimal sparks and clean finishes without burrs.
- Variable Speed Control: Stepless adjustment knob allows speed changes from 0 to 192 m/min to match different materials and applications.
- Integrated LED Light: Brightens the work surface for enhanced visibility and accurate cutting, especially in low-light conditions.
- Comfort and Convenience: Features an integrated hook for secure hanging, a quick-change blade lever for easy blade swaps, and a lightweight design (10.69 lbs / 4.85 kg).
- Battery Compatibility: Equipped with a 4000 mAh Li-ion battery compatible with Makita interface.

Figure 2.2: Illustration of the 2.56-inch cutting depth capability, ideal for small-scale and detailed tasks.

Figure 2.3: Visual representation of the smooth, burr-free, and sparkless cutting performance achieved by the 360W brushless motor.

Figure 2.4: The integrated LED light provides clear visibility of the cutting line, even in low-light conditions, with a 20-second automatic delay.

Figure 2.5: Demonstrates comfort and convenience features including tool-free blade changes, integrated hanging hook, 4000 mAh Li-ion battery charging, and the lightweight design for easy handling.
3. Setup
3.1 Unpacking
Carefully remove all components from the packaging. Inspect the tool for any signs of damage during transit. Retain packaging materials for future storage or transport if needed.
3.2 Battery Installation and Charging
- Ensure the battery is fully charged before first use. Connect the charger to a power outlet and insert the battery pack. The indicator light on the charger will show charging status.
- To install the battery, align the battery pack with the receptacle on the tool handle and slide it in until it clicks securely into place.
- To remove the battery, press the release button on the battery pack and slide it out.
3.3 Blade Installation
The VEVOR Portable Band Saw features a quick-change blade system for effortless replacement.
- Ensure the tool is powered off and the battery is removed.
- Locate the blade changing lever. Push or pull the lever to loosen the blade tension.
- Open the blade cover (if applicable) or gently spread the guides to remove the old blade.
- Carefully position the new blade around the drive wheels, ensuring the teeth are oriented correctly for cutting.
- Once the blade is seated, release the blade changing lever to apply tension. Ensure the blade is properly aligned within the guides.

Figure 3.1: Step-by-step guide for hassle-free blade replacement, demonstrating how to loosen tension and install a new blade.

Figure 3.2: Illustrates the tool-free blade rod replacement, highlighting easy disassembly and quick blade locking.
4. Operation
4.1 Powering On/Off
To turn the band saw on, depress the trigger switch. To turn it off, release the trigger switch. Some models may include a lock-on button for continuous operation; press the trigger and then the lock-on button to engage, and press the trigger again to release.
4.2 Speed Adjustment
The stepless adjustment knob allows you to vary the blade speed. Rotate the knob to increase or decrease the speed according to the material being cut. Refer to the guidelines below for optimal cutting speeds.

Figure 4.1: Recommended speed settings for different materials to achieve optimal cutting performance.
4.3 Cutting Techniques
- Workpiece Securing: Always secure the workpiece firmly using a vise or clamps to prevent movement during cutting.
- Starting the Cut: Allow the blade to reach full speed before engaging with the workpiece. Apply steady, even pressure.
- Material Compatibility: This band saw is suitable for cutting steel, aluminum, cables, angle iron, PVC pipes, wood, and other similar materials.

Figure 4.2: Examples of materials that can be efficiently cut with the VEVOR Portable Band Saw.

Figure 4.3: Proper operation demonstrating the use of the band saw on a workpiece secured in a vise.
5. Maintenance
Regular maintenance ensures the longevity and optimal performance of your VEVOR Portable Band Saw.
5.1 Cleaning
- After each use, disconnect the battery and clean the tool. Remove any dust, chips, or debris from the blade area, motor vents, and housing using a brush or compressed air.
- Do not use harsh chemicals or abrasive cleaners, as they may damage plastic parts.
5.2 Blade Replacement
Replace the blade when it becomes dull or damaged. Refer to Section 3.3 for detailed instructions on blade installation.
5.3 Storage
Store the band saw in a clean, dry place, out of reach of children. If storing for an extended period, remove the battery pack.
6. Troubleshooting
This section addresses common issues you might encounter with your band saw. For problems not listed here, contact VEVOR customer support.
| Problem | Possible Cause | Solution |
|---|---|---|
| Tool does not start | Battery not charged or improperly installed. | Ensure battery is fully charged and securely inserted. |
| Blade not cutting efficiently | Dull or damaged blade; incorrect speed setting for material. | Replace blade; adjust speed according to material (refer to Section 4.2). |
| Excessive vibration or noise | Loose blade; damaged blade; worn components. | Check blade tension and alignment; replace blade if damaged. If problem persists, seek professional service. |
| Blade comes off during operation | Insufficient blade tension; improper blade installation. | Ensure blade is correctly installed and tensioned (refer to Section 3.3). |
7. Specifications
Detailed technical specifications for the VEVOR 20V Portable Band Saw Kit.
| Item Model Number | BW2110 |
| Operating Voltage | DC 20V |
| Speed Adjustment | 0-192 m/min |
| Net Weight | 10.69 lbs / 4.85 kg |
| Main Material | ADC12+PA6-GF30 |
| Cutting Depth | 2.56 x 2.56 in / 65 x 65 mm |
| Blade Dimensions | 32.88 x 0.51 x 0.02 in / 835 x 13 x 0.5 mm |
| Product Dimensions (L x W x H) | 17.2 x 7.09 x 9.65 in / 437 x 180 x 245 mm |
| Included Components | 1 x Portable Band Saw, 1 x S4 Hex Wrench, 1 x S6 Hex Wrench, 1 x Saw Blade, 1 x Battery Pack & Charger |
| Battery Type | Lithium Ion (4000 mAh) |

Figure 7.1: Product dimensions and key specifications.
8. Warranty and Support
VEVOR products are designed for durability and performance. For warranty information, technical support, or service inquiries, please visit the official VEVOR website or contact their customer service department.
Online Support: www.vevor.com/support
Please have your model number (BW2110) and purchase information ready when contacting support.