1. Introduction
This manual provides essential instructions for the safe and efficient operation of your VEVOR Electric Post Hole Digger JH-300. This powerful 1500W tool is designed for various digging tasks, including fence installation and tree planting, offering efficient drilling up to 36.42 inches deep with a 5.71-inch auger bit. Please read this manual thoroughly before use and retain it for future reference.
2. Safety Instructions
Always prioritize safety when operating power tools. Failure to follow these instructions may result in serious injury or property damage.
General Safety
- Read and understand all instructions before operating the tool.
- Wear appropriate personal protective equipment (PPE), including safety glasses, gloves, and sturdy footwear.
- Keep the work area clean and well-lit. Cluttered or dark areas invite accidents.
- Keep children and bystanders away while operating the power tool. Distractions can cause you to lose control.
- Do not operate power tools in explosive atmospheres, such as in the presence of flammable liquids, gases, or dust.
Electrical Safety
- Ensure the power supply matches the voltage specified on the tool's rating plate.
- Avoid body contact with earthed or grounded surfaces, such as pipes, radiators, ranges, and refrigerators.
- Do not expose power tools to rain or wet conditions. Water entering a power tool will increase the risk of electric shock.
- Do not abuse the cord. Never use the cord for carrying, pulling, or unplugging the power tool. Keep cord away from heat, oil, sharp edges, or moving parts.
Operation Safety
- Maintain a firm grip on the handles during operation.
- Be aware of underground utilities (cables, pipes) before digging.
- Do not force the tool. Let the tool do the work at its intended speed.
- Always use the security lock feature to prevent accidental startups.
- If the auger bit jams, release the trigger immediately and use the reverse function to free it.
3. Package Contents
Verify that all items are present upon unpacking:
- 1 x Electric Post Hole Digger Unit
- 1 x Auger Bit (5.71 inch / 145 mm)
- 1 x Extension Rod (10.24 inch / 260 mm)
- 2 x Carbon Brushes
- 2 x Pins
- 2 x R-Pins
- 1 x Hex Wrench
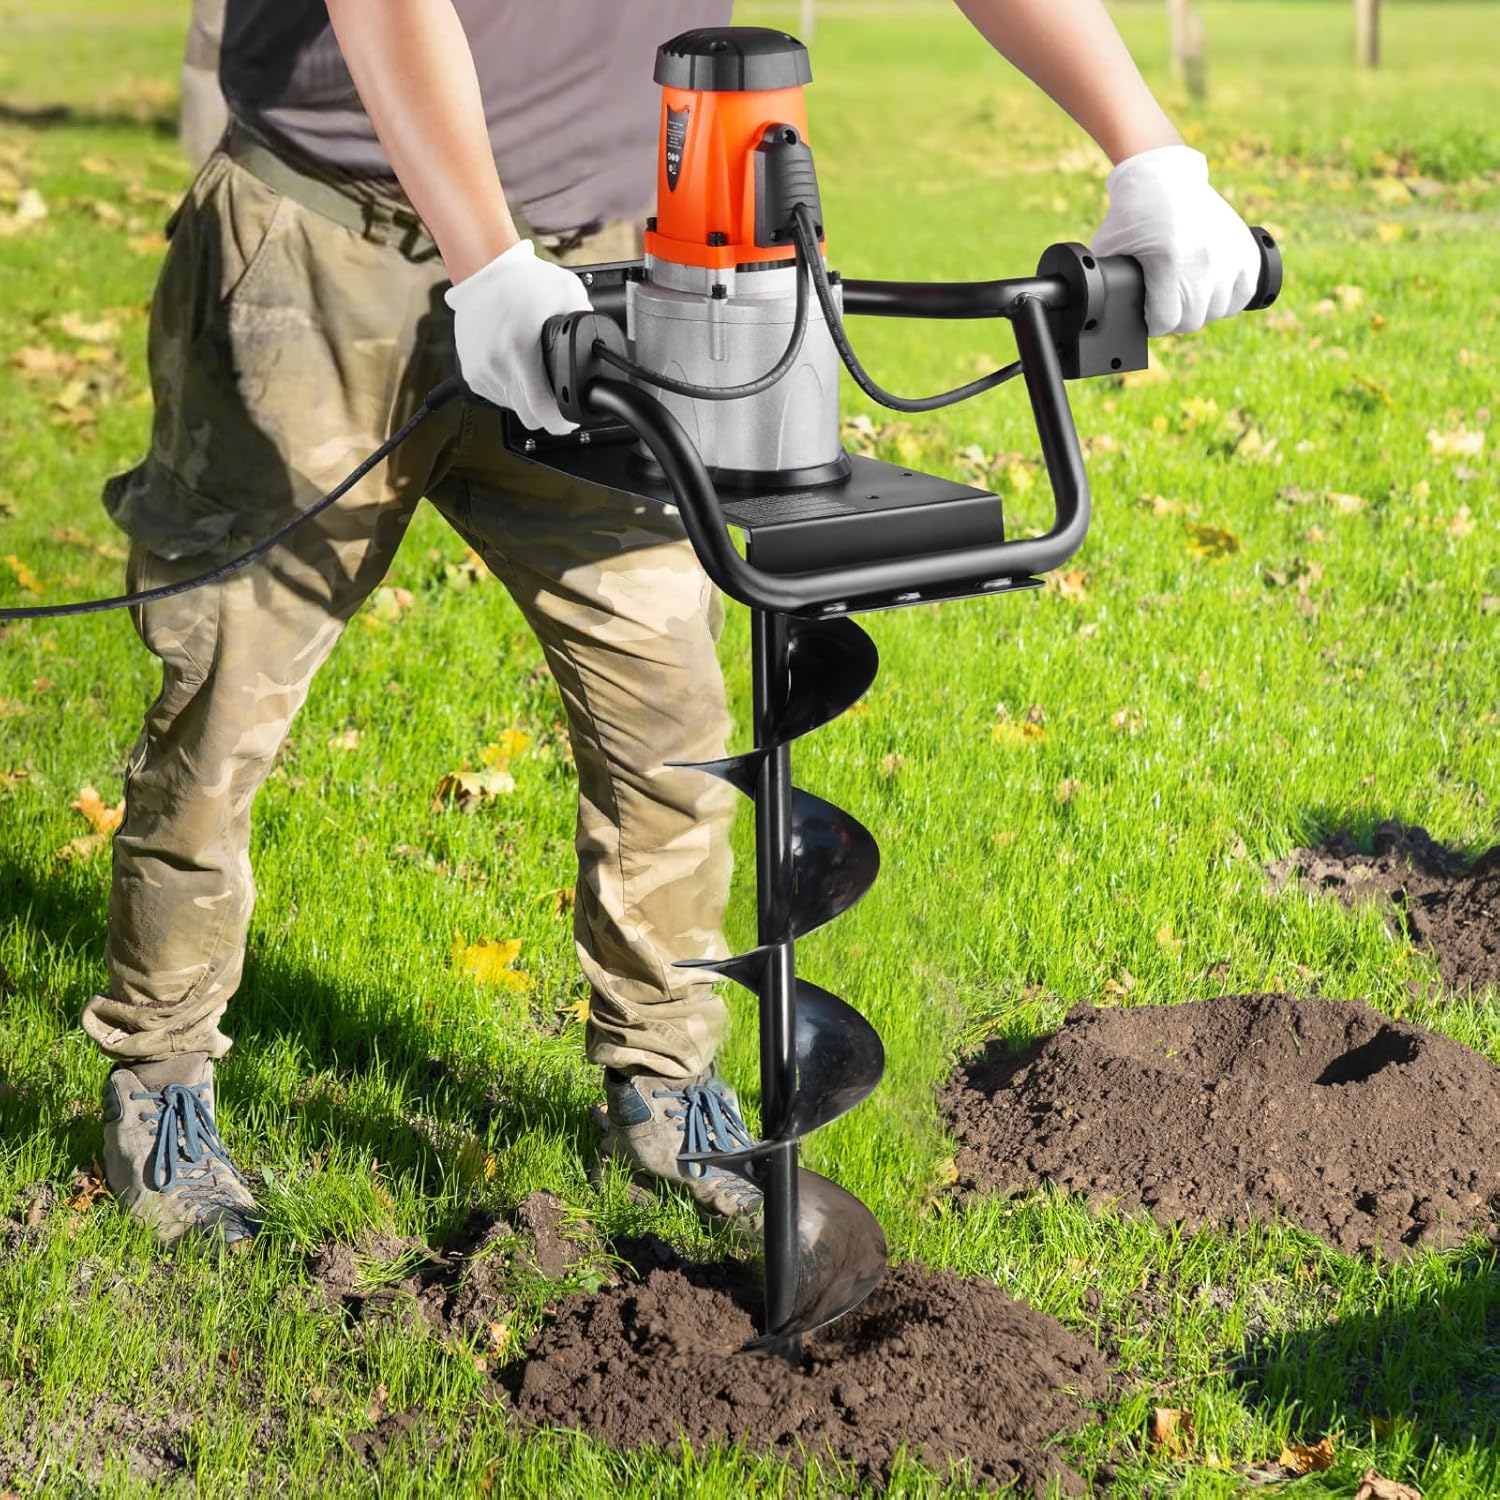
Figure 3.1: Diagram showing the VEVOR Electric Post Hole Digger JH-300 with its components and dimensions, including the main unit, auger bit, extension rod, carbon brushes, pins, R-pins, and hex wrench.
4. Setup and Assembly
Follow these steps to assemble your post hole digger:
- Attach the Auger Bit: Align the auger bit shaft with the output shaft of the main digger unit. Slide the auger bit onto the shaft.
- Secure the Auger Bit: Insert a pin through the designated holes to secure the auger bit to the main unit. Use an R-pin to lock the pin in place.
- Install Extension Rod (Optional): If deeper digging is required, attach the extension rod between the main unit and the auger bit. Secure it with pins and R-pins as described in step 2.
- Check Connections: Ensure all connections are secure before plugging in the unit.
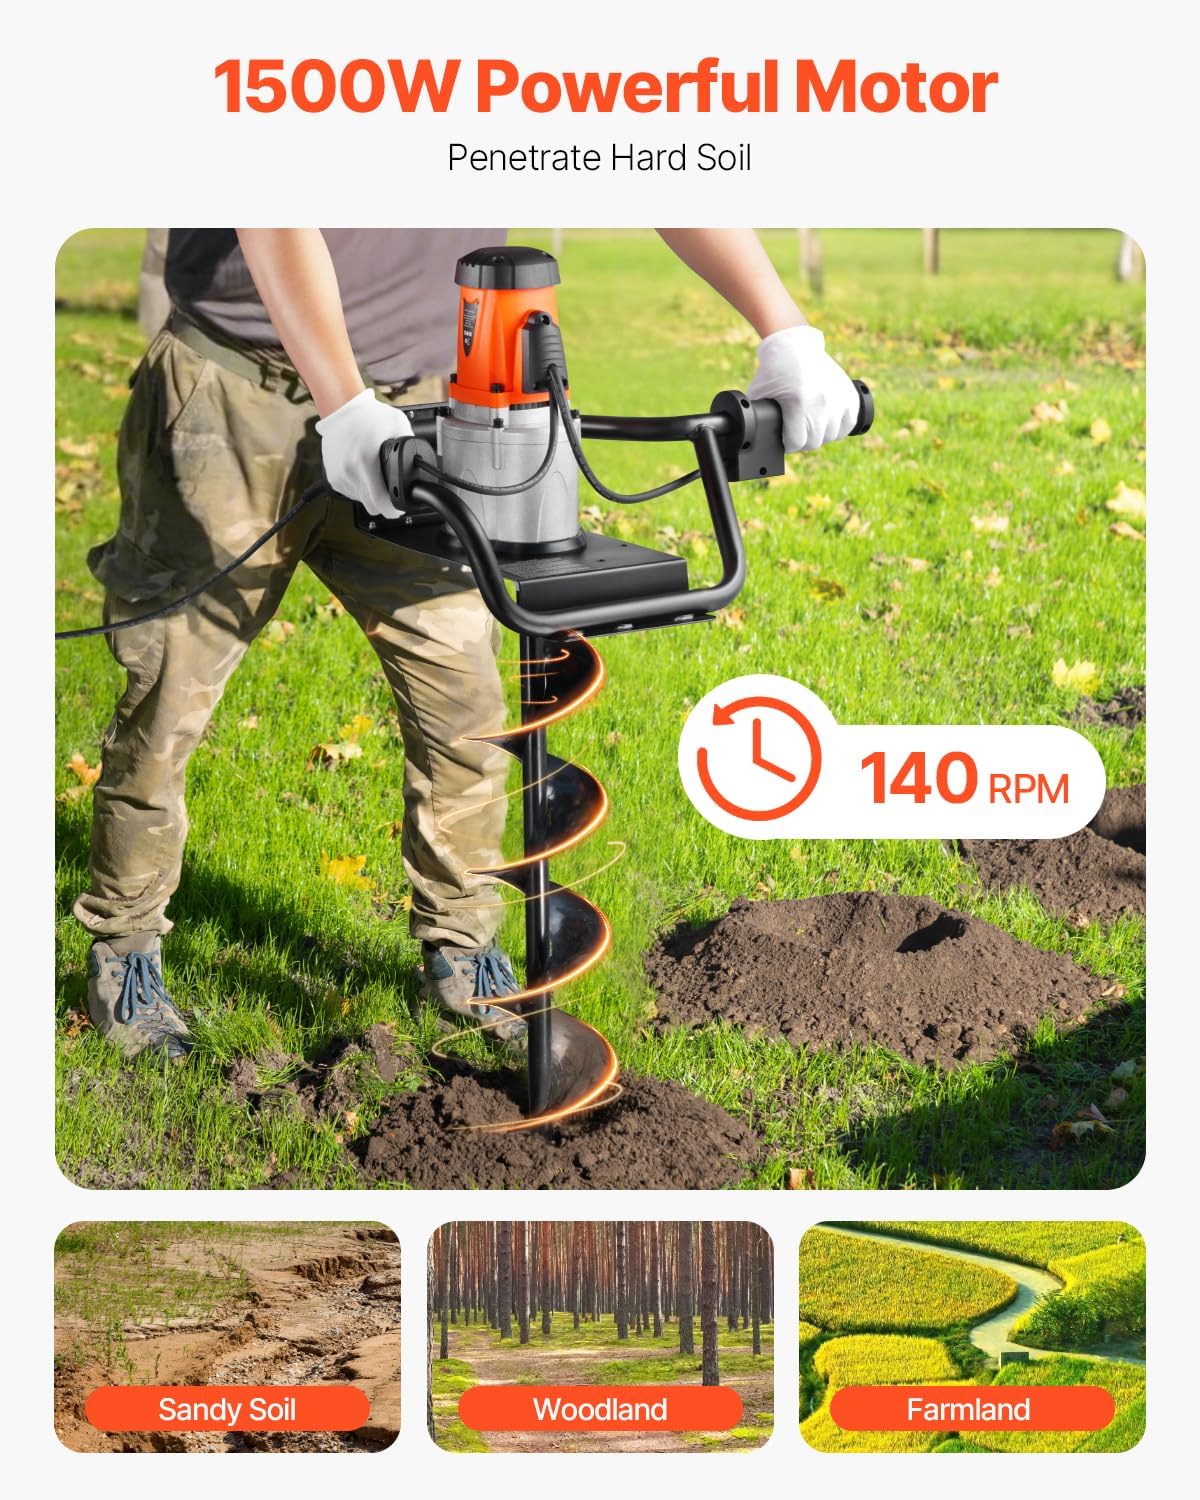
Figure 4.1: The VEVOR Electric Post Hole Digger main unit and auger bit, illustrating how they connect during assembly.
5. Operation
Operating the VEVOR Electric Post Hole Digger requires attention to safety and proper technique.
Pre-Operation Checks
- Inspect the tool for any damage or loose parts.
- Ensure the auger bit is securely attached.
- Clear the digging area of any debris, rocks, or potential obstructions.
- Locate and mark any underground utilities.
Starting and Drilling
- Power Connection: Plug the power cord into a suitable electrical outlet.
- Security Lock: Engage the security lock button on the handle to prevent accidental startup.
- Starting the Unit: While holding the security lock, press the trigger switch to start the motor. Release the security lock once the motor is running.
- Positioning: Place the tip of the auger bit at the desired digging location.
- Drilling: Apply steady, downward pressure while maintaining a firm grip on both handles. Allow the auger to penetrate the soil. The 1500W motor and 140 RPM speed are designed for efficient digging in various soil types.
- Clearing Soil: Periodically lift the auger slightly to clear loose soil from the hole, then continue drilling.
- Using the Extension Rod: If you need to dig deeper than the standard auger length, the 10.24-inch extension rod can be used to reach a maximum digging depth of 36.42 inches.
- Reverse Function: If the auger bit gets stuck, release the trigger, then activate the reverse function (if equipped) to help extract the bit from the soil.
- Stopping: Release the trigger switch to stop the motor.

Figure 5.1: The powerful 1500W motor and 140 RPM of the VEVOR Electric Post Hole Digger allow for efficient penetration in various soil conditions.

Figure 5.2: Key operational features including the security lock, reverse function, and quick start for enhanced safety and efficiency.

Figure 5.3: The ergonomic design of the digger allows for comfortable operation, reducing the need for bending compared to manual methods.
6. Maintenance
Regular maintenance ensures the longevity and optimal performance of your VEVOR Electric Post Hole Digger.
- Cleaning: After each use, disconnect the power and clean the auger bit and main unit. Remove any accumulated soil, mud, or debris.
- Inspection: Regularly inspect the auger bit for wear, damage, or dullness. A dull bit will reduce efficiency. Check the power cord for cuts or fraying.
- Carbon Brushes: The motor uses carbon brushes, which are consumable parts. If the motor performance decreases or sparks excessively, the carbon brushes may need replacement. Refer to the included spare carbon brushes and consult a qualified technician if unsure.
- Storage: Store the tool in a dry, secure location, out of reach of children.
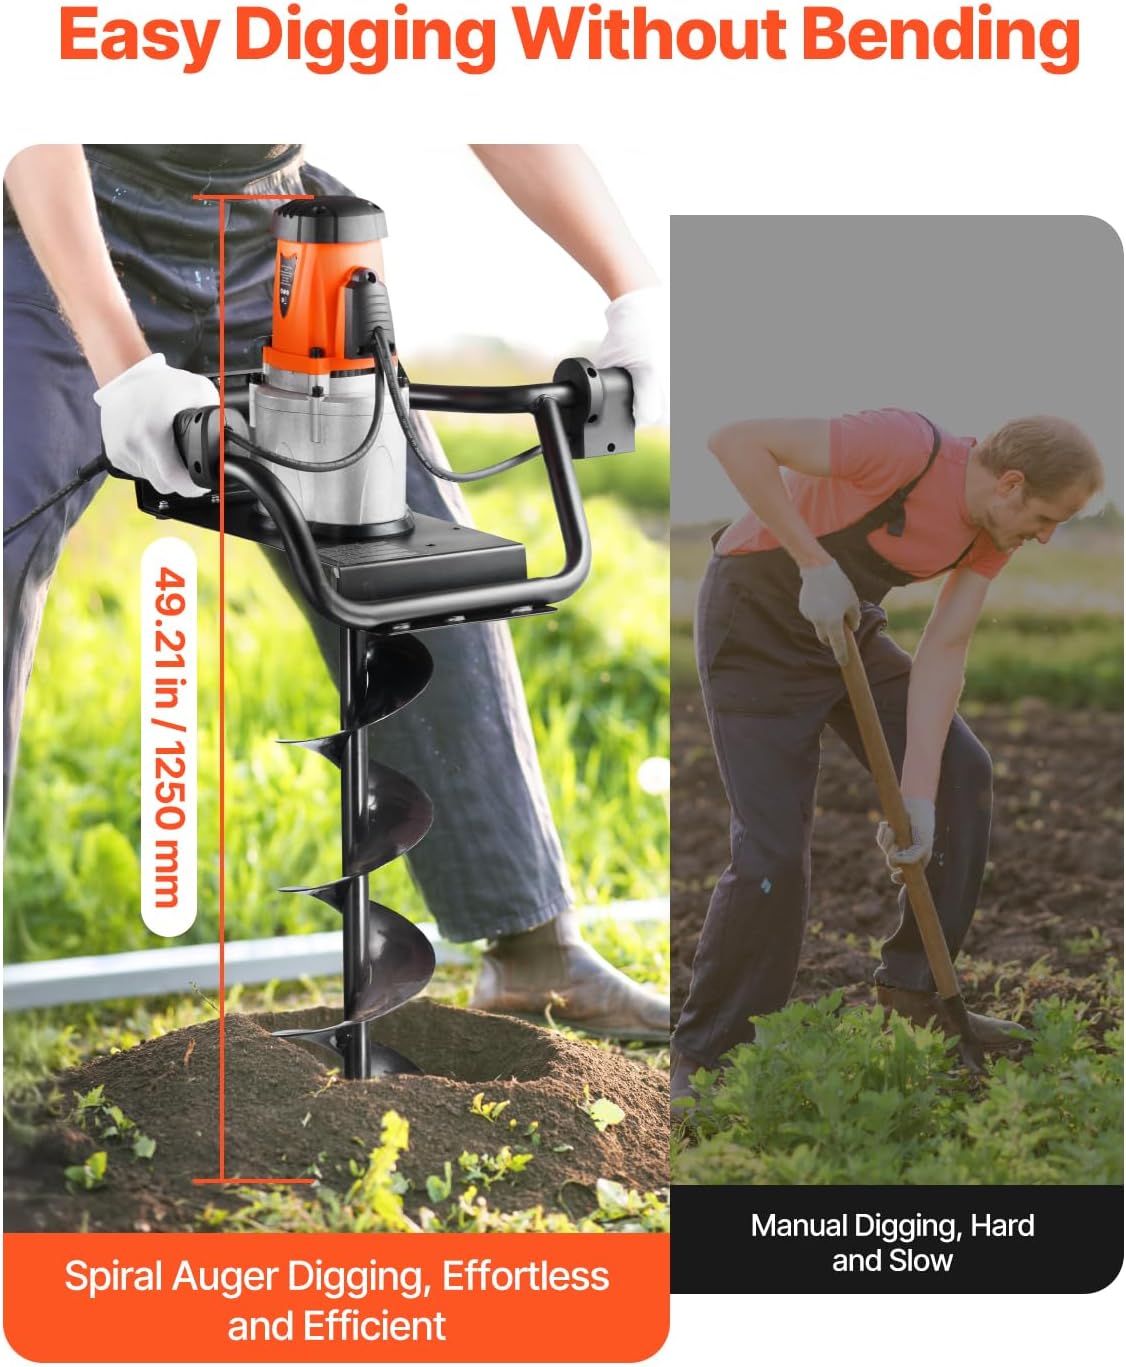
Figure 6.1: The durable alloy steel auger bit with a special powder coating is designed for resistance against rust and corrosion, requiring regular cleaning to maintain its condition.
7. Troubleshooting
Refer to this section for common issues and their solutions.
| Problem | Possible Cause | Solution |
|---|---|---|
| Unit does not start | No power supply Security lock not disengaged Damaged power cord | Check power connection Ensure security lock is pressed and trigger engaged Inspect cord, replace if damaged |
| Poor drilling performance | Dull auger bit Excessively hard soil Overloading the motor | Inspect and clean auger bit Apply less pressure, clear soil frequently Allow motor to cool, avoid forcing the tool |
| Auger bit jams | Hitting an obstruction (rock, root) Soil compaction | Release trigger, use reverse function to free Lift and clear soil, then resume drilling |
| Excessive sparking from motor | Worn carbon brushes | Replace carbon brushes (refer to maintenance section) |
8. Specifications
Technical specifications for the VEVOR Electric Post Hole Digger JH-300:
| Feature | Specification |
|---|---|
| Item Model Number | JH-300 |
| Main Material | Metal + Plastic |
| Maximum Power | 1500W |
| Maximum Drilling Diameter | 5.91 in / 150 mm |
| Maximum Digging Depth | 36.42 in / 925 mm (with extension rod) |
| Speed RPM (Blade) | 140 RPM |
| Color | Black + Orange |
| Product Weight | 25.79 lbs / 11.7 kg |
| Product Dimensions | 28.74 x 15.75 x 14.57 inches |
9. Warranty and Support
For warranty information or technical support, please contact VEVOR customer service. Keep your purchase receipt as proof of purchase.
You can typically find contact information on the official VEVOR website or through your retailer.