Introduction
Thank you for purchasing the INTEXCA & DESIGN 6L Air Fryer. This appliance is designed to cook a variety of foods using rapid hot air circulation, offering a healthier alternative to traditional frying methods. Please read this manual thoroughly before operation to ensure safe and efficient use of your new air fryer. Keep this manual for future reference.
Important Safety Instructions
When using electrical appliances, basic safety precautions should always be followed, including the following:
- Read all instructions before use.
- Do not touch hot surfaces. Use handles or knobs.
- To protect against electric shock, do not immerse cord, plugs, or housing in water or other liquid.
- Close supervision is necessary when any appliance is used by or near children.
- Unplug from outlet when not in use and before cleaning. Allow to cool before putting on or taking off parts.
- Do not operate any appliance with a damaged cord or plug or after the appliance malfunctions or has been damaged in any manner.
- The use of accessory attachments not recommended by the appliance manufacturer may cause injuries.
- Do not use outdoors.
- Do not let cord hang over edge of table or counter, or touch hot surfaces.
- Do not place on or near a hot gas or electric burner, or in a heated oven.
- Extreme caution must be used when moving an appliance containing hot oil or other hot liquids.
- Always attach plug to appliance first, then plug cord into the wall outlet. To disconnect, turn any control to "off", then remove plug from wall outlet.
- Do not use appliance for other than intended use.
- Ensure the appliance is placed on a stable, level, heat-resistant surface.
- Do not block any ventilation openings.
Package Contents
Verify that all items are present and in good condition upon opening the package:
- 1 x Air Fryer Unit
- 1 x Recipe Book
- 1 x User Manual (this document)
Product Overview
Familiarize yourself with the components and controls of your INTEXCA & DESIGN Air Fryer.

Figure 1: Front view of the Air Fryer showing the digital display, control panel, and removable basket with food.

Figure 2: Detailed dimensions of the air fryer and its components, including the basket and crisper plate. Also shown is a close-up of the control panel with labeled buttons for temperature, timer, and power.
Components:
- Main Unit: Houses the heating element and fan.
- Removable Basket: Non-stick coated basket for holding food.
- Crisper Plate: Sits inside the basket to allow air circulation around food.
- Digital Touch Control Panel: For setting time, temperature, and selecting presets.
Control Panel (Refer to Figure 2):
- Digital Display: Shows time, temperature, and selected mode.
- ON/OFF Button: Powers the unit on or off.
- Temp Button: Adjusts cooking temperature.
- Timer Button: Adjusts cooking time.
- Preset Mode Icons: Icons for various food types (e.g., Chips, Meat, Pizza, Chicken, Fish, Warm, Nut).
Setup and First Use
- Unpack: Remove all packaging materials, stickers, and labels from the appliance.
- Clean: Wash the basket and crisper plate thoroughly with hot water, dish soap, and a non-abrasive sponge. Wipe the inside and outside of the appliance with a damp cloth.
- Placement: Place the air fryer on a stable, level, heat-resistant surface, away from walls or other appliances to allow for proper air circulation. Ensure there is at least 10 cm (4 inches) of free space on the back and sides, and 10 cm (4 inches) above the appliance.
- Pre-heating (Optional but Recommended): For the first use, it is recommended to run the air fryer empty for about 10-15 minutes at 200°C (390°F) to burn off any manufacturing residues. A slight odor may be present, which is normal.
Operating Instructions
General Operation:
- Plug the power cord into a grounded wall outlet.
- Carefully pull the basket out of the air fryer.
- Place the crisper plate inside the basket.
- Place the ingredients into the basket. Do not overfill the basket.
- Slide the basket back into the air fryer.
- Press the ON/OFF button to power on the unit.
- Manual Setting: Use the Temp and Timer buttons to set your desired cooking temperature and time.
- Preset Modes: Alternatively, select one of the 8 preset cooking modes by tapping the corresponding icon on the touch screen. The air fryer will automatically set the optimal time and temperature for that food type.

Figure 3: The 8 preset cooking modes available on the digital display, offering optimized settings for various dishes.
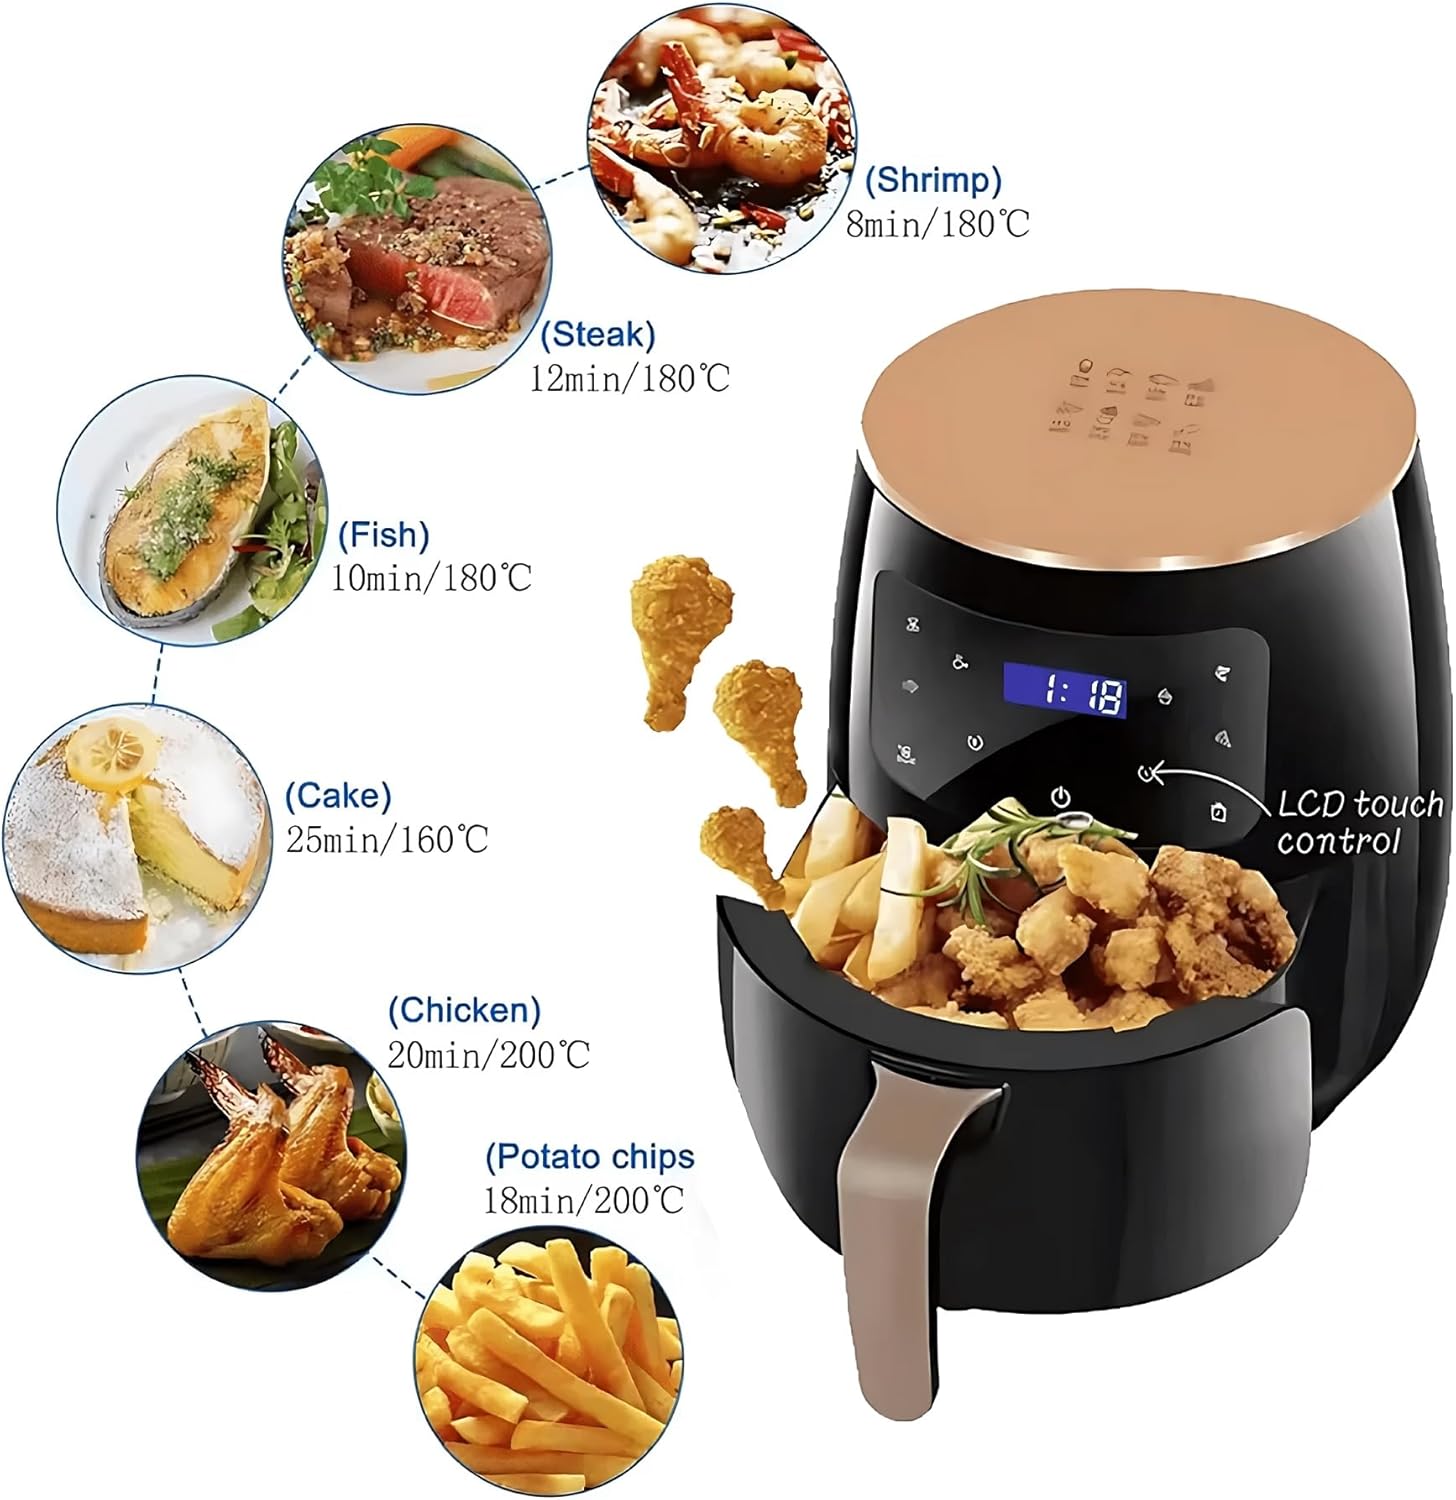
Figure 4: Example cooking guide with recommended times and temperatures for common air fryer recipes.
- Press the ON/OFF button again to start the cooking process.
- Some ingredients require shaking halfway through the preparation time. To do this, pull the basket out of the appliance by the handle and gently shake it. Then slide the basket back into the air fryer. The air fryer will resume cooking automatically.
- When the cooking time has elapsed, the air fryer will beep. Carefully pull the basket out and place it on a heat-resistant surface.
- Check if the food is cooked. If not, slide the basket back in and set the timer for a few extra minutes.
- Empty the basket contents into a serving dish. Use tongs to remove large or delicate items.
- Unplug the appliance after use.
Tips for Best Results:
- Smaller ingredients usually require a slightly shorter preparation time than larger ingredients.
- A larger amount of ingredients only requires a slightly longer preparation time.
- Shaking smaller ingredients halfway through the preparation time optimizes the end result and can help prevent unevenly fried ingredients.
- Add some oil to fresh potatoes for a crispy result. Fry your ingredients in the air fryer within a few minutes after you've added the oil.
- You can also use the air fryer to reheat dishes.
Cleaning and Maintenance
Clean the appliance after every use.
- Unplug the air fryer and allow it to cool down completely before cleaning.
- Wipe the outside of the appliance with a damp cloth.
- Clean the basket and crisper plate with hot water, dish soap, and a non-abrasive sponge. For stubborn residue, soak the basket in hot water for about 10 minutes. The basket and crisper plate are generally dishwasher safe, but hand washing is recommended to prolong their lifespan.
- Clean the inside of the appliance with hot water and a non-abrasive sponge.
- Clean the heating element with a cleaning brush to remove any food residues.
- Ensure all parts are thoroughly dry before storing.
Caution: Never immerse the main unit in water or any other liquid. Do not use abrasive cleaning materials or harsh chemicals.
Troubleshooting
| Problem | Possible Cause | Solution |
|---|---|---|
| The air fryer does not work. | The appliance is not plugged in. | Plug the main plug into a grounded wall socket. |
| The basket is not placed into the appliance correctly. | Slide the basket into the appliance correctly. | |
| Ingredients fried in the air fryer are not cooked evenly. | Too many ingredients are in the basket. | Put smaller batches of ingredients in the basket. Smaller batches are fried more evenly. |
| The temperature is set too low. | Increase the temperature. | |
| The cooking time is too short. | Increase the cooking time. | |
| White smoke comes out of the appliance. | Fatty ingredients are being fried. | This is normal. The air fryer produces white smoke when frying fatty ingredients, but this does not affect the result or the appliance. |
| The basket still contains grease residues from previous use. | Clean the basket thoroughly after each use. |
Specifications
| Feature | Detail |
|---|---|
| Model Name | AirFryer_JD389 |
| Brand | INTEXCA & DESIGN |
| Capacity | 6 Liters |
| Power | 2400W |
| Rated Voltage | 110-120V |
| Color | Black |
| Material | ABS |
| Product Dimensions (L x W x H) | 31 cm x 29 cm x 26 cm (13.78"D x 11.81"W x 11.81"H) |
| Item Weight | 3.1 kg (6.82 pounds) |
| UPC | 372615695293 |
Warranty and Support
For product support, warranty information, or inquiries, please contact the manufacturer directly:
Manufacturer: Intexca Inc
Address: 2600 John Street Unit 212, Markham, ON, L3R 3W3, CA
Please retain your proof of purchase for warranty claims.