
1. Product Overview
This high-temperature oven igniter is a critical component designed for safe and efficient gas ignition in compatible Jenn-Air gas range ovens. It facilitates the conversion of electrical current into the necessary heat to ignite natural gas or LP fuel, ensuring reliable bake and broil functions. Its robust construction, featuring a durable ceramic bar and metal mounting bracket, is engineered for longevity and consistent performance, helping to restore your oven's original cooking efficiency.
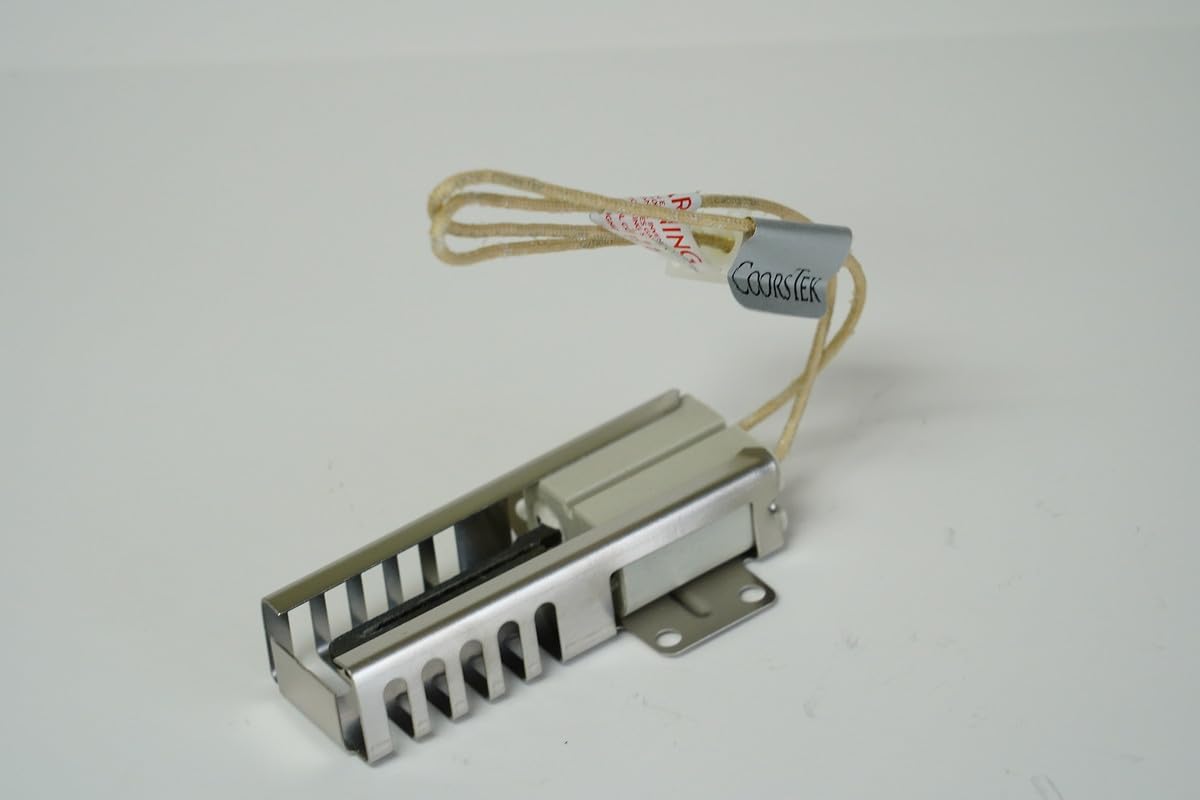
Figure 1: Overall view of the Gas Range Oven Igniter, showing its compact design and wiring.
2. Safety Information
WARNING: Installation and servicing of gas appliances should only be performed by a qualified professional. Failure to follow these instructions could result in fire, explosion, electrical shock, or property damage.
- Always disconnect power to the appliance at the circuit breaker or fuse box before attempting any service or repair.
- Turn off the gas supply to the appliance before beginning any work.
- Wear appropriate personal protective equipment, such as gloves and eye protection.
- Ensure the work area is well-ventilated.
- Check for gas leaks after reconnecting the gas supply using a non-corrosive leak detection solution.
3. Package Contents
The package includes the following:
- 1 x Gas Range Oven Igniter
4. Specifications
| Attribute | Value |
|---|---|
| Product Dimensions | 3.75 x 1.75 x 0.81 inches |
| Item Weight | 0.29 pounds |
| Operating Voltage | 120V (Standard Connection) |
| Component Type | High-temperature ceramic bar igniter with metal mounting bracket |
5. Compatibility
This igniter is compatible with a wide range of Jenn-Air gas range oven models. To quickly check compatibility, use the shortcut Ctrl+F (or Cmd+F on Mac) and paste your oven's model number into the search box.
Known compatible Jenn-Air models include, but are not limited to:
- JGW8130DDB12, JGW8130DDW12, JGR8875QDS, JGR8775QDS, JGS8850ADS, JGS8860BDP, JGR8875RDS, JGR8855BDS, JGR8875QDW, JGS8850ADW, JGS8850BDS, JGS8750BDS, JGW8130DDB, JGR8775QDQ, JGR8875QDB, JGS8750ADS, JGS8850ADB, JGR8775QDB, JGR8850BDW, JGS8750ADB, JGR8775QDW, JGR8875RDB, JGR8750BDW, JGR8775RDS, JGS8750ADW, JGS8850BDB, JGR8775RDW, JGR8850ADQ, JGR8850BDB, JGW8130DDW, JGR8775RDB, JGR8875RDW, JGS8750BDB, JGS8850ADQ, JGS8850BDQ
- JGR8730ADQ, JGR8730ADW, JGR8750ADQ, JGR8750BDB, JGR8750BDQ, JGR8850BDQ, JGR8885RDP, JGS8750BDW, JGS8750CDS01, JGS8850BDW, JGR8875RDB1, JGR8875RDS1, JGR8875RDW1, JGS8750BDB16, JGS8750BDS17, JGS8750BDW16, JGS8850BDS17, JGS8860BDP17, JGW8130DDB12, JGW8130DDB15, JGW8130DDW12, JGW8130DDW15
6. Installation Guide (Replacement)
This section provides general steps for replacing a gas oven igniter. Specific procedures may vary slightly depending on your oven model. Always refer to your appliance's service manual for detailed instructions.
Tools Required:
- Screwdriver (Phillips and/or Flathead)
- Nut Driver or Socket Wrench Set
- Wire Strippers/Crimpers (if connector needs replacement)
- Flashlight
- Work Gloves
Installation Steps:
- Prepare the Appliance: Ensure the oven is cool. Disconnect the appliance from the electrical power supply by unplugging it or turning off the circuit breaker. Turn off the gas supply valve to the oven.
- Access the Igniter: Open the oven door and remove the oven racks. Locate the bottom oven panel (oven floor) and remove the screws holding it in place. Lift and remove the panel to expose the bake burner tube and igniter.
- Disconnect the Old Igniter: The igniter is typically mounted to the bake burner tube with one or two screws. Remove these screws. Carefully pull the igniter away from the burner tube. Follow the igniter wires back to where they connect to the main oven wiring harness. This connection is usually a ceramic wire nut or a plastic quick-disconnect plug.

Figure 2: Detail of the electrical connector, which typically connects the igniter to the oven's wiring harness.
If it's a quick-disconnect plug, simply pull it apart. If it's a ceramic wire nut, unscrew it. Note the wire routing for reassembly.
- Install the New Igniter: Connect the wires of the new igniter to the oven's wiring harness. Ensure connections are secure. Mount the new igniter to the bake burner tube using the screws removed earlier. Ensure the igniter is positioned correctly, typically with the ceramic bar facing the gas ports of the burner tube.

Figure 3: The ceramic bar of the igniter, which glows red hot to ignite the gas.

Figure 4: Underside view of the igniter, highlighting the metal mounting bracket for secure attachment.
- Reassemble and Test: Replace the oven bottom panel and secure it with its screws. Replace oven racks. Turn the gas supply back on. Reconnect the electrical power to the oven. Test the oven's bake function to ensure the igniter glows and the gas ignites properly. Listen for any gas leaks.
7. Operating Principle
The gas oven igniter operates on a simple yet effective principle. When the oven is set to bake or broil, an electrical current is sent to the igniter. The igniter, made of a special ceramic material, heats up rapidly, glowing bright red. This intense heat creates a hot spot that is sufficient to ignite the gas flowing from the burner tube. Once the gas ignites, the igniter continues to draw current, acting as a flame sensor to ensure the gas valve remains open and the flame is sustained. If the igniter fails to sense a flame, the gas valve will close as a safety measure.
8. Maintenance
The oven igniter is a sealed component and generally requires no routine maintenance. However, regular inspection during oven cleaning or other servicing can help identify potential issues early:
- Visually inspect the ceramic bar for cracks or damage. A cracked igniter will not function correctly.
- Ensure the mounting bracket is secure and the igniter is not loose.
- Keep the area around the igniter and burner tube free from food debris or grease buildup, which can impede proper operation.
9. Troubleshooting
If your oven is experiencing issues related to ignition, the igniter may be the cause. Here are common symptoms and potential solutions:
| Symptom | Possible Cause | Solution |
|---|---|---|
| Oven not heating / No gas ignition | Faulty igniter, loose wiring connection, gas supply off | Check gas supply. Inspect igniter for glow. If no glow, check wiring connections. Replace igniter if it doesn't glow or glows dimly. |
| Oven heats slowly / Takes long to ignite | Weak igniter (not drawing enough current) | The igniter may be failing. A weak igniter will not get hot enough to open the gas valve quickly. Replacement is usually required. |
| Igniter glows but no gas ignition | Gas supply issue, faulty gas valve, igniter not hot enough | Ensure gas supply is on. If igniter glows brightly but no gas, the gas valve might be faulty. If glow is weak, replace igniter. Professional diagnosis recommended. |
If troubleshooting steps do not resolve the issue, it is recommended to consult a qualified appliance repair technician.
10. Warranty and Support
This Gas Range Oven Igniter comes with a 1-Year Manufacturer Warranty from the date of purchase. This warranty covers defects in materials and workmanship under normal use.
For warranty claims, technical support, or further assistance, please contact the seller or manufacturer directly. Keep your proof of purchase for warranty validation.