1. Introduction
This manual provides detailed instructions for the setup, operation, and maintenance of your AISLPC R36T Retro Gaming Console. Please read this manual thoroughly before using the device to ensure proper functionality and to maximize your gaming experience. The R36T is a handheld gaming device featuring a 3.5-inch IPS screen, designed for playing a wide variety of classic games.
2. What's in the Box
Upon opening the package, verify that all the following items are included:
- AISLPC R36T Retro Handheld Game Console
- Portable Storage Bag
- Type-C Charging Cable
- User Manual
- 64GB TF Card (pre-installed or separate)

Figure 2.1: Package Contents
This image displays the R36T console, a brown storage box, a Type-C charging cable, a user manual, and a 64GB TF card, illustrating all items included in the product package.
3. Product Overview
The AISLPC R36T is a compact handheld gaming console designed for retro gaming. It features a 3.5-inch IPS display and an intuitive control layout.
3.1 Console Components

Figure 3.1: Front View of the Console
This image shows the front of the R36T console, highlighting the 3.5-inch screen, the left D-pad, the right action buttons (X, Y, A, B), the left joystick with RGB lighting, and the 'SELECT' and 'START' buttons.

Figure 3.2: Screen Features
This diagram details the 3.5-inch IPS Full HD Color Screen, emphasizing its 640x480 pixel resolution and CRT-inspired display bezels for a classic aesthetic.

Figure 3.3: RGB Joystick Lighting
This image focuses on the console's joystick, illustrating the 16 million color RGB lighting with 16 adjustable light effects, and how to customize colors and brightness.

Figure 3.4: Ergonomic Grip Design
This image displays the rear of the R36T console, emphasizing its ergonomic curved grip designed for comfortable handling during extended play sessions, along with the placement of the back keys.
4. Setup
4.1 Initial Charging
Before first use, fully charge the console. Connect the provided Type-C charging cable to the console's charging port and the other end to a compatible USB power adapter (not included). The console features a 3500mAh battery, providing approximately 6-8 hours of gameplay on a full charge. Input power for fast charging is MAX 5V 2A.

Figure 4.1: Charging the Console
This image illustrates the charging process of the R36T console using a Type-C cable, emphasizing its 3500mAh battery and fast charging capabilities.
4.2 TF Card Installation
The console comes with a 64GB TF card pre-loaded with over 18,000 classic games. If the TF card is not pre-installed, locate the TF card slot on the side of the console and gently insert the card until it clicks into place. Ensure the console is powered off before inserting or removing the TF card.
5. Operating Instructions
5.1 Power On/Off
- To power on: Press and hold the power button until the screen illuminates.
- To power off: Press and hold the power button, then select the power off option from the menu.
5.2 Navigating the EmuELEC System
The R36T operates on the EmuELEC system, providing access to various game simulators. Use the D-pad or joystick to navigate through menus and select games. The 'A' button typically confirms selections, and the 'B' button returns to the previous screen.

Figure 5.1: EmuELEC System Interface
This image displays the EmuELEC system interface on the R36T console, highlighting its design for game selection and system navigation.
5.3 Playing Games
From the main menu, select your desired game simulator and then choose a game from the list. The console supports over 23 game simulators and comes with a vast library of classic games.
5.4 WiFi Networked Multiplayer
The R36T supports 5G WiFi for online multiplayer gaming. Follow these steps to set up a networked multiplayer session:
- Step 1: Connect to the Same Wi-Fi Network
- On both consoles, go to: MAIN MENU > Network Settings > Connect to the SAME Wi-Fi.
- Critical: Use identical Wi-Fi (e.g., "Home_Network").
- Once connected, note your Host Player's IP address.
- Step 2: Launch the Same Game
- Launch the desired game on both consoles via the Game & RetroArch Menu.
- Open the SAME game on both devices.
- Press 'Select + X' simultaneously, then tap 'B' to open RetroArch Menu.
- Step 3: Connecting Consoles
- Player 1 (Host): Navigate to: Netplay > Host > Start Netplay Host.
- Player 2 (Client): Go to: Netplay > Connect to Netplay Host. Manually enter Player 1's IP address, then press 'X' to connect.
- Step 4: Fight!
- Start the battle! When screens sync, Player 1 (Host) selects 'Multiplayer Mode'.
- Player 1's console will be the "Main Control Handle" by default.
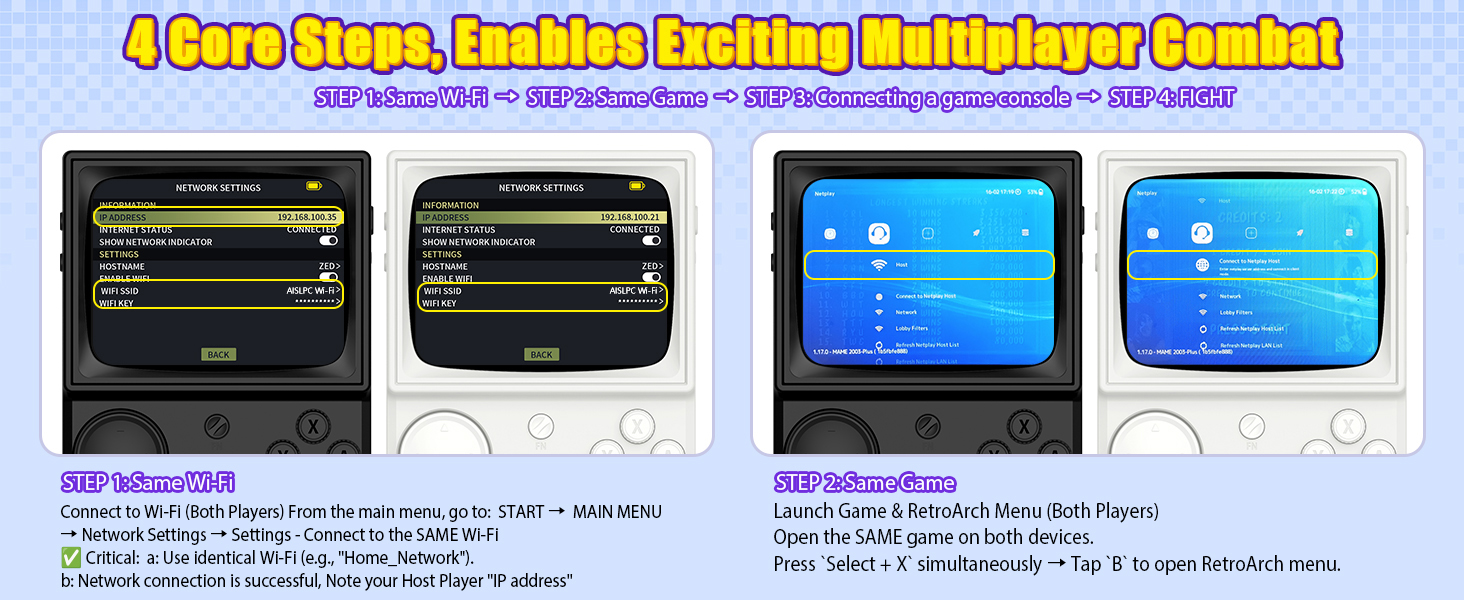
Figure 5.2: Multiplayer Setup - Step 1 (Wi-Fi Connection)
This image illustrates the first step in setting up multiplayer gaming on the R36T, showing two consoles connecting to the same Wi-Fi network and noting the IP address.
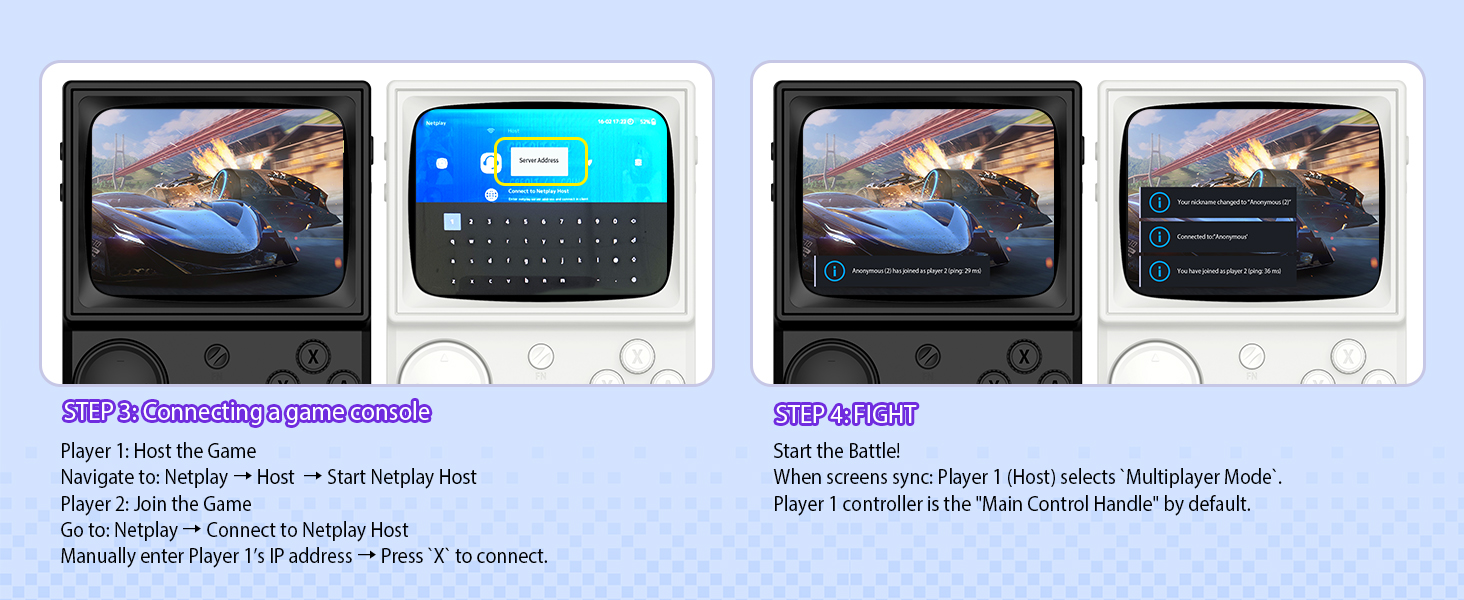
Figure 5.3: Multiplayer Setup - Steps 2, 3, 4 (Game Launch, Connection, Play)
This image details the subsequent steps for R36T multiplayer: launching the same game on both devices, connecting the consoles via Netplay (host and client), and initiating gameplay.
5.5 OTG Wireless Controller Support
The R36T supports 2.4G OTG wireless controllers, allowing for external controller connectivity. This feature enhances gameplay flexibility, especially for certain game types or for users who prefer a different control scheme.
6. Customization
6.1 RGB Joystick Lighting
The console's joystick features customizable RGB lighting with 16 million colors and 16 adjustable light effects. You can freely turn these lights on or off and adjust their appearance.
- Quick Settings: Access the lighting options through the Frontend Interface: START > EmuELEC SETTINGS > LED MODE.
- Available modes include: Always mode, Breath light fast, Simulator Phantom, Joystick Chasing light, Monochromatic Rainbow, Multicolor Rainbow.
- Options to customize colors and brightness are also available.
7. Maintenance
7.1 Cleaning
To clean the console, use a soft, dry cloth. Avoid using liquid cleaners or abrasive materials, as these can damage the screen or casing. For stubborn dirt, slightly dampen the cloth with water, ensuring no moisture enters the device openings.
7.2 Battery Care
To prolong battery life:
- Avoid fully discharging the battery frequently.
- Store the console in a cool, dry place when not in use for extended periods.
- Do not expose the console to extreme temperatures.
8. Troubleshooting
| Problem | Possible Cause | Solution |
|---|---|---|
| Console does not power on. | Low battery; faulty charging cable/adapter. | Charge the console for at least 30 minutes. Try a different Type-C cable and power adapter. |
| Games are not loading. | TF card not properly inserted; corrupted game files. | Ensure the TF card is correctly inserted. Reformat the TF card and re-add game files if necessary (advanced users). |
| Poor Wi-Fi connection. | Distance from router; interference. | Move closer to the Wi-Fi router. Ensure no obstructions are blocking the signal. |
| Joystick/buttons unresponsive. | Software glitch; physical damage. | Restart the console. If the issue persists, contact customer support. |
9. Specifications
| Feature | Detail |
|---|---|
| Model Number | R36T |
| Screen Size | 3.5 Inches |
| Display Type | IPS LCD, 640x480 Pixel Resolution |
| Processor | RK3326 (ARM 64bit Quad Core Cortex-A35 CPU) |
| Operating System | EmuELEC System |
| Memory Storage Capacity | 64 GB (TF Card) |
| Battery | 3500mAh Lithium-Ion |
| Battery Life | 6-8 Hours |
| Connectivity | 5G WiFi, 2.4G OTG Wireless Controller Support |
| Material | Plastic |
| Product Dimensions | 5 x 2 x 6 inches |
| Item Weight | 12.3 ounces |
10. Warranty and Support
For warranty information and technical support, please refer to the documentation provided with your purchase or visit the official AISLPC website. Keep your proof of purchase for any warranty claims.
Manufacturer: AISLPC