1. Introduction
This manual provides detailed instructions for the setup, operation, maintenance, and troubleshooting of your Epson EcoTank ET-4950 Wireless All-in-One Color Supertank Printer. The ET-4950 is designed for home office environments, offering print, scan, copy, and fax functionalities with a cartridge-free ink system.
Key features include:
- Integrated ink tanks for high-capacity, low-cost printing.
- Wireless and Ethernet connectivity for flexible placement and usage.
- Automatic Document Feeder (ADF) for multi-page scanning and copying.
- Automatic duplex printing to save paper.
- 2.4-inch color touchscreen for intuitive navigation.
- PrecisionCore Heat-Free technology for reliable performance.
2. What's in the Box
Upon unpacking your Epson EcoTank ET-4950, verify that all the following components are included:
- Epson EcoTank ET-4950 All-in-One Printer
- Power Cord
- 1 bottle of 502 Black Ink (127 mL)
- 1 bottle each of 502 Cyan, Magenta, Yellow Ink (70 mL each)
- Setup Guide / Manual
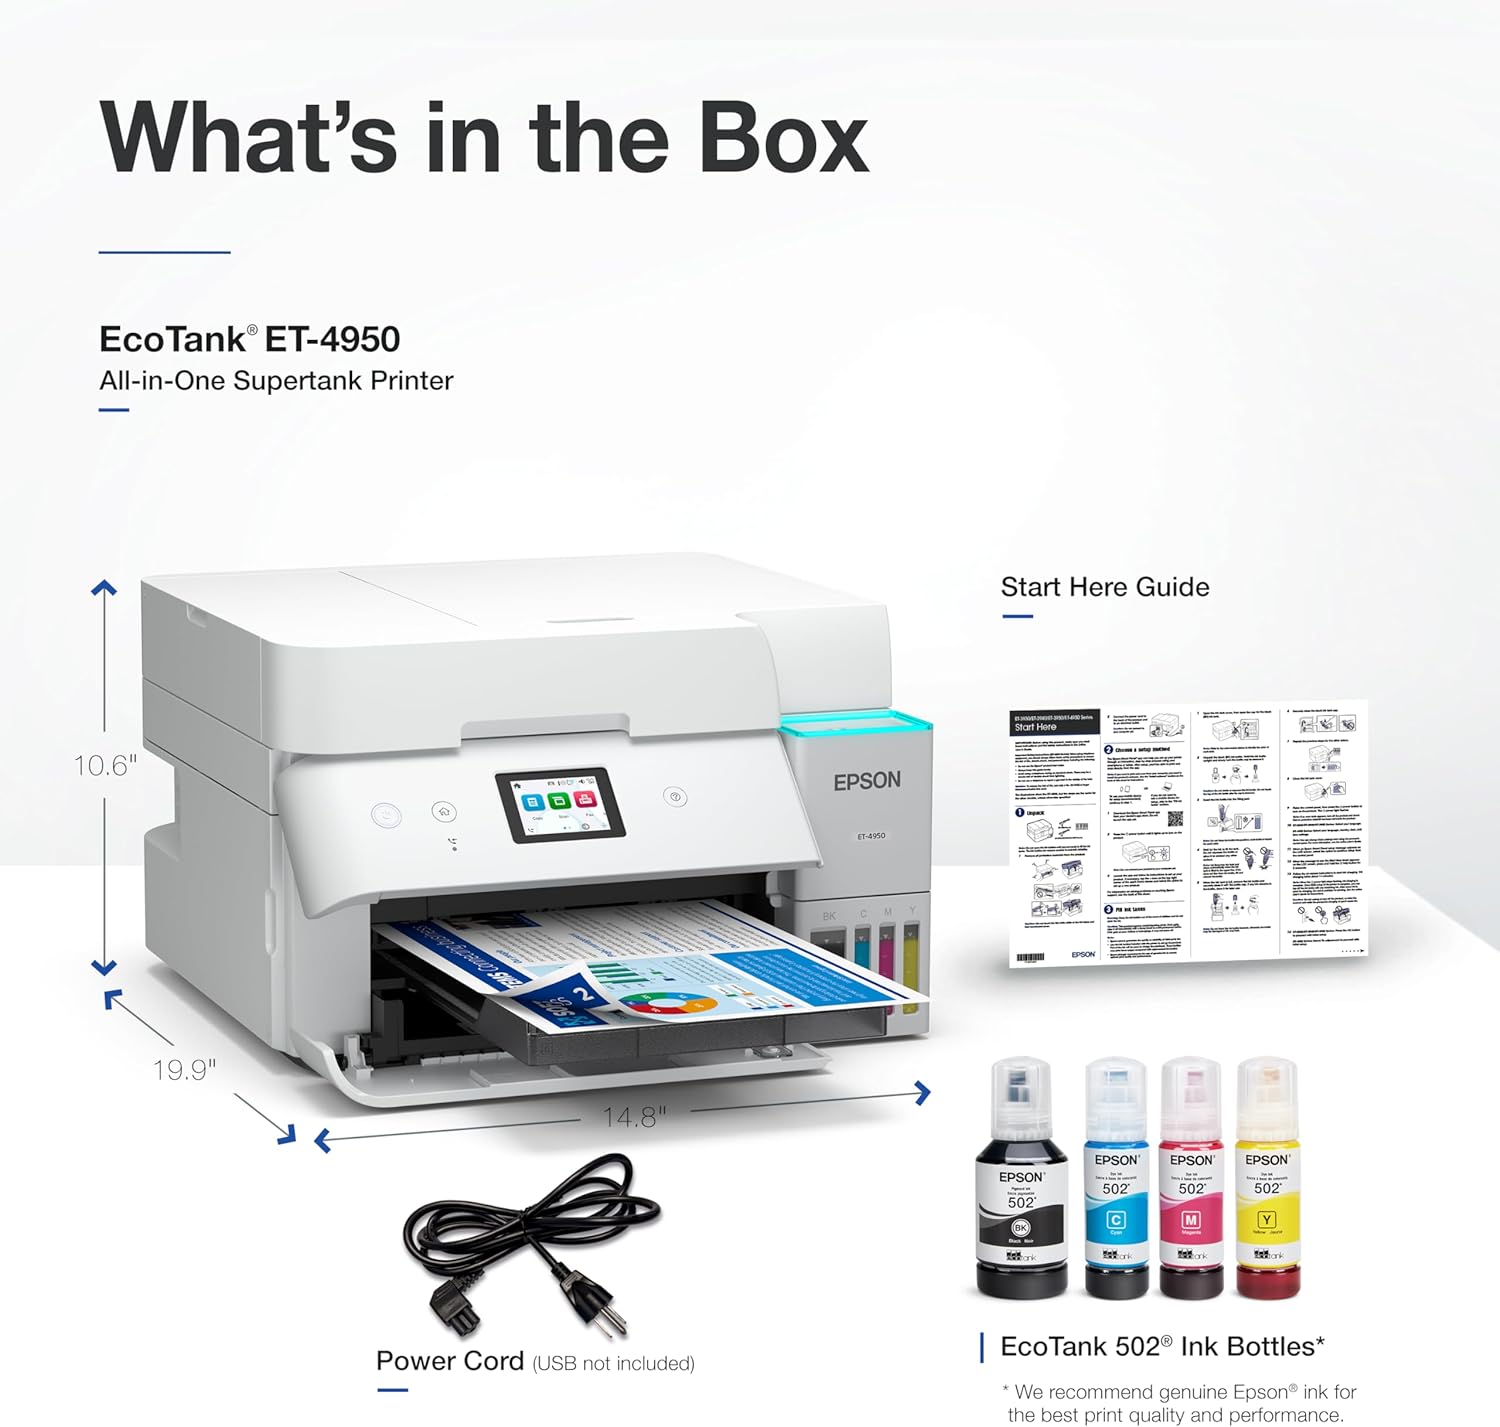
Image: Contents of the Epson EcoTank ET-4950 package, including the printer, ink bottles, power cord, and manual.
3. Setup Guide
3.1 Unpacking and Placement
Remove all protective materials and tape from the printer. Place the printer on a stable, flat surface with adequate space for paper trays and ventilation.
3.2 Power Connection
Connect the power cord to the printer and then to a power outlet. Do not turn on the printer yet.
3.3 Ink Filling
The EcoTank system uses refillable ink tanks. Follow these steps to fill the ink tanks:
- Open the ink tank unit cover on the side of the printer.
- Open the cap for the black ink tank.
- Uncap the black ink bottle. The EcoFit bottles are uniquely keyed to fit only the correct color tank, preventing mix-ups.
- Insert the ink bottle into the tank's filling port. The ink will automatically start to fill the tank. Do not squeeze the bottle.
- Once the tank is full, remove the bottle and recap the ink tank securely.
- Repeat this process for the Cyan, Magenta, and Yellow ink tanks.
- Close the ink tank unit cover.

Image: Illustration of the ink refilling process using Epson EcoFit bottles for the EcoTank ET-4950 printer.
3.4 Initial Power On and Configuration
After filling the ink tanks, turn on the printer. Follow the on-screen instructions on the 2.4-inch color touchscreen to complete the initial setup, including language selection, date/time, and ink initialization. Ink initialization may take several minutes.
3.5 Connectivity
The ET-4950 supports Wi-Fi, Ethernet, and USB connectivity.
- Wi-Fi Setup: On the printer's touchscreen, navigate to the Wi-Fi settings and select your network. Enter the password if prompted.
- Ethernet Setup: Connect an Ethernet cable from your router or network switch to the printer's Ethernet port.
- USB Setup: Connect a USB cable (not included) from your computer to the printer's USB port.
Install the necessary drivers and software on your computer from the Epson support website or the included CD (if applicable) to ensure full functionality.
4. Operation
The Epson EcoTank ET-4950 offers various functions accessible via the control panel or connected devices.

Image: The Epson EcoTank ET-4950 highlighting its multi-function capabilities and print speed specifications.
4.1 Printing
To print documents or photos:
- Load paper into the 250-sheet paper tray.
- From your computer or mobile device, select the print option in your application.
- Choose the Epson ET-4950 as your printer.
- Adjust print settings such as paper size, type, color/monochrome, and duplex printing (automatic two-sided printing) as needed.
- Initiate the print job. The printer offers speeds of up to 18 ISO ppm for black and 9 ISO ppm for color.
4.2 Scanning
You can scan documents using the flatbed scanner or the Automatic Document Feeder (ADF).
- Place your document on the scanner glass or in the ADF.
- From the printer's control panel or your computer's scanning software, select the scan function.
- Choose scan settings such as resolution, color mode, and destination (e.g., computer, cloud service).
- Start the scan.
4.3 Copying
To make copies:
- Place your document on the scanner glass or in the ADF.
- On the printer's control panel, select the copy function.
- Adjust settings like number of copies, color/monochrome, and paper size.
- Press the Start button to begin copying.
4.4 Faxing
The ET-4950 includes fax capabilities.
- Connect a phone line to the printer's LINE port.
- Place your document on the scanner glass or in the ADF.
- On the printer's control panel, select the fax function.
- Enter the recipient's fax number.
- Press the Start button to send the fax.
4.5 Mobile Printing
Utilize the Epson Smart Panel app (available for iOS and Android) for enhanced mobile printing and scanning. The printer also supports Apple AirPrint for direct printing from Apple devices.
5. Maintenance
5.1 Ink Refilling
When an ink tank level is low, refill it promptly using genuine Epson 502 ink bottles. Refer to section 3.3 for detailed ink filling instructions. Using non-genuine ink may cause damage not covered by the printer's limited warranty.

Image: Epson's commitment to genuine ink, recommending authentic Epson ink for optimal print quality and performance.
5.2 Cleaning
Regular cleaning helps maintain print quality and printer longevity.
- Exterior: Wipe the exterior of the printer with a soft, damp cloth.
- Scanner Glass: Clean the scanner glass with a soft, lint-free cloth and a mild glass cleaner.
- Print Head Cleaning: If print quality declines (e.g., missing lines, streaking), perform a print head cleaning cycle through the printer's control panel or printer software.
6. Troubleshooting
This section addresses common issues you might encounter with your ET-4950 printer.
6.1 Paper Jams
If a paper jam occurs:
- Turn off the printer.
- Carefully remove any jammed paper from the input tray, output tray, or inside the printer. Avoid tearing the paper.
- Important Note: If the printer is turned off, remove all paper from the paper tray before turning it back on. Once the printer has completed its startup sequence, then reload the paper. This can prevent paper feeding issues.
- Close all covers and turn the printer back on.
6.2 Print Quality Issues
If prints are faded, streaky, or have incorrect colors:
- Check ink levels and refill any low tanks.
- Perform a nozzle check to identify clogged nozzles.
- Run a print head cleaning cycle from the printer's maintenance menu.
- If issues persist, perform a print head alignment.
6.3 Connectivity Problems
If the printer cannot connect to your network or computer:
- Ensure the printer is within range of your Wi-Fi router.
- Restart your router, computer, and printer.
- Verify Wi-Fi settings on the printer's control panel.
- For Ethernet connections, check the cable and router connection.
- For USB connections, ensure the cable is securely connected and try a different USB port.
- Update printer drivers on your computer.
7. Specifications
| Feature | Specification |
|---|---|
| Product Dimensions (D x W x H) | 13.7" x 14.8" x 9.4" |
| Item Weight | 16.1 pounds |
| Printing Technology | Inkjet (PrecisionCore Heat-Free) |
| Printer Output | Color |
| Max Print Speed (Monochrome) | 18 ppm (ISO) |
| Max Print Speed (Color) | 9 ppm (ISO) |
| Maximum Print Resolution | 4800 x 1200 dpi |
| Scanner Type | Flatbed, Sheetfed (ADF) |
| Max Copy Speed (Black & White) | 18 ppm |
| Maximum Copies per Run | 99 |
| Max Input Sheet Capacity | 250 sheets |
| Duplex Printing | Automatic |
| Connectivity Technology | Ethernet, USB, Wi-Fi |
| Control Panel | 2.4" Color Touchscreen |
| Power Consumption | 15 Watts (On-mode) |
| Compatible Ink | Epson 502 ink |
8. Warranty and Support
8.1 Warranty Information
The Epson EcoTank ET-4950 comes with a Limited Warranty. For specific terms and conditions, please refer to the warranty documentation included with your product or visit the official Epson support website.
8.2 Customer Support
For further assistance, technical support, or to download the latest drivers and software, please visit the official Epson support website. You can also find contact information for customer service there.


