1. Introduction
This manual provides essential instructions for the safe and effective replacement of the Wxvuqpkg TV Motherboard, compatible with specific 40-inch TV models including UE40J5270, UE43J5202, UE48J6200, and UE48J5205. This replacement part is designed to restore core TV functionalities such as image, sound, and signal processing. Please read this manual thoroughly before attempting any installation.
2. Safety Information
- Disconnect Power: Always ensure the TV is completely unplugged from the power outlet before beginning any repair or installation work.
- Static Electricity: Wear an anti-static wrist strap or frequently touch a grounded metal object to discharge static electricity, which can damage sensitive electronic components.
- Professional Installation Recommended: TV repair involves working with high voltage components. If you are not experienced with electronics repair, it is highly recommended to seek assistance from a qualified technician.
- Handle with Care: Motherboards contain delicate components. Avoid touching integrated circuits and connectors directly. Hold the board by its edges.
- Ventilation: Ensure adequate ventilation during and after installation to prevent overheating.
3. Package Contents
Verify that your package contains the following item:
- 1 x Wxvuqpkg TV Motherboard (Model: BN41-02482A / BN41-02482 / BN94-10867H)
Note: Additional tools for installation (e.g., screwdrivers, anti-static mat) are not included and must be acquired separately.
4. Setup and Installation
Follow these steps carefully for motherboard replacement. Refer to your TV's specific service manual for detailed disassembly instructions if available.
- Preparation:
- Unplug the TV from all power sources and connected devices.
- Place the TV face down on a soft, clean surface to protect the screen.
- Gather necessary tools (screwdrivers, anti-static wrist strap).
- Open TV Casing: Carefully remove the back cover of the TV by unscrewing all retaining screws. Keep track of screw locations.
- Locate and Disconnect Old Motherboard: Identify the existing motherboard. Disconnect all cables connected to it, including power cables, ribbon cables (LVDS), and input/output cables. Take photos before disconnecting to aid reassembly.
- Remove Old Motherboard: Unscrew the motherboard from the TV chassis. Gently lift and remove the old board.
- Install New Motherboard: Carefully position the new Wxvuqpkg motherboard into the chassis, aligning it with the screw holes and connectors. Secure it with the screws removed earlier.
- Reconnect Cables: Reconnect all cables to the new motherboard. Ensure all connections are firm and correctly oriented. Refer to your photos taken during disassembly.

Image 1: Top view of the Wxvuqpkg TV Motherboard BN41-02482A. This image displays the main components, including the central processing unit under a heatsink, memory modules, and various input/output connectors. Note the arrangement of chips and circuit traces.

Image 2: Close-up of the Wxvuqpkg TV Motherboard BN41-02482A's input/output section. This view clearly shows the composite video (yellow) and stereo audio (red/white) RCA ports, as well as the coaxial input for the TV tuner. The integrated tuner module is also visible.
- Close TV Casing: Once all connections are secure, carefully replace the TV back cover and fasten all screws.
- Initial Test: Plug the TV back into the power outlet. Power on the TV and check for basic functionality (power on, display, sound, input recognition).
5. Operating
After successful installation, the TV should operate as normal. The motherboard is responsible for the core functions of your television. No specific operating instructions are required for the motherboard itself, as its function is to enable the TV's standard operation. If the TV powers on and displays an image, the motherboard is functioning correctly.
- Power On: Use the TV remote or power button to turn on the television.
- Input Selection: Verify that all input ports (HDMI, AV, USB) are recognized and function correctly by connecting external devices.
- Picture and Sound: Confirm that picture and sound are clear and stable.
6. Maintenance
The TV motherboard itself requires no routine maintenance. To ensure its longevity and optimal performance, follow these general guidelines for your television:
- Keep Clean: Regularly clean the TV's exterior and ventilation openings to prevent dust buildup, which can impede heat dissipation.
- Proper Ventilation: Ensure the TV has adequate space around its ventilation ports to allow for proper airflow. Avoid blocking these openings.
- Stable Power: Use a surge protector to protect the TV from power fluctuations.
- Avoid Liquids: Keep liquids away from the TV to prevent accidental spills and short circuits.
7. Troubleshooting
If you encounter issues after replacing the motherboard, consider the following troubleshooting steps:
- No Power:
- Check if the power cable is securely connected to both the TV and the wall outlet.
- Ensure the power supply unit (if external) is functioning.
- Verify all internal power connections to the motherboard are secure.
- No Picture / Distorted Picture:
- Check the LVDS (ribbon) cable connection between the motherboard and the display panel. Ensure it is fully seated and not damaged.
- Confirm the input source is correctly selected and the external device is working.
- If only a portion of the screen is distorted, it might indicate a panel issue or a faulty T-Con board, not necessarily the motherboard.
- No Sound:
- Check speaker connections to the motherboard.
- Ensure volume is not muted or set too low.
- Test with different audio sources or external speakers.
- Remote Control Not Responding:
- Check the remote control's batteries.
- Ensure the IR receiver cable (if separate) is properly connected to the motherboard.
If these steps do not resolve the issue, professional diagnosis may be required.
8. Specifications
| Feature | Description |
|---|---|
| Brand | Wxvuqpkg |
| Model Numbers | BN41-02482A, BN41-02482, BN94-10867H |
| Compatible TV Models | UE40J5270, UE43J5202, UE48J6200, UE48J5205 (40 Inch variant) |
| Core Functionality | Integrates main control chip for images, sound, and signal processing. |
| Performance | Optimized circuit design for long-term stable operation. |
| Image Quality | Built-in image processing chip for enhanced resolution, color, and dynamic compensation. |
| Power Consumption | Efficient components and circuit layout for reduced power consumption. |
| Heat Dissipation | Arranged components and designed paths to prevent overheating. |
| Dimensions (Approx.) | 1 x 1 x 1 cm (Parcel Dimensions) |
| Weight (Approx.) | 50 g (Parcel Weight) |
| Origin | Mainland China |
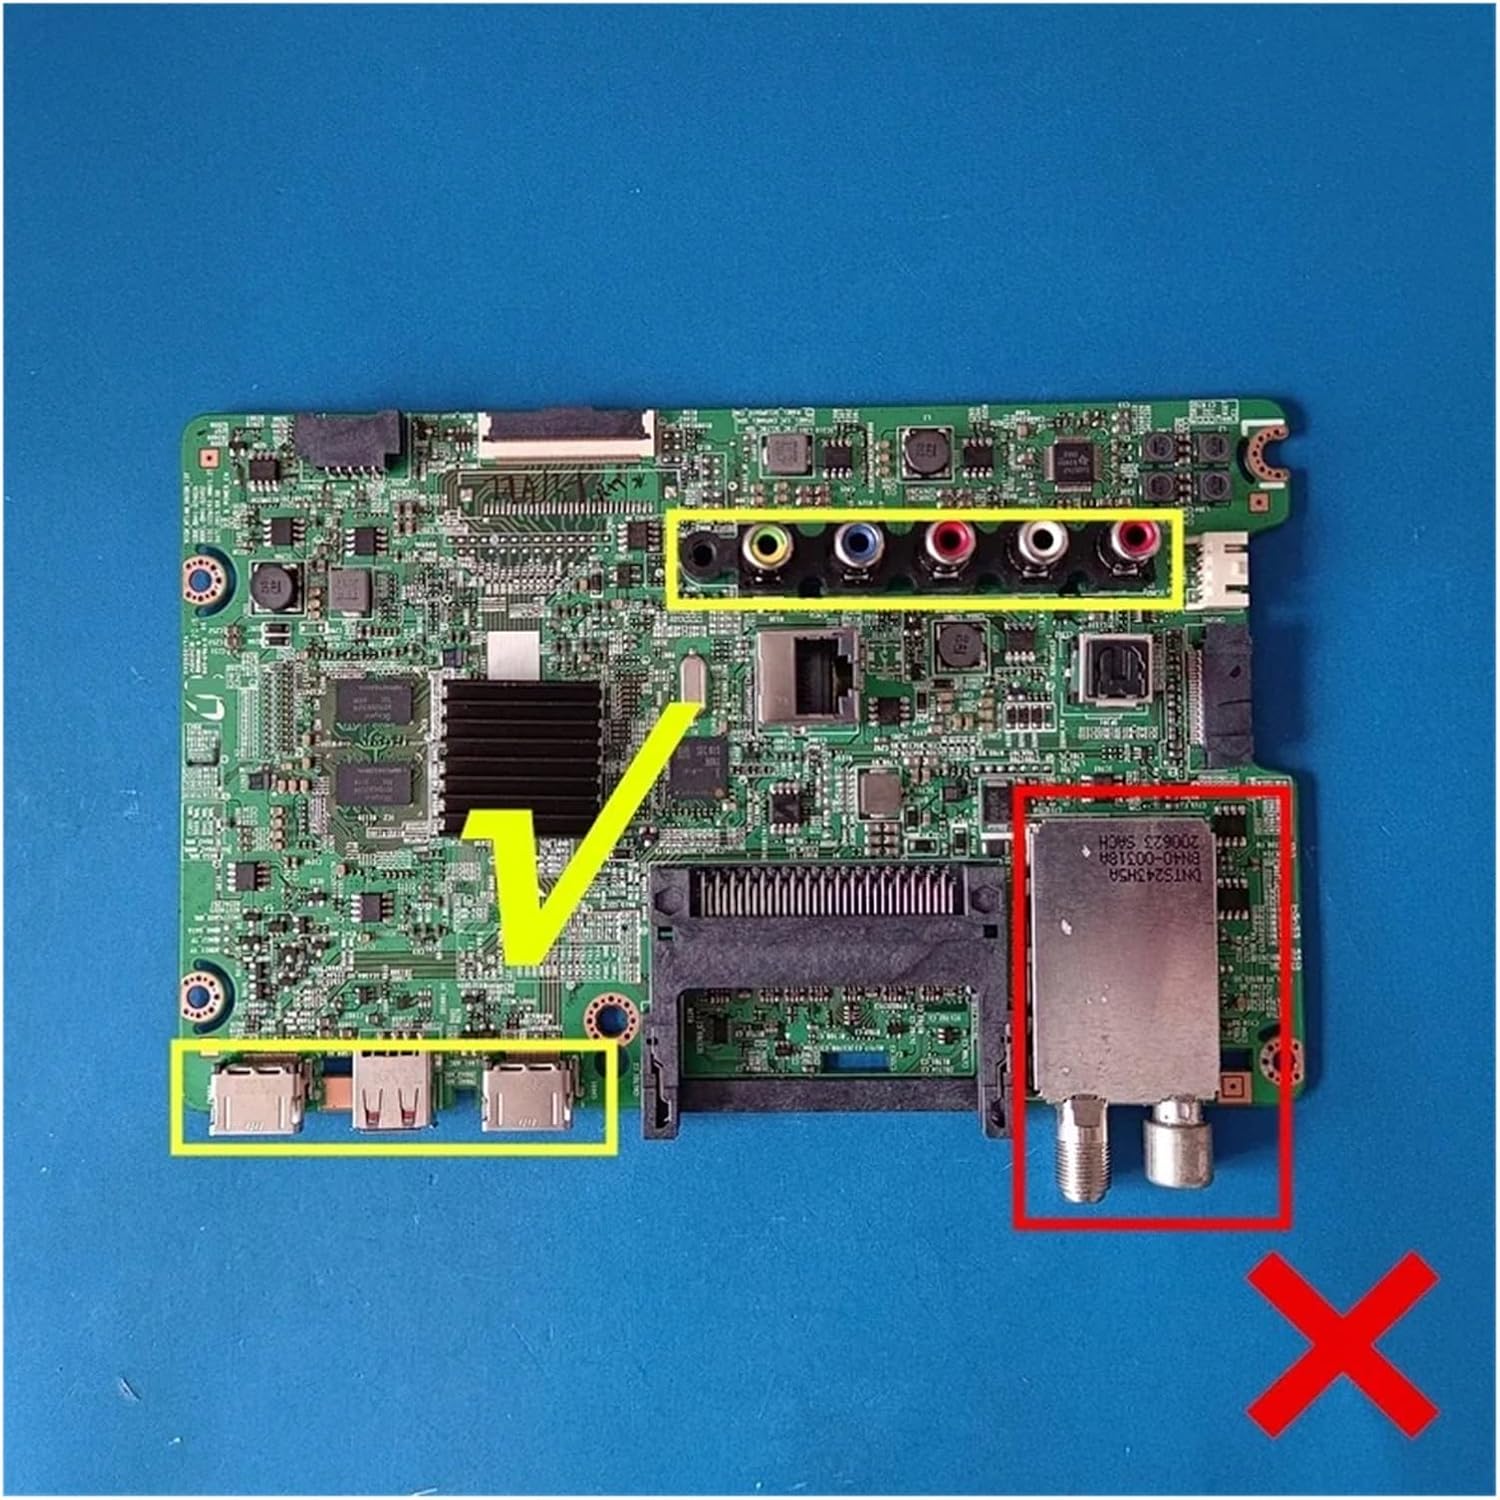
Image 3: Wxvuqpkg TV Motherboard BN41-02482A with key areas highlighted. The yellow boxes indicate the USB ports and the analog audio/video input ports. The red box highlights the tuner module. The green checkmark indicates the correct orientation for these connections, while the red 'X' indicates an area to avoid or a component that may vary.

Image 4: Bottom view of the Wxvuqpkg TV Motherboard BN41-02482A. This image shows the reverse side of the circuit board, revealing solder points, various small components, and the intricate network of circuit traces that connect the different parts of the motherboard.
9. Warranty and Support
Specific warranty details for this replacement part should be obtained directly from your seller at the time of purchase. For technical support or further assistance with installation and troubleshooting, please contact the vendor or a qualified electronics repair professional.