Introduction
Thank you for purchasing the Graigar WS6681 Wireless Weather Clock. This device provides comprehensive environmental monitoring, including indoor and outdoor temperature and humidity, weather forecasting, and timekeeping functions. It supports up to three remote sensors for multi-location monitoring and features a clear digital display with comfort indicators and an ice alert. Please read this manual carefully to ensure proper setup and operation of your new weather clock.
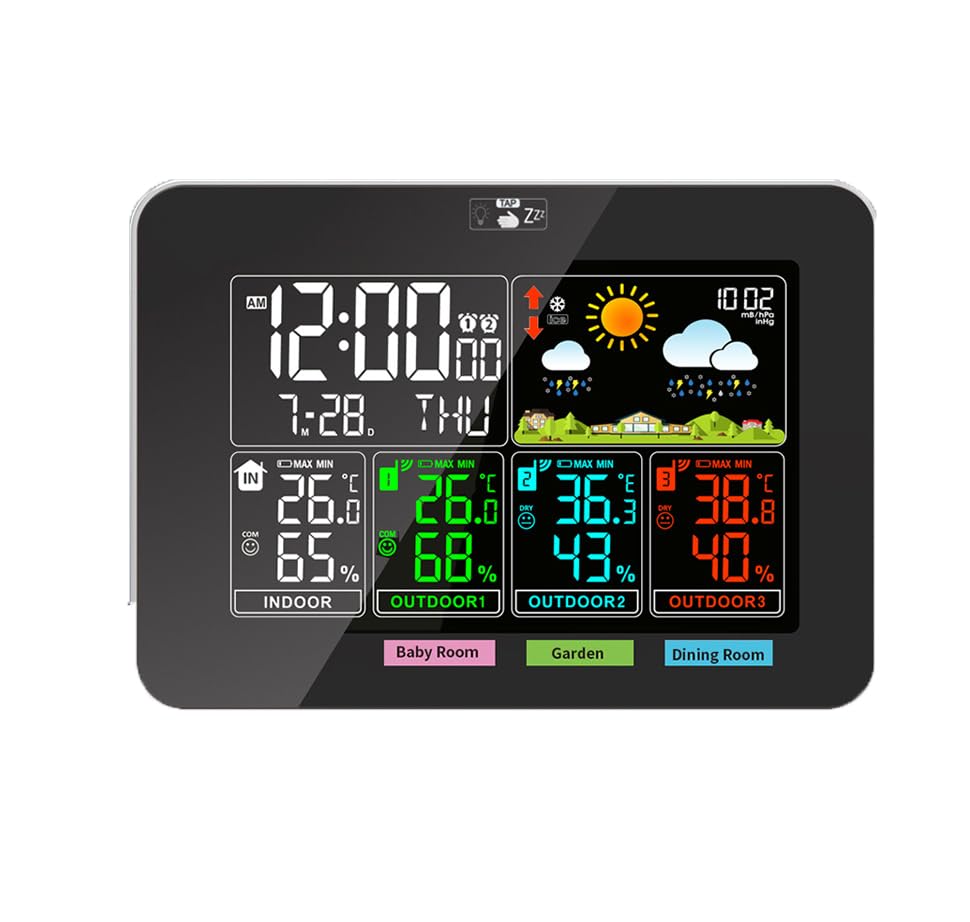
Figure 1: Front view of the WS6681 Wireless Weather Clock displaying time, weather forecast, and indoor/outdoor temperature and humidity readings.
Package Contents
- 1 x WS6681 Main Weather Clock Unit
- 3 x Wireless Remote Sensors
- 1 x USB Power Cable (DC 5V)
- 1 x User Manual (this document)

Figure 2: The main weather clock unit, three wireless remote sensors, and the USB power cable included in the package.
Setup
1. Powering the Main Unit
- Locate the battery compartment on the back of the main unit.
- Insert 2 AAA batteries (not included) into the compartment, observing the correct polarity (+/-).
- Alternatively, connect the provided USB power cable to the DC 5V port on the main unit and plug the other end into a USB power source (e.g., computer USB port, USB wall adapter - not included).
2. Powering the Remote Sensors
- Open the battery compartment on the back of each remote sensor.
- Insert 2 AAA batteries (not included) into each sensor, observing the correct polarity (+/-).
- Close the battery compartments securely.

Figure 3: Rear view of the main unit and a remote sensor, showing the battery compartments and stand for placement.
3. Sensor Placement and Pairing
- Place the remote sensors in desired outdoor or indoor locations within the 50-meter (164 feet) transmission range in an open area. Avoid direct sunlight or rain for outdoor sensors.
- The main unit will automatically attempt to connect with the sensors upon power-up. Ensure sensors are powered on before the main unit for best results.
- If a sensor does not connect, press the CHANNEL button on the main unit to cycle through channels (1, 2, 3) and then press the TX button inside the sensor's battery compartment to force a signal transmission.
Operating Instructions
Display Overview

Figure 4: Detailed view of the WS6681 display, highlighting sections for time, calendar, weather forecast, barometric pressure, indoor temperature/humidity, and three outdoor temperature/humidity channels.
- Time & Calendar: Displays current time (12/24-hour format) and date.
- Weather Forecast: Icons indicate predicted weather conditions.
- Barometric Pressure: Shows current atmospheric pressure.
- Indoor Temperature & Humidity: Readings from the main unit's internal sensor.
- Outdoor Temperature & Humidity (Channels 1, 2, 3): Readings from the remote sensors.
- Comfort Indicator: Icons (Dry, Comfort, Wet) based on humidity levels.
Setting Time and Date
Refer to the buttons on the back of the main unit (e.g., SET, UP, DOWN, ALARM, CHANNEL).
- Press and hold the SET button to enter time setting mode.
- Use the UP or DOWN buttons to adjust the flashing value.
- Press SET again to confirm and move to the next setting (e.g., 12/24-hour format, hour, minute, year, month, day, language).
- Repeat until all settings are configured.
Alarm and Snooze Function
- Press the ALARM button to view the alarm time.
- Press and hold ALARM to enter alarm setting mode.
- Use UP or DOWN to adjust the alarm hour and minute.
- Press ALARM to confirm.
- When the alarm sounds, press any button (except Snooze/Light) to stop it, or press the SNOOZE/LIGHT button (usually on top) for a temporary snooze.
Temperature and Humidity Display
- The main unit displays indoor temperature and humidity.
- It also displays temperature and humidity for up to three remote sensors (Outdoor 1, Outdoor 2, Outdoor 3).
- Press the °C/°F button to switch between Celsius and Fahrenheit temperature units.
- The comfort indicator (Dry, Comfort, Wet) changes based on the humidity level.

Figure 5: The display showing the comfort level indicators: Dry (humidity < 40%), Comfort (40% < humidity < 70% and 20°C < temperature < 28°C), and Wet (humidity > 70%).
Maximum/Minimum Records
The device records the maximum and minimum temperature and humidity values for indoor and each outdoor channel.
- Press the MAX/MIN button repeatedly to view the maximum and minimum recorded values.
- To clear the records, press and hold the MAX/MIN button while viewing the records.
Weather Forecast and Barometric Pressure
- The weather forecast icons are based on changes in barometric pressure.
- Press the hPa/inHg button to switch between hPa/mb and inHg units for barometric pressure display.
- An ice alert icon will appear when the outdoor temperature drops to a certain level, indicating potential icy conditions.
Maintenance
- Battery Replacement: When the low battery indicator appears on the display, replace the batteries in the main unit or the respective remote sensor. Use new AAA batteries.
- Cleaning: Wipe the device and sensors with a soft, damp cloth. Do not use abrasive cleaners or immerse the units in water.
- Storage: If storing the device for an extended period, remove all batteries to prevent leakage.
Troubleshooting
| Problem | Possible Cause | Solution |
|---|---|---|
| No display on main unit | Batteries are dead or incorrectly inserted; USB power not connected. | Replace batteries, check polarity, or connect USB power. |
| Outdoor sensor not connecting | Sensor batteries are dead; sensor is out of range; interference; channel mismatch. | Replace sensor batteries. Move sensor closer to the main unit. Avoid large metal objects. Press CHANNEL on main unit and TX on sensor to re-sync. |
| Inaccurate readings | Sensor placed in direct sunlight/rain; poor ventilation. | Relocate sensor to a shaded, well-ventilated area. Ensure proper air circulation around the main unit. |
| Weather forecast incorrect | Device needs time to learn local pressure patterns. | Allow 7-14 days for the weather station to calibrate to local conditions. |
Specifications
| Parameter | Value |
|---|---|
| Indoor Temperature Range | 14.2°F (-9.9°C) ~ 122°F (50°C) |
| Outdoor Temperature Range | -4°F (-20°C) ~ 140°F (60°C) |
| Temperature Accuracy | +/- 1.8°F |
| Indoor/Outdoor Humidity Range | 20%RH ~ 95%RH |
| Humidity Accuracy | +/- 5% |
| Barometric Pressure Range | 17.72 inHg ~ 32.50 inHg & 600 hPa/mb ~ 1100 hPa/mb |
| Sensor Transmission Range | 164 feet / 50 meters (open area) |
| Data Update Interval | 60 seconds |
| Main Unit Power | 2 x AAA batteries (not included) or DC 5V USB |
| Remote Sensor Power | 2 x AAA batteries (not included) |
| Dimensions (Main Unit) | 6.5 x 4.5 x 0.98 inches |
| RF Transmitting Frequency | 433.92MHz |
Warranty and Support
For warranty information or technical support, please contact Graigar customer service. Refer to the product packaging or the official Graigar website for contact details.
Note: Specifications are subject to change without notice.