1. Introduction
This manual provides essential information for setting up, operating, maintaining, and troubleshooting your new HP All-in-One Desktop PC, Model 0024. Please read these instructions carefully to ensure proper use and longevity of your device.

Image 1.1: HP All-in-One Desktop PC, showing the display, keyboard, and mouse.
2. Package Contents
Verify that all items are present in the package:
- HP All-in-One Desktop PC (Model 0024)
- Wired Keyboard
- Wired Mouse
- Power Adapter and Cable
3. Setup
3.1 Unpacking
- Carefully remove the PC and accessories from the packaging.
- Place the PC on a stable, flat surface.
3.2 Connecting Peripherals
Connect the keyboard, mouse, and power adapter to the appropriate ports on the back of the PC.
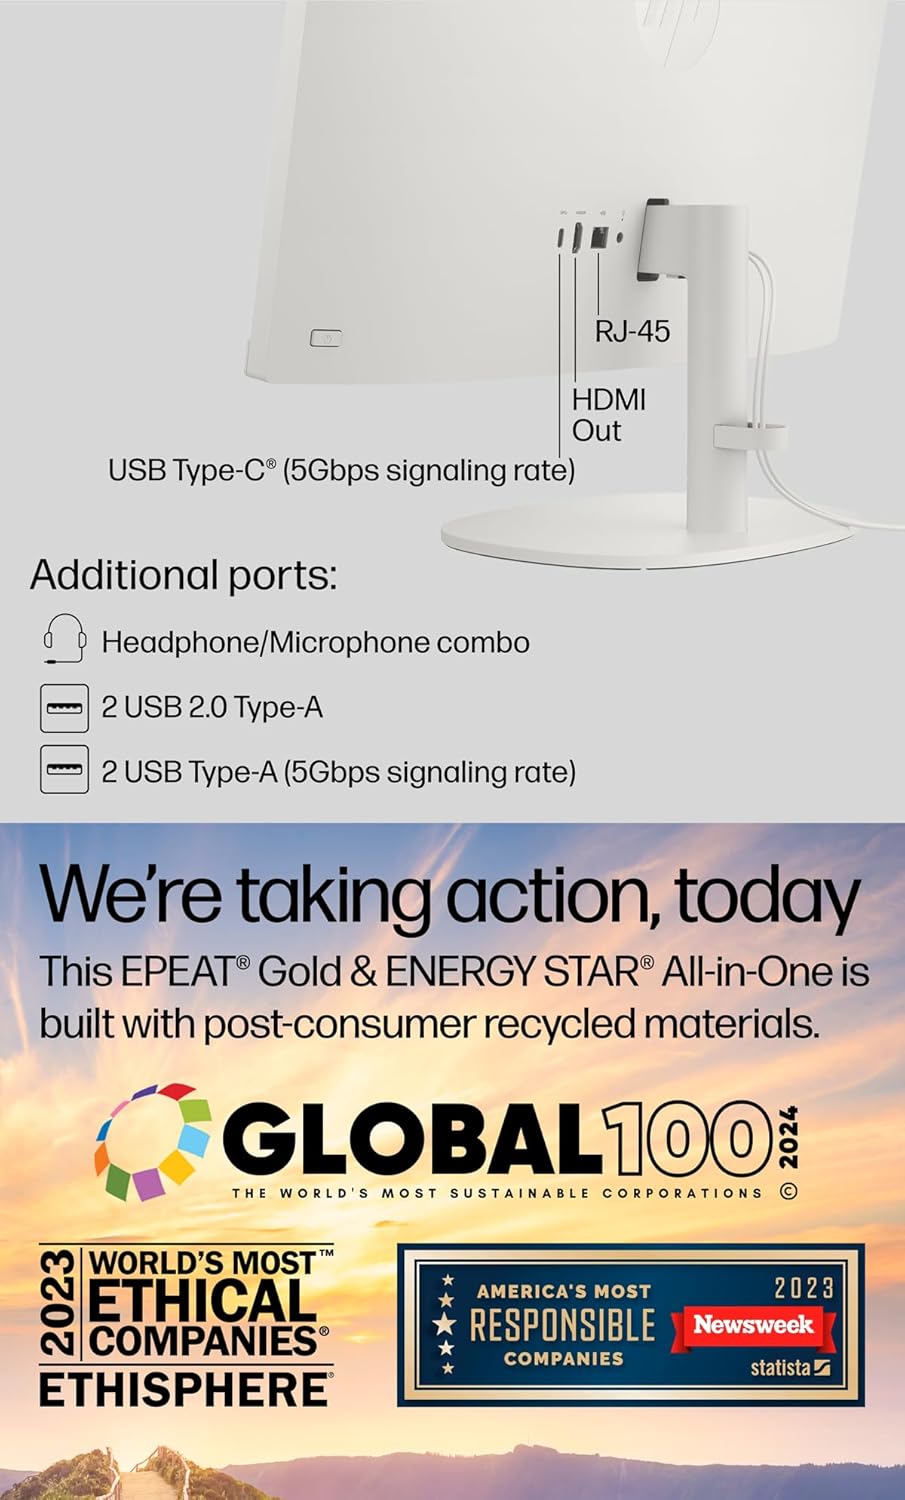
Image 3.1: Rear view of the HP All-in-One PC, highlighting the various ports for connectivity.
- Power: Connect the power cable to the power adapter, then to the PC and a wall outlet.
- Keyboard and Mouse: Connect the USB cables from the keyboard and mouse to any available USB Type-A ports on the PC.
- External Display (Optional): If using an external monitor, connect it to the HDMI-out port.
- Network (Optional): For a wired internet connection, connect an Ethernet cable to the RJ-45 port.
3.3 Initial Power On and Windows 11 Setup
- Press the power button, usually located on the side or bottom bezel of the display.
- Follow the on-screen instructions to complete the Windows 11 initial setup, including language, region, network connection, and user account creation.
- The myHP application may guide you through additional setup steps for HP-specific features.

Image 3.2: The myHP application interface, designed to simplify initial PC setup and management.
4. Operating Your PC
4.1 Basic Navigation (Windows 11)
Familiarize yourself with the Windows 11 interface:
- Start Menu: Access applications, settings, and power options.
- Taskbar: Pin frequently used applications and view open programs.
- Desktop: Your primary workspace for icons and open windows.
4.2 Connectivity
- Wi-Fi 6: To connect to a wireless network, click the network icon in the taskbar, select your desired network, and enter the password.
- Bluetooth: Enable Bluetooth in Windows Settings to pair with wireless devices like headphones or speakers.
- Ethernet: If connected via RJ-45, your PC will automatically detect the wired network.
4.3 Using the Camera and Microphone
The HP All-in-One PC features an HP True Vision 720p HD privacy camera and integrated dual array digital microphones, suitable for video calls and online meetings.

Image 4.1: A user engaged in a video conference, demonstrating the PC's camera and microphone capabilities.
- Privacy Camera: The camera includes a physical privacy shutter. Slide the shutter to cover the lens when not in use.
- Microphones: The dual array microphones are designed to capture clear audio and reduce background noise.
4.4 Ports Overview
The PC offers a variety of ports for connecting external devices:

Image 4.2: Detailed diagram illustrating the location and type of ports on the HP All-in-One PC.
- USB Type-C (5Gbps): For data transfer only.
- USB Type-A (5Gbps): High-speed USB ports for peripherals.
- USB 2.0 Type-A: Standard USB ports for peripherals.
- HDMI-out 1.4: Connects to an external display.
- Headphone/Microphone Combo: For audio input and output.
- RJ-45: For wired Ethernet network connection.
5. Maintenance
5.1 Cleaning
- Display: Use a soft, lint-free cloth slightly dampened with water or a screen cleaner. Avoid harsh chemicals.
- Chassis: Wipe with a soft, dry cloth.
- Keyboard and Mouse: Use compressed air to remove dust from crevices.
5.2 Software Updates
Regularly update your operating system and drivers to ensure optimal performance and security.
- Windows Update: Go to Settings > Windows Update to check for and install updates.
- HP Support Assistant: Use the pre-installed HP Support Assistant application to manage HP-specific driver and software updates.
5.3 Data Backup
Regularly back up your important files to an external drive or cloud storage to prevent data loss.
6. Troubleshooting
This section addresses common issues you might encounter.
- No Power:
Ensure the power cable is securely connected to the PC and the wall outlet. Test the outlet with another device. - No Display:
Check if the PC is powered on. If an external monitor is connected, ensure it is also powered on and correctly connected via HDMI. - No Internet Connection:
For Wi-Fi, verify your network password and router status. For Ethernet, ensure the cable is properly connected to the RJ-45 port and your router. - Keyboard or Mouse Not Responding:
Check USB connections. Try connecting them to different USB ports. - Slow Performance:
Close unnecessary applications. Check for available Windows updates. Consider running a disk cleanup or antivirus scan.
7. Specifications
Key technical specifications for the HP All-in-One Desktop PC, Model 0024.

Image 7.1: Physical dimensions of the HP All-in-One PC.
| Feature | Description |
|---|---|
| Model | 0024 |
| Processor | Intel Celeron J4025 (2.0 GHz base, up to 2.9 GHz, 2 cores) |
| Display | 21.5-inch FHD (1920 x 1080), VA, Anti-Glare, 250 nits, 72% NTSC |
| RAM | 12GB DDR4 (Configurable up to 64GB) |
| Storage | 1TB PCIe NVMe M.2 SSD (Configurable up to 2TB) |
| Operating System | Windows 11 Home, 64-bit |
| Graphics | Integrated Intel UHD Graphics |
| Webcam | HP True Vision 720p HD privacy camera with dual array digital microphones |
| Wireless Connectivity | Wi-Fi 6, Bluetooth |
| Ports | 1x USB Type-C (5Gbps), 2x USB Type-A (5Gbps), 2x USB 2.0 Type-A, 1x HDMI-out 1.4, 1x Headphone/Microphone combo, 1x RJ-45 |
| Dimensions (L x W x H) | 19.30 x 7.05 x 14.99 inches |
| Weight | 12.56 lbs |
8. Warranty and Support
Your HP All-in-One Desktop PC comes with a standard manufacturer's warranty. For detailed warranty information, please refer to the warranty card included with your product or visit the official HP support website.
For technical assistance, driver downloads, or further support, please visit the HP Support website or contact HP customer service. Keep your product model number (0024) and serial number ready when contacting support.