MERACH MR-2512
MERACH Vibration Plate Armrest
Model: MR-2512
Instruction Manual
1. Introduction
Thank you for choosing the MERACH Vibration Plate Armrest. This accessory is designed to provide enhanced stability and support during your vibration plate workouts, making it suitable for seniors and beginners. This manual contains important information regarding the assembly, operation, maintenance, and specifications of your new armrest. Please read it thoroughly before use and retain it for future reference.
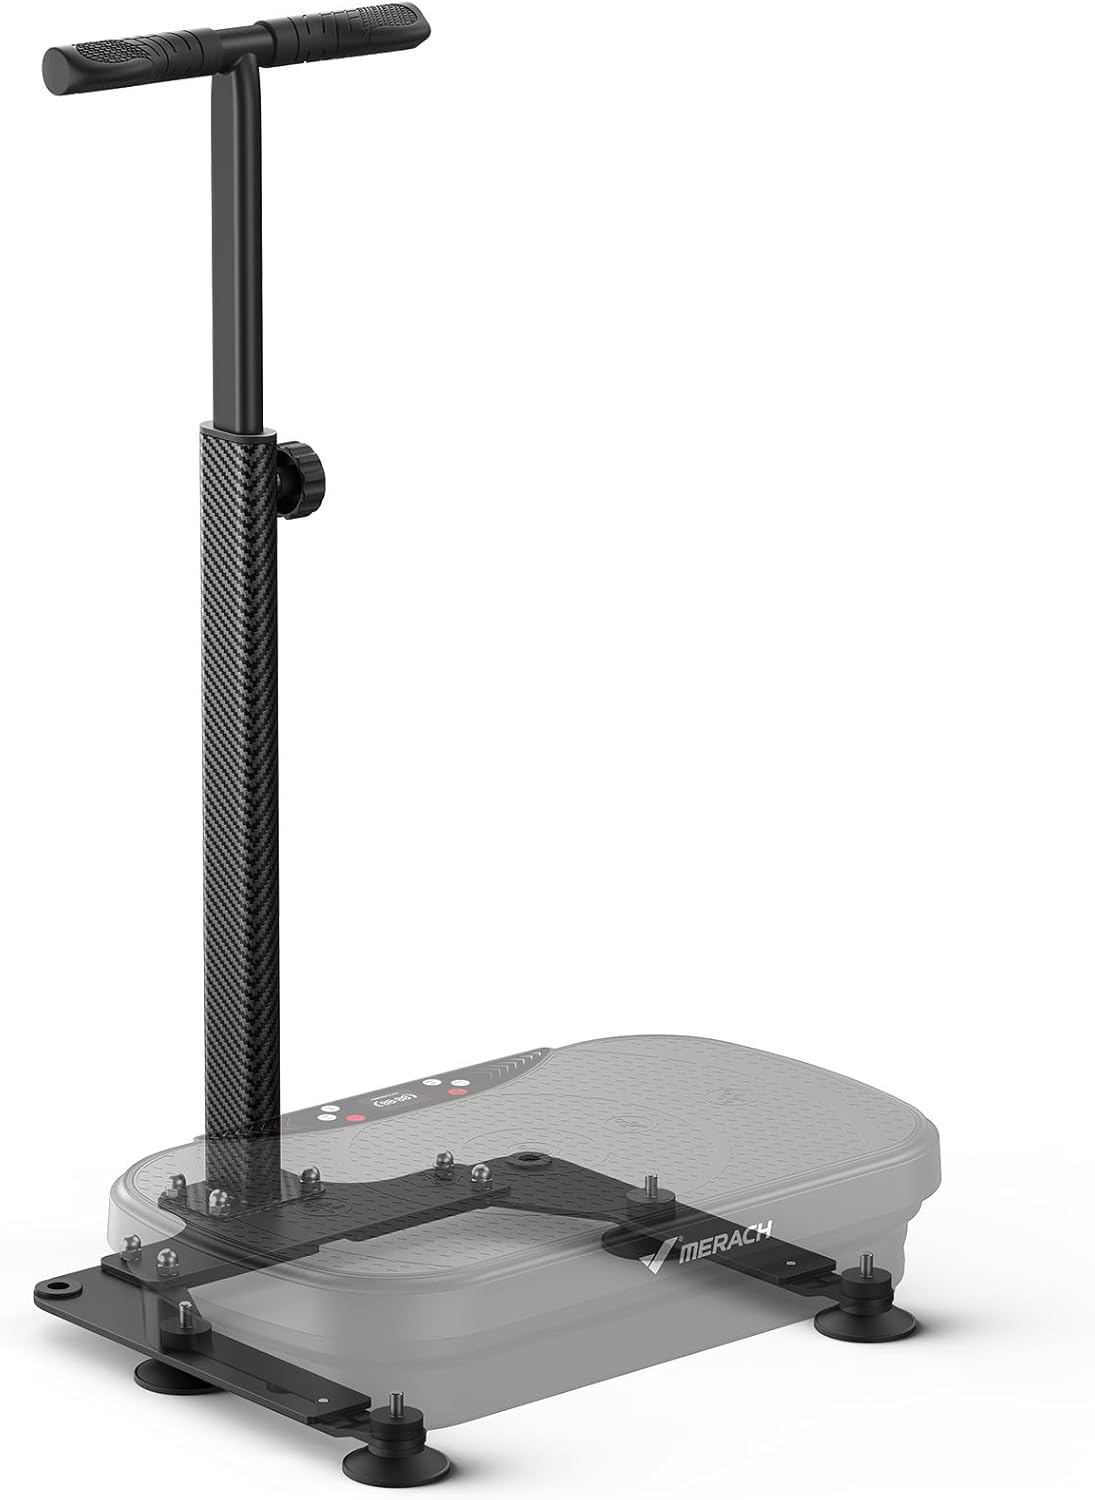
Image: The MERACH Vibration Plate Armrest, designed to attach to a vibration plate (not included) for added stability.
2. Important Safety Information
To ensure safe operation and prevent injury, please observe the following precautions:
- Always ensure the armrest is securely attached to your vibration plate before use.
- Verify that all screws and connections are tightened according to the assembly instructions.
- Do not exceed the maximum recommended height adjustment.
- Inspect the armrest for any signs of damage or wear before each use. Discontinue use if damage is found.
- This product is a standalone handrail bracket and does NOT include a vibration plate.
- Consult a healthcare professional before starting any new exercise program.
3. Package Contents
Please check the package to ensure all components are present and undamaged:

Image: Exploded view of the MERACH Vibration Plate Armrest components, indicating each part.
- Support Handle Rail
- Vertical Support Rail
- Vertical Support Rail Base
- Left Suction Cup Base
- Right Suction Cup Base
- Adjustable Height Knob for Support Rail
- Padding Blocks (32x15mm) x 4
- Padding Blocks (40x5mm) x 1
- Screws (various sizes for assembly)
- Suction Cup Screw
4. Assembly Instructions
Follow these steps to assemble your MERACH Vibration Plate Armrest:
Step 1: Install Padding Blocks
Remove the original suction cups from your vibration plate. Install the four (4) padding blocks (32x15mm) onto the designated points on the bottom of your vibration plate.

Image: Step 1 - Installation of padding blocks on the vibration plate.
Step 2: Mounting the Base
Use the provided screws to attach the Vertical Support Rail Base to the Left and Right Suction Cup Bases. Then, use the suction cup screws to connect this assembled base to your vibration plate, ensuring a secure fit.

Image: Step 2 - Mounting the armrest base to the vibration plate.
Step 3: Installing the Vertical Support Rails
Install the Vertical Support Rail onto the assembled base. Lock all screws into place to ensure the rail is firmly secured.

Image: Step 3 - Installing the vertical support rail.
Step 4: Installing the Support Handle Rail
Insert the Support Handle Rail into the top of the Vertical Support Rail. Adjust to your desired height and lock the adjustable height knob to complete the installation.

Image: Step 4 - Installing and adjusting the support handle rail.
5. Operation and Use
Height Adjustment
The armrest height can be adjusted to accommodate various user heights and exercise preferences. To adjust, loosen the adjustable height knob on the vertical support rail, slide the handle rail to the desired height between 27.2 inches and 38.6 inches, and then securely tighten the knob.
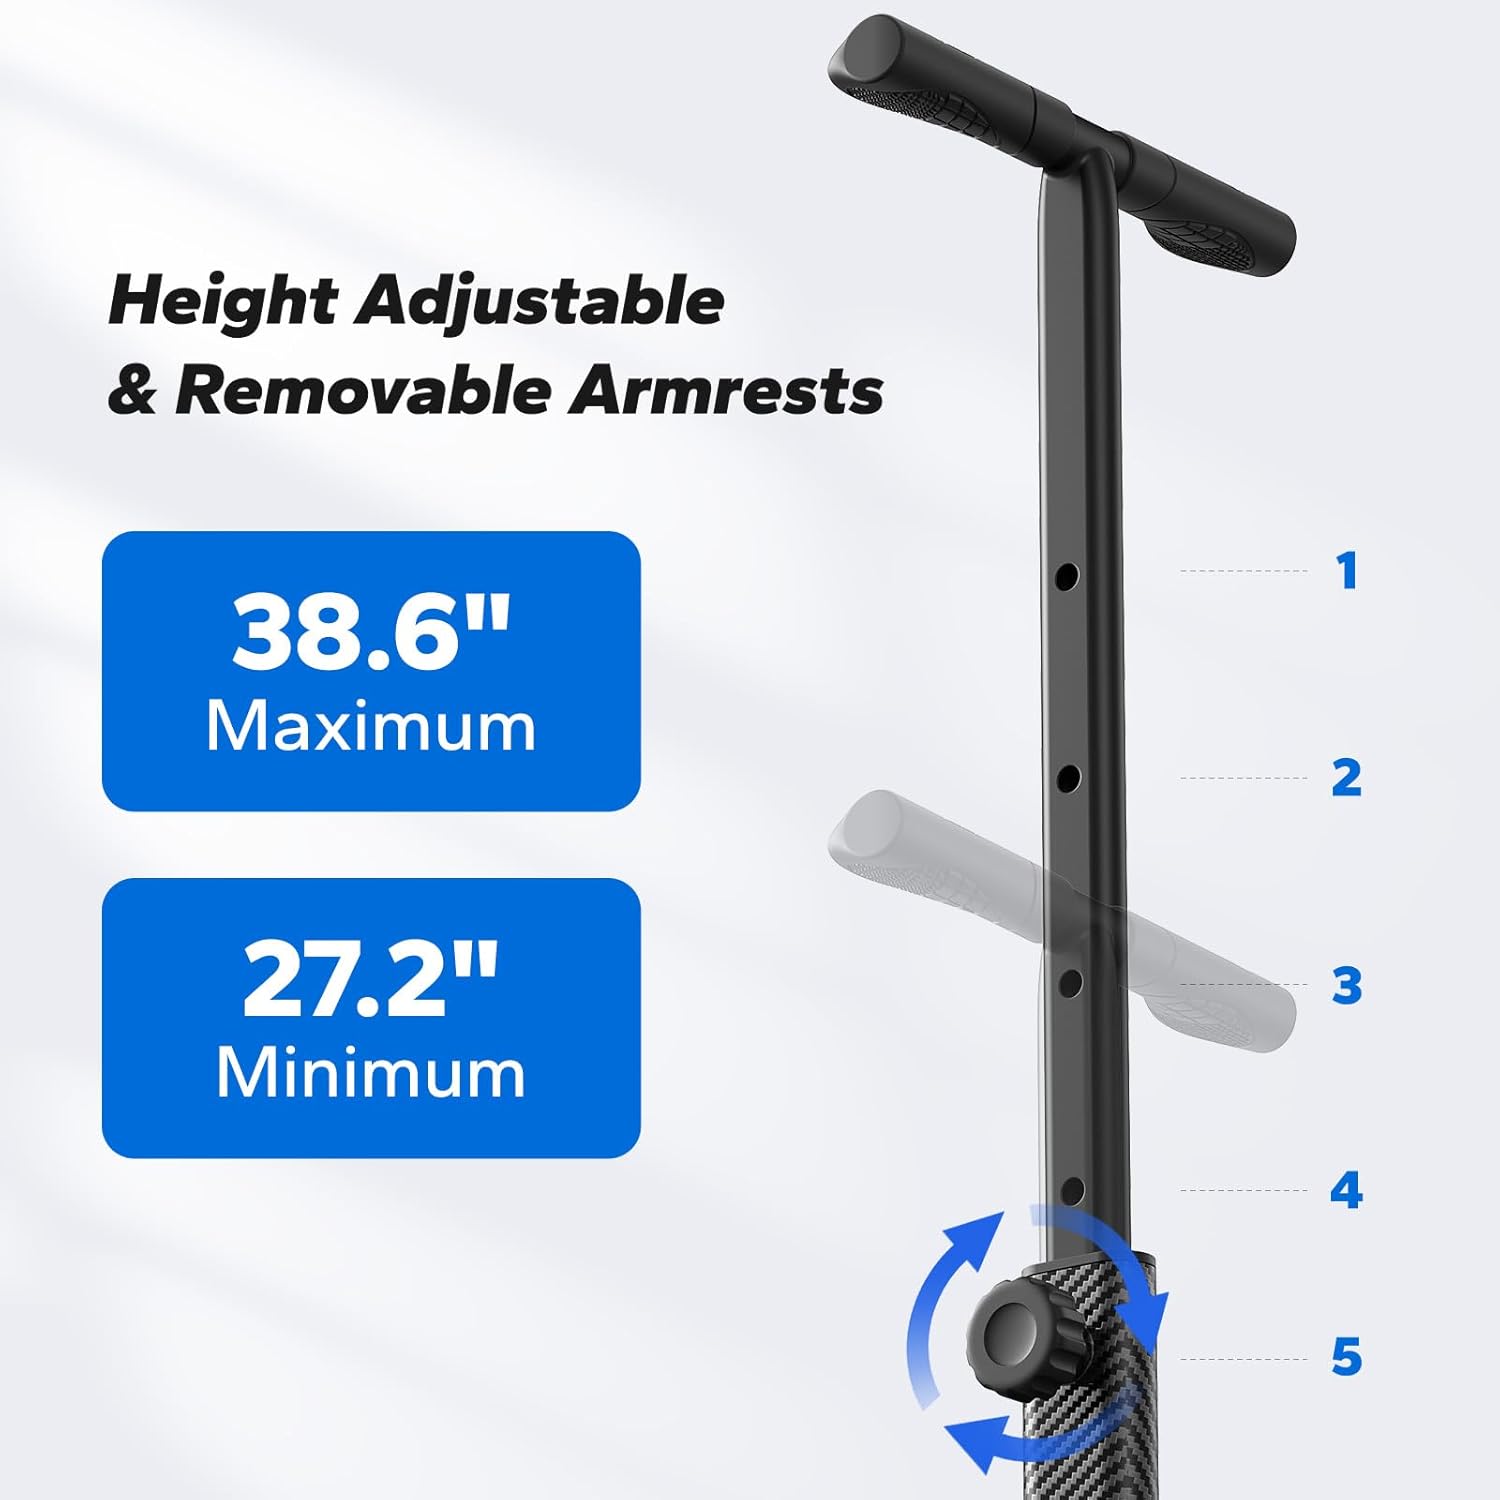
Image: The armrest offers height adjustment from 27.2 inches (minimum) to 38.6 inches (maximum).
Compatibility
This armrest is designed for wide compatibility with various vibration plates. It is specifically compatible with MERACH models MR-2439, MR-2441, MR-2480, MR-2491, and MR-2398slim. It also fits other vibration plates with a depth ranging from 12.7 inches to 22.8 inches.
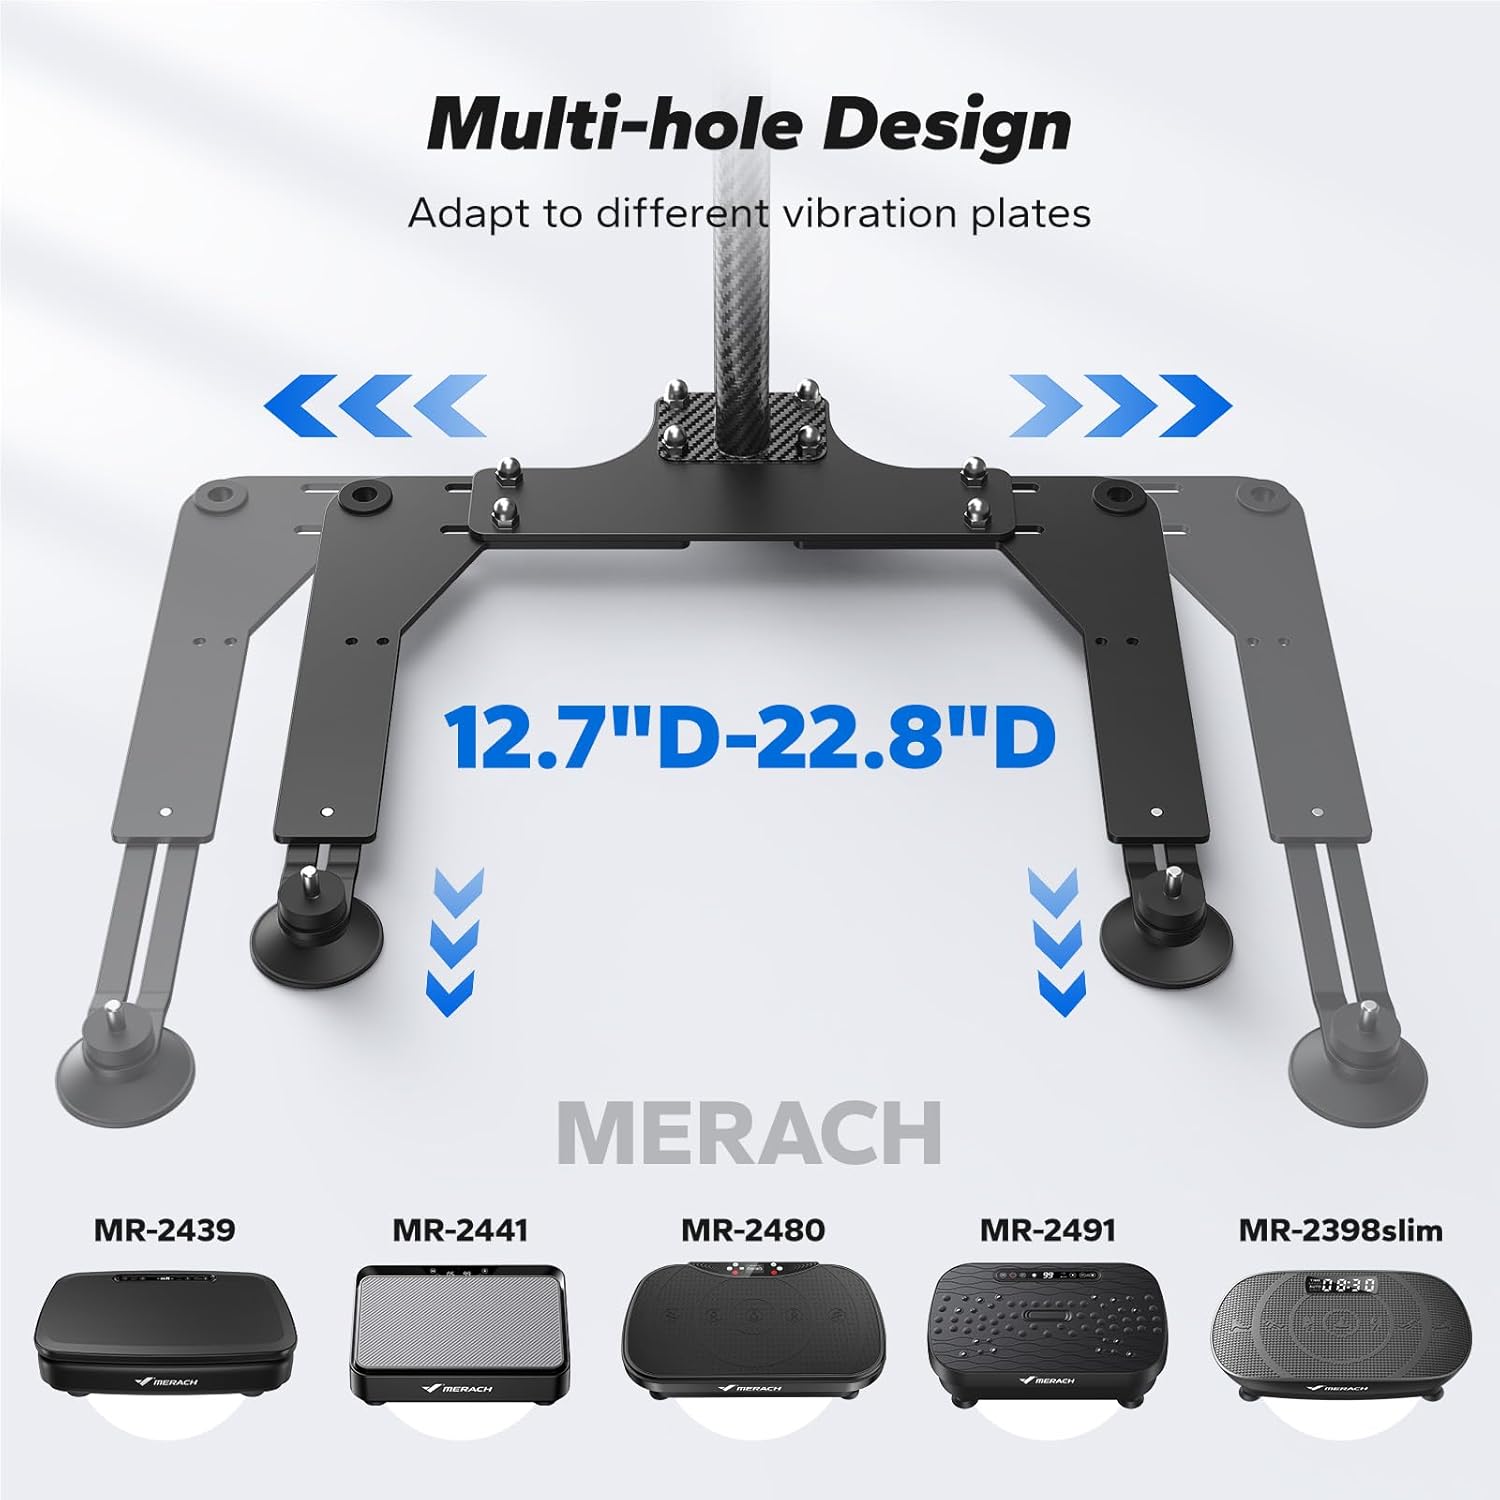
Image: The armrest features a multi-hole design for adaptability to various vibration plate sizes, including specific MERACH models.
Enhanced Stability
The armrest provides stable support during vibration plate exercises. Its base is equipped with 5 suction cups for stronger suction and a non-slip grip, ensuring the armrest remains firmly in place during use. The handles are made of soft rubber for a comfortable and secure grip.

Image: Details of the armrest's construction, highlighting the 5 suction cups, alloy steel material, and rubber armrests.
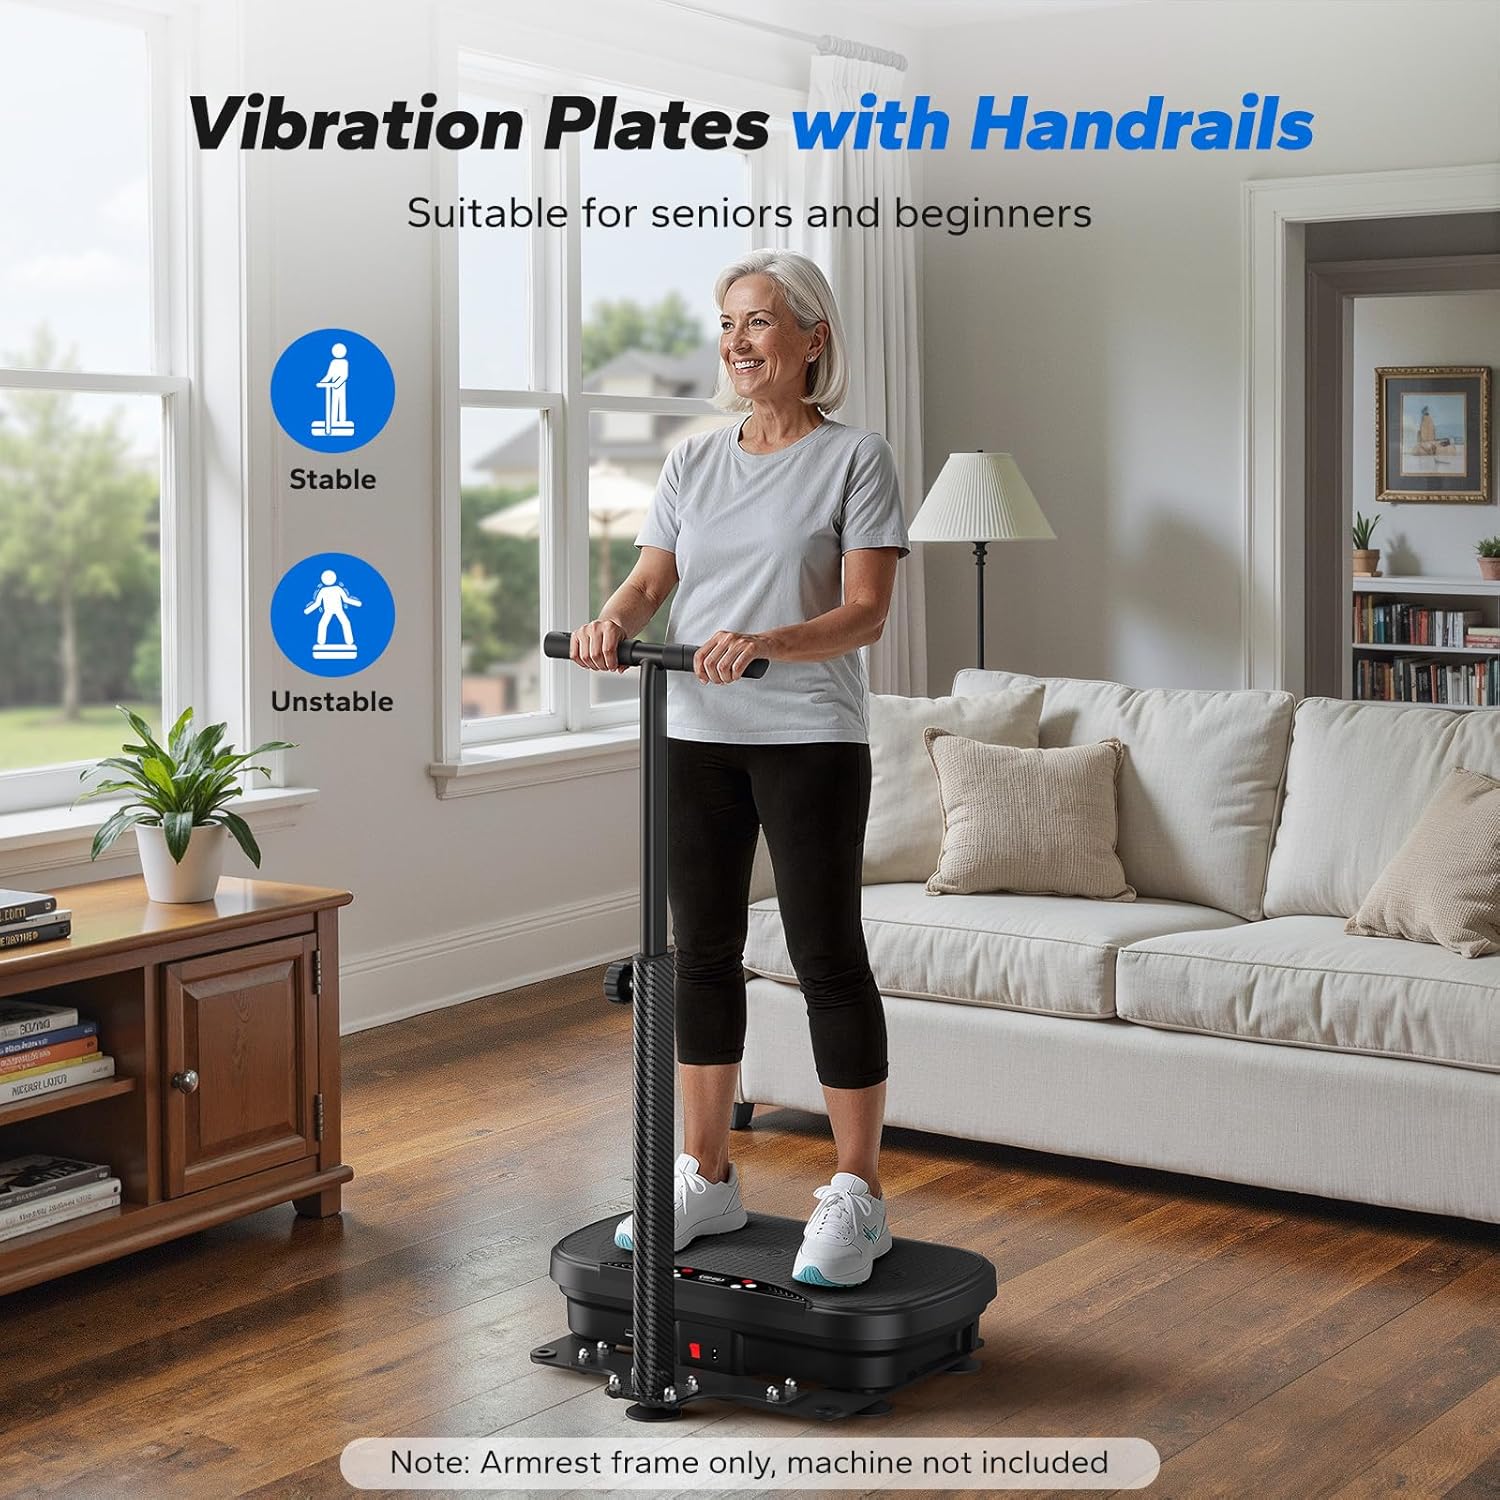
Image: A user demonstrating the stability provided by the armrest during a vibration plate exercise.
6. Maintenance
Regular maintenance will help prolong the life of your MERACH Vibration Plate Armrest:
- Cleaning: Wipe down the armrest with a soft, damp cloth after each use. Avoid abrasive cleaners or solvents that could damage the finish.
- Inspection: Periodically check all screws and connections to ensure they remain tight. Re-tighten if necessary.
- Storage: Store the armrest in a clean, dry place away from direct sunlight and extreme temperatures.
7. Troubleshooting
If you encounter any issues with your MERACH Vibration Plate Armrest, refer to the following common solutions:
| Problem | Possible Cause | Solution |
|---|---|---|
| Armrest feels unstable or wobbly. | Loose screws or improper installation of suction cups. | Ensure all assembly screws are tightened. Verify that the 5 suction cups on the base are making full contact with the floor and are clean. |
| Difficulty adjusting height. | Height adjustment knob is too tight or mechanism is obstructed. | Loosen the adjustable height knob completely before attempting to slide the handle rail. Check for any debris obstructing the rail. |
| Armrest does not fit my vibration plate. | Vibration plate dimensions are outside the compatible range. | Confirm your vibration plate's depth is between 12.7"D and 22.8"D. This armrest is designed for specific MERACH models and compatible sizes. |
8. Specifications
- Model Name: MR-2512
- Material: Alloy Steel
- Color: Black
- Item Weight: 10.4 Pounds
- Adjustable Height Range: 27.2 inches to 38.6 inches
- Compatible Vibration Plate Depth: 12.7 inches to 22.8 inches
- Package Dimensions (L x W x H): 23.8 x 12.8 x 4.3 inches
9. Warranty and Customer Support
Warranty Information
The MERACH Vibration Plate Armrest (Model MR-2512) comes with a 1-year warranty from the date of purchase. This warranty covers manufacturing defects and material flaws under normal use. It does not cover damage caused by misuse, accidents, unauthorized modifications, or normal wear and tear.
Customer Support
For any questions, assistance with assembly, troubleshooting, or warranty claims, please contact MERACH customer support. Refer to your purchase documentation or the MERACH official website for the most current contact information.
You can also visit the official MERACH Store on Amazon for product information and support: MERACH Store
Ask a question about this manual
Ask about setup, troubleshooting, compatibility, parts, safety, or missing instructions. Manuals+ will review the question and use this page’s manual context to help answer it.