1. Introduction
Thank you for choosing the Lioncho 15-inch Commercial Under Counter Ice Maker Machine. This manual provides essential information for the safe and efficient operation, installation, and maintenance of your ice maker. Please read this manual thoroughly before use and retain it for future reference.
2. Safety Instructions
- Ensure the ice maker is properly grounded to prevent electrical shock.
- Do not operate the appliance with a damaged power cord or plug.
- Keep ventilation openings clear of obstructions.
- Do not store explosive substances such as aerosol cans with a flammable propellant in this appliance.
- Only use potable water for ice production.
- Unplug the appliance before cleaning or performing any maintenance.
- This appliance is not intended for use by persons (including children) with reduced physical, sensory or mental capabilities, or lack of experience and knowledge, unless they have been given supervision or instruction concerning use of the appliance by a person responsible for their safety.
3. Product Overview
3.1 Key Features
- Ultra-efficient Ice Making: Produces up to 85 lbs of ice per day, with a cycle time of 11-20 minutes.
- Large Storage Capacity: Features a 30 lbs ice storage bin.
- Flexible Installation: Designed for both under-counter and freestanding placement, with a 15-inch width.
- Reversible Door: The door can be configured to open from either the left or right side.
- Adjustable Leveling Feet: Ensures stable installation on various surfaces.
- Intelligent LCD Touch Screen: Provides control over ice thickness, scheduled ice making, automatic cleaning, real-time temperature display, and fault warnings.
- Built-in LED Ice Bin Light: Illuminates the ice bin for convenience in low light conditions.
- Durable Construction: Made with 304 food-grade stainless steel exterior and ABS inner tank.
- Enhanced Insulation: 3-layer vacuum insulation foam plus anti-freeze foam door for improved energy efficiency.
- Maintenance-Free Design: Detachable ice bucket and dual gravity drainage/automatic water replenishment system simplify cleaning and installation.
3.2 Package Contents
The following items are included with your Lioncho Ice Maker:
- Lioncho Ice Maker Unit
- Ice Bucket
- Ice Scoop
- Water Inlet Hose
- Water Outlet Hose
- Instruction Manual

Image 3.2.1: The Lioncho ice maker unit shown with its included accessories: ice bucket, ice scoop, water inlet hose, and water outlet hose. A glass with ice and fruit is also depicted.

Image 3.2.2: A visual representation of the ice maker's dimensions (33 inches high, 15 inches wide, 21 inches deep) and the included accessories: ice bucket, ice scoop, water inlet hose, and water outlet hose.
4. Setup
4.1 Placement
- Place the ice maker on a flat, stable surface. The adjustable leveling feet can be used to ensure stability, especially on uneven floors or countertops.
- Ensure adequate ventilation around the unit. Maintain at least 2 inches of space from walls or cabinets for proper airflow.
- The unit is designed for under-counter installation or freestanding use.

Image 4.1.1: The ice maker seamlessly integrated under a kitchen counter, demonstrating its under-counter installation capability.
4.2 Water Connection
Connect the water inlet hose to a potable water supply and the water outlet hose for drainage. The system supports gravity drainage, eliminating the need for complex plumbing modifications.

Image 4.2.1: A close-up view showing the water inlet and water outlet connections on the ice maker, illustrating the simple hook-up process.
4.3 Power Connection
Plug the ice maker into a dedicated, grounded electrical outlet. Ensure the voltage matches the specifications of the appliance.
4.4 Initial Cleaning
Before first use, it is recommended to perform an initial cleaning cycle. Refer to the 'Maintenance and Cleaning' section for detailed instructions on using the automatic cleaning feature.
5. Operating Instructions
5.1 Control Panel
The ice maker features an intuitive LCD touch screen for easy operation.

Image 5.1.1: A detailed view of the LCD control panel, highlighting buttons for Timer/Self Cleaning, Power Switch/Cancel Setup, Increase Thickness/Time, and Reduction Thickness/Time.
- TIMER/CLEAN Button: Press to set a scheduled ice making time or initiate the automatic cleaning cycle.
- NO/OFF Button: Functions as the power switch and can cancel current settings.
- '+' Button: Increases ice thickness or adjusts time settings.
- '-' Button: Decreases ice thickness or adjusts time settings.
- Display: Shows real-time temperature, ice thickness settings, and fault warnings.
5.2 Adjusting Ice Thickness
Use the '+' and '-' buttons on the control panel to adjust the desired ice cube thickness. Thinner ice cubes are produced faster, while thicker cubes melt slower.

Image 5.2.1: Illustrates the three adjustable ice cube sizes: Thin (approx. 8 minutes), Medium (approx. 12 minutes), and Thick (approx. 16 minutes), with examples of their use in beverages and food presentation.
5.3 Ice Production
Once connected to water and power, and settings are adjusted, the machine will begin its ice-making cycle. The LCD screen will display the current status. The built-in LED light in the ice bin will illuminate when the door is opened, providing visibility.
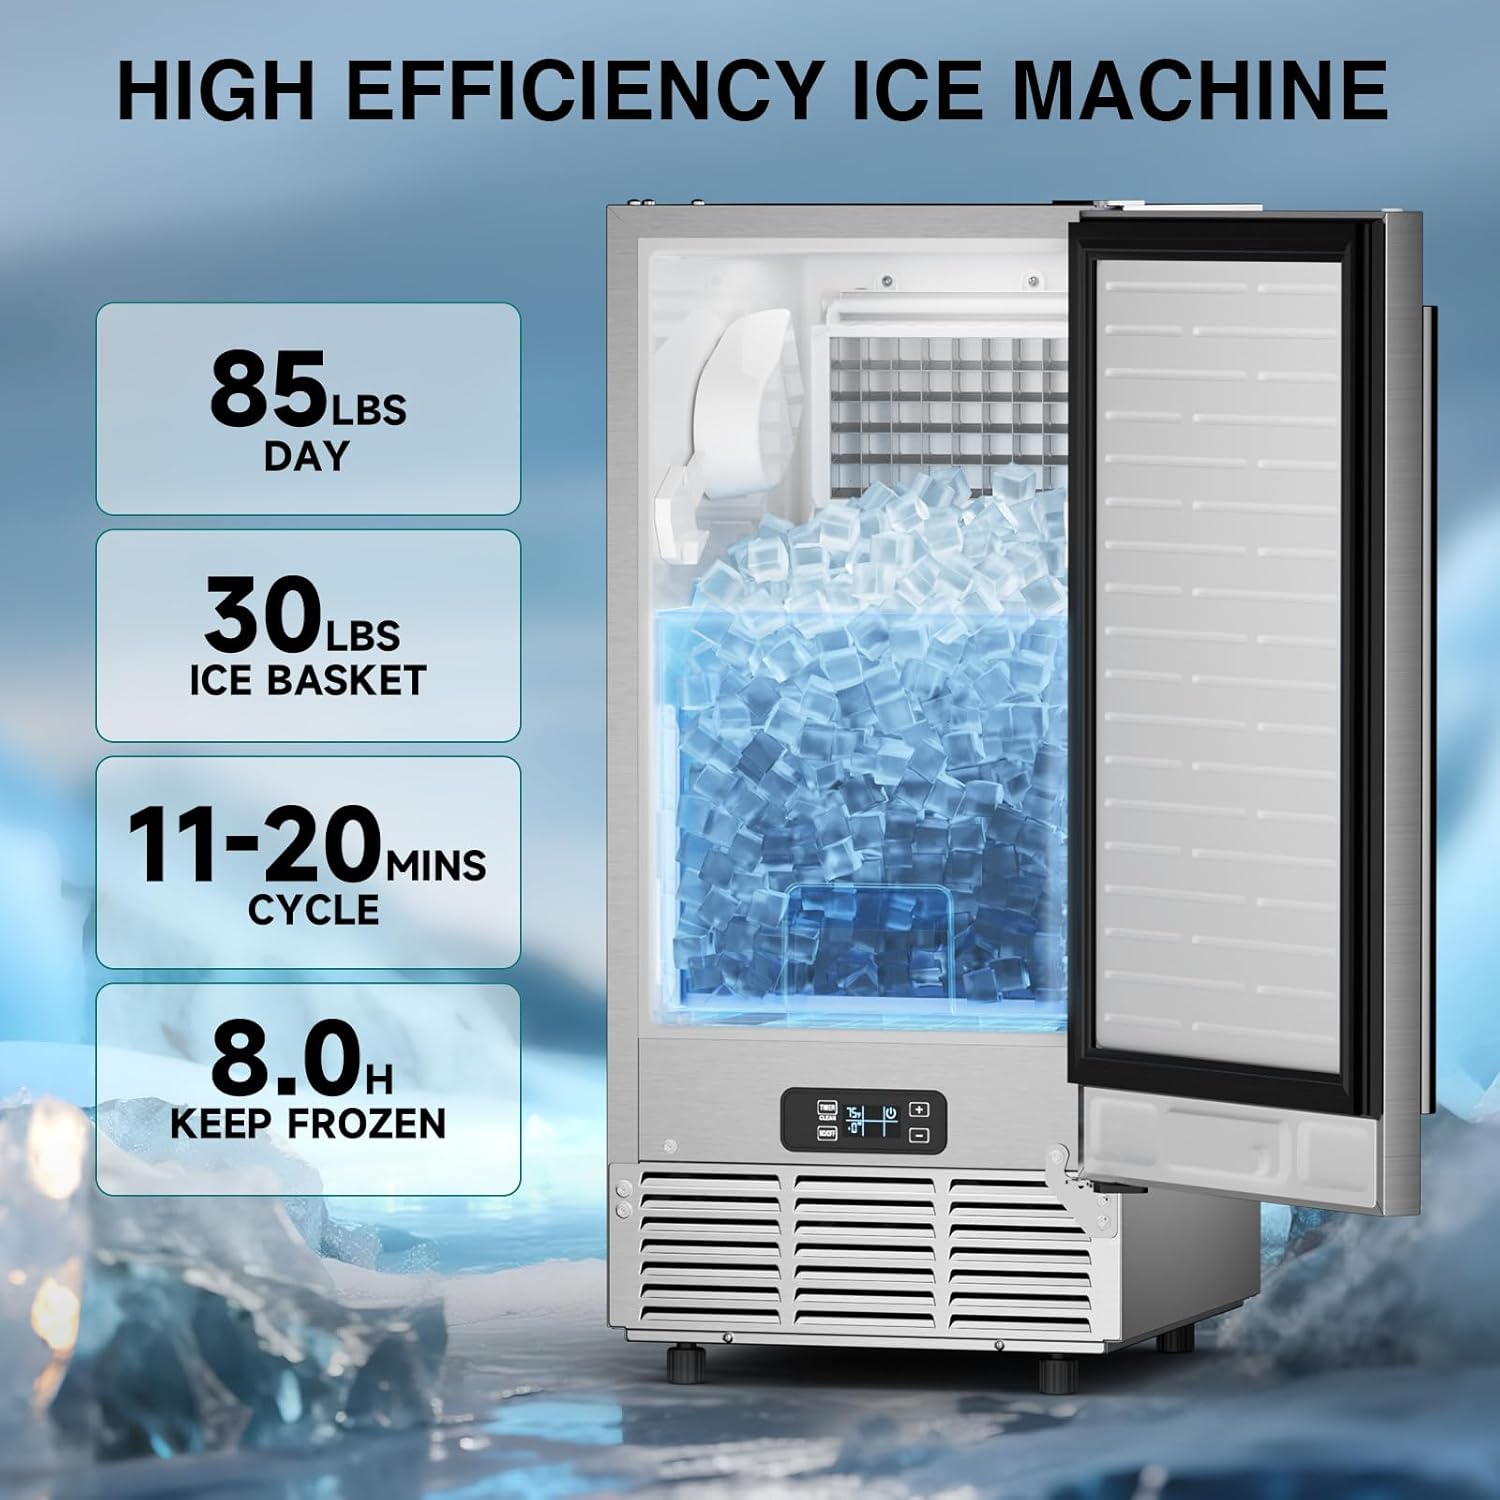
Image 5.3.1: Highlights the ice maker's high efficiency with key statistics: 85 lbs per day production, 30 lbs ice basket capacity, 11-20 minutes per cycle, and 8.0 hours of ice preservation.
6. Maintenance and Cleaning
6.1 Automatic Cleaning
The ice maker features an automatic cleaning function. To activate, press and hold the 'TIMER/CLEAN' button for 3 seconds. The system will run a cleaning program to flush the internal components.
6.2 Detachable Ice Bucket
The ice bucket is detachable for easy manual cleaning. Regularly remove and clean the ice bucket with mild soap and water to maintain hygiene.
6.3 Drainage System
The gravity drainage system ensures efficient water removal. Periodically check the water outlet hose for any blockages to ensure proper drainage.
6.4 Exterior Cleaning
Clean the stainless steel exterior with a soft cloth and a non-abrasive cleaner. Avoid harsh chemicals that could damage the finish.
7. Troubleshooting
If you encounter issues with your ice maker, please refer to the following common problems and solutions:
| Problem | Possible Cause | Solution |
|---|---|---|
| No ice production | No water supply; clogged water inlet; power issue. | Check water connection and supply; clean water inlet filter; ensure power cord is securely plugged in. |
| Ice melts quickly in bin | Ambient temperature too high; door not sealed properly. | Ensure proper ventilation; check door seal for damage or obstructions. Note: The ice bin is insulated but not refrigerated, so some melting is normal over time. |
| E4 Error Message | Water system malfunction; sensor error. | Turn off the unit, unplug it for 5 minutes, then plug it back in and restart. If the error persists, contact customer support. |
| Unusual noise | Unit not level; fan obstruction. | Adjust leveling feet; check for any objects obstructing the fan. |
For issues not listed above or if problems persist, please contact Lioncho customer support.
8. Specifications
| Specification | Value |
|---|---|
| Brand | Lioncho |
| Model Name | Commercial Ice Maker (85lbs/24h) |
| Product Dimensions (D x W x H) | 21" x 15" x 33" |
| Ice Production Capacity | 85 lbs/day |
| Ice Storage Capacity | 30 lbs |
| Refrigerant | R290a |
| Manufacturer | Lioncho |
| ASIN | B0FFGP21G8 |
9. Warranty and Support
For warranty information or technical support, please contact Lioncho customer service. Details can typically be found on the product packaging or the official Lioncho website. Please have your model number (85lbs/24h) and purchase date available when contacting support.


