Introduction
Thank you for choosing the VEVOR Battery Powered Backpack Sprayer. This manual provides essential information for the safe and efficient operation, maintenance, and troubleshooting of your new sprayer. Please read this manual thoroughly before first use and retain it for future reference.

Image: The VEVOR Battery Powered Backpack Sprayer, showcasing its white and orange design with the spray wand attached.
Important Safety Information
WARNING: Failure to follow these safety instructions may result in serious injury or property damage.
- Do not use pressurized liquids other than those recommended for this sprayer.
- Avoid contact with eyes. Always wear appropriate protective eyewear when operating the sprayer.
- Wear protective gloves and suitable clothing when handling chemicals.
- Keep the sprayer and all chemicals out of reach of children and pets.
- Ensure proper ventilation when spraying, especially with chemical solutions.
- Do not modify the sprayer or its components. Use only genuine VEVOR replacement parts.
- Always disconnect the battery before performing any maintenance or cleaning.
Product Overview and Components
The VEVOR Battery Powered Backpack Sprayer is designed for efficient and comfortable spraying tasks. Familiarize yourself with the main components:

Image: Labeled diagram showing key components of the backpack sprayer, including nozzles, wide mouth lid, trigger handle, trigger-lock, battery compartment, switch & pressure adjuster, and voltage digital display.
- Tank: 3.2 Gallon (12 Liter) capacity for liquids.
- Battery Compartment: Houses the removable 18V 2Ah lithium battery.
- Pressure Adjuster: Dial to control spray pressure from 0-90 PSI.
- Trigger Handle: Activates the spray. Features a snap-on design for easy operation.
- Spray Wands: Includes two retractable wands (plastic steel and stainless steel) for varied reach.
- Nozzles: Five different nozzles for various spray patterns (Windproof, Fan-shaped, Shower-Head, Single Head Copper, Three-end mist).
- Padded Shoulder Straps: Ergonomically designed for comfortable wear.
Setup
1. Unpacking and Inspection
Carefully remove all components from the packaging. Inspect for any damage during transit. Ensure all parts listed in the manual are present.
2. Battery Charging and Installation
- Open the battery cap on the sprayer.
- Remove the 18V 2Ah lithium battery from its compartment.
- Connect the battery to the provided charger. Plug the charger into a standard electrical outlet.
- Allow the battery to fully charge. The charging indicator on the charger will change when complete (refer to charger manual for specific indicator details).
- Once charged, insert the battery back into the sprayer's battery compartment, ensuring it clicks securely into place. Close the battery cap.
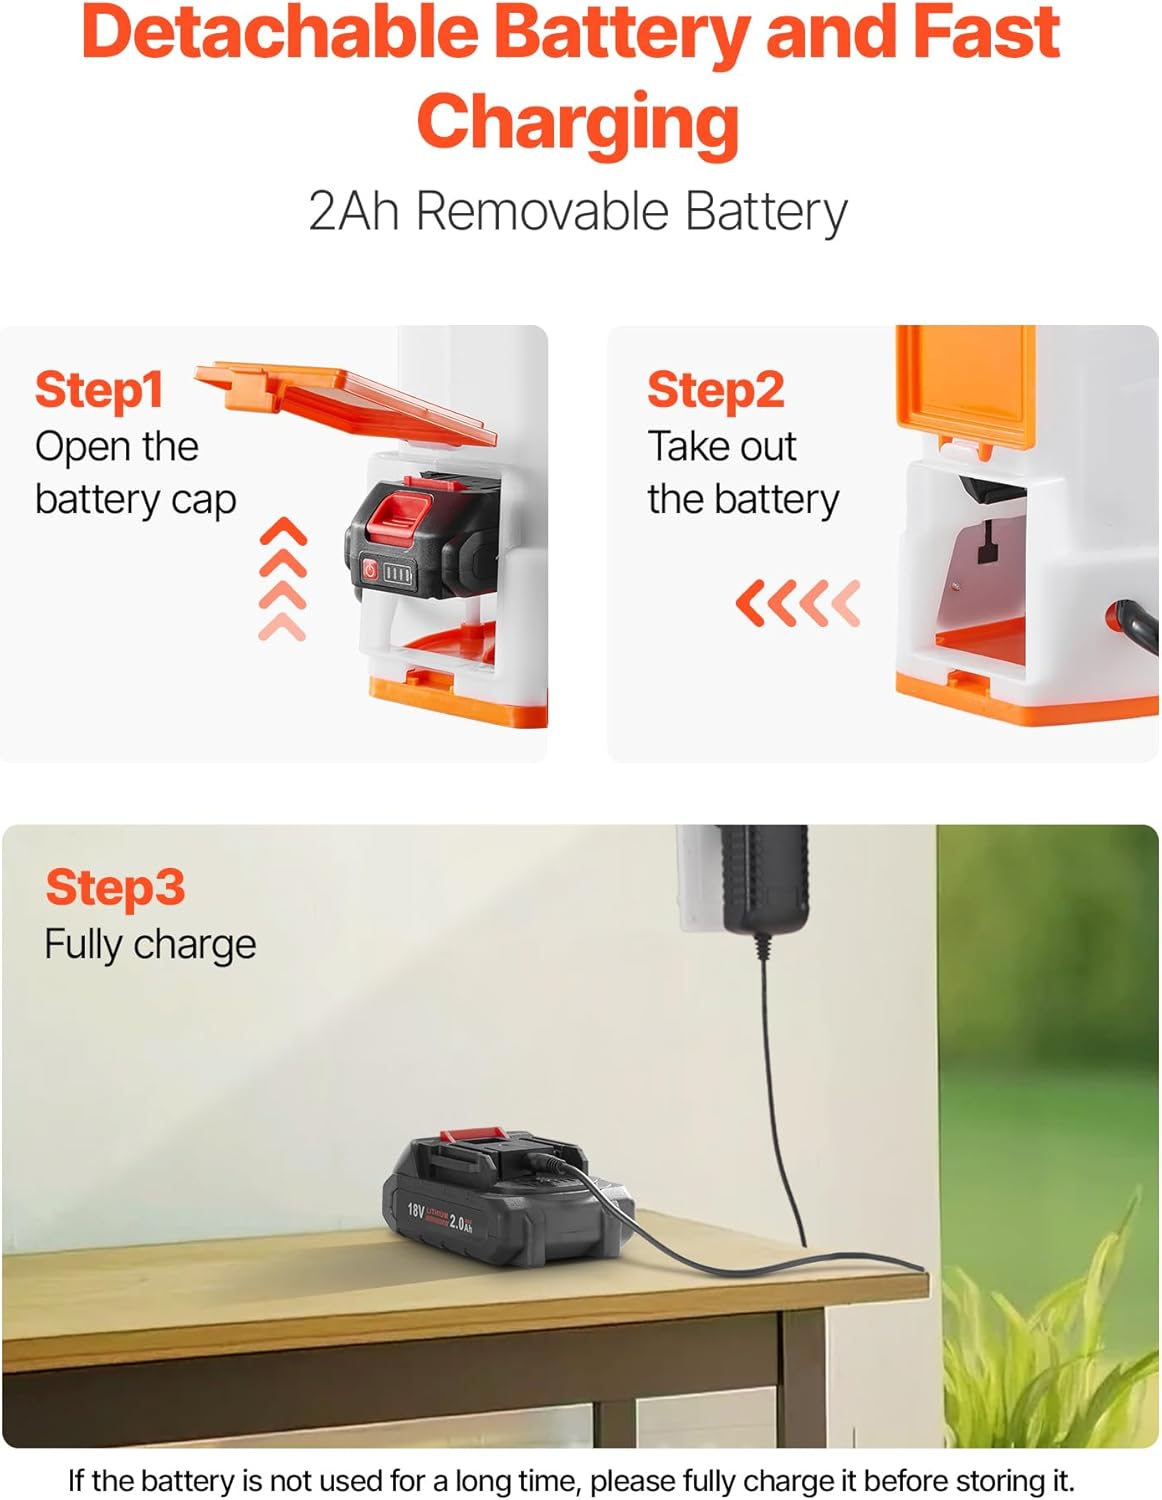
Image: A three-step visual guide demonstrating how to open the battery cap, remove the battery, and fully charge it using the provided charger.
3. Assembling the Wands and Nozzles
- Select the desired spray wand (plastic steel or stainless steel). Both are adjustable in length.
- Attach the chosen wand to the trigger handle by screwing it clockwise until secure. Use plumber's tape on threaded connections if necessary to prevent leaks.
- Select one of the five provided nozzles based on your spraying needs.
- Screw the selected nozzle onto the end of the spray wand. Ensure it is hand-tightened to prevent leaks.

Image: Comparison of the two retractable spray wands: an adjustable plastic steel wand (16-30 inches) and an adjustable stainless steel wand (21-39 inches).

Image: Visual representation of the five different nozzles included: Windproof, Fan-shaped, Shower-Head, Single Head Copper, and Three-end mist nozzles, each showing its unique spray pattern.
4. Filling the Tank
- Ensure the sprayer is on a stable, level surface.
- Unscrew and remove the wide mouth lid from the top of the tank.
- Carefully pour the desired liquid (water, herbicide, fertilizer, etc.) into the tank. Do not overfill past the maximum fill line.
- Securely screw the lid back onto the tank, ensuring a tight seal to prevent leaks.
Operation
1. Powering On/Off
Locate the power switch, typically near the pressure adjustment dial. Flip the switch to the 'ON' position to activate the pump. Flip to 'OFF' when done spraying or when moving the sprayer.
2. Adjusting Pressure
The sprayer features an adjustable pressure dial (0-90 PSI). Rotate the dial clockwise to increase pressure and counter-clockwise to decrease pressure. Adjust the pressure according to the task and the type of liquid being sprayed.

Image: Close-up view of the pressure adjustment dial, indicating a maximum pressure of 90 PSI and its adjustable nature.
3. Spraying Techniques
- Once the tank is filled and the battery is installed, put on the backpack sprayer, adjusting the padded straps for comfort.
- Turn the power switch to 'ON'.
- Aim the nozzle at the target area.
- Squeeze the trigger handle to begin spraying. The trigger may have a lock feature for continuous spraying.
- Adjust the pressure dial as needed during operation to achieve the desired spray pattern and coverage.
- When finished, release the trigger and turn the power switch to 'OFF'.

Image: Four panels illustrating various applications of the sprayer: Garden, Lawn, Farm, and Pet bathing, demonstrating its versatility.
Maintenance
1. Cleaning After Use
Proper cleaning extends the life of your sprayer and prevents cross-contamination of chemicals.
- Empty any remaining liquid from the tank.
- Rinse the tank thoroughly with clean water. For chemical residues, follow the chemical manufacturer's cleaning recommendations.
- Fill the tank with clean water and spray it through the wand and nozzle to flush out the pump and hose.
- Clean the exterior of the sprayer with a damp cloth.
- Remove and clean nozzles separately to prevent clogging.
2. Battery Care and Storage
- Always store the battery in a cool, dry place away from direct sunlight and extreme temperatures.
- If the battery is not used for a long time, please fully charge it before storing it to maintain battery health.
- Recharge the battery periodically (e.g., every 3-6 months) even if not in use to prevent deep discharge.
3. Long-Term Storage
- Ensure the sprayer is thoroughly cleaned and dry before storing.
- Store the sprayer in a dry, frost-free location.
- Remove the battery from the sprayer for long-term storage.
- Store the spray wand and nozzles in a way that prevents damage.
Troubleshooting
This section addresses common issues you might encounter with your sprayer.
| Problem | Possible Cause | Solution |
|---|---|---|
| Sprayer does not turn on. | Battery not charged or not installed correctly. | Ensure battery is fully charged and properly seated in the compartment. Check power switch is ON. |
| No spray or low pressure. | Clogged nozzle or wand; low battery; air in pump; pressure dial set too low. | Clean nozzle and wand. Recharge battery. Prime pump by spraying water. Adjust pressure dial to higher setting. |
| Leaking from connections. | Loose connections; worn O-rings; damaged hose. | Tighten all connections. Inspect and replace O-rings if damaged. Check hose for cracks or punctures. |
| Inconsistent spray pattern. | Partially clogged nozzle; incorrect nozzle for task. | Clean nozzle thoroughly. Select appropriate nozzle for desired spray pattern. |
Specifications
Detailed technical specifications for the VEVOR Battery Powered Backpack Sprayer:
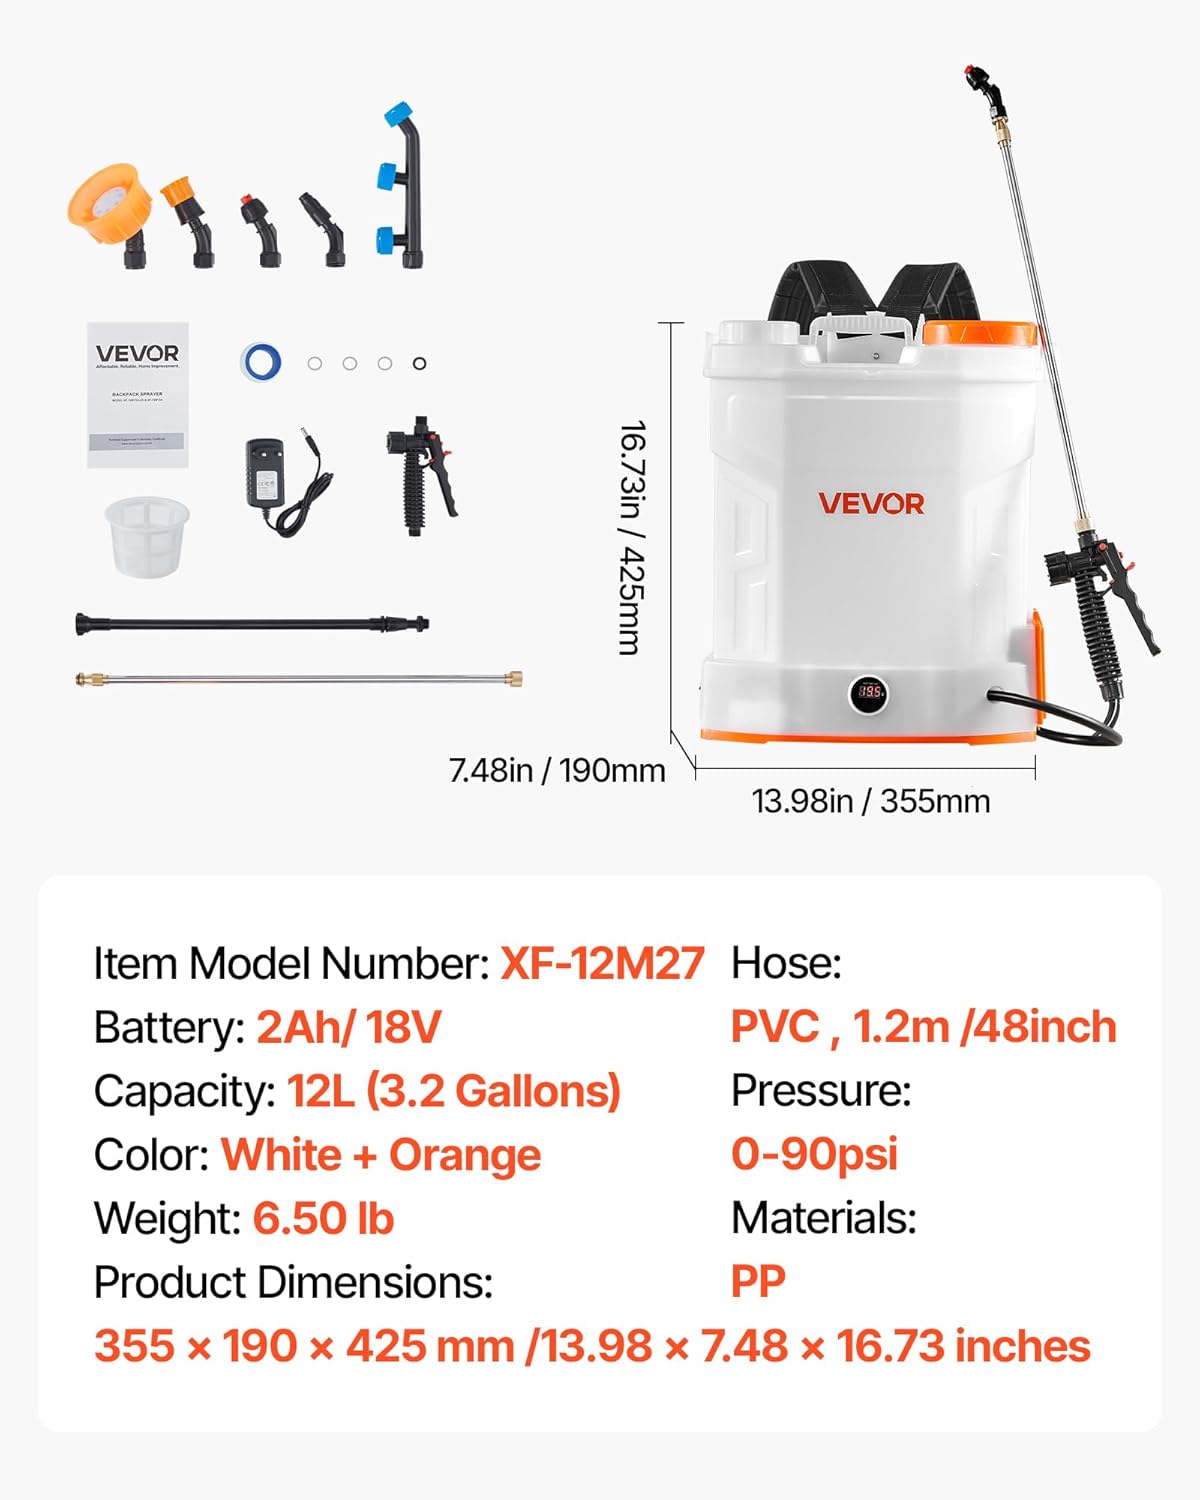
Image: A graphic displaying key specifications including item model number, battery type, capacity, color, weight, product dimensions, hose length, pressure range, and materials.
- Item Model Number: XF-12M27-US
- Battery: 18V 2Ah Lithium Ion (included)
- Capacity: 12 Liters (3.2 Gallons)
- Color: White + Orange
- Item Weight: 2.9 kg (6.50 lb)
- Product Dimensions: 35.51 x 35.51 x 42.49 cm (13.98 x 7.48 x 16.73 inches)
- Hose Length: 1.2 meters (48 inches) PVC
- Maximum Pressure: 90 PSI
- Power Source: Battery Powered
- Materials: PP (Polypropylene)
Warranty and Support
VEVOR products are designed for durability and performance. For specific warranty details, please refer to the warranty card included with your product or visit the official VEVOR website. If you encounter any issues or require technical assistance, please contact VEVOR customer support through their official channels. Always provide your model number (XF-12M27-US) and purchase details when seeking support.