SURRYN NPS3010W
Wanptek NPS3010W Bench Power Supply User Manual
Model: NPS3010W (4 Digits 30V 10A)
Brand: SURRYN
1. Introduction
This manual provides detailed instructions for the safe and efficient operation of your Wanptek NPS3010W Bench Power Supply. This miniature switching DC power supply offers adjustable output voltage and current, with high-precision four-digit display for voltage, current, and power. It is designed for laboratory, educational, and DIY applications requiring a stable and adjustable power source.
Key features include:
- Complete operating protection functions: over temperature protection, overload protection, short circuit protection.
- Small size, low ripple, light weight, and high power density.
- Highly efficient design.
- Voltage stabilization and current limiting capabilities.
- Automatic switching between Constant Voltage (CV) and Constant Current (CC) modes.
- High-precision four-digit LED display for voltage, current, and power.

Figure 1: Front view of the Wanptek NPS3010W Bench Power Supply.
2. Safety Instructions
Please read and understand all safety instructions before operating the power supply. Failure to follow these instructions may result in electric shock, fire, or damage to the unit.
- Power Source: Connect the power supply only to a grounded AC outlet with the correct voltage (115V or 230V, ensure the voltage selector switch on the rear panel is set correctly).
- Ventilation: Ensure adequate ventilation around the unit. Do not block the cooling fan or ventilation openings. Maintain at least 10 cm (4 inches) of clear space around the unit.
- Environment: Do not operate the power supply in damp, wet, or explosive environments. Avoid direct sunlight and high temperatures.
- Overload: Do not exceed the rated output voltage or current. Operating the unit beyond its specifications can cause damage.
- Maintenance: Do not attempt to service the unit yourself. Refer all servicing to qualified personnel.
- Connections: Ensure all connections are secure before applying power. Disconnect power before making or changing connections.
3. Product Components and Layout
3.1 Front Panel

Figure 2: Labeled front panel of the NPS3010W.
- Voltage Display: Shows the output voltage in Volts (V).
- Current Display: Shows the output current in Amperes (A).
- Power Display: Shows the output power in Watts (W).
- C.V. Indicator: Illuminates when the power supply is operating in Constant Voltage mode.
- C.C. Indicator: Illuminates when the power supply is operating in Constant Current mode.
- V-COARSE Knob: Coarse adjustment for output voltage.
- V-FINE Knob: Fine adjustment for output voltage.
- A-COARSE Knob: Coarse adjustment for output current limit.
- A-FINE Knob: Fine adjustment for output current limit.
- Power Switch: ON/OFF button for the power supply.
- Negative Output Terminal (-): Black terminal for negative connection.
- Positive Output Terminal (+): Red terminal for positive connection.
3.2 Rear Panel

Figure 3: Rear panel of the NPS3010W.
- Cooling Fan: Automatically adjusts speed based on internal temperature to ensure optimal cooling.
- AC Input Socket: For connecting the power cord.
- Fuse Holder: Contains the protective fuse.
- AC Input Voltage Switch (115V/230V): Selects the appropriate input voltage for your region. Ensure this is set correctly before connecting to power.
4. Setup
- Unpacking: Carefully remove the power supply and all accessories from the packaging. Verify that all components are present: power supply unit, power cord, and operation manual.
- Placement: Place the power supply on a stable, level surface. Ensure there is sufficient space around the unit for proper ventilation, especially around the cooling fan on the rear panel.
- Voltage Selection: Before connecting the power cord, check the AC Input Voltage Switch on the rear panel. Set it to match your local mains voltage (115V or 230V). Incorrect setting can damage the unit.
- Power Connection: Connect the provided power cord to the AC Input Socket on the rear panel of the power supply, then plug the other end into a grounded AC outlet.
- Initial Check: With no load connected, press the Power Switch to turn on the unit. The LED displays should illuminate, showing default voltage and current readings.

Figure 4: Typical package contents.
5. Operating Instructions
5.1 Adjusting Voltage and Current
- Power On: Ensure the power supply is turned on.
- Set Voltage: Use the V-COARSE and V-FINE knobs to set the desired output voltage. The Voltage Display will show the set value.
- Set Current Limit: Use the A-COARSE and A-FINE knobs to set the desired current limit. This is the maximum current the power supply will deliver. It is recommended to set the current limit slightly above the expected operating current of your load to prevent accidental overcurrent.
- Constant Voltage (CV) Mode: When the output voltage is stable and the current drawn by the load is below the set current limit, the C.V. indicator will be lit. The power supply will maintain the set voltage.
- Constant Current (CC) Mode: If the load resistance is too low or the load attempts to draw more current than the set limit, the power supply will automatically switch to Constant Current mode. The C.C. indicator will be lit, and the output current will be maintained at the set limit, while the output voltage will drop.
5.2 Connecting a Load
- Power Off: Turn off the power supply before connecting any load.
- Connect Leads: Connect the positive (+) lead from your load to the red Positive Output Terminal (+) and the negative (-) lead from your load to the black Negative Output Terminal (-). Ensure connections are secure.
- Power On: Turn on the power supply. The displays will show the actual voltage, current, and power being delivered to the load.
- Disconnecting: Always turn off the power supply before disconnecting the load.
6. Maintenance
Proper maintenance ensures the longevity and reliable operation of your power supply.
- Cleaning: Regularly clean the exterior of the unit with a soft, dry cloth. Do not use abrasive cleaners or solvents. Ensure no liquids enter the unit.
- Ventilation: Periodically check the cooling fan and ventilation openings for dust accumulation. Use compressed air to gently clear any blockages. A blocked fan can lead to overheating.
- Fuse Replacement: If the unit fails to power on, the fuse may need replacement. Ensure the power supply is disconnected from the mains before attempting to replace the fuse. The fuse holder is located on the rear panel. Replace with a fuse of the same type and rating only.
- Storage: When not in use for extended periods, store the power supply in a cool, dry place, away from direct sunlight and extreme temperatures.
7. Troubleshooting
This section addresses common issues you might encounter. For problems not listed here, contact customer support.
| Problem | Possible Cause | Solution |
|---|---|---|
| No power/Unit does not turn on | Power cord not connected; AC outlet faulty; Fuse blown; Incorrect voltage selection. | Check power cord connection; Test AC outlet; Replace fuse (see Maintenance); Verify AC Input Voltage Switch setting. |
| No output voltage/current | Output terminals not connected; Voltage/current knobs set to zero; Overload protection activated. | Ensure load is properly connected; Adjust voltage/current knobs; Check for short circuit in load, reduce load, or increase current limit. |
| Unit overheats | Blocked ventilation; Excessive load. | Ensure clear space around unit, clean fan/vents; Reduce load or operate within specified limits. |
| C.C. indicator is always on | Load resistance is too low; Current limit set too low for the load. | Increase the current limit using A-COARSE/A-FINE knobs; Check load for short circuit or very low resistance. |
8. Specifications
The following specifications apply to the Wanptek NPS3010W (4 Digits 30V 10A) model:
- Model: NPS3010W
- Output Voltage: 0-30V (Adjustable)
- Output Current: 0-10A (Adjustable)
- Display: 4-digit LED for Voltage (0.01V resolution), Current (0.001A resolution), and Power.
- Input Voltage: AC 115V/230V ±10% (Switchable)
- Load Regulation (CV): <0.1% + 2mV
- Load Regulation (CC): <0.1% + 2mA
- Ripple and Noise (CV): <20mVrms
- Ripple and Noise (CC): <20mArms
- Protection: Over Temperature Protection (OTP), Overload Protection (OLP), Short Circuit Protection (SCP).
- Dimensions: Approximately 70mm (W) x 130mm (H) x 230mm (D)
- Item Weight: 6.61 pounds (approx. 3 kg)
- Operating Temperature: 0°C to 40°C
- Storage Temperature: -10°C to 70°C
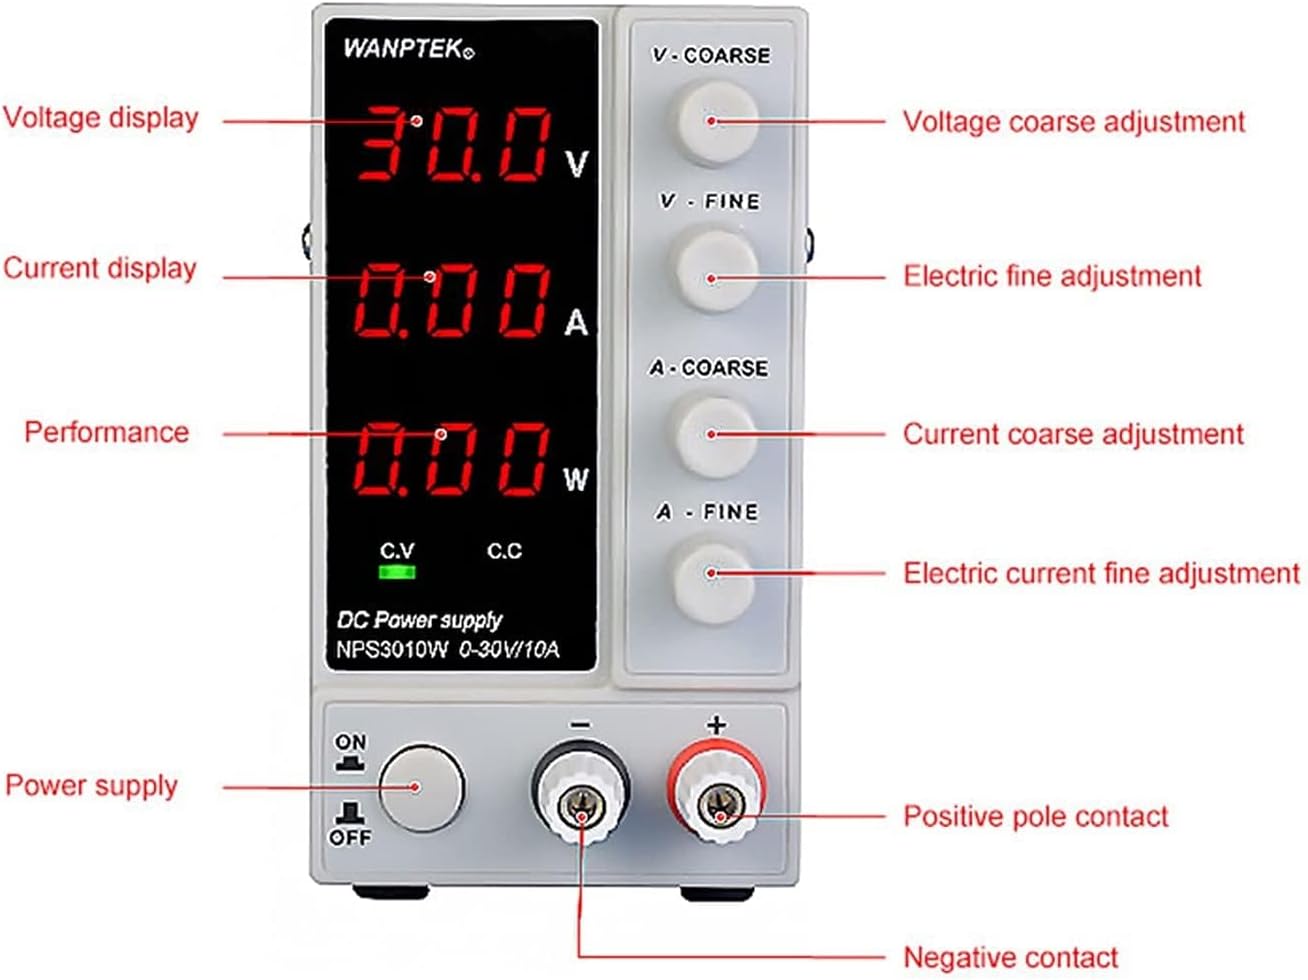
Figure 5: Approximate dimensions of the NPS3010W.
9. Warranty and Support
This product is manufactured by SURRYN. For specific warranty information and terms, please refer to the documentation included with your purchase or contact the seller directly. Manufacturer warranties typically cover defects in materials and workmanship for a specified period from the date of purchase.
Optional extended protection plans may be available for purchase separately. These plans are not provided by the manufacturer but offer additional coverage beyond the standard warranty period.
For technical support, troubleshooting assistance, or inquiries regarding parts and service, please contact the retailer or the manufacturer's customer service department using the contact information provided at the time of purchase.
Related Documents - NPS3010W
 |
WANPTEK NPS Series DC Power Supply User Manual Comprehensive user manual for WANPTEK NPS series programmable DC power supplies, detailing safety guidelines, product specifications, operational procedures, and troubleshooting for models NPS306W, NPS3010W, NPS605W, and NPS1203W. |
 |
WANPTEK NPS Series DC Power Supply User Manual User manual for the WANPTEK NPS series of DC stabilized power supplies, covering operation, safety, specifications, and troubleshooting. |
 |
NPS Series Adjustable Switching DC Power Supplies Datasheet Detailed specifications and features for the NPS series of adjustable switching DC power supplies, including models NPS306W, NPS3010W, NPS605W, and NPS1203W. These supplies offer simultaneous display of voltage, current, and power and are suitable for repair, laboratory, and production line applications. |
 |
Electro CR Catálogo de Componentes Electrónicos y Kits DIY Descubre el catálogo completo de Electro CR, con una amplia gama de componentes electrónicos, kits de desarrollo Arduino, sensores, pantallas táctiles y accesorios para tus proyectos de electrónica y 'Hazlo tú mismo' (DIY). |
Ask a question about this manual
Ask about setup, troubleshooting, compatibility, parts, safety, or missing instructions. Manuals+ will review the question and use this page’s manual context to help answer it.