1. Important Safety Information
Please read this manual thoroughly before installation and use. Keep these instructions for future reference.
- Electrical Safety: Always turn off power at the circuit breaker before beginning installation or maintenance. Consult a qualified electrician if you are unsure about wiring.
- Mounting: Ensure the mounting surface can support the weight of the fan (approximately 5 lbs). Use appropriate mounting hardware for your ceiling type.
- Blade Clearance: Maintain a minimum clearance of 7 feet from the floor to the fan blades and 18 inches from walls or other obstructions.
- Cleaning: Disconnect power before cleaning. Use a soft, damp cloth. Do not use abrasive cleaners.
- Children and Pets: Keep children and pets away from the fan during operation and installation.
2. Package Contents
Verify that all components are present before proceeding with installation:
- Ceiling Fan with Light Unit
- Remote Control
- Instruction Manual
- Mounting Hardware (screws, wire nuts, etc.)
3. Installation Guide
Installation should be performed by a qualified individual. Ensure power is disconnected at the circuit breaker before starting.
3.1. Mounting the Bracket
- Turn off power at the main circuit breaker.
- Remove the existing light fixture from the ceiling junction box.
- Attach the mounting bracket securely to the ceiling junction box using the provided screws. Ensure the bracket is firmly fixed and can support the fan's weight.
3.2. Wiring Connections
Connect the fan's wires to the household wiring according to local electrical codes. Typically:
- Connect the black wire (live/hot) from the fan to the black wire from the ceiling.
- Connect the white wire (neutral) from the fan to the white wire from the ceiling.
- Connect the green or bare copper wire (ground) from the fan to the ground wire from the ceiling.
- Secure all connections with wire nuts and electrical tape.
3.3. Attaching the Fan Body
Carefully lift the fan unit and align it with the mounting bracket. Secure the fan to the bracket using the provided screws. Ensure all connections are tucked safely into the junction box and the fan is stable.
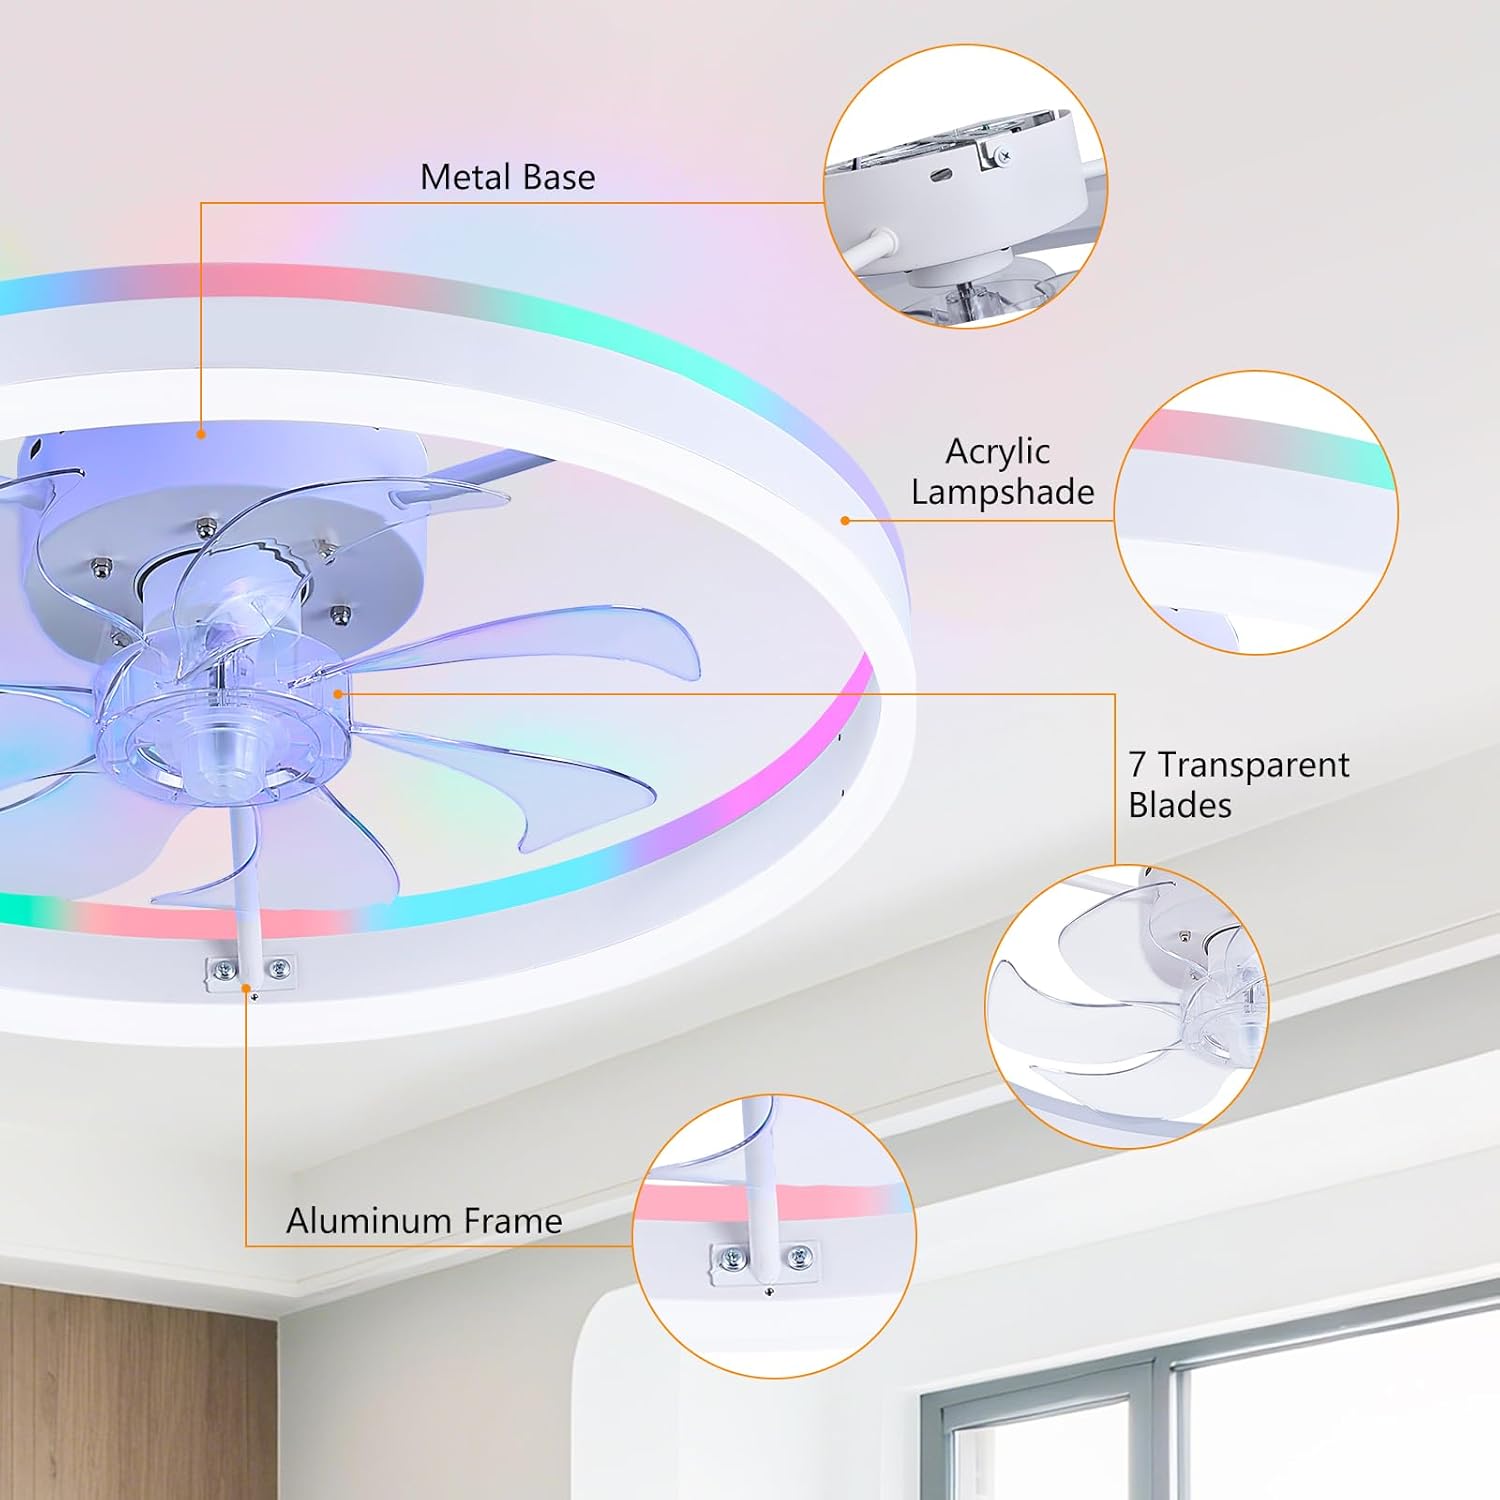
Figure 3.3.1: Exploded view of the fan components, highlighting the metal base, acrylic lampshade, 7 transparent blades, and aluminum frame.
4. Operating Instructions
The STERREN RGB Smart LED Ceiling Fan can be controlled via the included remote control or a dedicated smartphone application.
4.1. Remote Control Operation
Insert two AAA batteries (not included) into the remote control. Point the remote towards the fan for optimal response.

Figure 4.1.1: Remote control and app interface for the fan.
- ON/OFF Button: Powers the fan and light on or off.
- Fan Speed (1-6): Adjusts fan speed from 1 (lowest) to 6 (highest).
- Light ON/OFF: Toggles the main light on or off.
- Brightness +/-: Adjusts the brightness of the main light (10%-100%).
- Color Temperature (3000K/4000K/6000K): Cycles through Warm White (3000K), Natural White (4000K), and Cold White (6000K).
- RGB Button: Activates RGB color mode. Press repeatedly to cycle through colors or modes.
- Forward/Reverse: Changes the fan blade rotation direction for summer (downward airflow) or winter (upward airflow).
- Timer (1H/2H): Sets the fan to turn off automatically after 1 or 2 hours.
4.2. Smart App Control
Download the 'Fan Lamp Pro' app from your smartphone's app store or scan the QR code provided in the product packaging. Follow the in-app instructions for pairing the fan.

Figure 4.2.1: Smartphone app interface for advanced controls.
The app allows for comprehensive control:
- Adjust fan speed (6 levels).
- Control light brightness (10%-100%).
- Set 3 color temperatures (3000K, 4000K, 6000K).
- Select from millions of RGB hues and dynamic color modes.
- Change wind direction (forward/reverse).
- Schedule sleep modes and timers.
For app download and further details, visit: https://www.jasonghost.com/fanlamppro/
4.3. Fan Speed Control

Figure 4.3.1: Fan speed recommendations.
- Low Speed (1-2): Ideal for quiet operation and sleep.
- Medium Speed (3-4): Suitable for general comfort in family settings.
- High Speed (5-6): Provides maximum airflow for cooling during warmer periods.
4.4. Lighting Control (CCT & RGB)

Figure 4.4.1: Dimmable Tricolor Light and RGB options.
The fan offers both functional and ambient lighting options:
- Color Temperature (CCT): Choose between 3000K (Warm White), 4000K (Natural White), and 6000K (Cold White) for task lighting or general illumination. Brightness is adjustable from 10% to 100%.
- RGB Lighting: Access a spectrum of colors to create different moods or match decor. The RGB mode can cycle through colors or be set to a static hue.
4.5. Reversible Motor Function

Figure 4.5.1: Year-round comfort with reversible motor.
The reversible motor allows for year-round comfort:
- Summer Mode (Forward): Blades rotate counter-clockwise, pushing cool air downwards to create a refreshing breeze.
- Winter Mode (Reverse): Blades rotate clockwise, drawing warm air up towards the ceiling and circulating it gently downwards, improving heating efficiency.
4.6. Timer Function
The fan includes a timer function to automatically turn off after a set period, ideal for sleep or energy saving. Use the remote control or app to set the timer for 1 or 2 hours.
Video 4.6.1: Official product video demonstrating various features including lighting modes, fan speeds, and remote/app control. This video is provided by STERREN LED.
5. Maintenance
Regular maintenance ensures optimal performance and longevity of your ceiling fan.
- Cleaning: Periodically clean the fan and light fixture with a soft, dry cloth. For stubborn dirt, a slightly damp cloth can be used. Ensure the power is off before cleaning.
- Blade Inspection: Check fan blades for any dust buildup or damage. Clean as needed.
- Tighten Screws: Over time, screws may loosen. Periodically check and tighten all screws on the mounting bracket and fan body.
- No Lubrication Needed: The motor is permanently lubricated and does not require additional oiling.
6. Troubleshooting
If you encounter any issues, refer to the table below for common problems and solutions.
| Problem | Possible Cause | Solution |
|---|---|---|
| Fan does not start | No power supply Loose wiring Remote control battery dead | Check circuit breaker Verify all wire connections Replace remote control batteries |
| Light does not turn on | No power supply Loose wiring Light setting off | Check circuit breaker Verify all wire connections Ensure light is turned on via remote/app |
| Remote control not working | Batteries dead/incorrectly inserted Not paired with fan Obstruction between remote and fan | Replace batteries, check polarity Follow pairing instructions in Section 4.1 Ensure clear line of sight |
| Fan makes noise | Loose screws Improper installation | Tighten all screws Re-check installation steps |
| App control not working | Fan not paired with app Bluetooth/Wi-Fi issues | Follow app pairing instructions Check device's Bluetooth/Wi-Fi connection |
7. Specifications
| Feature | Detail |
|---|---|
| Brand | STERREN |
| Model Number | XMCF01 |
| Color | RGB White |
| Material | Acrylic, Aluminum, Metal |
| Style | Modern |
| Light Fixture Form | Ceiling Fan Light |
| Room Type | Bedroom, Living Room, Dining Room, Kitchen, Office, Game Room, Nursery |
| Indoor/Outdoor Usage | Indoor |
| Power Source | Corded Electric |
| Control Method | App, Remote |
| Light Source | LED |
| Number of Light Sources | 2 |
| Voltage | 120 Volts |
| Lighting Method | Downlight and Uplight |
| Wattage | 71 watts |
| Mounting Type | Ceiling Mount |
| Installation Type | Flush Mount |
| Shape | Round |
| Item Dimensions (L x W x H) | 20"L x 20"W x 6.9"H |
8. Warranty and Support
This STERREN product is covered by a manufacturer's warranty against defects in materials and workmanship. Please refer to the warranty card included in your package for specific terms and conditions.
For technical support, troubleshooting assistance, or warranty claims, please contact STERREN customer service through the retailer where the product was purchased or visit the official STERREN website.