1. Safety Instructions
Please read all instructions carefully before assembly and use. Keep this manual for future reference.
- Always assemble the cabinet on a soft, clean surface to prevent scratches.
- Ensure all parts are present and undamaged before beginning assembly.
- Do not overtighten screws, as this may damage the material.
- Keep small parts away from children during assembly.
- Distribute weight evenly within the cabinet to prevent tipping.
- Do not climb on or stand on the cabinet.
- For safety, consider anchoring the cabinet to a wall, especially in homes with children or pets.
2. Package Contents
Verify that all components are included in your package. If any parts are missing or damaged, please contact customer support.
- Cabinet Panels (Top, Bottom, Sides, Back)
- Drawer Panels and Slides
- Door Panels and Hinges
- Wooden Legs
- Hardware Pack (Screws, Dowels, Handles, etc.)
- Assembly Tool (Hex Key, if applicable)
3. Setup and Assembly
Follow these steps for proper assembly of your KINTOP Kitchen Cabinet. It is recommended to have two people for assembly.
3.1 Overview of Cabinet Dimensions

Image 1: Overall dimensions of the KINTOP Kitchen Cabinet. The cabinet measures approximately 120 cm in width, 30 cm in depth, and 80 cm in height.
3.2 Assembly Steps
- Attach Legs: Secure the wooden legs to the bottom panel of the cabinet using the provided screws. Ensure they are firmly attached.
- Assemble Frame: Connect the side panels to the bottom panel, then attach the back panel. Use dowels and screws as indicated in the detailed diagram (refer to the included paper manual for specific diagrams).
- Install Drawer Slides: Attach the drawer slides to the inner side panels of the cabinet. Pay attention to the orientation of the slides.
- Assemble Drawers: Construct the three drawers by connecting the front, back, and side panels, then slide the bottom panel into place. Attach the drawer handles.
- Insert Drawers: Carefully slide the assembled drawers onto the installed drawer slides.
- Attach Door Hinges: Secure the hinges to the two door panels.
- Mount Doors: Attach the doors to the cabinet frame using the hinges. Adjust hinges as needed to ensure proper door alignment and closure. Attach door handles.
- Attach Top Panel: Place the top panel onto the assembled frame and secure it with screws.
3.3 Internal Storage Layout
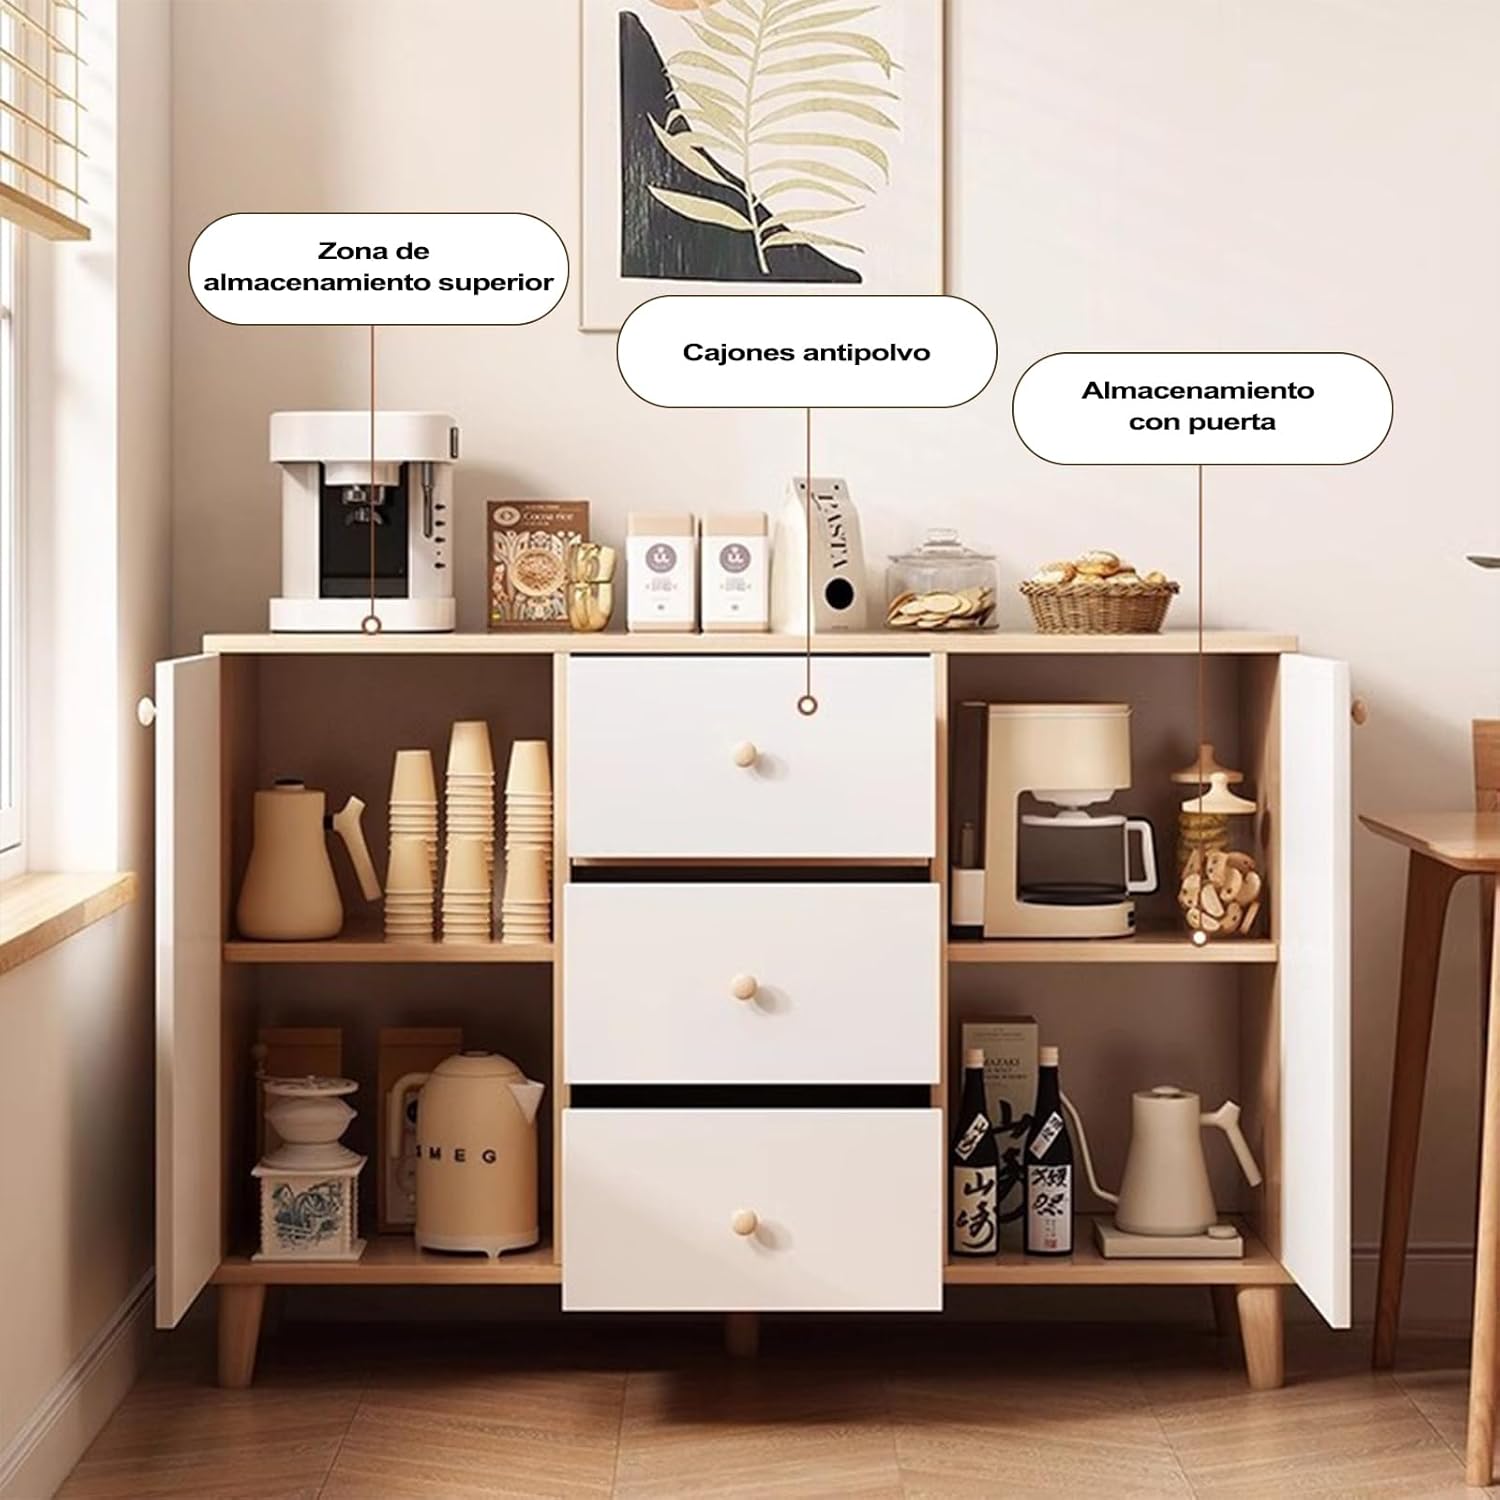
Image 2: The cabinet features an open top storage area, three central dust-proof drawers, and two side compartments with adjustable shelves for versatile storage.
3.4 Drawer Capacity

Image 3: The drawers are designed for ample storage, capable of holding various kitchen items such as canned goods, tea, or small appliances.
3.5 Material Properties

Image 4: The cabinet is constructed from high-density fiberboard with a smooth, delicate veneer. It features thick artificial boards and fine, flat edges, offering water resistance, scratch resistance, and an easy-to-clean surface.
3.6 Top Surface Usage

Image 5: The spacious top surface (120cm x 30cm) is suitable for placing kitchen appliances like microwaves, coffee makers, or for organizing condiments, cutlery, and cups.
3.7 Leg Design and Cleaning

Image 6: The cabinet features solid wooden legs providing a 10 cm clearance from the floor, allowing for easy cleaning underneath, including access for robot vacuum cleaners.
4. Operating and Usage
The KINTOP Kitchen Cabinet is designed for versatile storage and organization in various rooms.
- Open Top Section: Ideal for frequently used items like a coffee maker, toaster, or decorative pieces.
- Central Drawers: Use the three dust-proof drawers for storing smaller items such as cutlery, tea bags, spices, or other kitchen essentials. The ultra-quiet sliders ensure smooth operation.
- Side Compartments: The two side compartments with doors are suitable for larger items, appliances, or pantry storage. Adjustable shelves allow for customized organization.
- Multi-room Use: While designed for the kitchen, this cabinet can also function as a sideboard in a dining room, a storage unit in a living room, or an organizer in an entryway.
5. Maintenance
Proper care will ensure the longevity and appearance of your cabinet.
- Cleaning: Wipe surfaces with a soft, damp cloth. For stubborn marks, use a mild, non-abrasive cleaner. Dry immediately with a clean cloth.
- Spills: Due to its waterproof material, spills can be easily wiped away. Clean liquid spills promptly to prevent any potential damage.
- Avoid Harsh Chemicals: Do not use abrasive cleaners, strong detergents, or solvents, as these can damage the finish.
- Protection: Use coasters or placemats under hot items or items that may scratch the surface.
- Drawer Slides: Periodically check drawer slides for smooth operation. If they become stiff, a small amount of silicone lubricant can be applied.
6. Troubleshooting
Here are solutions to common issues you might encounter:
| Problem | Possible Cause | Solution |
|---|---|---|
| Cabinet is wobbly after assembly. | Screws are not fully tightened; uneven floor. | Ensure all screws are securely tightened. Use shims under the legs if the floor is uneven. |
| Drawers do not slide smoothly. | Drawer slides are misaligned or obstructed. | Check that drawer slides are correctly installed and free of debris. Apply a small amount of silicone lubricant if needed. |
| Doors are not aligned or do not close properly. | Hinges are not adjusted correctly. | Adjust the screws on the hinges to align the doors. Refer to the hinge adjustment instructions in the detailed paper manual. |
| Missing or damaged parts. | Packaging error or transit damage. | Do not proceed with assembly. Contact customer support immediately for replacement parts. |
7. Specifications
| Feature | Detail |
|---|---|
| Brand | KINTOP |
| Model Number | Mueble para despensa de cocina |
| Product Dimensions | 120D x 30W x 80H Centimetres (47.2 x 11.8 x 31.5 inches) |
| Item Weight | 25 kg (55 lbs) |
| Maximum Weight Capacity | 50 Kilograms (110 lbs) |
| Material | Wood (High-density fiberboard with veneer) |
| Colour | Brown (Wood tone with white panels) |
| Special Features | Minimalist Design, Raised Legs, Three Central Drawers, Two Side Compartments, Water-resistant, Scratch-resistant, Easy to clean |
| Mounting Type | Freestanding |
| Room Type | Kitchen, Dining Room, Living Room, Office |
8. Warranty & Support
KINTOP products are manufactured with quality and customer satisfaction in mind. For specific warranty information, please refer to the documentation included with your purchase or visit the official KINTOP website.
If you have any questions, require assistance with assembly, or need to report missing/damaged parts, please contact our customer support team:
- Customer Support: Refer to the contact information provided on your purchase receipt or the KINTOP official website.
- Please have your product model number (Mueble para despensa de cocina) and purchase date ready when contacting support.