1. Introduction
The FOTRIC TD2 Acoustic Imager is an advanced industrial tool designed for precise sound source localization, primarily used for detecting compressed air leaks, vacuum leaks, and identifying mechanical anomalies. This device utilizes 64 high-sensitivity MEMS digital microphones to visualize sound, making it an essential instrument for maintenance and inspection tasks across various industrial sectors. This manual provides comprehensive instructions for the safe and effective operation of your TD2 Acoustic Imager.
2. Product Overview
The FOTRIC TD2 combines acoustic imaging technology with a visual camera to provide real-time sound visualization. Key features include:
- Advanced Acoustic Sensor Array: Equipped with 64 MEMS digital microphones for accurate sound source localization.
- Wide Field of View: A 66°×52° field of view (FOV) ensures broad area coverage for detection.
- Broad Frequency Range: Detects sounds within a 2 to 100kHz frequency range, suitable for both audible and ultrasonic detection.
- High-Resolution Visual Camera: A 13-megapixel digital camera provides clear visual context for acoustic images.
- Intuitive Touchscreen Display: Features a 3.5-inch high-resolution IPS touchscreen (640×480) with Gorilla Glass protection.
- Multiple Display Modes: Supports single-source, multi-source, and hologram modes for versatile analysis.
- Durable and Portable Design: Lightweight (770g), IP54 rated for dust and water resistance, and tested for 2-meter drop resistance.
- Extended Battery Life: A 5000mAh rechargeable battery provides over 4 hours of continuous operation.
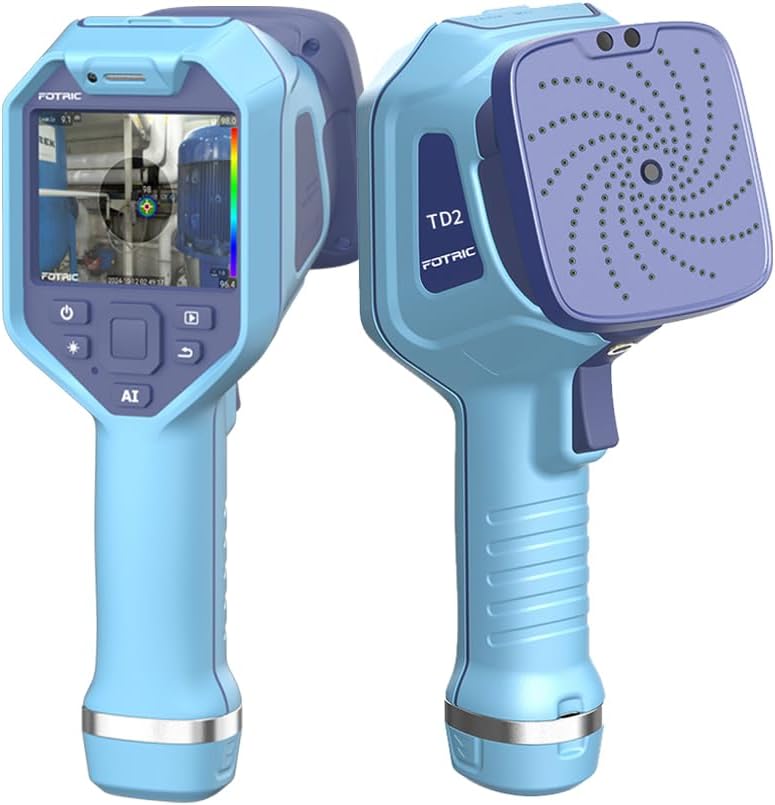
Figure 2.1: Front and back view of the FOTRIC TD2 Acoustic Imager, showcasing its ergonomic design and microphone array.
3. What's in the Box
Upon unpacking, please verify that all the following items are included:
- FOTRIC TD2 Acoustic Imager Body
- Rechargeable Lithium Ion Battery (pre-installed or separate)
- Data Cable (USB-C)
- Power Supply Adapter
- MicroSD Card (pre-installed or separate)
4. Setup
4.1. Charging the Battery
- Connect the data cable to the TD2 Imager's charging port.
- Connect the other end of the data cable to the power supply adapter.
- Plug the power supply adapter into a standard electrical outlet.
- The charging indicator on the device will illuminate. Allow the device to charge completely before first use.
4.2. Inserting the MicroSD Card
If the MicroSD card is not pre-installed, locate the MicroSD card slot (usually on the side or bottom of the device). Gently insert the MicroSD card with the contacts facing down until it clicks into place. Ensure it is inserted correctly to avoid damage.
5. Operation
5.1. Powering On/Off
- Power On: Press and hold the power button (typically marked with a power symbol) until the screen illuminates.
- Power Off: Press and hold the power button until a shutdown prompt appears on the screen. Select "Power Off" or similar option.
5.2. Navigating the User Interface
The TD2 features a 3.5-inch touchscreen for intuitive navigation. Tap icons to select functions, swipe to scroll, and use pinch-to-zoom gestures where applicable. The main screen typically displays the real-time acoustic image overlay, frequency range, sound pressure level (dB), and battery status.
5.3. Leak Detection and Sound Source Localization
The primary function of the TD2 is to visualize sound sources. As you scan an area, the device will display a color overlay on the visual image, indicating the intensity and location of sound emissions. Higher intensity colors (e.g., red, yellow) typically denote stronger sound sources or leaks.
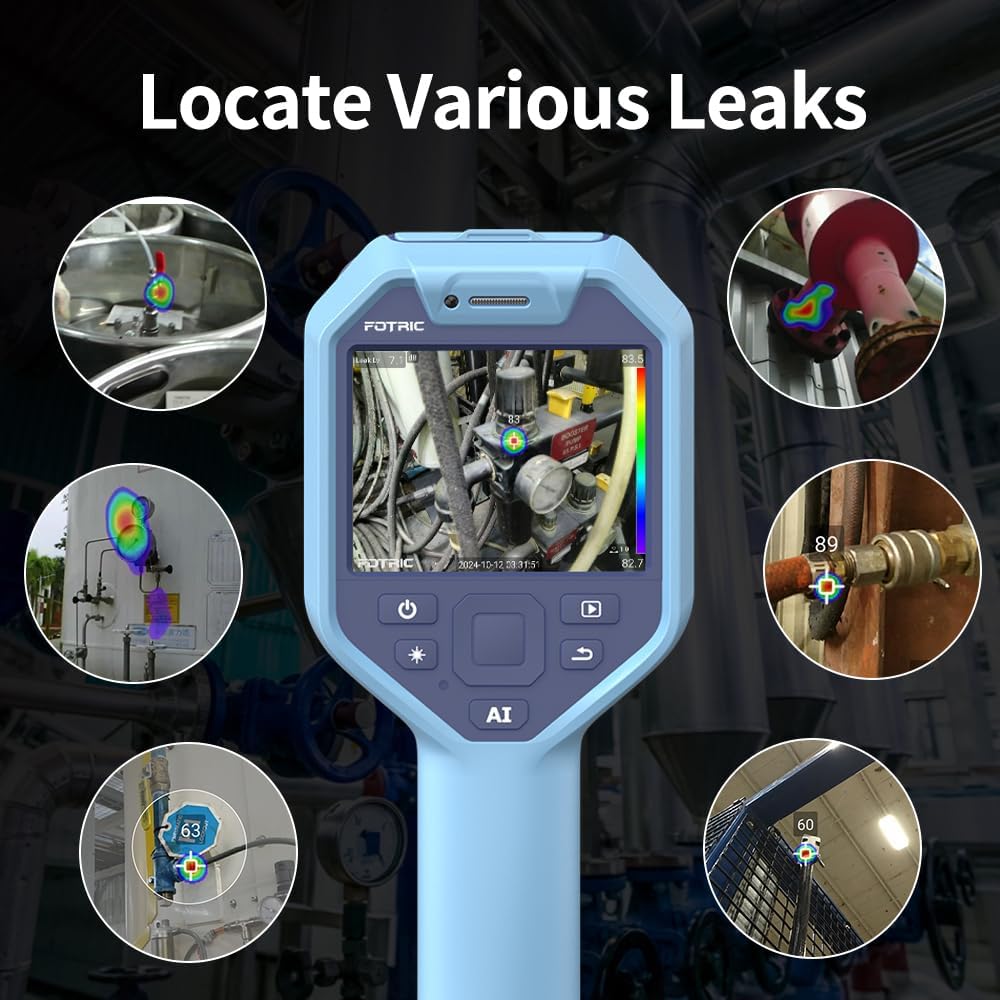
Figure 5.1: The TD2 Acoustic Imager displaying various industrial leaks, with color overlays indicating sound intensity.

Figure 5.2: A visual comparison illustrating the efficiency of acoustic imaging over traditional methods like soapy water for leak detection.
5.4. Acoustic Image Focus
The TD2 features an acoustic image focus function that allows you to concentrate the sound detection on a specific area, reducing interference from ambient noise. This is particularly useful for pinpointing small leaks or anomalies in noisy environments.

Figure 5.3: Demonstration of the Acoustic Image Focus feature, highlighting how it isolates sound sources for clearer analysis.
5.5. Display Modes
The TD2 offers several display modes to suit different inspection needs:
- Single-Source Mode: Focuses on the strongest sound source detected.
- Multi-Source Mode: Displays multiple significant sound sources simultaneously.
- Hologram Mode: Provides a more comprehensive acoustic visualization, often used for complex sound environments.

Figure 5.4: Examples of the Single-source, Multi-source, and Holographic display modes available on the TD2.
5.6. Recording and Saving Data
The TD2 allows you to capture images and potentially video recordings of your inspections. Refer to the on-screen menu for options to save data to the MicroSD card. Saved data can be transferred to a computer via the data cable for further analysis.
6. Maintenance
6.1. Cleaning the Device
Wipe the device body and screen with a soft, damp cloth. Do not use abrasive cleaners or solvents. Ensure no liquid enters the microphone array or charging ports.
6.2. Battery Care
To prolong battery life, avoid fully discharging the battery frequently. Store the device in a cool, dry place when not in use for extended periods, with the battery charged to approximately 50%.
6.3. Storage
Store the TD2 in its protective case to prevent damage from impacts or environmental factors. Avoid extreme temperatures and high humidity.
7. Troubleshooting
| Problem | Possible Cause | Solution |
|---|---|---|
| Device does not power on. | Low or depleted battery. | Charge the device using the provided power supply. |
| No acoustic image displayed. | Microphone array obstructed; frequency range too narrow; no significant sound source. | Ensure microphone array is clear. Adjust frequency range settings. Move closer to potential sound sources. |
| Screen is unresponsive. | Software glitch; extreme temperature exposure. | Perform a soft reset (refer to device settings or hold power button for extended period). Allow device to return to normal operating temperature. |
| Cannot save images/videos. | MicroSD card full or improperly inserted; card error. | Check MicroSD card capacity and insertion. Reformat the card (this will erase data) or try a different card. |
8. Specifications
| Feature | Detail |
|---|---|
| Model Number | TD2 |
| Microphones | 64 MEMS Digital Microphones |
| Frequency Range | 2 kHz ~ 100 kHz |
| Field of View (FOV) | 66° × 52° |
| Digital Camera | 13 Megapixel |
| Display | 3.5" IPS Touch Screen (640×480), Gorilla Glass |
| Battery | 1 Lithium Ion (5000mAh), 4+ hours operation |
| Ingress Protection (IP) Rating | IP54 |
| Drop Resistance | 2 meters |
| Item Weight | 770g (approx. 1.7 lbs) |
| Storage Media | MicroSD Card |
| Package Dimensions | 12.95 x 9.06 x 5.47 inches |
9. Warranty and Support
FOTRIC products are designed for reliability and performance. For information regarding warranty coverage, technical support, or service, please refer to the warranty card included with your product or visit the official FOTRIC website. Keep your purchase receipt as proof of purchase for warranty claims.
For additional assistance, you may contact FOTRIC customer support through their official channels. Contact information can typically be found on the manufacturer's website or in the product packaging.


