1. Introduction
Thank you for choosing the GROWNEER 40W 14-inch Solar Attic Fan. This manual provides essential information for the safe and efficient installation, operation, and maintenance of your new solar attic fan. Please read this manual thoroughly before installation and keep it for future reference.
2. Product Features
- Solar-Powered Operation: Equipped with high-efficiency solar panels, the fan converts solar energy into electricity, offering an eco-friendly and energy-saving ventilation solution.
- Low-Light Activation: The fan is designed to activate and operate even in dim light conditions, such as dawn, sunset, or under moonlight, ensuring continuous ventilation.
- 24/7 Operation Capability: Includes a 6.56ft extension adapter for continuous operation, allowing the fan to function throughout the night or during periods of insufficient sunlight.
- Remote Control: A remote control allows adjustment of settings within a 30-meter range, providing convenient function switching without requiring attic access.
- Smart Temperature and Humidity Control: Features a smart thermostat that automatically activates the fan when indoor humidity exceeds 60% or temperature rises above 26°C (78.8°F), and stops when both conditions are below thresholds for 10 minutes.
- High Performance Ventilation: Powered by a 40W brushless DC motor, offering 4-speed settings (660CFM/1000CFM/1500CFM/2000CFM) suitable for spaces up to 2000 square feet.
- Durable and Waterproof Design: Constructed from high-quality aluminum alloy with an IP68 waterproof rating, designed to withstand harsh weather conditions.
- Critter-Proof Net: Features a built-in protective grille to prevent animal intrusion, ensuring safe and uninterrupted operation.
- Adjustable Solar Panel: The solar panel can be adjusted for optimal solar gain, with 360-degree horizontal rotation and 0-75 degree vertical adjustment.
- Wide Application: Suitable for attics, sunrooms, warehouses, factories, and farm sheds.
3. Package Contents
Verify that all components are present and undamaged before proceeding with installation.
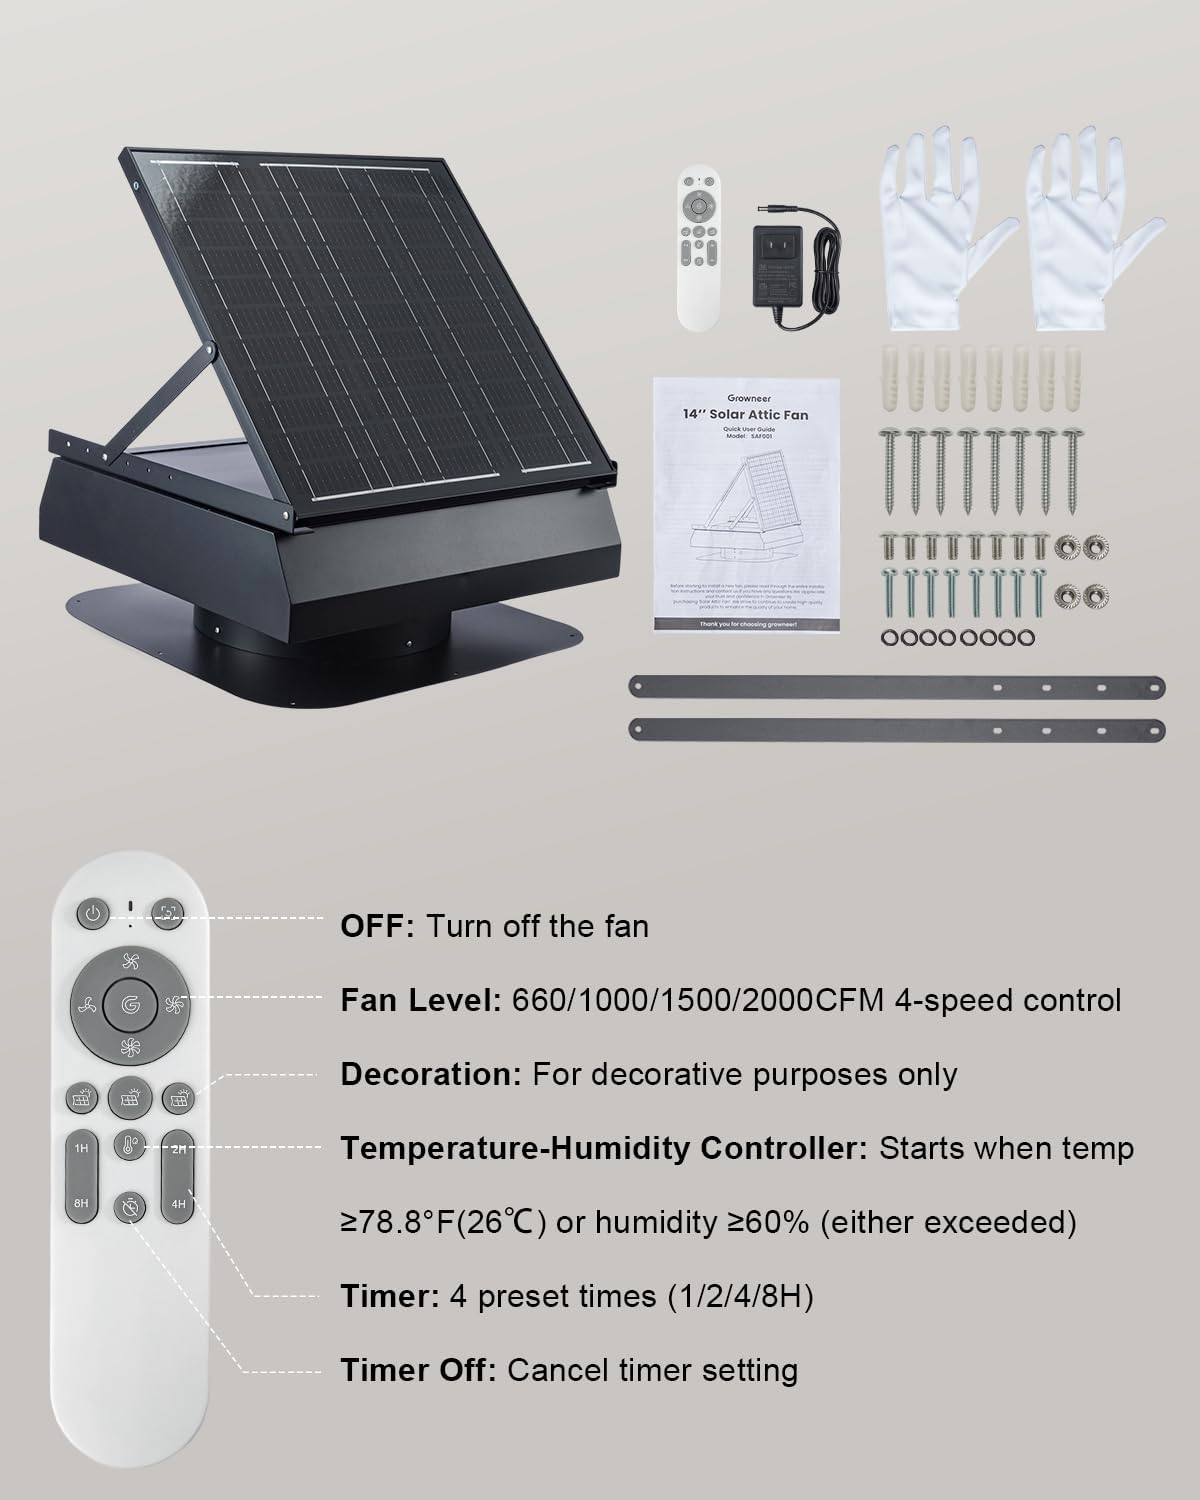
Image: GROWNEER 40W 14-inch Solar Attic Fan, remote control, AC adapter, gloves, user manual, mounting screws, and support brackets.
- Solar Attic Fan Unit
- Remote Control
- AC Extension Adapter (6.56ft)
- Pair of Gloves
- User Manual
- Mounting Screws and Anchors
- Support Brackets
4. Safety Information
Please observe the following safety precautions during installation and operation:
- Always wear appropriate personal protective equipment (PPE), including gloves and eye protection, during installation.
- Exercise extreme caution when working on roofs. Ensure stable footing and use fall protection if necessary.
- Disconnect any power sources before performing maintenance or adjustments.
- Ensure all electrical connections are secure and waterproofed to prevent short circuits or damage.
- Do not attempt to modify the fan or its components. Unauthorized modifications may void the warranty and pose safety risks.
- Keep children and pets away from the installation area.
5. Setup and Installation
Proper installation is crucial for the optimal performance and longevity of your solar attic fan. If you are not familiar with roofing work, it is recommended to consult a professional.
5.1 Site Selection
- Choose a location on your roof that receives maximum direct sunlight throughout the day.
- Ensure the chosen spot is free from obstructions like trees or chimneys that could cast shadows on the solar panel.
5.2 Installation Steps
- Prepare the Opening: Measure the size of the ventilation opening inside the fan unit. Carefully cut an appropriate-sized circular hole in the roof at the selected location. Ensure the hole is large enough for the fan's base but small enough for the flashing to cover.
- Secure the Base: Position the fan base over the cut-out hole. Ensure it sits flush with the roof surface. Secure the base using the provided mounting screws, driving them through the pre-drilled holes in the flashing into the roof decking.
- Seal the Edges: Apply a waterproof sealant (e.g., roofing cement or silicone caulk) around the edges of the fan base and over the screw heads to prevent water intrusion.
- Connect Wiring: Connect the solar panel cable to the fan unit. Ensure the red wire connects to the red terminal and the blue wire to the blue terminal.
- Adjust Solar Panel Angle: The solar panel can be adjusted for optimal sun exposure. Loosen the adjustment rod, set the panel to the desired angle (0-75 degrees vertical adjustment, 360-degree horizontal rotation), and then tighten the rod to secure it.

Image: Adjustable solar panel for optimal solar gain.
5.3 AC Backup Power (Optional)
For continuous operation during periods of low sunlight or at night, connect the provided AC extension adapter to the fan unit and plug it into a standard wall outlet. The fan will automatically switch between solar and AC power as needed.

Image: Fan operating in solar mode during the day and backup power mode at night or during rain.
6. Operating Instructions
The GROWNEER Solar Attic Fan can be operated manually or automatically using the remote control.
6.1 Remote Control Functions

Image: Remote control layout and function descriptions.
- Power Button (ON/OFF): Turns the fan on or off.
- Fan Level (Speed Control): Adjusts the fan speed through 4 levels: 660CFM, 1000CFM, 1500CFM, and 2000CFM.
- Temperature-Humidity Controller: Activates the smart thermostat function. The fan will start when the indoor temperature is ≥ 26°C (78.8°F) or humidity is ≥ 60%. It will stop when both conditions fall below these thresholds for 10 minutes.
- Timer: Sets the fan to operate for preset durations (1, 2, 4, or 8 hours).
- Timer Off: Cancels any active timer setting.

Image: Smart temperature and humidity control in action, indicating activation conditions.
6.2 Solar Mode
When sufficient sunlight is available, the fan will operate using solar power. The fan speed may vary based on the intensity of sunlight.
6.3 Backup Power Mode
If the AC adapter is connected, the fan will automatically switch to AC power when solar power is insufficient (e.g., at night, on cloudy days). In this mode, the fan speed can be manually adjusted via the remote control.

Image: Low-light activation feature, showing fan operation during various dim light scenarios.
7. Maintenance
Regular maintenance ensures optimal performance and extends the lifespan of your GROWNEER Solar Attic Fan.
- Clean Solar Panel: Periodically clean the surface of the solar panel with a soft, damp cloth to remove dust, dirt, or debris that may reduce its efficiency.
- Inspect Fan Blades: Annually inspect the fan blades for any accumulation of dust or debris. Clean gently if necessary.
- Check for Obstructions: Ensure the fan's intake and exhaust areas are free from obstructions (e.g., leaves, bird nests). The built-in critter-proof net helps, but occasional checks are recommended.
- Verify Sealant: Periodically check the sealant around the fan base on the roof for cracks or deterioration. Reapply sealant as needed to maintain a waterproof seal.
- Brushless Motor: The fan features a brushless motor, which requires minimal maintenance and offers a longer product life compared to brushed motors.

Image: Critter-proof net design to prevent animal intrusion.
8. Troubleshooting
If you encounter issues with your GROWNEER Solar Attic Fan, refer to the following troubleshooting guide:
| Problem | Possible Cause | Solution |
|---|---|---|
| Fan not operating in solar mode. | Insufficient sunlight; solar panel is dirty or obstructed; wiring issue. | Ensure direct sunlight on the panel. Clean the solar panel. Check solar panel cable connections. |
| Fan not operating with AC adapter. | AC adapter not properly plugged in; power outlet issue; adapter malfunction. | Verify AC adapter is securely plugged into both the fan and a working outlet. Test the outlet with another device. |
| Low airflow. | Fan speed set too low; obstructions in fan or vents; dirty fan blades. | Increase fan speed using the remote. Clear any obstructions. Clean fan blades. |
| Fan runs intermittently. | Fluctuating sunlight; smart thermostat activating/deactivating. | This may be normal behavior due to changing light conditions or smart thermostat settings. If persistent, check wiring. |
| Unusual noise during operation. | Debris in fan blades; loose mounting. | Turn off the fan and inspect blades for debris. Ensure the fan is securely mounted. |
If the problem persists after attempting these solutions, please contact customer support.
9. Specifications
| Feature | Detail |
|---|---|
| Brand | GROWNEER |
| Model Number | AX253601001 |
| Maximum Power | 40 Watts |
| Airflow (CFM) | 660 / 1000 / 1500 / 2000 (4 speeds) |
| Coverage Area | Up to 2000 Sq.Ft |
| Material | Aluminum Alloy, Tempered Glass, Monocrystalline Silicon or Polycrystalline Silicon |
| Waterproof Rating | IP68 |
| Special Features | Smart Thermostat, Humidity Control, Low-Light Activation, Remote Control, Adjustable Solar Panel |
| Included Components | Remote, AC Adapter |
| Connector Type | MC4 |
10. Warranty and Support
GROWNEER offers a 12-month warranty for this product. We are committed to ensuring your satisfaction.
For any questions, technical assistance, or warranty claims, please do not hesitate to reach out to our customer support team. We provide 24-hour customer support to assist you.
You can visit the official GROWNEER store for more information: GROWNEER Store