1. Product Overview
The Alondy Double Din Car Stereo GH-7900W is an advanced in-car entertainment and navigation system designed to enhance your driving experience. It features a 7-inch full HD touchscreen, offering seamless integration with your smartphone via wireless Apple CarPlay and Android Auto. This unit also includes Bluetooth connectivity, an FM radio, USB and Type-C charging ports, and supports a rear view backup camera.
Key Features:
- Wireless/Wired Apple CarPlay & Android Auto: Access navigation, music, calls, and messages with voice assistant support.
- Audio Mixing: Navigate with CarPlay/Android Auto while listening to the radio in the background.
- Bluetooth 5.2 & External Microphone: Enhanced transmission efficiency, reduced static noise, hands-free calling, and audio streaming.
- 7-inch Full HD Touchscreen: 1280*600 resolution with support for 1080P video playback. Features a physical volume knob for easy control.
- Rear View Backup Camera Input: Supports night vision, 170° viewing angle, and waterproof backup cameras for safer reversing.
- Built-in DSP: 2 channels of pre-amplifier (RCA) with 10-band EQ support for high-quality audio.
- USB Type-A and Type-C Ports: For charging devices and data transfer.
2. Package Contents
Before installation, please verify that all items are present in the package:
- Alondy Double Din Car Stereo Unit
- Remote Control
- Power Cable
- External Microphone
- Rear View Camera
- Mounting Brackets
- ISO Harness

Image: Contents of the Alondy Double Din Car Stereo package.
3. Setup and Installation
Proper installation is crucial for optimal performance. It is recommended to have this unit installed by a professional car audio technician.
3.1 Pre-Installation Check:
- Ensure your vehicle's dash opening is compatible with a double din unit (7 inches wide).
- You may need to purchase a specific double din dash kit and an ISO harness compatible with your car's make and model.

Image: Illustration of car stereo installation, emphasizing the need for a compatible dash kit and ISO harness.
3.2 Wiring Diagram:
Refer to the following diagram for proper wiring connections. Incorrect wiring can damage the unit or your vehicle's electrical system.

Image: Detailed wiring diagram and dimensions for the Alondy car stereo.
- Power Connections: Connect the yellow wire to +12V constant power, red wire to +12V ignition switch (ACC), and black wire to ground.
- Speaker Connections: Connect the speaker wires according to the color codes (e.g., Grey/Grey-Black for front right, White/White-Black for front left).
- Rear View Camera: Connect the reversing video input and the reverse detection wire (usually brown).
- External Microphone: Plug the external microphone into the designated port for improved call quality.
- Steering Wheel Control: Connect the steering wheel control wires (SWC1, SWC2) if your vehicle supports this feature.
4. Operating Instructions
4.1 Power On/Off and Volume Control:
- To power on the unit, ensure the ignition is on. The unit typically powers on automatically.
- Adjust volume using the physical knob on the front panel. Rotate clockwise to increase, counter-clockwise to decrease.

Image: Practical volume knob for audio adjustment.
4.2 Apple CarPlay & Android Auto:
This unit supports both wireless and wired connections for Apple CarPlay and Android Auto.
- Wireless Connection: Enable Bluetooth and Wi-Fi on your smartphone. Pair your phone with the car stereo via Bluetooth. Follow the on-screen prompts to activate wireless CarPlay or Android Auto.
- Wired Connection: Connect your smartphone to the USB Type-A port using a certified USB cable. The system will automatically detect and launch CarPlay or Android Auto.
Once connected, you can access navigation, make calls, send messages, and play music directly from your phone's interface displayed on the stereo screen.

Image: Wireless/Wired CarPlay & Android Auto interface.
4.3 Bluetooth Connectivity:
The independent Bluetooth module allows for hands-free calling and audio streaming.
- Go to the Bluetooth menu on the stereo.
- Enable Bluetooth on your smartphone and search for available devices.
- Select the car stereo (e.g., "Alondy GH-7900W") from your phone's list and pair.
- Use the external microphone for clear hands-free communication.

Image: Bluetooth connectivity icon.

Image: Voice Assistant and Bluetooth hands-free calling in action.
4.4 FM Radio:
Access local radio stations with the built-in FM tuner.
- Select the "Radio" icon from the main menu.
- Use the scan function to automatically find and save stations, or manually tune to a specific frequency (87.5 ~ 107.9MHz).

Image: FM Radio interface.
4.5 Phone Mirroring:
Mirror your smartphone screen directly onto the stereo display.
- Select the "PhoneLink" or "Mirror Link" option from the main menu.
- Follow the on-screen instructions to connect your Android or iOS device. This typically involves connecting via USB and enabling developer options/USB debugging for Android, or trusting the device for iOS.
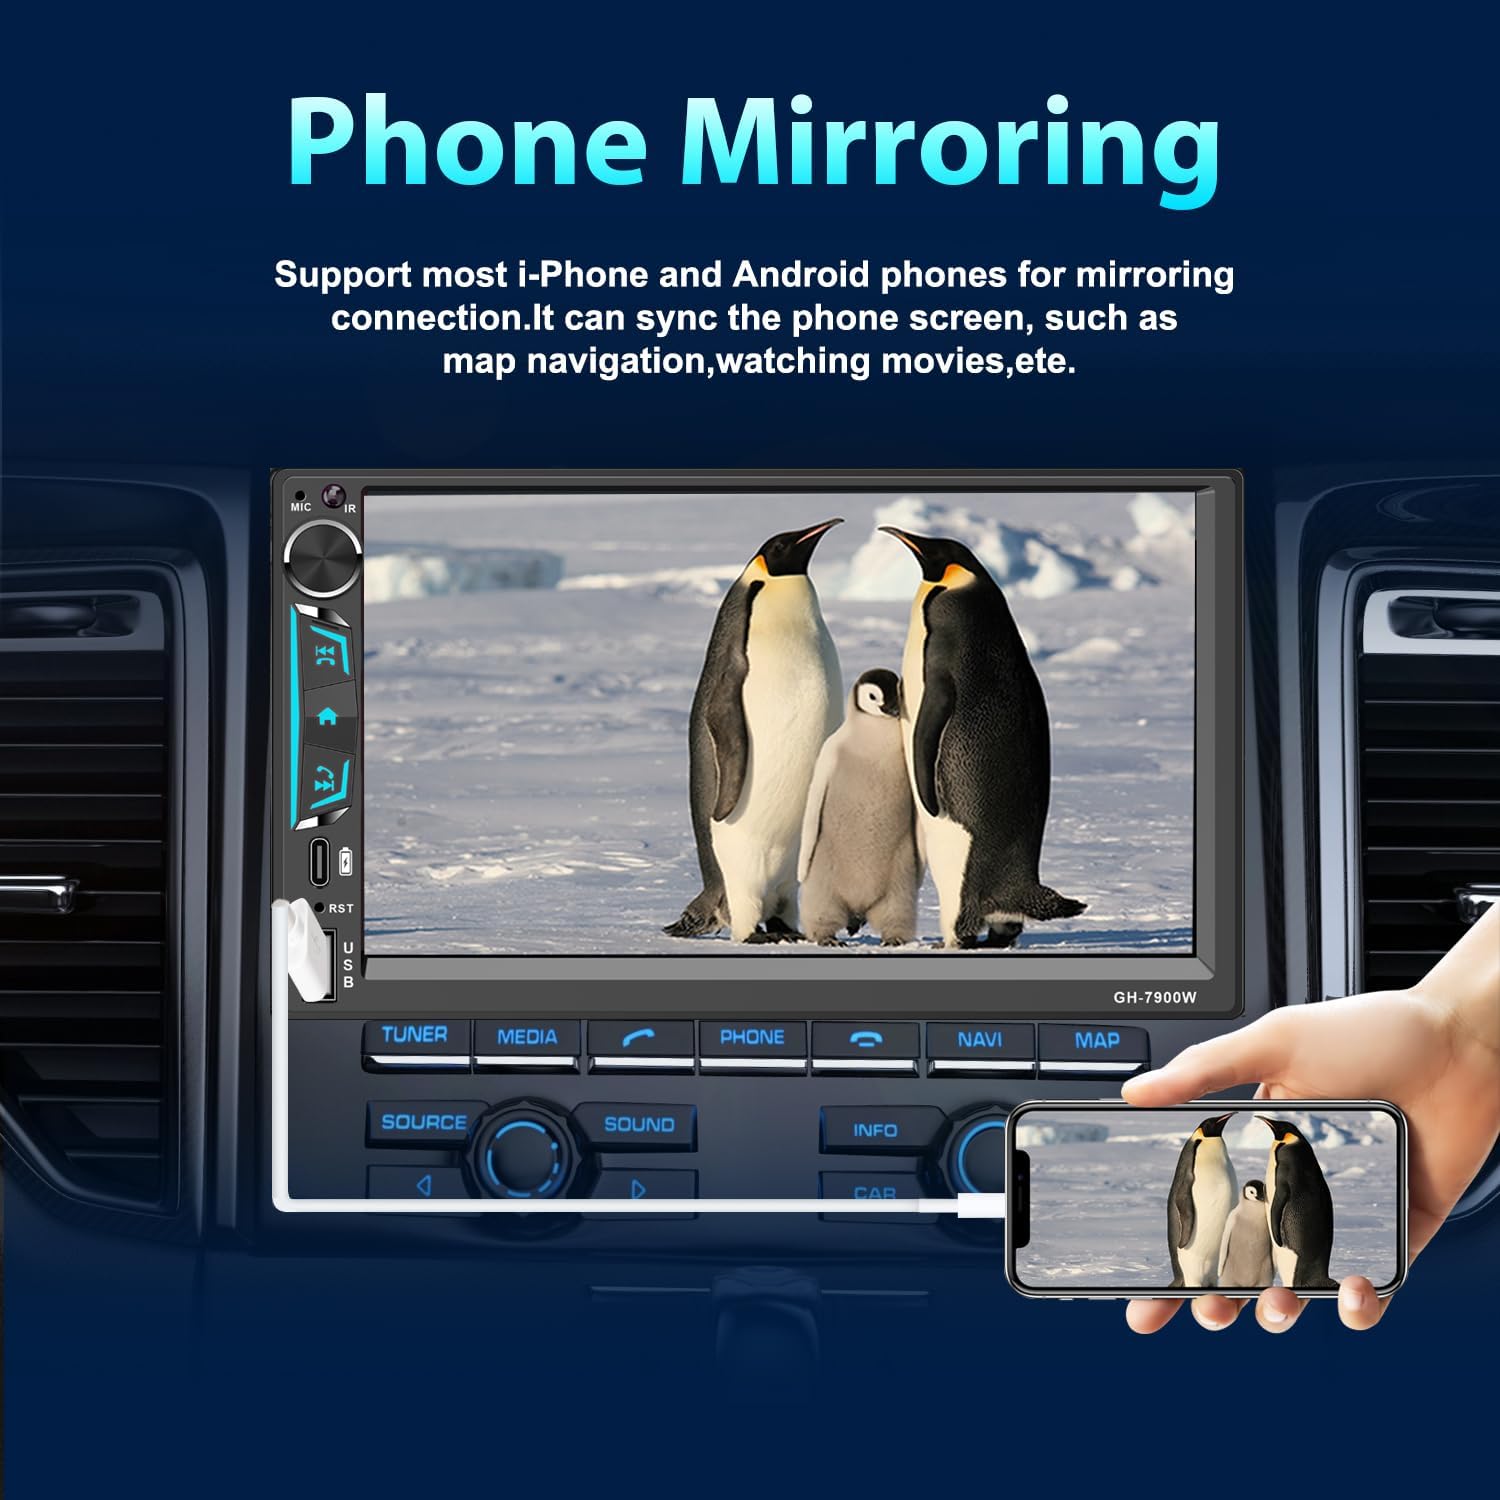
Image: Phone Mirroring functionality.
4.6 Rear View Backup Camera:
The system automatically displays the rear view when shifting into reverse gear.
- Ensure the backup camera is correctly installed and wired to the unit's reversing video input.
- The camera provides a 170° wide-angle view with night vision capabilities.

Image: Reversing Camera features and display.
4.7 Audio Settings (DSP & EQ):
Customize your audio experience with the built-in Digital Sound Processor (DSP) and 10-band Equalizer (EQ).
- Access the "Sound Setup" or "EQ" menu from the main interface.
- Adjust frequency bands (e.g., 30Hz, 60Hz, 125Hz, etc.) to fine-tune bass, mid-range, and treble.
- Utilize the fader and balance controls to optimize sound distribution within the vehicle.
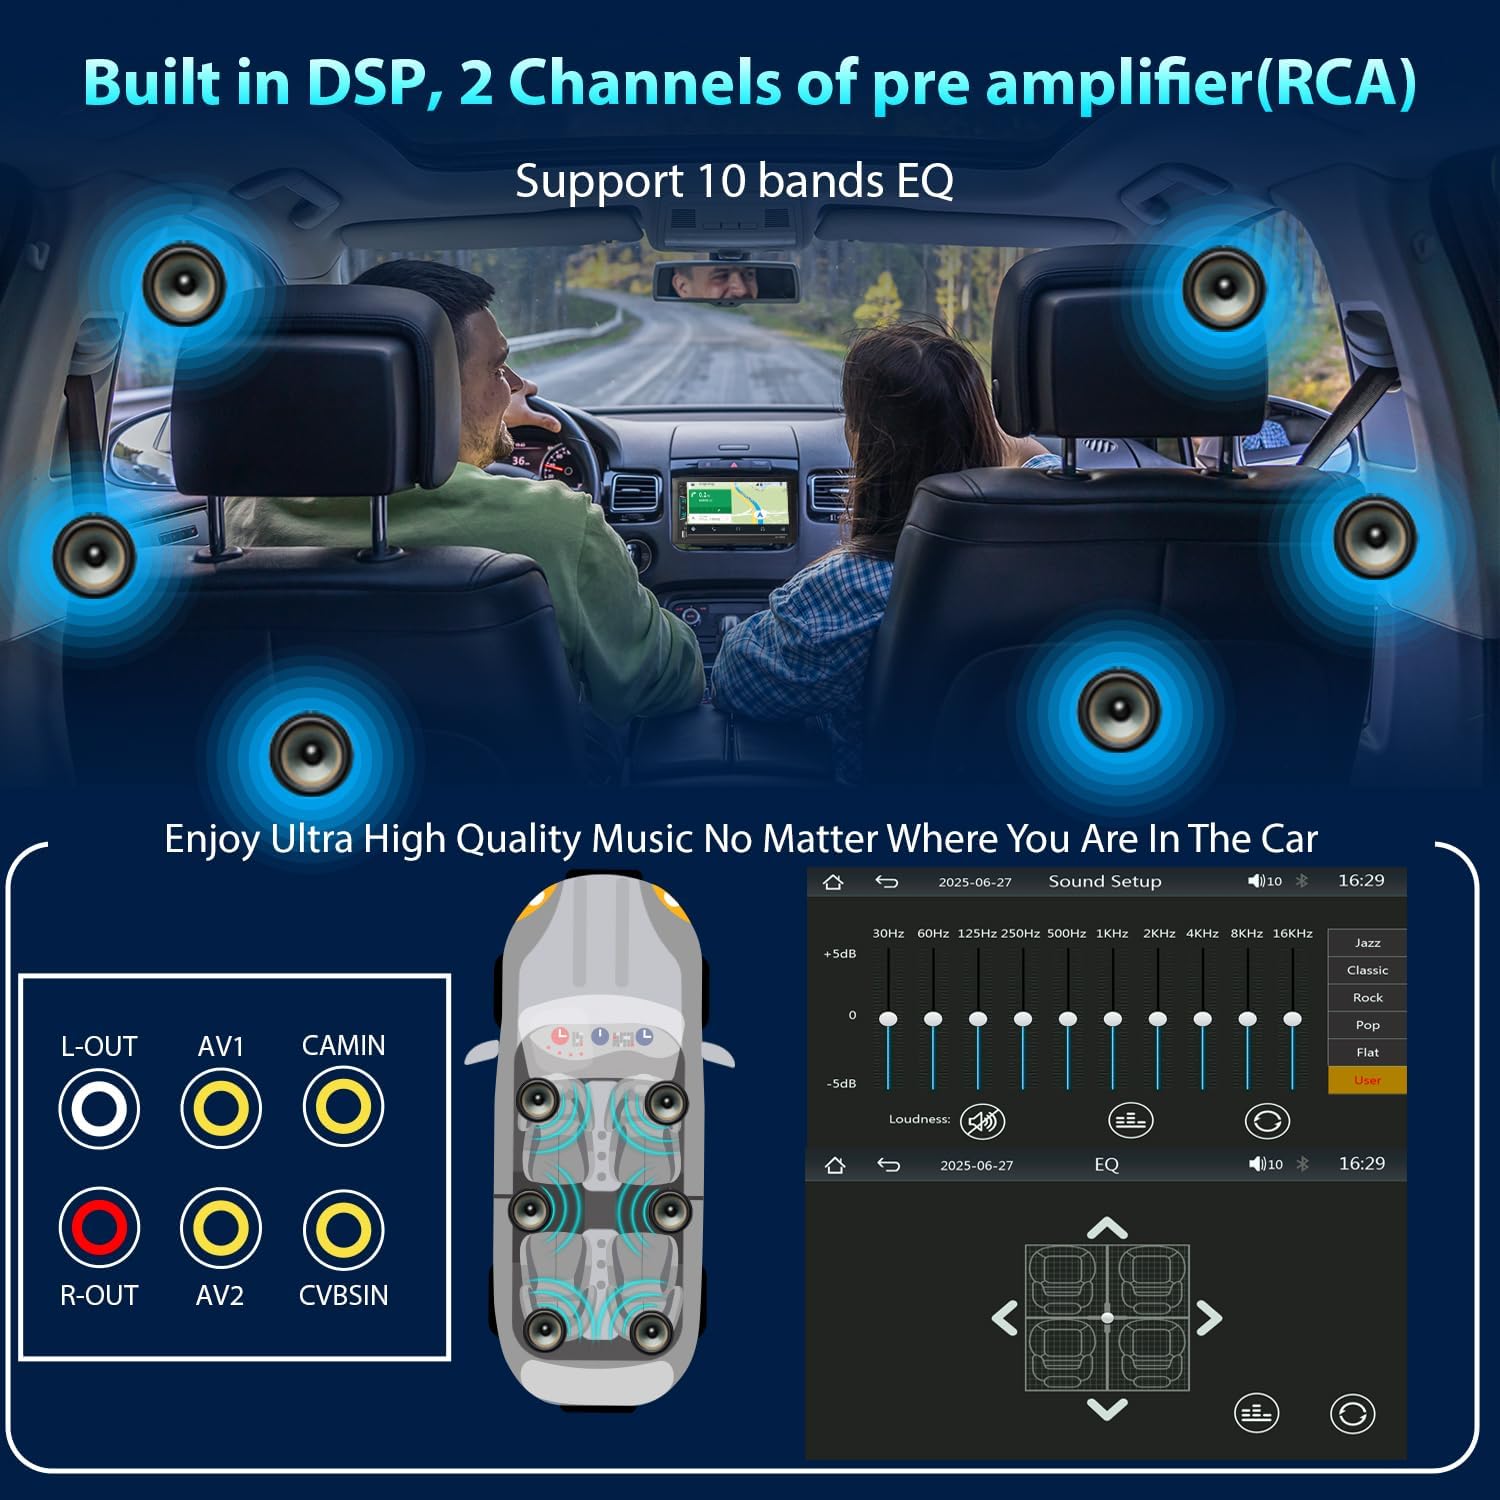
Image: Built-in DSP and 10-band EQ for audio customization.
4.8 Steering Wheel Control:
Program your steering wheel buttons to control the stereo functions.
- Go to the "Steering Wheel Control" settings in the system menu.
- Follow the on-screen instructions to assign functions (e.g., volume up/down, track skip, mode) to your vehicle's steering wheel buttons.

Image: Steering Wheel Control setup interface.
4.9 USB Type-A and Type-C Ports:
The unit features both USB Type-A and Type-C ports for charging and data transfer.
- Use these ports to charge your mobile devices.
- The USB Type-A port is primarily used for wired Apple CarPlay/Android Auto connections and playing media from USB drives.

Image: Both USB Type-A and Type-C ports for charging.
5. Maintenance
To ensure the longevity and optimal performance of your Alondy car stereo, follow these maintenance guidelines:
- Screen Cleaning: Use a soft, lint-free cloth to gently wipe the touchscreen. For stubborn smudges, slightly dampen the cloth with water or a screen-safe cleaner. Avoid abrasive materials or harsh chemicals.
- Dust Removal: Periodically use compressed air to clear dust from around buttons and ports.
- Software Updates: Check the manufacturer's website for any available firmware updates to ensure the system runs efficiently and has the latest features.
- Avoid Extreme Temperatures: Do not expose the unit to prolonged direct sunlight or extreme cold, as this can affect performance and screen longevity.
6. Troubleshooting
If you encounter issues with your car stereo, refer to the following common problems and solutions:
| Problem | Possible Cause | Solution |
|---|---|---|
| Unit does not power on. | Incorrect wiring (power/ground), blown fuse, vehicle ignition off. | Check power cable connections (yellow, red, black wires). Verify vehicle's fuse box and stereo's inline fuse. Ensure ignition is on. |
| Bluetooth connection issues (not connecting, dropping). | Interference, phone's Bluetooth off, incorrect pairing, software glitch. | Ensure phone's Bluetooth is on and visible. Forget the device on both phone and stereo, then re-pair. Restart both devices. |
| CarPlay/Android Auto not launching. | Incorrect USB cable, phone settings, app issues, wireless connection problems. | Use a certified USB cable. Check phone settings for CarPlay/Android Auto permissions. For wireless, ensure Bluetooth and Wi-Fi are enabled and paired. |
| Touchscreen is unresponsive or laggy. | Temporary software issue, excessive dust/debris on screen. | Restart the unit. Clean the screen thoroughly. If persistent, a factory reset might be necessary (consult support). |
| No sound from speakers. | Incorrect speaker wiring, mute activated, volume too low, amplifier issue. | Check speaker wire connections. Ensure volume is up and unit is not muted. Verify external amplifier (if used) is powered on. |
| Backup camera image is poor or not displayed. | Incorrect camera wiring, faulty camera, poor lighting. | Check camera power and video signal connections. Ensure the reverse trigger wire is correctly connected. Test camera in different lighting conditions. |
7. Specifications
| Feature | Detail |
|---|---|
| Brand | Alondy |
| Model Number | GH-7900W |
| Product Dimensions (D x W x H) | 3.46" x 7" x 3.8" |
| Item Weight | 1.7 Pounds |
| Connectivity Technology | Bluetooth, USB, Wi-Fi |
| Controller Type | Android, iOS |
| Special Features | Android Auto, Apple CarPlay, Built-In Bluetooth, Rear View Camera Input, Screen Mirroring |
| Compatible Devices | Amplifier, Smartphone, Speaker |
| Connector Type | RCA, USB Type A |
| Audio Output Mode | Stereo |
| Surround Sound Channel Configuration | 5.1 |
| Video Encoding | H.263 |
| Output Power | 180 Watts |
| Number of Channels | 4 |
| Output Wattage | 240 Watts |
| Control Method | Remote, Touch, Voice |
| Audio Output Type | Speakers |
| Format | Surround Sound |
8. Warranty Information
The Alondy Double Din Car Stereo GH-7900W comes with a 1-year warranty from the date of purchase. This warranty covers manufacturing defects and malfunctions under normal use. Please retain your proof of purchase for warranty claims.
For detailed warranty terms and conditions, please refer to the documentation included with your product or contact Alondy customer support.
9. Customer Support
If you require further assistance, have questions about installation, operation, or troubleshooting that are not covered in this manual, please contact Alondy customer support.
- Visit the Alondy Store on Amazon for product information and support resources.
- Refer to the contact information provided in your product packaging for direct support channels.