1. Introduction
This manual provides comprehensive instructions for the installation, operation, and maintenance of your Bonn 1949 Automatic Chicken Coop Door. This device is designed to automate the opening and closing of your chicken coop door, offering convenience and security for your poultry. It features solar power, a rechargeable battery, an LCD screen, timer and light sensor modes, and remote control functionality.
2. Package Contents
Please verify that all items listed below are included in your package:
- Automatic Chicken Coop Door x1
- Solar Panel x1
- Remote Control x1
- USB Type-C Cable x1
- Screws x4
- User Manual x1

Image: All components included in the Bonn 1949 Automatic Chicken Coop Door package.
3. Product Features
- Multiple Power Supply Modes: Operates via solar power, USB Type-C cable, or a built-in 4000mAh rechargeable battery.
- Intelligent Control Modes: Features Timer, Light Sensor, Timer & Light, and Light & Time modes for automatic operation.
- Manual Control: Includes a remote control and direct door buttons for manual opening and closing.
- Smart Anti-Pinch Protection: Equipped with a sensitive detection system that prevents the door from closing on chickens.
- Durable Construction: Made from premium aluminum alloy, resistant to extreme weather conditions (snowproof, waterproof, sunproof) and temperatures from -20°F to 140°F.
- User-Friendly LCD Screen: Large display for easy setup and monitoring of time, modes, and battery status.
- Wide Application: Suitable for various poultry and small animals (under 10 lbs) and compatible with different coop materials like wood, metal, or netting.
4. Safety Information
- Initial Charge: Before first use, fully charge the device for approximately 20 minutes using the provided adapter to ensure sufficient power.
- Installation Orientation: This automatic coop door is designed for vertical installation only. Horizontal installation may lead to improper functionality.
- Testing Environment: Do not test the chicken door on a white, smooth surface. Such surfaces can reflect infrared rays, causing confusion in the door's opening/closing mechanism.
- Anti-Pinch Feature: The door includes an anti-pinch function. If an obstruction is detected during closing, the door will bounce back and attempt to close again. Ensure the path is clear for safe operation.
- Cable Protection: Protect the USB Type-C charging cable from animal interference to prevent damage and ensure continuous power supply.
5. Installation
The Bonn 1949 Automatic Chicken Coop Door is designed for easy installation, typically taking around 3 minutes.
- Prepare Opening: Create an appropriately sized opening in your chicken coop. The door unit dimensions are 9.65" L x 1.8" W x 13.2" H. The open door size is 13.2" L x 22.44" H. Ensure the opening for the door panel is approximately 8.27" wide and 9.45" high.
- Mount the Door: Position the automatic door unit over the prepared opening. Use the provided screws to secure the unit to the coop structure. Important: Do not overtighten the screws, as this can compress the door frame and hinder proper operation.
- Connect Solar Panel: Attach the solar panel to a location where it receives maximum direct sunlight throughout the day. Connect the solar panel cable to the designated port on the main door unit.
- Initial Power-Up: After installation, ensure the unit has sufficient power by charging it via the USB-C cable or allowing the solar panel to charge the built-in battery.

Image: Visual guide for the installation process of the automatic chicken coop door.
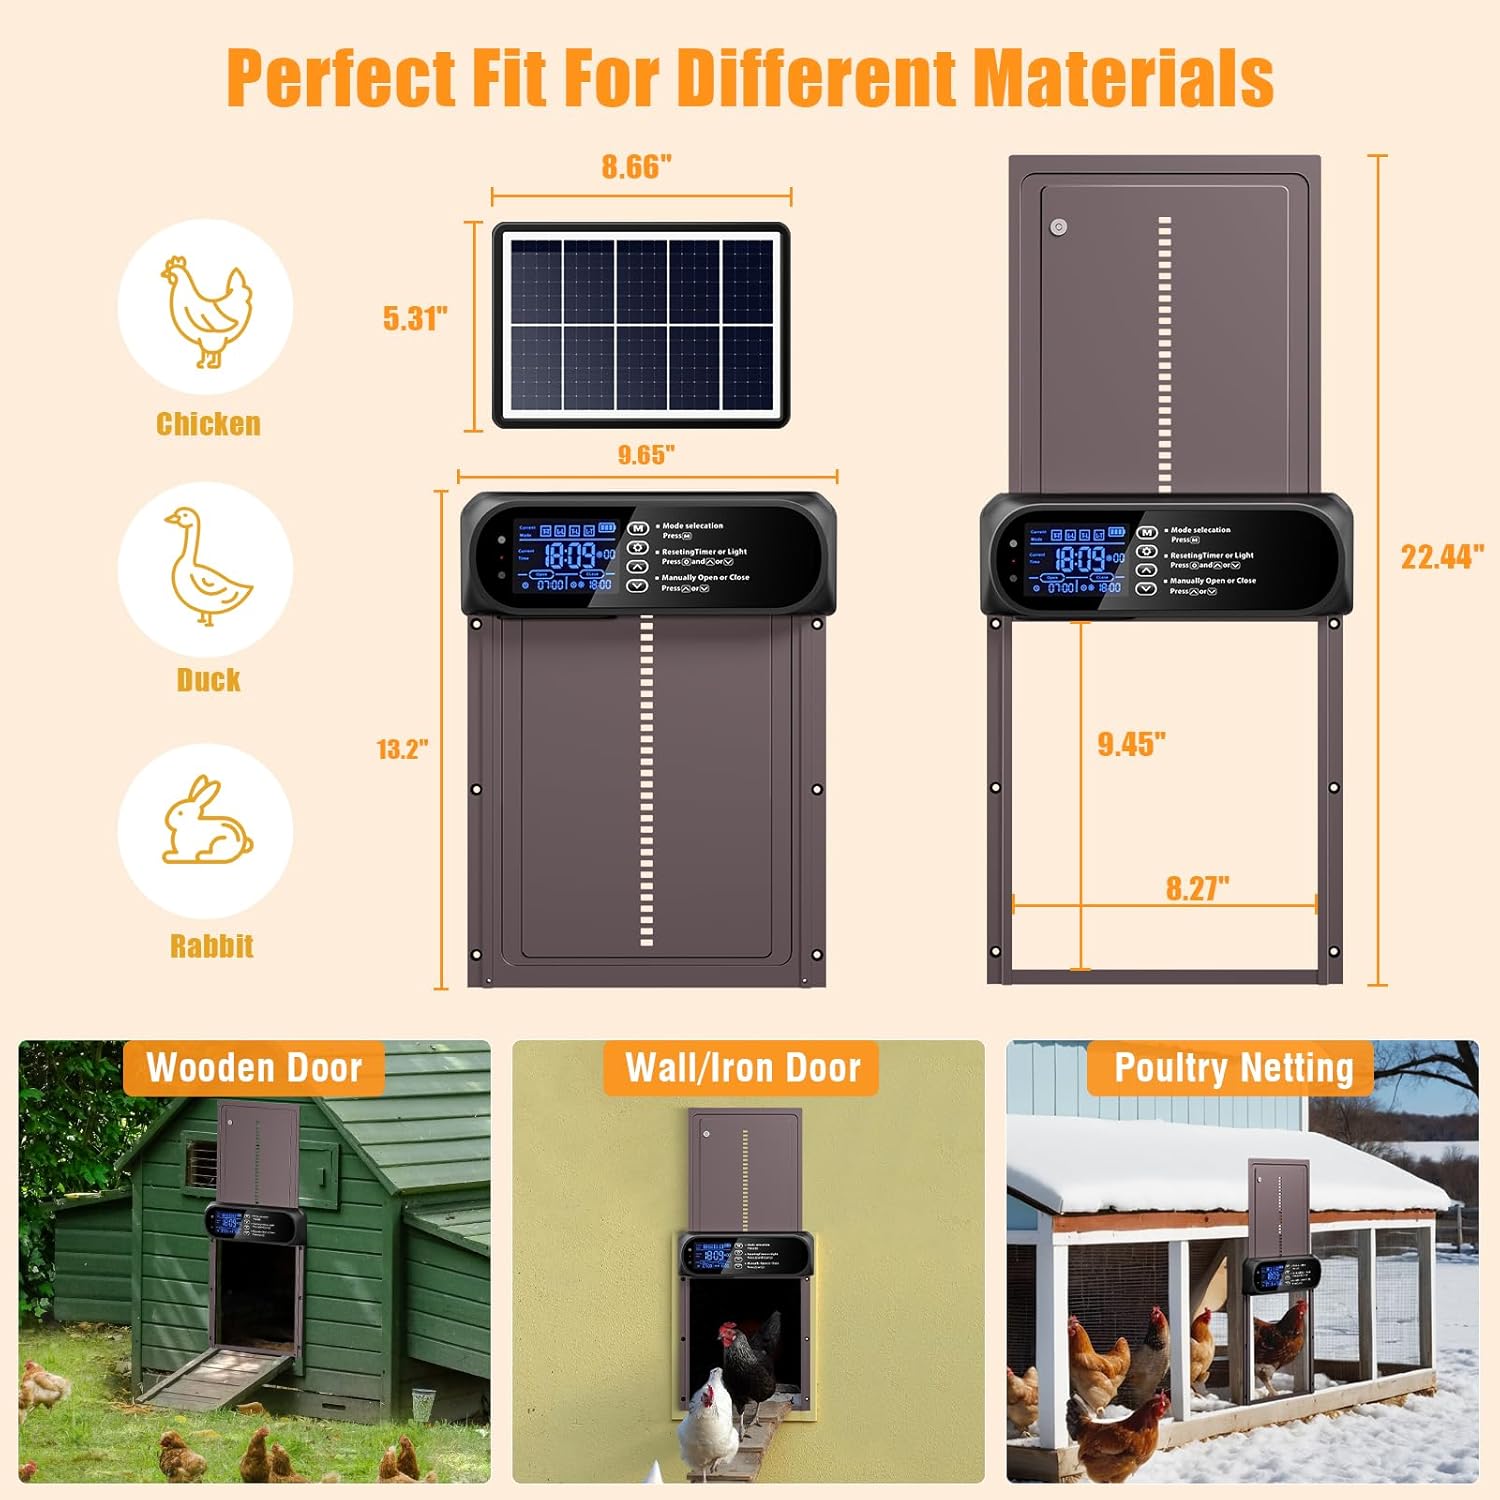
Image: Dimensions and examples of suitable installation surfaces for the door.
6. Power Supply Modes
Your automatic chicken coop door offers three flexible power options:
- Solar Charging: The included solar panel automatically charges the internal battery during sunny conditions. Ensure the solar panel is placed in direct sunlight for optimal performance.
- USB Type-C Cable: For initial charging or in periods of low sunlight, use the provided USB Type-C cable with a 5V/1A charger (not included) to charge the unit.
- Built-in 4000mAh Battery: The internal rechargeable battery provides backup power, capable of operating the door for 10-15 days on a full charge, ensuring continuous function even without direct solar input or USB connection.

Image: Overview of the three power supply methods for the chicken coop door.
7. Operating Modes
The door offers various modes for automated and manual control:
7.1 Automatic Modes (Timer & Light Sensor)
The door features four smart automatic modes, combining timer and light sensor functionalities:
- TT (Timer-Timer) Mode: The door opens and closes based on preset times.
- LL (Light-Light) Mode: The door opens and closes based on detected light intensity.
- TL (Timer-Light) Mode: The door opens at a preset time and closes based on light intensity.
- LT (Light-Timer) Mode: The door opens based on light intensity and closes at a preset time.
7.2 Manual Control Modes
- Remote Control: Use the provided remote control to manually open or close the door from up to 10 meters (33 feet) away.
- Door Buttons: Utilize the physical buttons on the door unit for direct manual operation.

Image: Visual representation of the various timer and light sensor operating modes, along with remote control functionality.
8. LCD Display Overview
The large LCD screen provides clear information and easy navigation for setting up your door.

Image: Detailed view of the LCD screen and its various indicators and controls.
Key indicators and controls on the LCD display:
- Current Mode: Displays the active operating mode (TT, LL, TL, LT).
- Current Time: Shows the current time.
- Natural Light Value: Indicates the detected ambient light level.
- Alarm Light: Illuminates for warnings or notifications.
- Charging Indicator: Shows battery charging status.
- Open Time/Light: Displays the set opening time or light threshold.
- Close Time/Light: Displays the set closing time or light threshold.
- Turn ON/OFF: Indicates if the automatic function is enabled or disabled.
- Type-C Charging Port: Connection point for USB-C charging.
- Buttons: 'M' for Mode selection, 'Gear' for Resetting Timer or Light, 'Up/Down arrows' for Manual Open/Close or value adjustment.
9. Setting Up the Door
Follow these steps to configure the time and operating modes:
9.1 Setting Current Time
- Press the 'Gear' button to enter time setting mode.
- Use the 'Up' and 'Down' arrow buttons to adjust the hour.
- Press the 'Gear' button again to move to minute adjustment.
- Use the 'Up' and 'Down' arrow buttons to adjust the minutes.
- Press the 'Gear' button one more time to save and exit.
9.2 Selecting Operating Mode
- Press the 'M' button to cycle through the available modes (TT, LL, TL, LT).
- Once your desired mode is displayed, press the 'Gear' button to enter its specific settings.
9.3 Setting Open/Close Parameters (Example for TT Mode)
- In TT mode settings, the 'Open' time will flash. Use 'Up'/'Down' arrows to set the desired opening hour.
- Press 'Gear' to confirm the hour and move to minutes. Adjust minutes with 'Up'/'Down' arrows.
- Press 'Gear' to confirm minutes and move to 'Close' time setting.
- Repeat the process to set the desired closing hour and minutes.
- Press 'Gear' to save all settings and exit.
For LL, TL, and LT modes, the 'Gear' button will allow you to adjust light sensitivity thresholds instead of times for the light-controlled actions. Refer to the LCD display for specific icons indicating time or light settings.
10. Maintenance
- Cleaning: Periodically clean the door panel and tracks to ensure smooth operation. Use a soft, damp cloth. Avoid abrasive cleaners.
- Solar Panel: Keep the solar panel clean from dust, dirt, and debris to maximize charging efficiency.
- Battery: The built-in battery is designed for long life. If the door is stored for extended periods, ensure it is charged periodically to maintain battery health.
- Obstruction Check: Regularly check the door's path for any obstructions that might interfere with its movement or trigger the anti-pinch sensor unnecessarily.
11. Troubleshooting
| Problem | Possible Cause | Solution |
|---|---|---|
| Door does not open/close automatically. | Incorrect mode setting, low battery, sensor obstruction, incorrect time/light settings. | Check the selected operating mode and its parameters on the LCD. Ensure the battery is charged. Clear any obstructions around the door. Verify current time and light sensor calibration. |
| Door opens/closes erratically or not at all. | Low battery, solar panel not receiving enough light, faulty sensor, overtightened screws. | Charge the battery via USB-C. Reposition solar panel for direct sunlight. Check for loose connections. Loosen mounting screws slightly if they are too tight. |
| Anti-pinch feature constantly triggers. | Obstruction in the door path, sensor malfunction. | Ensure the door path is completely clear. Clean the sensor area. If the problem persists, contact support. |
| Remote control not working. | Remote battery dead, out of range, interference. | Replace remote control battery. Ensure you are within the 10-meter range. Reduce potential interference sources. |
| LCD screen is blank or unresponsive. | No power, unit malfunction. | Check battery level and charging status. Try charging via USB-C. If still unresponsive, contact support. |
12. Specifications
| Feature | Detail |
|---|---|
| Model Number | JM-A01 |
| Product Dimensions (Closed) | 9.65" L x 1.8" W x 13.2" H |
| Open Door Size | 13.2" L x 22.44" H |
| Item Weight | 2.72 pounds |
| Material | Aluminum Alloy |
| Power Supply Modes | Solar Powered, USB Type-C Charging, Built-in 4000mAh Battery |
| Operating Modes | Timer, Light Sensor, Timer & Light, Light & Time, Remote Control, Manual Button |
| Remote Control Range | Up to 10 meters (33 feet) |
| Special Features | Anti-Pinch Function, Easy Assembly, Waterproof, Weather Resistant |
| Target Audience | Chickens, Ducks, Rabbits, and other small animals (less than 10 lbs) |
13. Warranty and Support
Bonn 1949 offers a lifetime warranty for this product. For any questions, technical assistance, or warranty claims, please contact our customer support team. We provide 7*24 hours support to ensure your satisfaction.
For support, please refer to the contact information provided with your purchase or visit the official Bonn 1949 store online.