OUTGUAVA NYX08-184WH
OUTGUAVA Double Tilt Out Trash Cabinet Instruction Manual
Model: NYX08-184WH
Introduction
This manual provides detailed instructions for the assembly, operation, and maintenance of your OUTGUAVA Double Tilt Out Trash Cabinet. Please read this manual thoroughly before beginning assembly or use to ensure proper function and longevity of your product. Keep this manual for future reference.
Product Overview
The OUTGUAVA Double Tilt Out Trash Cabinet is a versatile and space-saving storage solution designed for kitchens, dining rooms, living rooms, or bathrooms. It features two tilt-out compartments for concealing trash cans up to 13 gallons each, two hideaway drawers for utensils or small items, and an upper hutch with glass doors and adjustable shelves for additional storage or display.

Figure 1: Fully assembled OUTGUAVA Double Tilt Out Trash Cabinet, showcasing its design and functionality in a home environment.
Key Features:
- Space-Saving Design: Conceals two 13-gallon trash cans, providing a cleaner aesthetic and maximizing floor space.
- Adjustable Shelves: The upper hutch includes movable shelves to accommodate various item heights.
- Integrated Wine Glass Rack: Three metal wine glass holders are included for convenient storage of stemware.
- Durable Construction: Made from CARB P2 compliant MDF with polished moisture-proof stickers, ensuring longevity and easy cleaning.
- Anti-Tipping Mechanism: Includes hardware to secure the cabinet to a wall, enhancing stability and safety.
- Wire Management Hole: A discreet wire hole is provided on the countertop for small appliances.
Specifications:
| Attribute | Detail |
|---|---|
| Brand | OUTGUAVA |
| Model Number | NYX08-184WH |
| Color | White-1 |
| Product Dimensions (D x W x H) | 13.35" x 39" x 72.16" |
| Item Weight | 115.5 pounds |
| Material | Engineered Wood (MDF) |
| Trash Can Capacity | Fits up to two 13-gallon trash cans (not included) |
| Assembly Required | Yes |
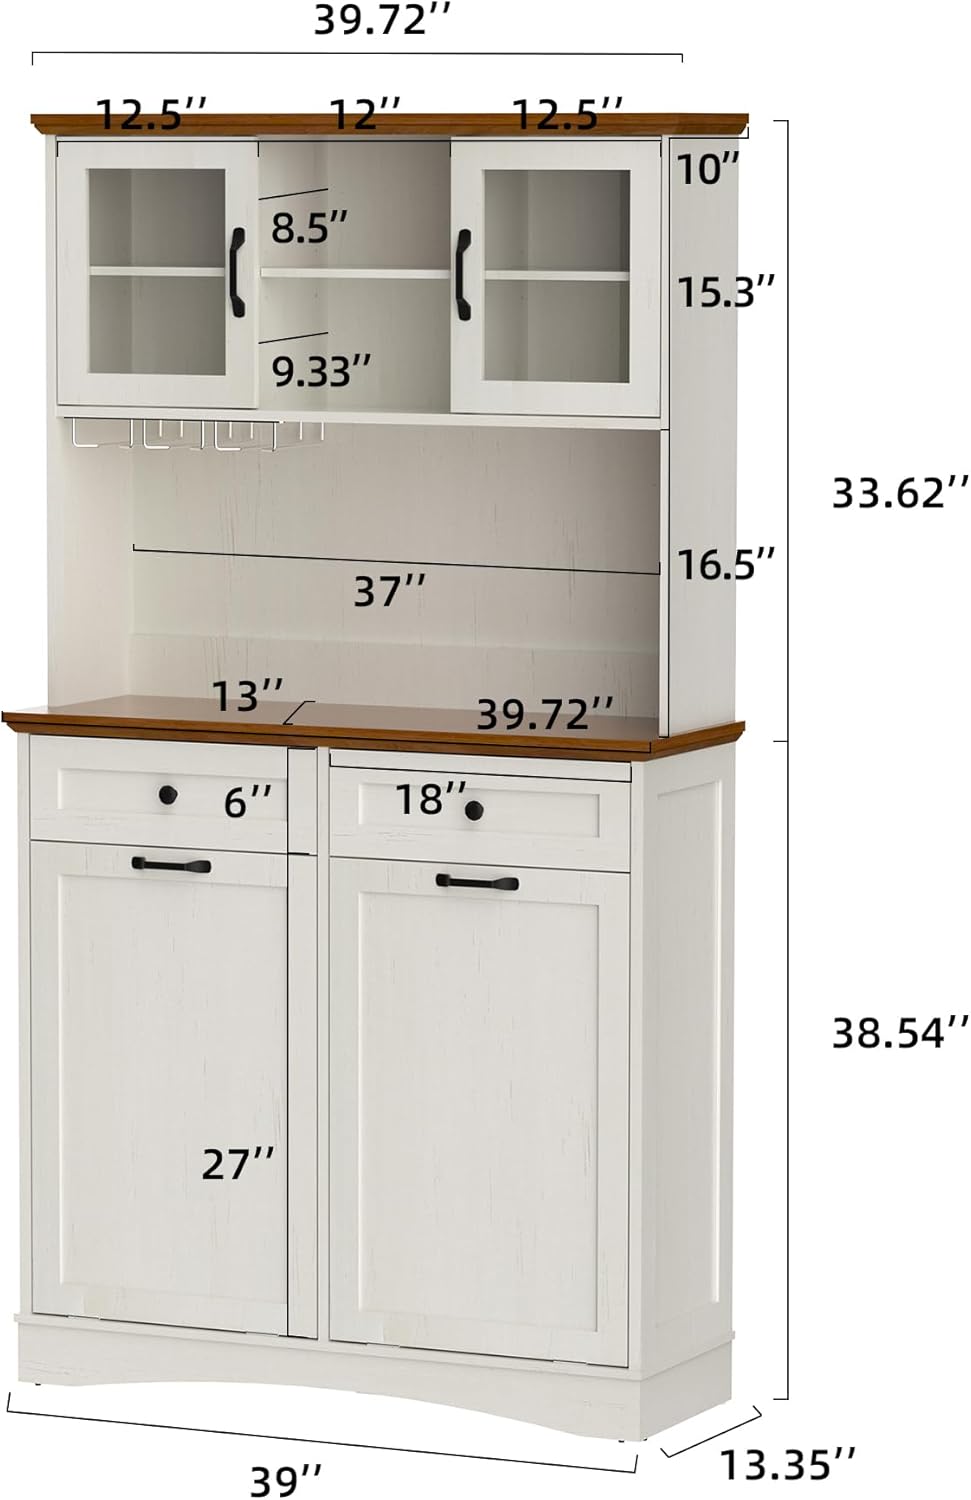
Figure 2: Dimensional drawing of the cabinet, showing height, width, and depth measurements for various sections.
Setup and Assembly
Assembly of the OUTGUAVA Double Tilt Out Trash Cabinet is required. Please ensure all parts are present and undamaged before beginning. It is recommended to assemble the cabinet on a soft, clean surface to prevent scratches.
Before You Begin:
- Review the included assembly instructions and diagrams thoroughly.
- Identify all components and hardware. If any parts are missing or damaged, contact customer support before proceeding.
- Gather necessary tools: Phillips head screwdriver, hammer (optional, for dowels), level.
- Ensure you have adequate space for assembly.
Assembly Steps (General Guidance):
- Unpack and Sort: Carefully unpack all components and lay them out. Group similar parts and hardware.
- Assemble Base Frame: Follow the instructions to connect the side panels, bottom panel, and back panel to form the base structure.
- Install Tilt-Out Mechanisms: Attach the tilt-out door mechanisms and install the tilt-out bins. Ensure smooth operation.
- Assemble Drawers: Construct the two hideaway drawers and install the drawer slides into the cabinet frame. Insert the assembled drawers.
- Attach Countertop: Secure the top panel (countertop) to the base cabinet.
- Assemble Upper Hutch: Construct the upper hutch frame, including the adjustable shelves and glass doors.
- Install Wine Glass Rack: Attach the metal wine glass rack to the underside of the upper hutch or designated area.
- Mount Upper Hutch: Carefully place and secure the assembled upper hutch onto the countertop of the base cabinet.
- Install Anti-Tipping Kit: For safety, it is highly recommended to install the anti-tipping hardware to secure the cabinet to a wall. This prevents accidental tipping, especially in households with children or pets.

Figure 3: Illustration of the anti-tipping safety feature, demonstrating how to secure the cabinet to a wall.
Operating Instructions
Using the Tilt-Out Trash Bins:
- Gently pull the handle on the lower cabinet door to tilt the bin forward.
- Place a 13-gallon (or smaller) trash can inside the compartment. Ensure the can fits securely.
- To close, push the door back until it is flush with the cabinet frame.

Figure 4: View of the tilt-out mechanism for trash bins and the integrated wine glass rack.
Utilizing Drawers and Shelves:
- The two upper drawers are suitable for storing cutlery, small kitchen gadgets, or other accessories.
- The upper hutch features adjustable shelves. To adjust, remove items, lift the shelf, and reposition the shelf pegs to the desired height.
- The glass doors on the upper hutch allow for easy visibility of stored items while keeping them protected.
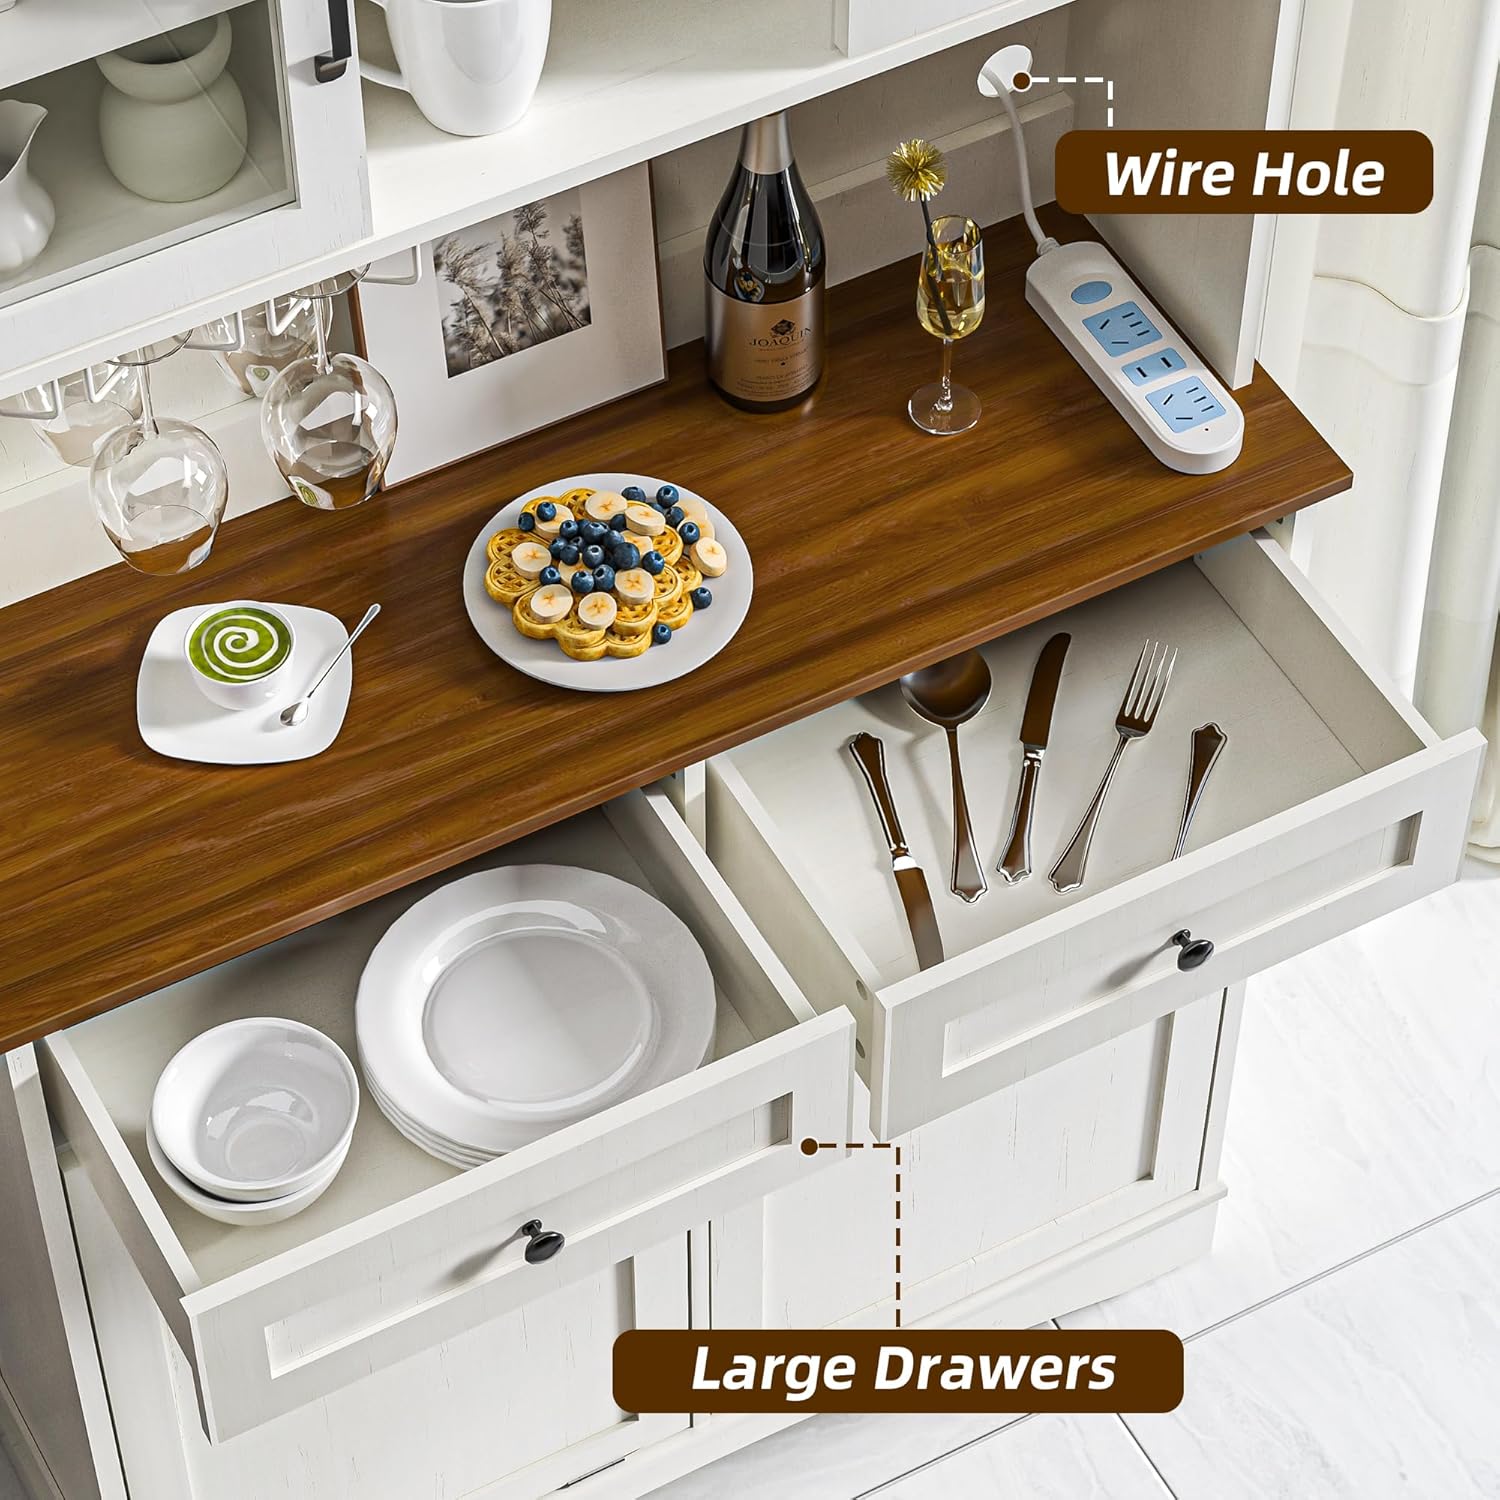
Figure 5: Illustration of the spacious drawers and the convenient wire hole for appliance cords.
Wire Management:
- A wire hole is located on the back of the countertop. Use this to neatly route power cords for small appliances such as coffee makers or blenders placed on the cabinet top.
Maintenance and Care
Proper care and maintenance will extend the life and appearance of your OUTGUAVA cabinet.
- Cleaning: Wipe surfaces with a soft, damp cloth. Avoid abrasive cleaners or harsh chemicals, as these can damage the finish. For spills, clean immediately to prevent staining.
- Dusting: Regularly dust with a dry, soft cloth.
- Hardware: Periodically check all screws and fasteners to ensure they are tight. Tighten if necessary to maintain stability.
- Moisture: While the cabinet has moisture-proof stickers, avoid prolonged exposure to excessive moisture or humidity.
- Weight Capacity: Do not overload shelves or drawers beyond their intended capacity to prevent damage or instability.
Troubleshooting
| Problem | Possible Cause | Solution |
|---|---|---|
| Cabinet feels wobbly or unstable. | Loose fasteners; uneven floor; anti-tipping kit not installed. | Check and tighten all screws. Ensure the cabinet is on a level surface. Install the anti-tipping kit as per instructions. |
| Drawers or tilt-out bins do not slide smoothly. | Misaligned slides; debris in tracks; overtightened screws. | Check alignment of slides. Clean tracks of any dust or debris. Loosen screws slightly if they are too tight. |
| Missing parts during assembly. | Packaging error. | Do not proceed with assembly. Contact OUTGUAVA customer support immediately with your purchase details. |
Warranty and Support
OUTGUAVA stands behind the quality of its products. For specific warranty information, please refer to the documentation included with your purchase or visit the official OUTGUAVA website. If you encounter any issues or have questions not covered in this manual, please contact OUTGUAVA customer support.
Contact Information:
- Website: Visit the OUTGUAVA Store on Amazon (for general inquiries and product information)
- For direct support, please refer to the contact details provided on your purchase receipt or the product packaging.
Ask a question about this manual
Ask about setup, troubleshooting, compatibility, parts, safety, or missing instructions. Manuals+ will review the question and use this page’s manual context to help answer it.