1. Introduction
This manual provides detailed instructions for the assembly, operation, and maintenance of your Patiowell 6 x 8 FT Plastic Outdoor Storage Shed. Designed for durability and spacious storage, this shed is an ideal solution for organizing your outdoor tools, equipment, and other belongings. Please read this manual thoroughly before beginning assembly to ensure proper installation and safe use.
The Patiowell storage shed offers a generous 72.6"L × 95"W × 83"H of space, suitable for storing lawn mowers, bikes, garden tools, and patio furniture. Its design maximizes both vertical and horizontal storage capacity, making it a versatile addition to any garden or backyard.

Image 1.1: Exterior view of the Patiowell 6x8 FT Plastic Outdoor Storage Shed. This shed features a dark grey finish with two windows and a lockable double door, blending seamlessly into a garden or backyard environment.
2. Safety Information
- Site Preparation: Ensure the assembly area is level and clear of debris. A stable, level foundation is crucial for the shed's structural integrity and stability.
- Local Regulations: Before construction, verify with your local Homeowners Association (HOA) or municipal authorities regarding any permits or restrictions for outdoor structures.
- Assembly Personnel: Assembly is recommended for 2-3 people due to the size and weight of components. This will ensure safety and efficiency during the installation process.
- Package Handling: The shed will be delivered in multiple packages (typically 4). These may arrive at different times. Confirm all packages have arrived before starting assembly.
- Personal Protective Equipment: Wear gloves during assembly to protect hands from sharp edges or splinters.
3. Package Contents
Your Patiowell storage shed includes all necessary pre-labeled parts, hardware, and a step-by-step assembly guide. Before beginning, unpack all components and verify against the parts list provided in your detailed instruction manual to ensure nothing is missing or damaged. Contact customer service immediately if any discrepancies are found.
4. Setup and Installation
4.1 Pre-Assembly Considerations
- Foundation: The shed features a thick resin floor and reinforced frame, providing a robust and level base. Ensure the ground where the shed will be placed is as level as possible to prevent structural stress and ensure proper door alignment.
- Space Requirements: Allow ample space around the shed for assembly and future access. Refer to the dimensions diagram for precise measurements.
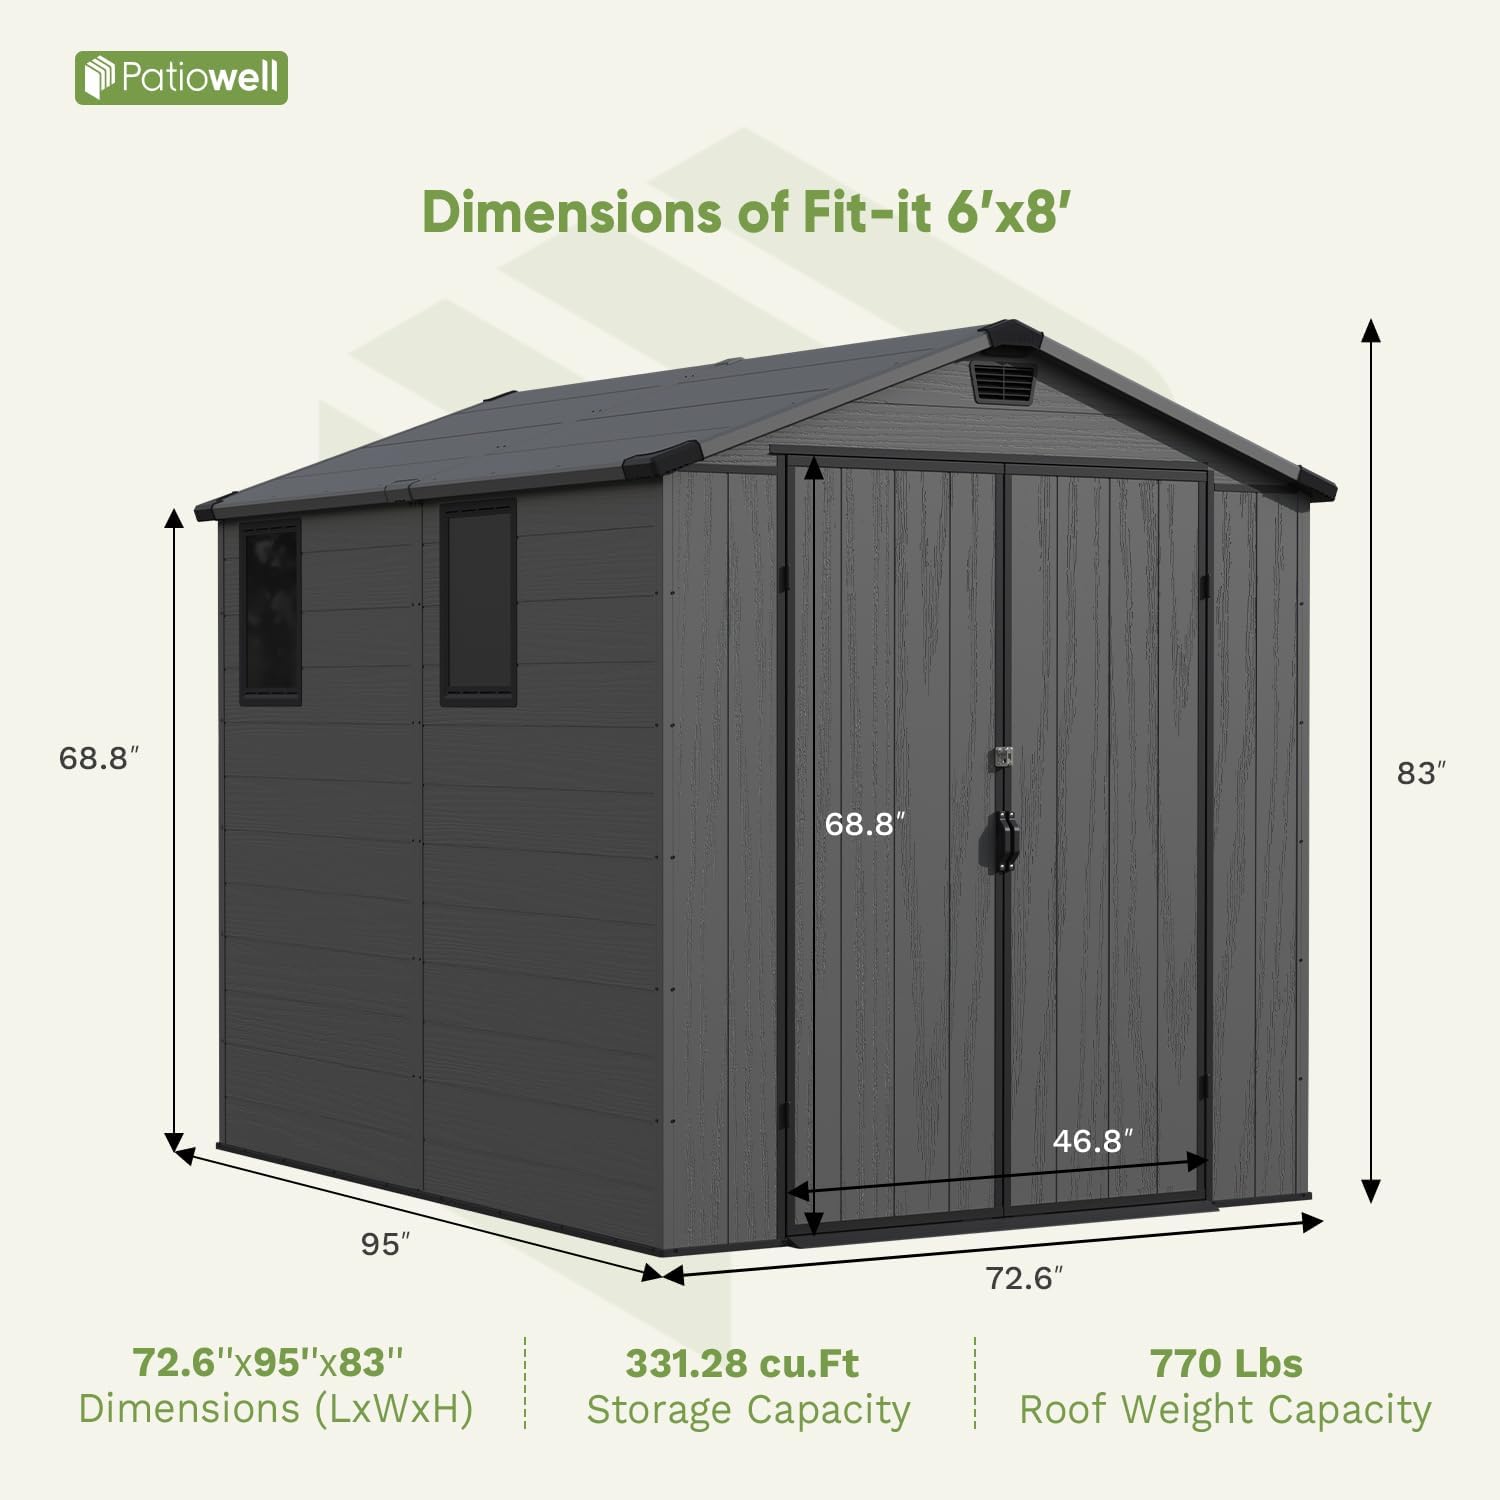
Image 4.1: Detailed dimensions of the Patiowell 6x8 FT shed. The diagram shows the overall length (95"), width (72.6"), and height (83"), along with door dimensions (46.8" W x 68.8" H) and storage capacity (331.28 cu.Ft).
4.2 Assembly Process
Follow the step-by-step guide provided with your shed for tool-free assembly. While many parts snap together, be prepared for the installation of numerous screws (approximately 250-280) to secure the structure. The process is designed to be straightforward, but having 2-3 people will significantly ease the assembly, especially when handling larger panels and the roof.

Image 4.2: The Patiowell shed with its double doors fully open, showcasing the spacious interior. The design allows for customizable storage solutions, including shelving for bins and wall space for hanging tools.
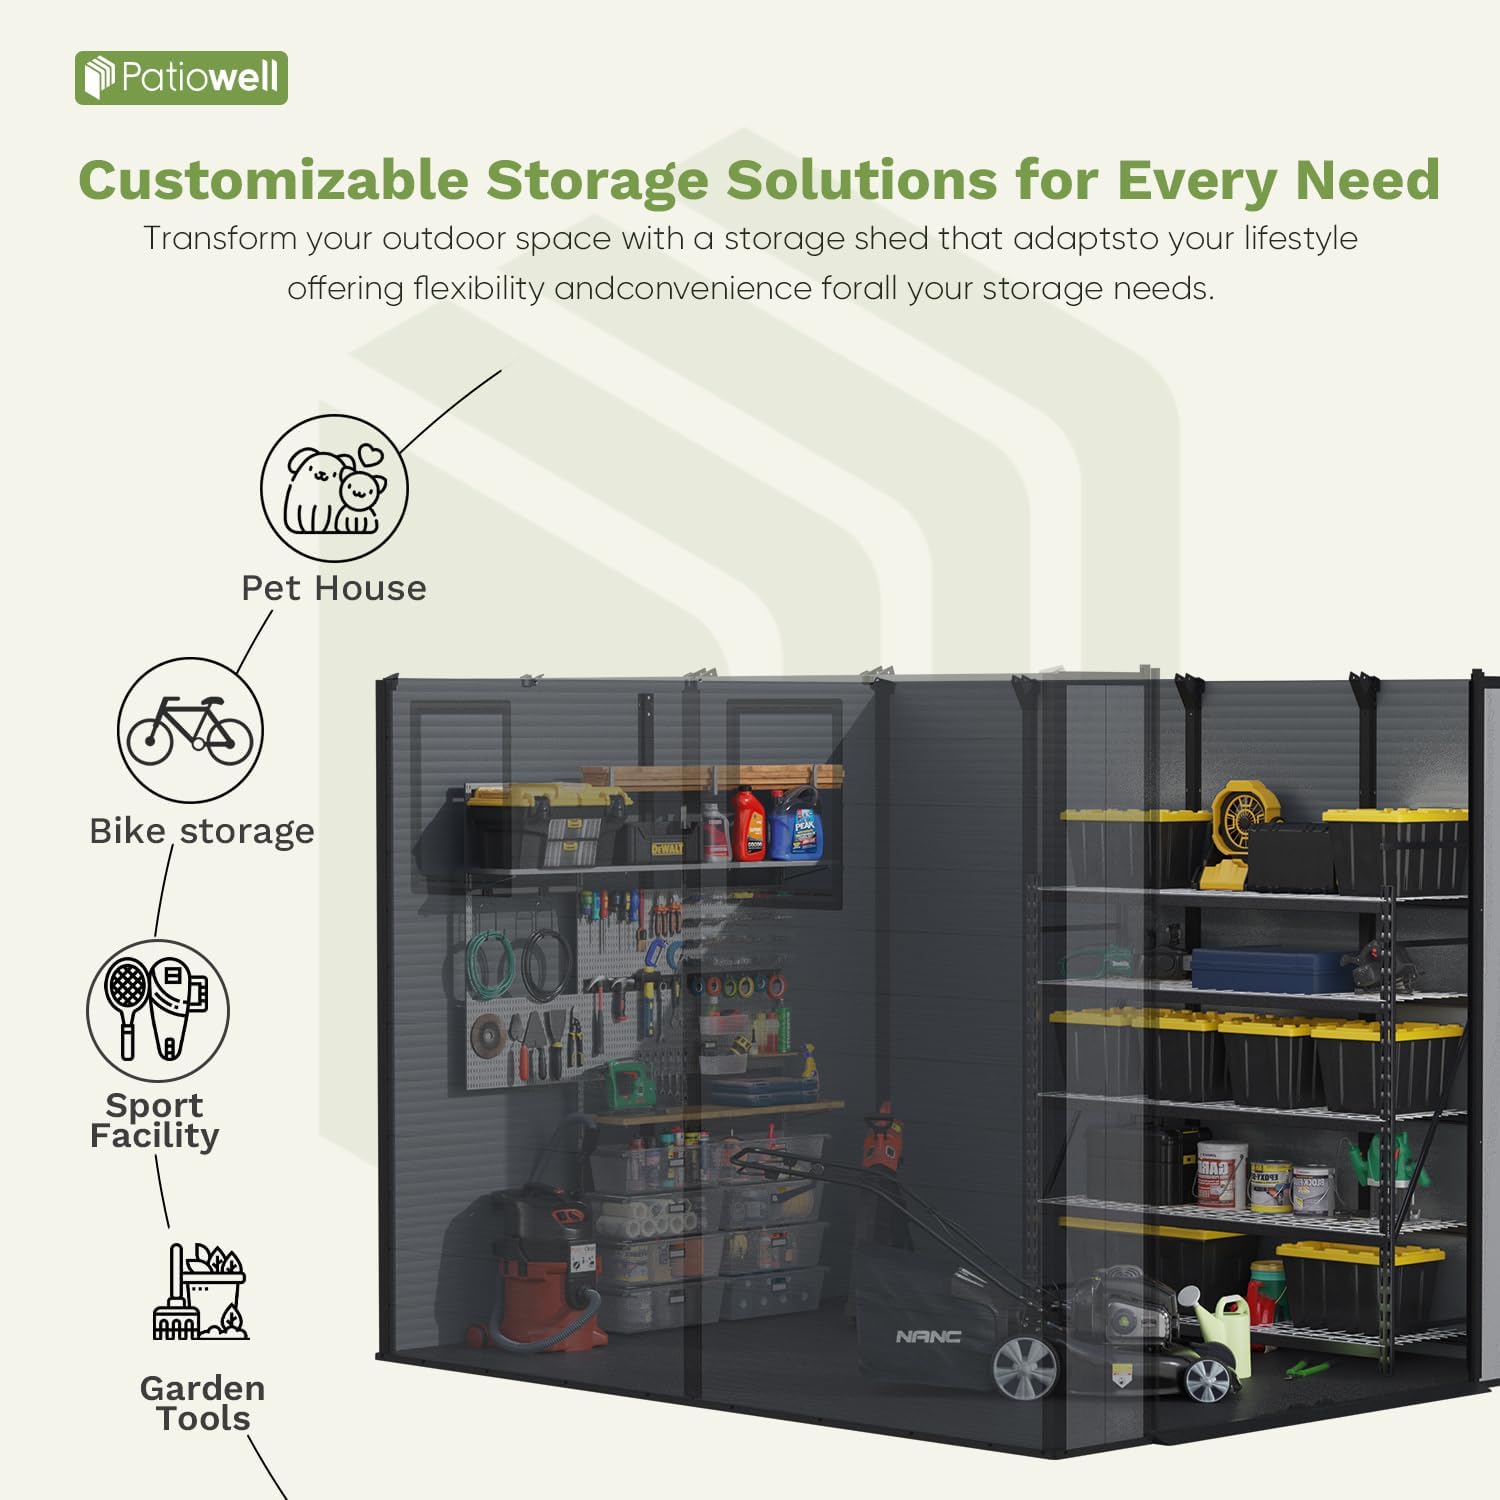
Image 4.3: This graphic highlights the versatile uses of the Patiowell shed, including storage for garden tools, bikes, sports equipment, and even as a pet house. It demonstrates the potential for organizing various items within the shed.
5. Operating Instructions
Your Patiowell shed is designed for secure and convenient use. The lockable door ensures the safety of your stored items. Always ensure the doors are properly closed and locked when not in use to protect contents from theft and weather elements. The strategically placed vents ensure proper airflow, preventing moisture buildup and keeping your items fresh.
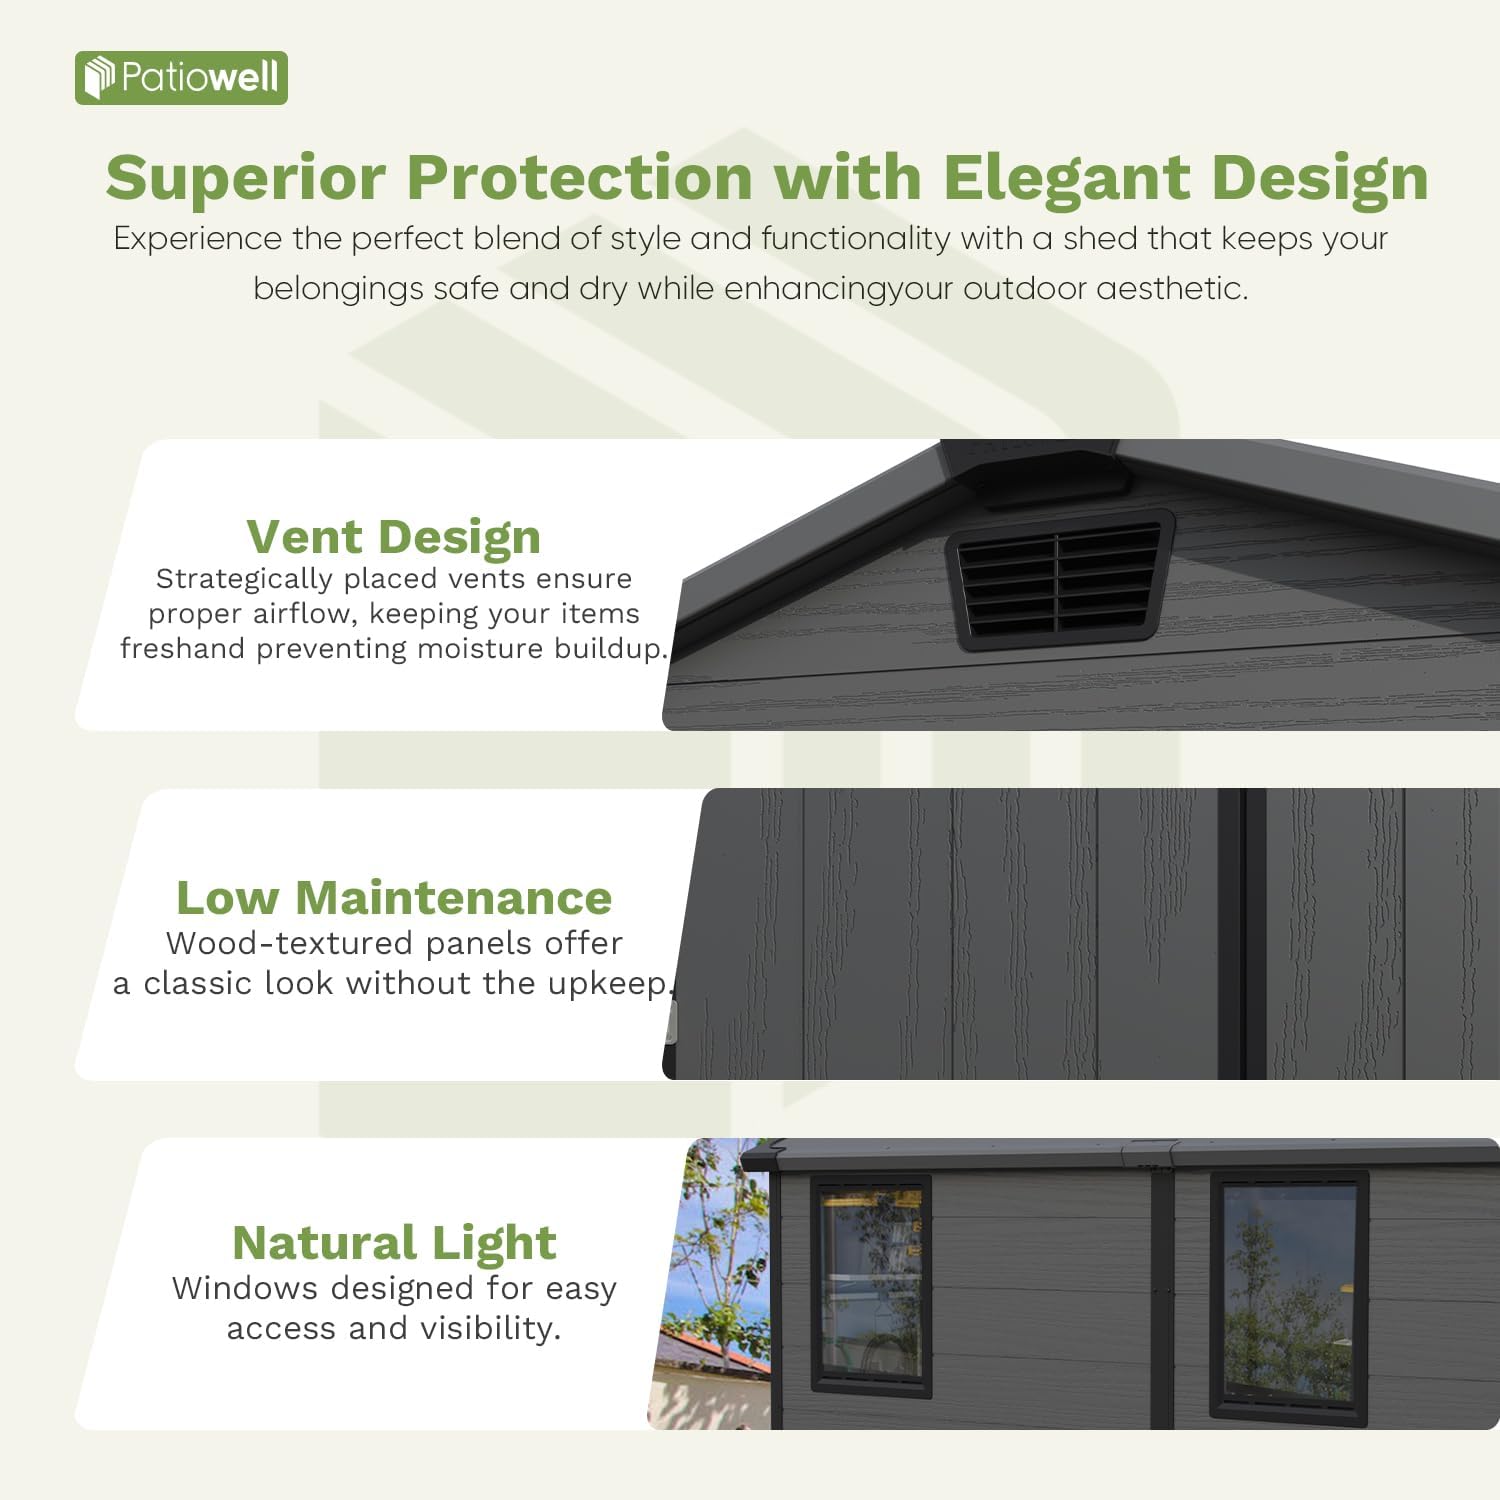
Image 5.1: This graphic illustrates key design elements such as the vent design for proper airflow, low-maintenance wood-textured panels, and natural light windows for visibility and easy access.
6. Maintenance
To ensure the longevity and optimal performance of your Patiowell shed, regular maintenance is recommended:
- Cleaning: Periodically clean the exterior of the shed with mild soap and water. Avoid abrasive cleaners or harsh chemicals that could damage the resin panels.
- UV Protection: The shed is crafted with UV-resistant, high-density plastic panels to withstand harsh sunlight. However, regular inspection for any signs of fading or material degradation is advised, especially in areas with intense sun exposure.
- Waterproofing: The weather-resistant peak roof and seamless panel joints are designed to prevent water pooling and block rain and dust. If you notice any leaks, particularly around roof panels, consider applying a high-quality silicone sealant (e.g., GE pure clear silicone) to the seams where panels join.
- Hardware Inspection: Periodically check all screws and fasteners for tightness. Some exterior screws, particularly at the bottom where side panels meet, may be prone to rust over time. Consider replacing these with rust-proof exterior decking screws for enhanced durability.

Image 6.1: This graphic highlights the shed's all-weather capabilities, featuring UV-resistant materials and a waterproof design with advanced roofing and sealed seams to protect against rain and snow.

Image 6.2: This graphic showcases the shed's robust construction, including roof safety corners to reduce security risks, reliable roof construction for good load-bearing capacity, and an enhanced solid floor to keep out dirt and moisture.
7. Troubleshooting
- Assembly Difficulties: If you encounter difficulties during assembly, re-check the step-by-step guide. Ensure all parts are correctly oriented and that the foundation is level. Small pictures in the manual may require close attention.
- Leaks: While designed to be waterproof, if leaks occur, inspect roof panels and seams. Applying a silicone caulk to the joints can resolve minor leaks.
- Stability: If the shed feels flimsy, ensure all screws are tightened and that the structure is anchored down, especially in areas prone to strong winds. The integrated holes inside the shed can be used for anchoring.
- Missing Packages/Parts: If your shed arrived in multiple packages, confirm all have been delivered. If parts are missing or damaged, contact customer service immediately.
For any persistent issues or questions not covered in this manual, please contact Patiowell customer service. They guarantee a reply within 24 hours.
8. Specifications
| Feature | Detail |
|---|---|
| Brand | Patiowell |
| Model Number | AP-PS24-0672-DGY |
| Color | Deep Gray |
| Material | Plastic, Resin (Alloy Steel Frame) |
| Product Dimensions (L x W x H) | 95"D x 72.6"W x 83"H |
| Item Weight | 240 Pounds |
| Storage Capacity | 331.28 cu.Ft |
| Roof Weight Capacity | 770 Lbs |
| Water Resistance Level | Water Resistant |
| Door Style | Single Hinged Door (Double Door Appearance) |
| Door Width | 46.8 Inches |
| Door Height | 68.8 Inches |
| Assembly Required | Yes (2-3 persons recommended) |
9. Warranty and Support
Patiowell is committed to providing quality products and customer satisfaction. For specific warranty information regarding your storage shed, please refer to the documentation included with your purchase or contact Patiowell customer service directly. Our professional customer service team is available to assist with any questions or concerns you may have during or after the installation process, with replies guaranteed within 24 hours.
You can reach Patiowell customer service through the contact information provided on the product packaging or the official Patiowell website.


