TRIUMPHKEY H6
TRIUMPHKEY Vanity with Mirror LED Light Instruction Manual
Model: H6
Brand: TRIUMPHKEY
Introduction
This manual provides detailed instructions for the assembly, operation, and maintenance of your TRIUMPHKEY Vanity with Mirror LED Light. This versatile furniture piece can function as a makeup vanity, a bedside storage cabinet, or even a compact desk. Please read this manual thoroughly before assembly and use to ensure safe and proper operation.
Safety Information
- Always assemble the vanity on a clean, flat, and stable surface to prevent damage or injury.
- Keep all small parts and packaging materials away from children and pets to avoid choking hazards.
- Ensure all screws and fasteners are securely tightened before use. Periodically check and re-tighten as needed.
- Do not overload drawers or shelves. Distribute weight evenly to maintain stability.
- Avoid exposing the vanity to excessive moisture or direct sunlight, which can damage the material.
- For electrical components (LED light), ensure the power source matches the product's requirements. Unplug the unit before cleaning or maintenance.
Package Contents
Before beginning assembly, verify that all components listed below are present and undamaged. If any parts are missing or damaged, please contact customer service immediately.
| Item | Description | Quantity |
|---|---|---|
| Main Vanity Frame | Includes desktop and side panels | 1 |
| Sliding Mirror Assembly | With integrated LED lighting | 1 |
| Drawers | 5 drawers, including one with lock | 5 |
| Internal Shelves | For hidden and open storage | Various |
| Hardware Pack | Screws, dowels, cam locks, drawer slides, etc. | 1 |
| Assembly Instructions | Printed guide | 1 |

Figure 1: Illustration of various components and hardware included in the package.
Setup and Assembly
Assembly of this vanity requires careful attention to detail. It is recommended to have at least two people for assembly. Follow the included printed instructions step-by-step. If the labels on parts are unclear, refer to the diagrams in the printed manual for identification.
- Prepare the Area: Clear a spacious, clean, and well-lit area for assembly. Lay down a blanket or cardboard to protect the floor and furniture pieces from scratches.
- Identify Parts: Unpack all components and lay them out. Match each part to the corresponding number or letter in the assembly instructions. Verify all hardware is present.
- Assemble the Main Frame: Begin by connecting the main side panels and the desktop using the provided cam locks and dowels. Ensure all connections are snug and stable.
- Install Shelving: Insert the fixed and adjustable shelves into their designated slots within the main frame and the hidden storage area.
- Assemble Drawers: Construct each of the five drawers. Pay close attention to the orientation of the drawer slides. Install the lock mechanism on the designated drawer.
- Install Drawer Slides: Attach the drawer slides to both the drawers and the vanity frame. Ensure they are aligned correctly for smooth operation.
- Attach Sliding Mirror Assembly: Carefully mount the sliding mirror unit to the top section of the vanity. Connect the LED light power cable as instructed.
- Final Checks: Once assembled, gently move the vanity to its desired location. Check all screws and fasteners for tightness. Test the sliding mirror and all drawers for smooth operation.

Figure 2: The TRIUMPHKEY Vanity fully assembled, showcasing its mirror, drawers, and storage shelves.
Operating Instructions
LED Lighted Mirror Operation
The vanity features an integrated LED lighted mirror with adjustable brightness levels.
- Power On/Off: Locate the touch sensor on the mirror surface. Tap once to turn the LED light on or off.
- Adjust Brightness: With the light on, press and hold the touch sensor to cycle through the three brightness levels (low, medium, high). Release when the desired brightness is achieved.

Figure 3: The LED mirror offers three adjustable brightness levels for optimal lighting.
Sliding Mirror and Hidden Storage
The mirror is designed to slide horizontally, revealing three layers of hidden storage shelves behind it.
- Accessing Hidden Storage: Gently slide the mirror to the left or right along its track. This will expose the shelves behind it, ideal for storing cosmetics, skincare products, or other personal items.
- Concealing Storage: Slide the mirror back to its central position to cover the shelves and maintain a tidy appearance.

Figure 4: The mirror slides to reveal hidden storage compartments, enhancing organization.
Drawer and Open Shelf Usage
The vanity includes five drawers of varying sizes and several open shelves for diverse storage needs.
- Drawers: Utilize the five drawers for organized storage of smaller items. One drawer is equipped with a lock for securing valuables.
- Open Shelves: The open shelves provide easy access storage for frequently used items or decorative displays.

Figure 5: Detailed view of the vanity's storage options, including five drawers and open shelving.
Maintenance
- Cleaning: Wipe surfaces with a soft, damp cloth. Avoid abrasive cleaners or harsh chemicals that could damage the finish. For the mirror, use a glass cleaner applied to a cloth, not directly to the mirror.
- Dusting: Regularly dust all surfaces with a dry, soft cloth to prevent buildup.
- Hardware Check: Periodically inspect all screws, bolts, and fasteners to ensure they remain tight. Re-tighten as necessary to maintain structural integrity.
- Drawer Slides: If drawers become stiff, apply a small amount of silicone lubricant to the drawer slides.
- LED Light: The LED lights are designed for long life and are not user-replaceable. If the light malfunctions, refer to the troubleshooting section or contact customer support.
Troubleshooting
| Problem | Possible Cause | Solution |
|---|---|---|
| LED mirror light does not turn on or flickers. | Power connection issue, faulty LED strip, or touch sensor malfunction. |
|
| Drawers are difficult to open or close. | Misaligned drawer slides, loose screws, or obstruction. |
|
| Vanity feels wobbly or unstable. | Loose assembly hardware or uneven floor. |
|
| Missing parts or unclear assembly instructions. | Packaging error or instruction manual clarity. |
|
Specifications
| Feature | Detail |
|---|---|
| Model Number | H6 |
| Brand | TRIUMPHKEY |
| Product Dimensions (L x W x H) | 80 x 38 x 130 cm (31.5 x 15 x 51.2 inches) |
| Item Weight | 23 kg (50.7 lbs) |
| Material | Wood |
| Color | White-1 |
| Number of Drawers | 5 |
| Mirror Type | Sliding with LED Light |
| LED Light Levels | 3 (Adjustable Brightness) |
| Assembly Required | Yes |
| UPC | 756407660506 |
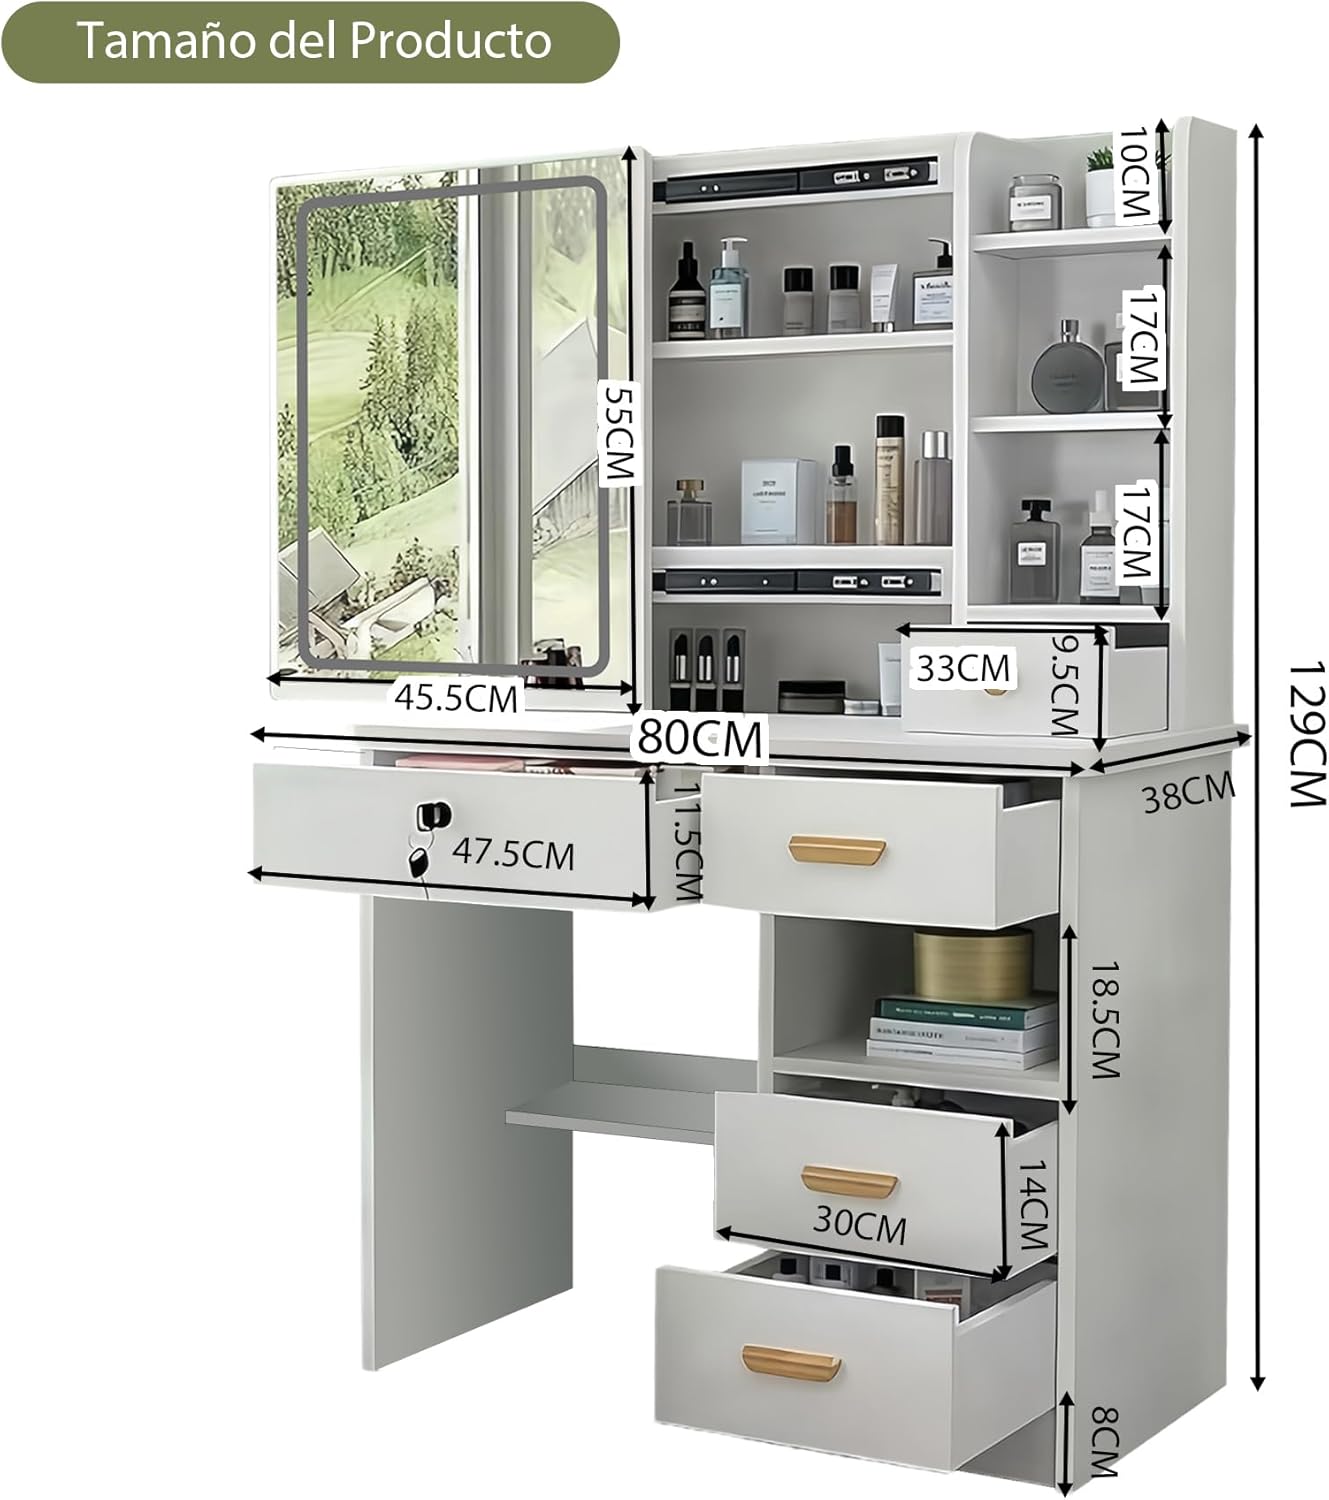
Figure 6: Detailed product dimensions for planning placement and space.
Warranty and Support
TRIUMPHKEY is committed to providing high-quality products. While specific warranty details are not provided in this manual, we encourage you to contact our customer service for any questions regarding product defects, missing parts, or assembly assistance.
Our customer service team aims to provide a solution within 24 hours for any inquiries. Please have your model number (H6) and purchase information ready when contacting support.
For support, please refer to the contact information provided at the point of purchase or on the TRIUMPHKEY official website.