1. Introduction
Thank you for choosing the SHEHDS 192 DMX DJ Controller. This versatile lighting console is designed to provide precise control over various DMX-compatible stage lighting fixtures, including fog machines, spotlights, par lights, strobes, and beam lights. This manual will guide you through the setup, operation, maintenance, and troubleshooting of your new controller to ensure optimal performance and longevity.
2. Product Overview
2.1. What's in the Box
- SHEHDS 192 DMX DJ Controller
- Power Adapter
- DMX Cable
- User Manual

Figure 1: Contents of the SHEHDS 192 DMX Controller package, including the controller, power adapter, DMX cable, and user manual.
2.2. Key Components

Figure 2: SHEHDS 192 DMX Controller with labeled components: charger input, LCD display, wear-resistant buttons, DMX interface, and channel faders.
2.3. Control Panel Layout

Figure 3: Detailed view of the SHEHDS 192 DMX Controller's control panel, highlighting the lighting area, channel faders, scene keys, page change area, functional area, time speed fader, power switch, power interface, and DMX signal interface.
3. Setup
- Power Connection: Connect the provided power adapter to the controller's power interface and then to a suitable power outlet.
- DMX Connection: Use a standard 3-pin DMX cable to connect the controller's DMX output to the DMX input of your first lighting fixture. Daisy-chain additional DMX fixtures from the output of the previous fixture.
- Power On: Flip the power switch to the 'ON' position. The LCD display should illuminate, indicating the controller is ready for operation.
- DMX Address Setting: Ensure all your DMX lighting fixtures are set to unique DMX addresses. Refer to your lighting fixture's manual for instructions on setting DMX addresses.
4. Operating Instructions
4.1. Basic Channel Control
- Use the Channel Faders (labeled 'Putter' in Figure 3) to adjust the intensity or parameter values for individual DMX channels.
- The Lighting Area buttons (DMX512 section) allow you to select specific DMX channels or groups of channels for control.
- Use the Page Change Area buttons (Page A/Page B) to switch between different pages of DMX channels if your fixture requires more than 8 channels.
4.2. Scene Programming
- Adjust your lighting fixtures to the desired state using the channel faders.
- Press the Program button to enter programming mode.
- Select an empty Scene Key (labeled 'Scene' in Figure 3) where you wish to save the current lighting state.
- Press the MIDI/Add button to save the scene.
- Repeat for additional scenes. Press Program again to exit programming mode.
4.3. Chase Programming
Chases are sequences of scenes that play back automatically.
- Enter programming mode by pressing the Program button.
- Select a Chase button (Chase 1-6) to program a new chase.
- Recall the scenes you wish to include in the chase by pressing their respective Scene Keys.
- Press the MIDI/Add button after each scene to add it to the chase sequence.
- Adjust the Speed and Fade Time faders to control the playback speed and transition time between scenes in the chase.
- Press Program again to exit programming mode.
4.4. Important Note on DMX Address
After setting the DMX address for your fixtures, the original DMX address is maintained as long as you press the OK button, even if you power off and restart the controller.
5. Maintenance
- Cleaning: Regularly wipe the surface of the controller with a soft, dry cloth. Avoid using abrasive cleaners or solvents.
- Storage: When not in use, store the controller in a cool, dry place away from direct sunlight and extreme temperatures.
- Cable Management: Ensure DMX and power cables are not kinked or strained to prevent damage.
6. Troubleshooting
| Problem | Possible Cause | Solution |
|---|---|---|
| Controller does not power on. | No power supply or faulty cable. | Check power adapter connection and power outlet. Ensure power switch is ON. |
| Lights are not responding to the controller. | Incorrect DMX connections or DMX addresses. | Verify DMX cable connections. Ensure DMX addresses on fixtures match controller settings. Check for faulty DMX cables. |
| Intermittent light control. | Loose DMX connection or DMX termination issue. | Secure all DMX connections. Consider using a DMX terminator at the end of the DMX chain. |
| Specific channels not responding. | Incorrect channel selection or fixture profile mismatch. | Ensure the correct DMX channels are selected on the controller. Verify the DMX channel layout for your specific lighting fixture. |
7. Specifications
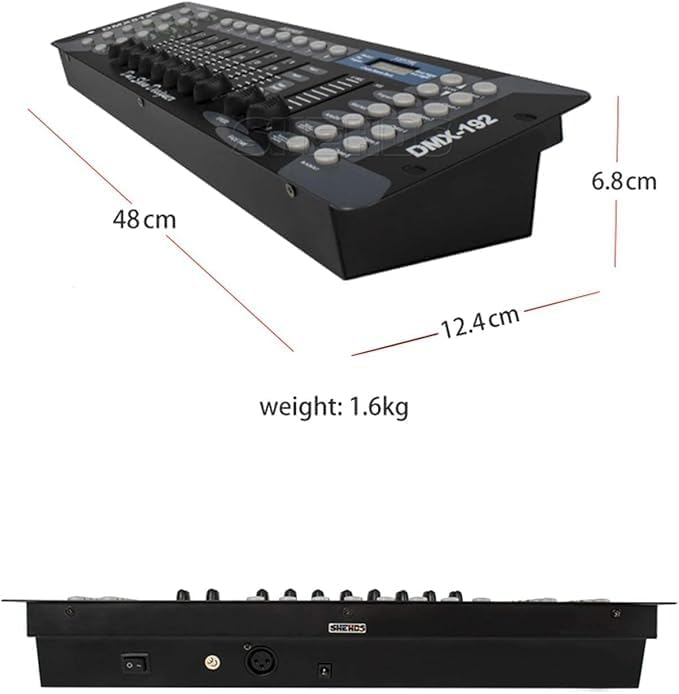
Figure 4: Dimensions of the SHEHDS 192 DMX Controller: 48 cm length, 12.4 cm width, 6.8 cm height, and 1.6 kg weight.
| Feature | Detail |
|---|---|
| Model Number | 192 DMX |
| Brand | SHEHDS |
| Color | Black |
| Material | Aluminum |
| Finish Type | Polished |
| Light Source Type | LED (Light Emitting Diode) |
| Power Source | Corded Electric |
| Item Weight | 2.04 Kilograms |
| Style | Modern |
| Mounting Type | Rack Mount |
| Features | Dimmable, Color Changing, Multiple Control Channels |
| Number of Bulbs | 12 (referring to internal LEDs for indicators) |
| Batteries Included | No |
| Country of Origin | China |
| Item Dimensions (L x W x H) | 57.3L x 16.7W x 10H centimeters |
8. Warranty and Support
SHEHDS is committed to providing quality products and customer satisfaction.
- 1 Month Replacement: In case of any manufacturing defects or issues within the first month of purchase, the product is eligible for a replacement.
- 1 Year Warranty: The SHEHDS 192 DMX DJ Controller is covered by a 1-year warranty from the date of purchase, protecting against defects in materials and workmanship.
- Customer Service: For any inquiries, technical assistance, or warranty claims, please contact SHEHDS customer service. Refer to your purchase documentation or the SHEHDS official website for contact details.