Introduction
This manual provides comprehensive instructions for the installation, operation, and maintenance of your JOYING Android 13 Car Radio Head Unit, model JY-HT153N4. This unit is specifically designed for Honda CRV models from 2012 to 2016, offering advanced features such as a 9-inch display, built-in DSP, 4G module, Apple CarPlay, and Android Auto. Please read this manual thoroughly before using the product to ensure proper function and safety.
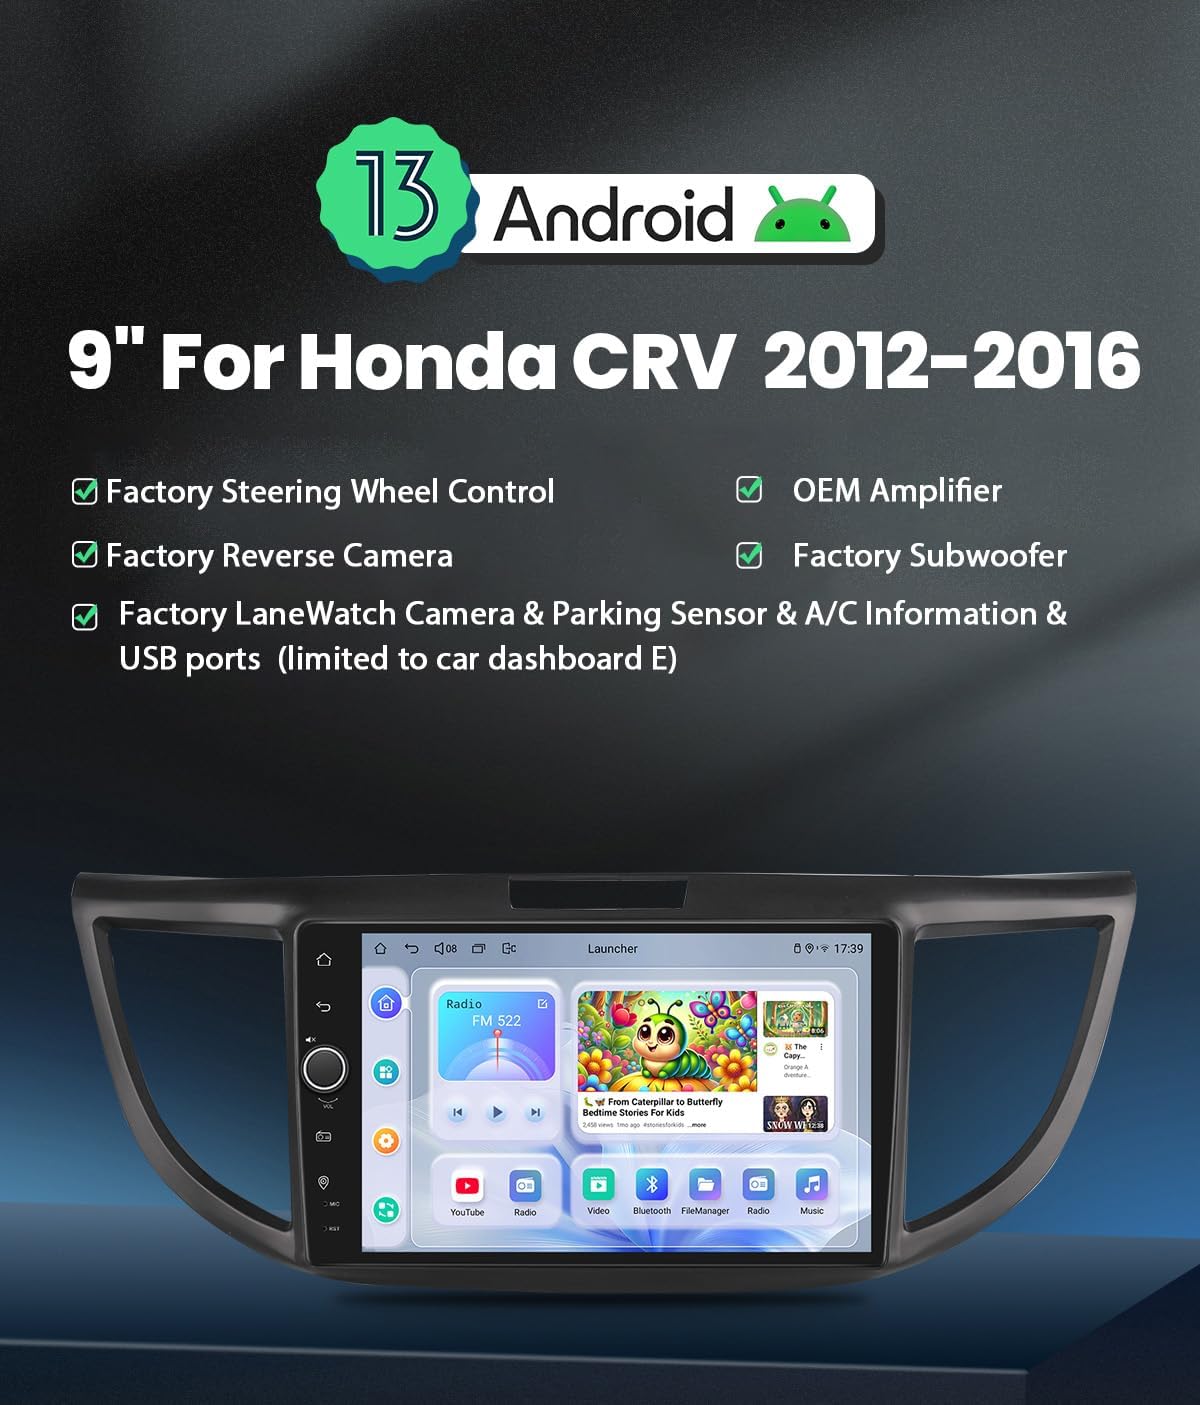
Figure 1: Joying Android 13 Car Radio Head Unit overview.
Product Overview
Key Features
- Android 13 Operating System: Modern and intuitive user interface.
- 9-inch Display: Large touchscreen for clear visibility and easy interaction.
- Built-in DSP (Digital Signal Processor): TDA7851 chip with 48-band graphic equalizer for high-quality sound.
- Built-in 4G Module: Supports SIM card for internet access (data only, no calls/SMS).
- Apple CarPlay & Android Auto: Seamless smartphone integration via USB or Bluetooth.
- GPS Navigation: Precise positioning with offline map support.
- Fast Boot: Quick startup in approximately 2 seconds after initial boot.
- Optical Fiber and Coaxial Digital Output: For direct connection to external amplifiers.
- HDMI Output: Supports projection screen display for rear passengers.
- Split-screen Multitasking: Run two applications simultaneously.
- Enhanced Cooling System: Dual heat sink design with fan control for optimal performance.
- Bluetooth 5.0: Supports audio streaming, phone book transfer, and hands-free calls.
What's in the Box
The package includes the following components:
- 9" Radio Unit (x1)
- Single Din Cage (x1)
- Left & Right Bracket (x1 pair)
- WiFi Antenna (x1)
- GPS Antenna (x1)
- 4G Antenna (x2)
- External Microphone (x1)
- USB Cable (x2)
- AR Cable (x1)
- Screen Ribbon Cable (x1)
- Power Cable (x1)
- User Manual (x1)
Setup and Installation
Vehicle Compatibility
This head unit is designed for Honda CRV models manufactured between 2012 and 2016. Ensure your vehicle's dashboard configuration matches one of the compatible types shown below.
Confirm Your Car Dashboard
Before installation, carefully compare your vehicle's dashboard and wiring harness with the images provided to ensure compatibility and identify the correct wiring configuration. This unit is compatible with various factory amplifier setups.
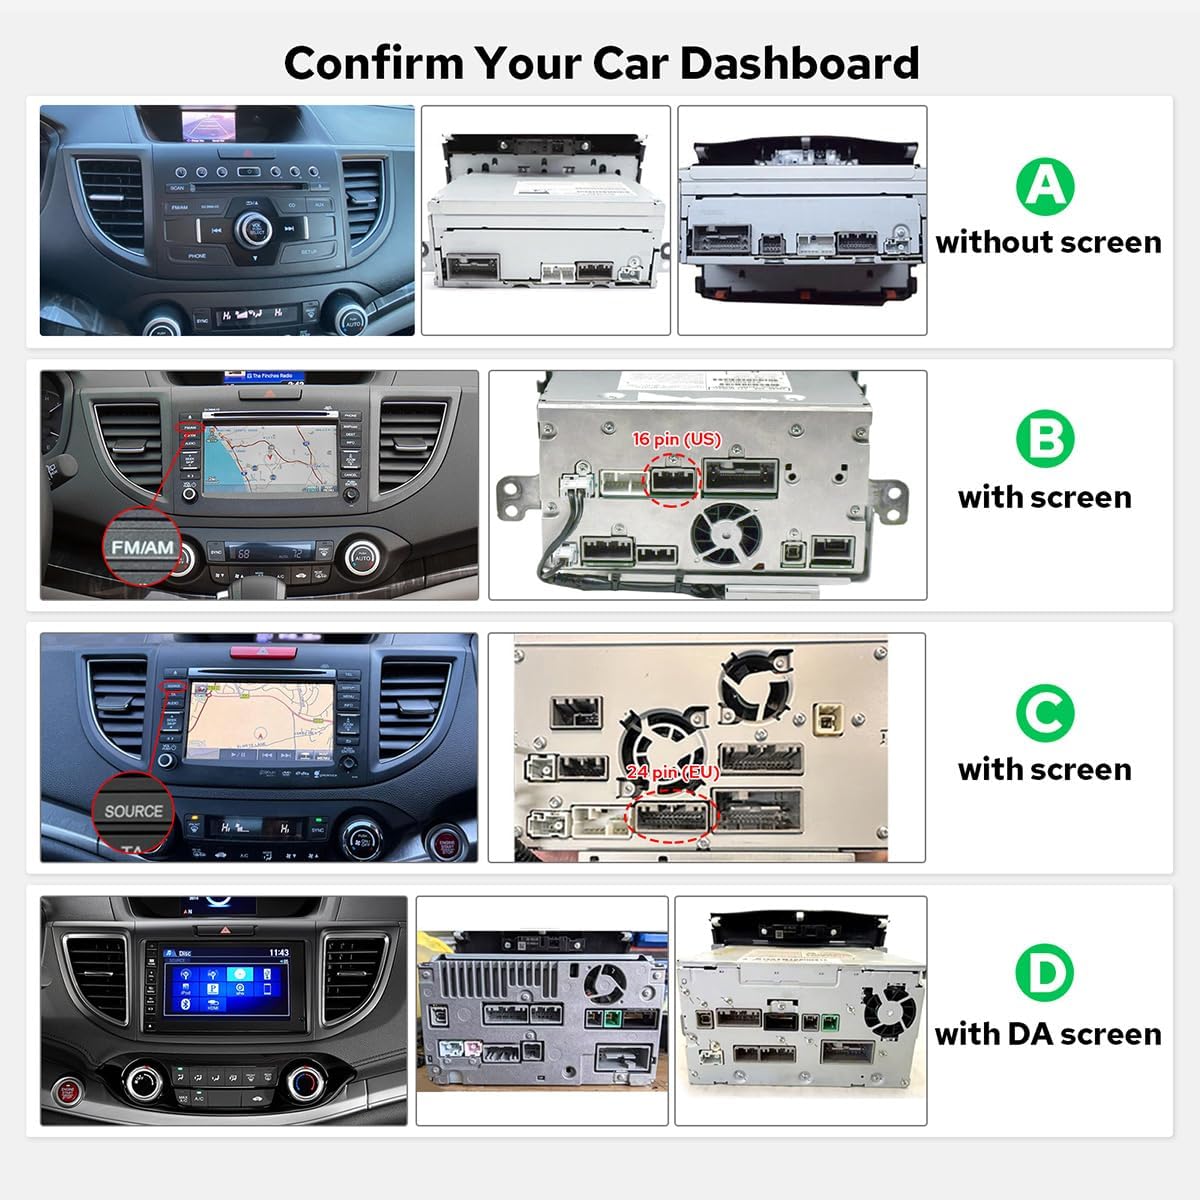
Figure 2: Various Honda CRV dashboard types and their respective wiring harnesses. Type B, with screen, is compatible with this unit.
Installation Steps (General Guidelines)
- Preparation: Disconnect the vehicle's battery before starting any electrical work.
- Remove Factory Unit: Carefully remove the existing car radio and dashboard trim. Refer to your vehicle's service manual for specific instructions.
- Connect Wiring Harness: Connect the provided power cable, AR cable, and screen ribbon cable to the new head unit and the vehicle's wiring harness. Ensure all connections are secure.
- Install Antennas: Connect the WiFi, GPS, and 4G antennas to their respective ports on the head unit. Position them for optimal signal reception.
- Mounting: Use the Single Din Cage and Left & Right Brackets to secure the head unit into the dashboard opening.
- External Components: Connect the external microphone and any other accessories as needed.
- Test Functionality: Reconnect the battery and power on the unit to test all functions (radio, navigation, Bluetooth, etc.) before fully reassembling the dashboard.
- Reassemble: Carefully reassemble the dashboard trim.
Operating Instructions
Initial Startup
The first boot-up may take approximately 30-40 seconds. Subsequent startups, once the car key is inserted, will enter the user interface in about 2 seconds due to the fast boot feature.
Apple CarPlay & Android Auto
Connect your mobile phone to the car radio via a USB cable or Bluetooth to utilize Apple CarPlay or Android Auto. This allows you to access your phone's apps, navigation, make calls, and stream music directly on the head unit's larger screen.

Figure 3: Apple CarPlay and Android Auto interfaces displayed on the head unit.
High-Quality Sound Enjoyment
The unit features a TDA7851 DSP chip and a 48-band graphic equalizer, providing advanced audio customization. It delivers 4x50W max output power and supports aftermarket amplifiers through 4 audio outputs, 1 SUB output, Fiber Optical Output, SPDIF Coaxial Output, and Center Channel Output.
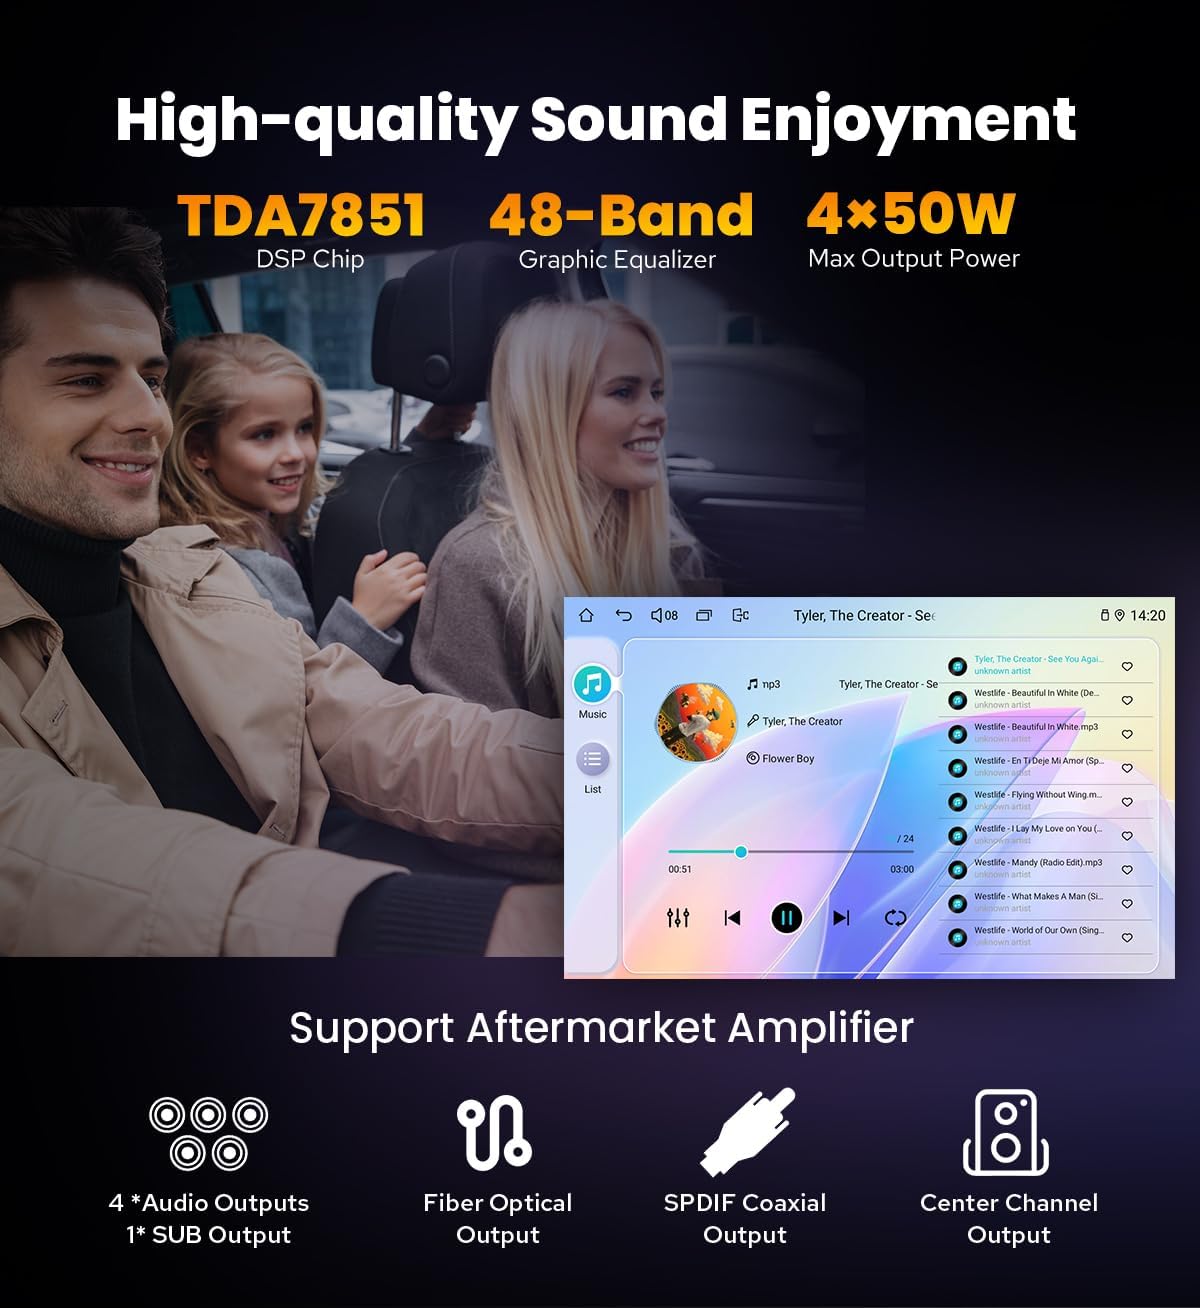
Figure 4: Audio features and output options for enhanced sound quality.
HDMI Output
The HDMI output provides a full digital image and sound-sending interface, allowing uncompressed audio and video signals to be output synchronously. This is ideal for connecting to external displays, such as headrest monitors, for passenger entertainment. The HDMI cable is not included.
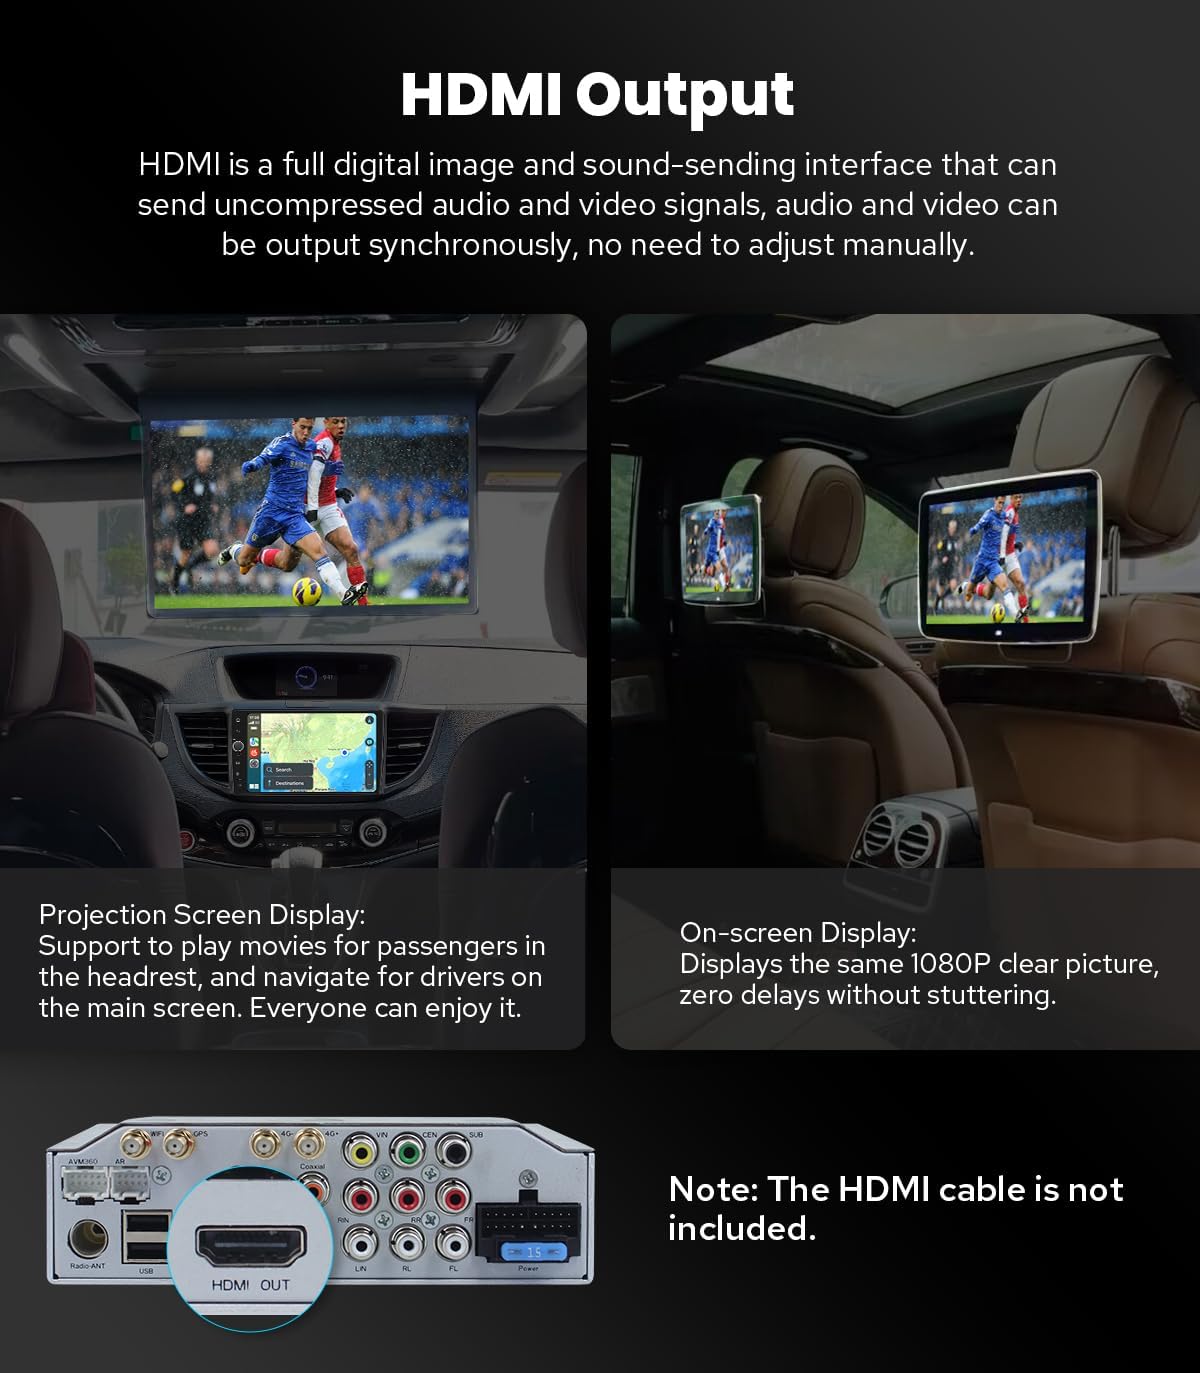
Figure 5: HDMI output functionality for external displays.
Split-screen Multitasking
The head unit supports split-screen multitasking, allowing you to run two applications side-by-side. For example, you can use navigation on one side and music playback on the other.
- Tap the recent apps icon.
- Find the app you want to run in split-screen, click the app icon to bring up the split-screen button, and tap it.
- The first app you selected will display on the left side; then choose the second app from recent apps.

Figure 6: Steps for using split-screen multitasking.
Built-in 4G Module
Insert a compatible SIM card into the designated slot to enable internet access via the built-in 4G module. Note that this module supports data connectivity only and cannot be used for phone calls or sending SMS messages. Supported FDD-LTE bands include B2/B4/B5/B7/B12/B13/B14/B17/B25/B26/B38/B66/B71, and TDD-LTE band B41.
GPS Navigation
The unit features precise GPS engines and includes a GPS antenna for accurate positioning and faster real-time navigation. It supports offline maps; you can download map data for specific areas and use them without an internet connection. You can also synchronize mobile phone map data to the head unit via CarPlay or Android Auto.
Maintenance
Cooling System
The head unit incorporates a dual heat sink design and an upgraded cooling fan to ensure superior heat dissipation, improved temperature control, and enhanced performance stability. You can set a warning value for CPU temperature or volume. If the CPU temperature or radio's volume exceeds this value, the fan will automatically activate to prevent overheating.

Figure 7: Internal cooling system with dual heat sinks and fan control interface.
General Care
- Keep the screen clean using a soft, lint-free cloth. Avoid abrasive cleaners.
- Ensure all connections are secure and free from dust or debris.
- Avoid exposing the unit to extreme temperatures or direct sunlight for prolonged periods.
Troubleshooting
If you encounter issues with your JOYING head unit, please refer to the following general troubleshooting steps:
- No Power: Check all power cable connections and the vehicle's fuse box. Ensure the battery is properly connected.
- No Sound: Verify speaker connections, amplifier settings, and volume levels. Check audio output settings in the unit's menu.
- GPS Signal Loss: Ensure the GPS antenna is properly connected and has a clear view of the sky.
- Touchscreen Unresponsive: Try restarting the unit. If the issue persists, a factory reset might be necessary (note: this will erase all user data).
- Bluetooth Connectivity Issues: Ensure Bluetooth is enabled on both the head unit and your mobile device. Try unpairing and re-pairing the devices.
- CarPlay/Android Auto Not Connecting: Check the USB cable for damage. Ensure your phone's operating system is up to date.
For more detailed troubleshooting or persistent issues, please contact JOYING customer support.
Specifications
| Feature | Detail |
|---|---|
| Brand | JOYING |
| Model Number | JY-HT153N4 |
| Special Feature | Apple CarPlay, Android Auto |
| Connectivity Technology | Bluetooth 5.0, 4G, Wi-Fi |
| Audio Output Mode | Stereo (4x50W Max Output) |
| Compatible Devices | Amplifier, Smartphones |
| Control Method | Touch |
| Display Size | 9 inches |
| Operating System | Android 13 |
| Memory/Storage (Current Variant) | 4GB RAM + 64GB Storage |
| Warranty | 2 Years |

Figure 8: Dimensions and port layout of the JOYING head unit.
Warranty and Support
Product Warranty
This JOYING Car Radio Head Unit comes with a 2-year warranty from the date of purchase. This warranty covers manufacturing defects and malfunctions under normal use. Please retain your proof of purchase for warranty claims.
Customer Support
For technical assistance, troubleshooting, or warranty inquiries, please contact JOYING customer support through their official website or the retailer where the product was purchased. You may need to provide your model number (JY-HT153N4) and proof of purchase.
For additional resources and updates, visit the official JOYING store: JOYING Amazon Store