1. Introduction
This manual provides detailed instructions for the assembly, installation, and maintenance of your Tecmojo 10-inch Desktop Mini Rack, 6U 200mm Depth. Please read these instructions carefully before proceeding with assembly to ensure proper setup and safe operation. This rack is designed for organizing 10-inch AV, NAS, and server equipment in compact environments.
2. Product Overview
The Tecmojo 10-inch Desktop Mini Rack is a compact and versatile solution for housing various networking and server equipment. It features a durable steel frame with translucent acrylic side panels, offering both stability and visibility.
Key Features:
- Compact Design: 10-inch width and 6U height, suitable for desktops and small spaces.
- Durable Construction: High-strength steel frame with premium acrylic side panels for stability and protection.
- Open-Frame Design: Ensures superior airflow for optimal cooling of equipment.
- Translucent Side Panels: Provides dust protection and allows easy monitoring of device indicators.
- Versatile Compatibility: Supports 10-inch rack-mountable equipment including patch panels, network switches, and shelves.
- Accessory Kit: Includes blank panels, rack shelf, SBC shelf, micro adapter boards, and mounting hardware.

Image 2.1: Fully assembled Tecmojo 10-inch Desktop Mini Rack. This image displays the compact design with its steel frame and clear acrylic side panels, showcasing the internal shelves and adapter boards.
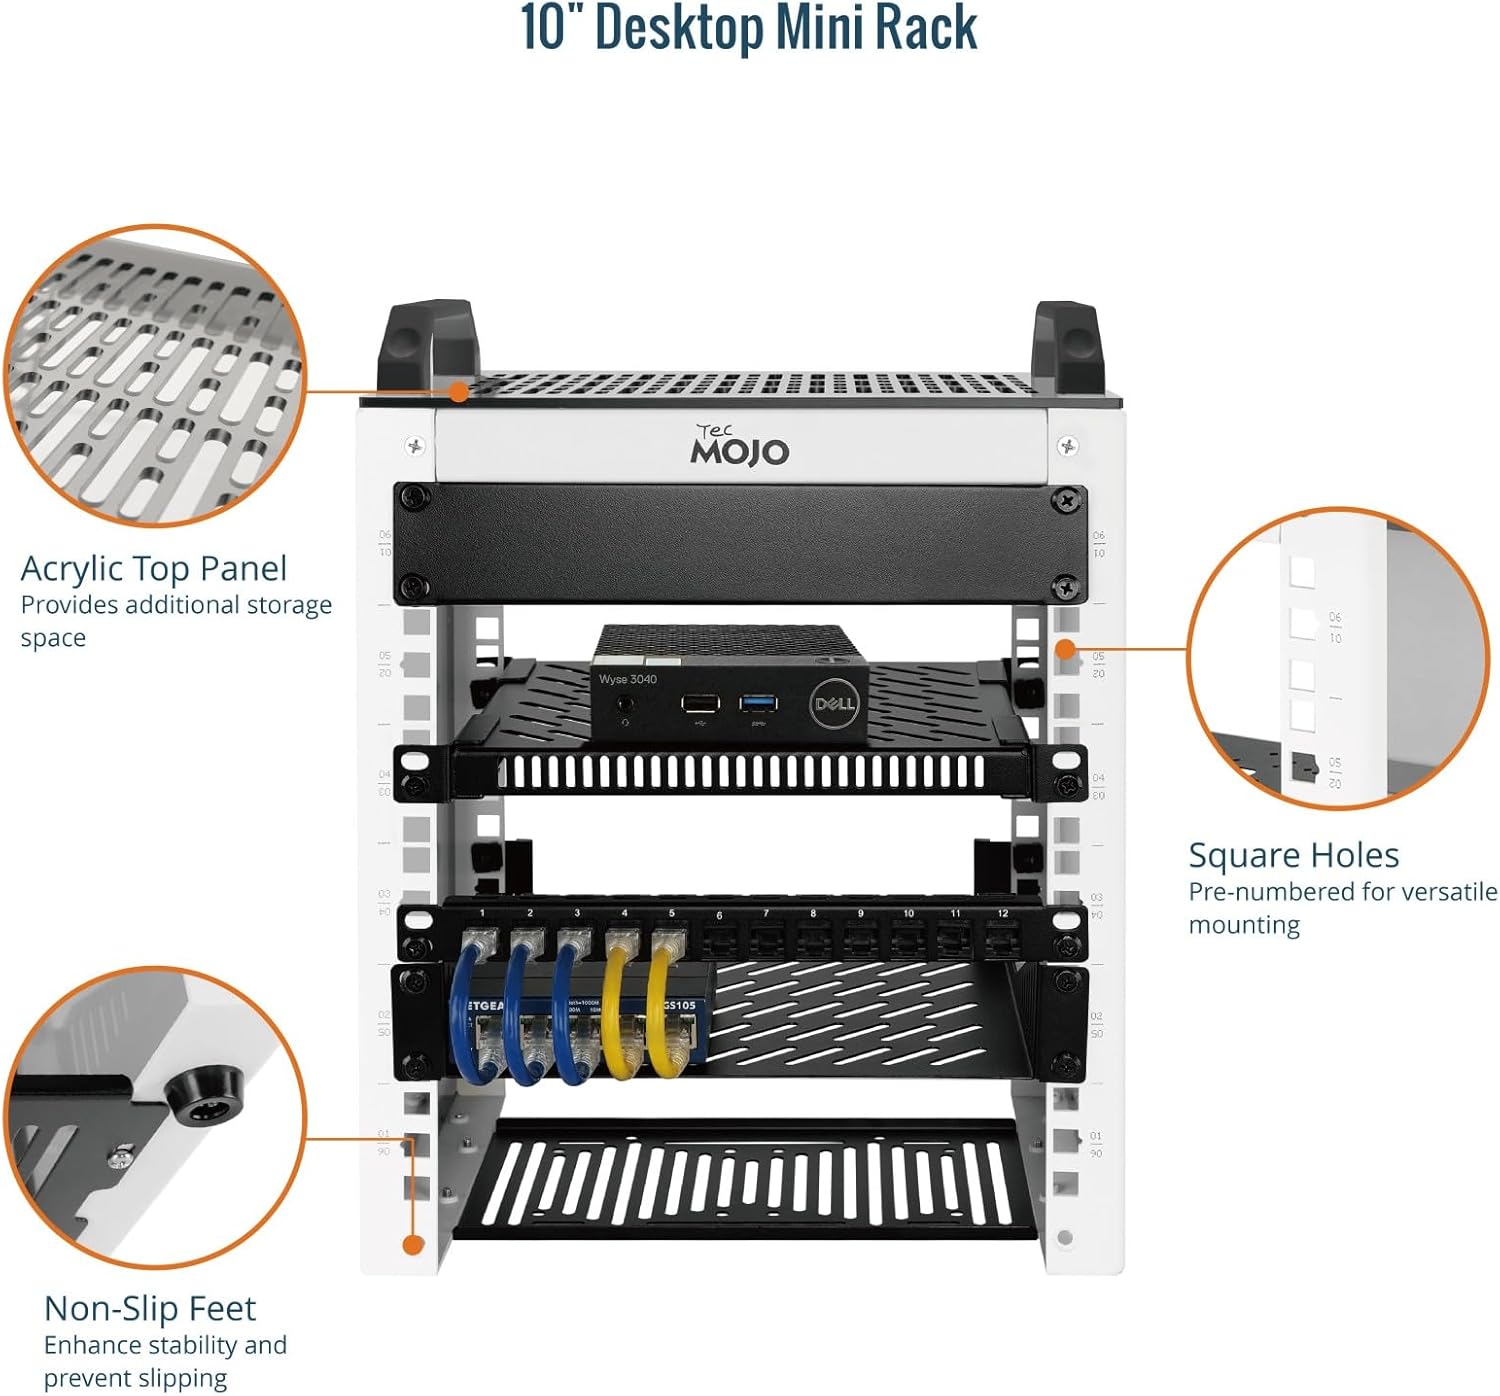
Image 2.2: Detailed view of key features including the acrylic top panel for additional storage, non-slip feet for enhanced stability, and pre-numbered square holes for versatile equipment mounting.

Image 2.3: Close-up of the SBC shelf designed to fit 2.5-inch hard drives and the robust mounting brackets that enhance the rack's overall stability.
3. Specifications
| Attribute | Value |
|---|---|
| Brand | Tecmojo |
| Model Number | 11120501-UK |
| Size | 6U |
| Product Dimensions (D x W x H) | 7.87"D x 11.02"W x 14.53"H (200mm D x 280mm W x 369.1mm H) |
| Item Weight | 4.1 Kilograms (9.04 lbs) |
| Weight Capacity | 132 lbs (60 kg) |
| Material | Steel Frame / Acrylic Sides |
| Frame Type | Open Frame |
| Assembly Required | Yes |

Image 3.1: Visual representation of the rack's dimensions and key specifications, including height, width, and depth measurements in both inches and millimeters.

Image 3.2: Illustration showing the available U-height variations for Tecmojo Desktop Mini Racks, including 6U, 9U, and 12U models, and their respective heights.
4. Package Contents
Verify that all components listed below are present in your package before beginning assembly. If any parts are missing or damaged, please contact customer support.

Image 4.1: Visual display of all included components and hardware.
| Item | Quantity |
|---|---|
| M6 Screw | 24 |
| M6 Cage nut | 24 |
| M5×10mm Screw | 4 |
| M4×14mm Screw | 4 |
| M4×8mm Screw | 4 |
| Micro HDMI to HDMI adapter board | 2 |
| 1U Blank panel | 1 |
| 10in×8in Rack shelf | 1 |
| Mounting bracket | 2 |
| 1U SBC shelf | 1 |
| Screwdriver | 1 |
5. Setup and Assembly
Assembly of the Tecmojo 10-inch Desktop Mini Rack requires careful attention to detail. Follow these steps to ensure a secure and stable setup.
- Unpack Components: Carefully remove all parts from the packaging and verify against the package contents list (Section 4).
- Assemble Frame: Connect the side panels and top/bottom plates using the provided M6 screws and cage nuts. Ensure all connections are secure but do not overtighten initially.
- Install Mounting Brackets: Attach the mounting brackets to the desired locations on the rack frame using the appropriate screws. These brackets provide additional stability.
- Install Shelves: Position the 10in×8in rack shelf and the 1U SBC shelf at your preferred U-heights. Secure them using M6 screws and cage nuts. The SBC shelf is designed for 2.5-inch hard drives.
- Install Adapter Boards: Mount the Micro HDMI to HDMI adapter boards as needed for your specific setup.
- Install Blank Panel: Use the 1U blank panel to cover any unused U-height spaces, which helps with airflow management and aesthetics.
- Final Tightening: Once all components are in place and aligned, carefully tighten all screws to ensure the rack is rigid and stable.
- Attach Non-Slip Feet: Secure the non-slip feet to the bottom of the rack to prevent movement and protect surfaces.
Optional: Cooling Fan Installation
The rack is adaptable for 80x80mm or 120x120mm cooling fans (fans are not included). If installing fans, ensure they are properly oriented for optimal airflow (intake or exhaust) and secured to the designated mounting points on the shelves or panels.
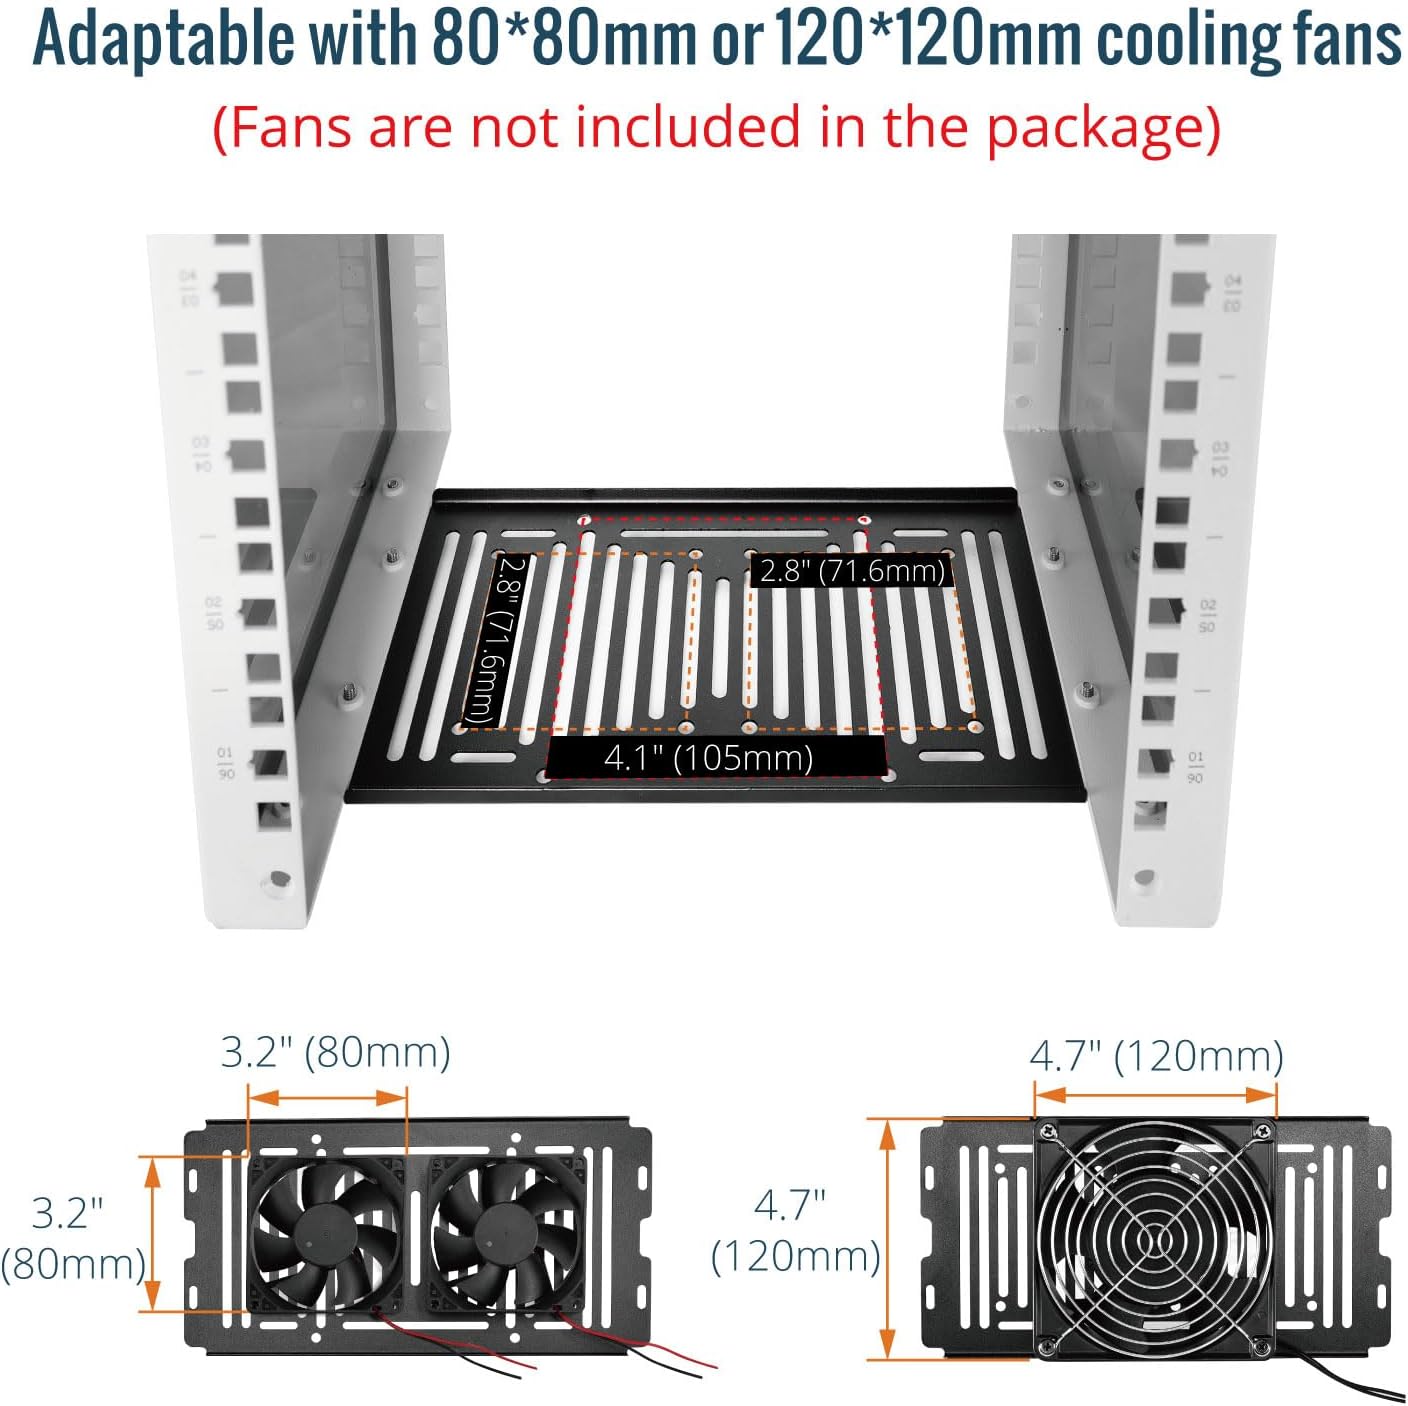
Image 5.1: Diagram illustrating the mounting points and dimensions for optional 80x80mm and 120x120mm cooling fans on the rack shelves.
6. Operating Instructions
Once assembled, the Tecmojo Mini Rack is ready for equipment installation.
- Placement: Place the assembled rack on a stable, level surface. Ensure adequate space around the rack for ventilation and cable management.
- Mounting Equipment:
- For 10-inch rack-mountable devices (e.g., switches, patch panels), align the mounting holes of the device with the square holes on the rack's vertical rails.
- Insert M6 cage nuts into the square holes on the rack rails at the desired U-height.
- Secure the equipment using M6 screws. Ensure the equipment is evenly distributed and securely fastened.
- For devices placed on shelves (e.g., SBCs, small servers), ensure they are stable and do not obstruct airflow.
- Cable Management: Utilize cable ties or other cable management accessories (not included) to organize power and data cables. Proper cable management improves airflow and simplifies maintenance.
- Power Connection: Connect power supplies for your equipment to a suitable power strip (not included) mounted within or near the rack.
7. Maintenance
Regular maintenance ensures the longevity and optimal performance of your Tecmojo Mini Rack and the equipment housed within it.
- Cleaning: Periodically wipe down the rack's surfaces, including the acrylic panels, with a soft, damp cloth. Avoid abrasive cleaners that could scratch the acrylic.
- Dust Removal: Use compressed air or a soft brush to remove dust buildup from equipment and ventilation openings to maintain proper airflow.
- Hardware Check: Periodically inspect all screws and connections to ensure they remain tight. Retighten any loose fasteners.
- Cable Inspection: Check cables for any signs of wear, damage, or kinks. Replace damaged cables immediately.
8. Troubleshooting
This section addresses common issues you might encounter with your Tecmojo Mini Rack.
- Rack Instability:
- Issue: The rack feels wobbly or unstable.
- Solution: Ensure all assembly screws are fully tightened. Verify that the rack is placed on a flat, level surface. Check if the non-slip feet are properly installed.
- Equipment Not Fitting:
- Issue: 10-inch equipment does not align with mounting holes.
- Solution: Confirm that your equipment is indeed 10-inch rack-mountable. Ensure cage nuts are correctly inserted into the square holes.
- Overheating Equipment:
- Issue: Devices inside the rack are running hot.
- Solution: Ensure proper cable management to avoid obstructing airflow. Consider installing optional cooling fans (80x80mm or 120x120mm) if not already present. Verify that the rack is not placed in an enclosed space without ventilation.
9. Warranty and Support
For warranty information or technical support, please refer to the official Tecmojo website or contact their customer service directly. Specific warranty terms and conditions may vary.
For further assistance, please visit: Tecmojo Store on Amazon