1. Introduction
This manual provides detailed instructions for the safe and efficient operation of the Bloepum XY-SK120X DC Adjustable Buck Boost Converter. Please read this manual thoroughly before use and retain it for future reference.
2. Safety Instructions
- Ensure proper ventilation to prevent overheating.
- Do not expose the device to moisture or extreme temperatures.
- Verify input and output connections before powering on.
- Avoid connecting two or more input interfaces simultaneously.
- Handle with care to prevent physical damage.
3. Product Overview
The Bloepum XY-SK120X is a versatile DC buck-boost converter featuring a VA color LCD display for real-time monitoring of voltage, current, and power. It supports constant voltage (CV) and constant current (CC) modes, and includes features like MPPT solar charging support and Modbus protocol for serial communication.
3.1 Front Panel
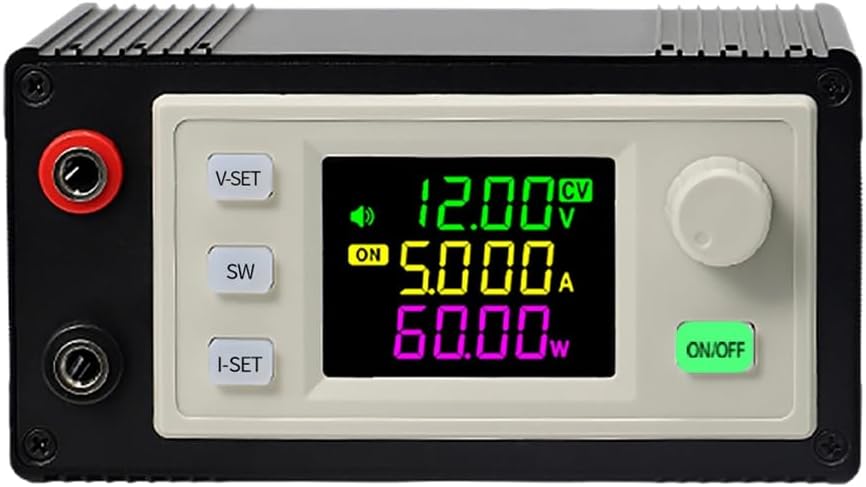
Image Description: This image shows the front panel of the converter. It features a large VA color LCD display showing voltage (V), current (A), and power (W) readings. To the left of the display are three buttons: "V-SET", "SW", and "I-SET". To the right is a rotary encoder knob and an "ON/OFF" button. Red and black banana plug terminals are visible on the far left.
- V-SET Button: Used to set the output voltage.
- I-SET Button: Used to set the output current limit.
- SW Button: Toggles display modes or functions.
- Rotary Encoder: Adjusts values when setting voltage or current.
- ON/OFF Button: Controls the output power.
- Input/Output Terminals: Red and black terminals for power connections.
3.2 Rear Panel and Ventilation
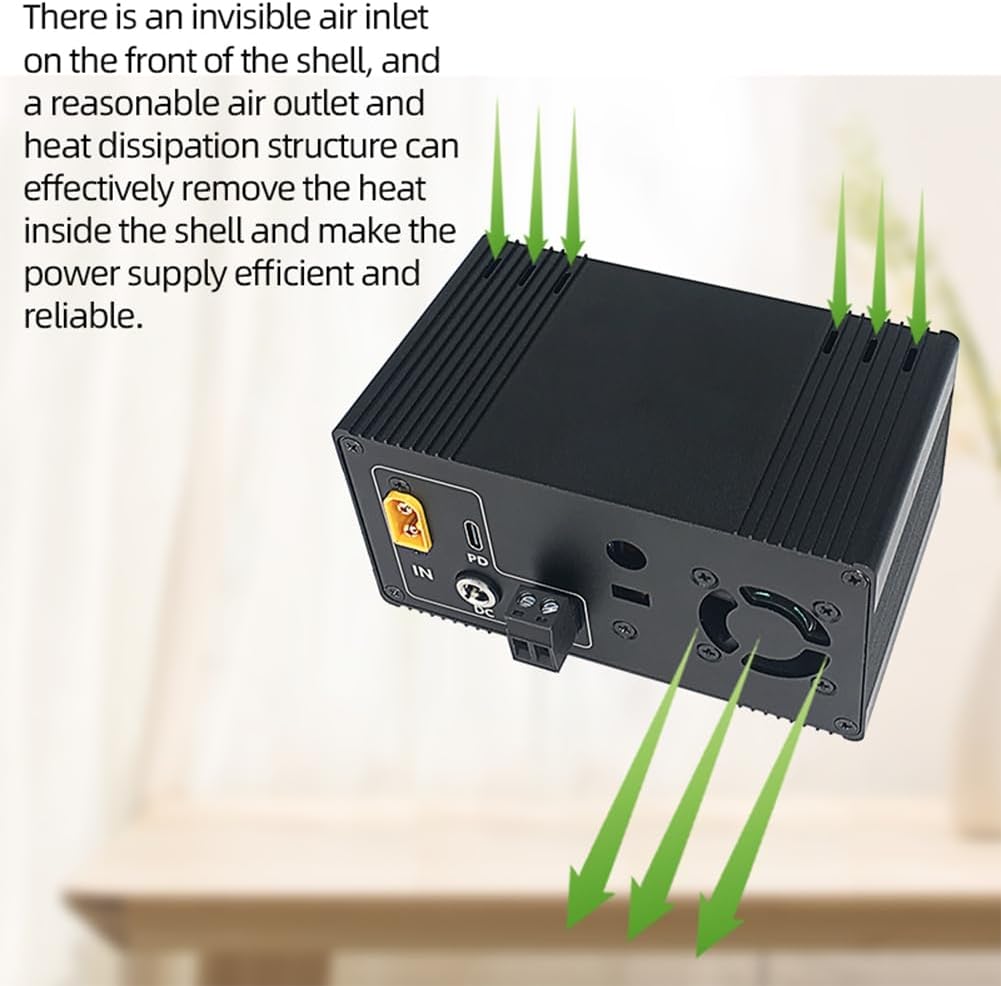
Image Description: This image displays the rear of the converter, highlighting its ventilation system. Air inlets are visible on the top and sides, with an exhaust fan on the back. Various input ports are also present, including a yellow XT60-style connector labeled "IN", a USB-C PD port, a DC5.5*2.5 plug, and a pluggable terminal block.
- IN (XT60): Main power input.
- PD (USB-C): Power Delivery input, automatically activates for 20V output.
- DC5.5*2.5 Plug: Standard DC barrel jack input.
- Pluggable Terminal Block: Screw terminal input for bare wires.
- Exhaust Fan: Intelligent temperature-controlled fan for heat dissipation.
- Spare Expansion Port: For customizable usage.
4. Specifications
| Parameter | Value |
|---|---|
| Input Voltage | 6.0 - 36.00 V |
| Output Voltage | 0 - 36.00 V |
| Output Current | 0 - 6.000 A |
| Power Output | 120 W (Max) |
| Storage Space | 10 groups |
| Display | VA Color LCD (>1.8 inches) |
| Dimensions (L x W x H) | 111mm x 65mm x 57mm (approx.) |
| Weight | 302g (SK120X) |

Image Description: This image provides the physical dimensions of the converter. It shows a length of 111mm, a width of 65mm, and a height of 57mm. The weight for the SK120X model is listed as 302g.
5. Setup
- Power Input: Connect a suitable DC power source (6.0V to 36.0V) to one of the input terminals on the rear panel (XT60, USB-C PD, DC5.5*2.5, or pluggable terminal block). Note: Do not connect multiple input sources simultaneously.
- Output Connection: Connect your load to the red (+) and black (-) output terminals on the front panel.
- Initial Power On: Once connections are secure, the device will power on and display current settings.
6. Operating Instructions
6.1 Setting Output Voltage (CV Mode)
- Press the V-SET button. The voltage display will start blinking.
- Rotate the Rotary Encoder to adjust the desired output voltage.
- Press the V-SET button again to confirm the setting.
6.2 Setting Output Current Limit (CC Mode)
- Press the I-SET button. The current display will start blinking.
- Rotate the Rotary Encoder to adjust the desired maximum output current.
- Press the I-SET button again to confirm the setting.
6.3 Enabling/Disabling Output
- Press the ON/OFF button to toggle the power output to your load.
6.4 Display Modes and Functions
- Press the SW button to cycle through different display modes or access additional functions (e.g., viewing input voltage, power, or stored settings).
- The device supports 10 groups of storage for settings. Refer to the on-screen prompts for saving and recalling.
7. Maintenance
- Keep the device clean and free from dust. Use a soft, dry cloth for cleaning.
- Ensure ventilation openings are not obstructed to maintain proper cooling.
- Regularly check all connections for tightness and integrity.
8. Troubleshooting
- No Display/No Power: Check input power source and connections. Ensure the input voltage is within the specified range (6.0V-36.0V).
- No Output: Verify that the output is enabled using the ON/OFF button. Check output connections and ensure the load is not short-circuited or drawing excessive current.
- Output Voltage/Current Not Stable: Ensure the input power supply is stable and capable of providing sufficient current. Check for loose connections.
- Overheating: Ensure adequate ventilation around the device. Clear any obstructions from the fan or air vents.
9. Warranty and Support
For warranty information and technical support, please refer to the product packaging or contact your retailer. Keep your purchase receipt for warranty claims.