1. Introduction
This manual provides detailed instructions for the installation, operation, and maintenance of your Jingelsye 10-inch touchscreen car radio designed for Nissan Sentra models from 2013 to 2017. Please read this manual thoroughly before use to ensure proper functionality and safety.
2. Safety Information
- Always operate the device responsibly and avoid distractions while driving.
- Do not attempt to disassemble or modify the unit. This may void the warranty and cause damage.
- Ensure all wiring connections are secure and properly insulated to prevent short circuits.
- Consult a professional for installation if you are unsure about any steps.
- Keep the screen clean and free from obstructions for optimal visibility.
3. Package Contents
Verify that all items are present in the package:
- Power Harness x1
- RCA Cable x1
- GPS Antenna x1
- Backup Camera x1
- Cam-in Cable x1
- Mic x1
- USB Cable x2
- Tool x1
4. Product Overview
The Jingelsye car radio is a 10-inch touchscreen stereo designed to upgrade the infotainment system in your Nissan Sentra (2013-2017). It features Android 12, 2GB RAM, 32GB ROM, and supports various connectivity options.

Image: The Jingelsye 10-inch car radio seamlessly integrated into a Nissan Sentra dashboard.

Image: Comparison of the dashboard before and after installation, highlighting CarPlay, Android Auto, and Mirror Link capabilities.
5. Installation Guide
This unit is designed for plug-and-play installation for Nissan Sentra 2013-2017 models. Ensure the vehicle's ignition is off and the battery is disconnected before starting installation.
5.1 Pre-Installation Check
- Confirm vehicle compatibility (Nissan Sentra 2013-2017).
- Unpack all components and verify against the package contents list.
5.2 Removal of Factory Radio
- Carefully remove the trim panels surrounding the factory radio using the provided tool.
- Unscrew the mounting bolts/screws securing the factory radio.
- Gently pull out the factory radio and disconnect all wiring harnesses and antenna cables.
5.3 Connecting the New Unit
- Connect the provided power harness to the vehicle's wiring and the new head unit.
- Attach the GPS antenna, RCA cables, and USB cables as needed.
- Connect the backup camera cable to the unit and route it to the rear of the vehicle.
- Ensure all connections are firm and correct.
5.4 Mounting and Reassembly
- Slide the new car radio into the dashboard opening and secure it with the mounting screws.
- Reattach the trim panels, ensuring they snap securely into place.
- Reconnect the vehicle battery.

Image: Visual guide showing compatible and incompatible dashboard configurations for installation.
6. Operating Instructions
6.1 Power On/Off
Press and hold the power button (usually located on the front panel) to turn the unit on or off. A short press typically mutes or unmutes the audio.
6.2 Touchscreen Interface
The unit features a 10-inch 1280x800 IPS touchscreen for clear visuals and responsive control. Navigate through menus and applications by tapping or swiping.

Image: Visual comparison demonstrating the superior clarity of the 1280x800 IPS screen and its wide 170-degree viewing angle.
6.3 Bluetooth 5.0 Connectivity
Pair your smartphone via Bluetooth 5.0 for hands-free calling and audio streaming. Access the Bluetooth menu to search for devices and connect.
- Pairing: Go to Settings > Bluetooth, enable Bluetooth on your phone, and select the car radio from the list of available devices.
- Hands-Free Calling: Make and receive calls directly from the touchscreen.
- Audio Streaming: Play music from your phone through the car's speakers.

Image: The Bluetooth call interface on the screen, showing integration with steering wheel controls for answering and ending calls.
6.4 CarPlay & Android Auto
Connect your iPhone or Android device for seamless integration of navigation, music, and communication apps. Supports both wireless and wired connections.
- Wireless Connection: Ensure Bluetooth and Wi-Fi are enabled on your phone and the car radio. Follow on-screen prompts to connect.
- Wired Connection: Use a USB cable to connect your phone to the car radio's USB port.
6.5 GPS Navigation
The unit comes with a built-in offline North America map. You can also use online navigation applications when connected to Wi-Fi.
- Offline Maps: Access pre-loaded maps without an internet connection.
- Online Navigation: Connect to Wi-Fi to use apps like Google Maps, Waze, etc.

Image: The GPS navigation screen displaying a map, alongside icons indicating 5G WiFi connectivity and various compatible applications.
6.6 5G WiFi Connection
Connect the car radio to a Wi-Fi hotspot (e.g., from your smartphone) to access online features, download apps, and stream media.
- Connecting: Go to Settings > Wi-Fi, select your network, and enter the password.
- Online Access: Browse the internet, download apps from the Play Store, and stream content.
6.7 FM/RDS Radio
Tune into your favorite FM radio stations. The RDS (Radio Data System) feature provides additional information like station name and song title where available.
- Tuning: Use the on-screen controls to scan for stations or manually enter frequencies.
- Presets: Save up to 18 of your favorite stations for quick access.

Image: The interface for adjusting the built-in equalizer settings and the FM/RDS radio display showing station frequencies.
6.8 Audio Settings (EQ)
Customize your audio experience with the built-in 15-band equalizer. Select from preset modes (Folk, Rock, Classic, Jazz) or create custom settings.
- EQ Presets: Choose from various sound profiles.
- Custom Adjustment: Fine-tune individual frequency bands to your preference.
6.9 Steering Wheel Control (SWC)
The unit supports the original car's steering wheel controls, allowing you to manage audio and calls without taking your hands off the wheel.
- Configuration: Access the SWC settings menu to map your steering wheel buttons to specific functions.
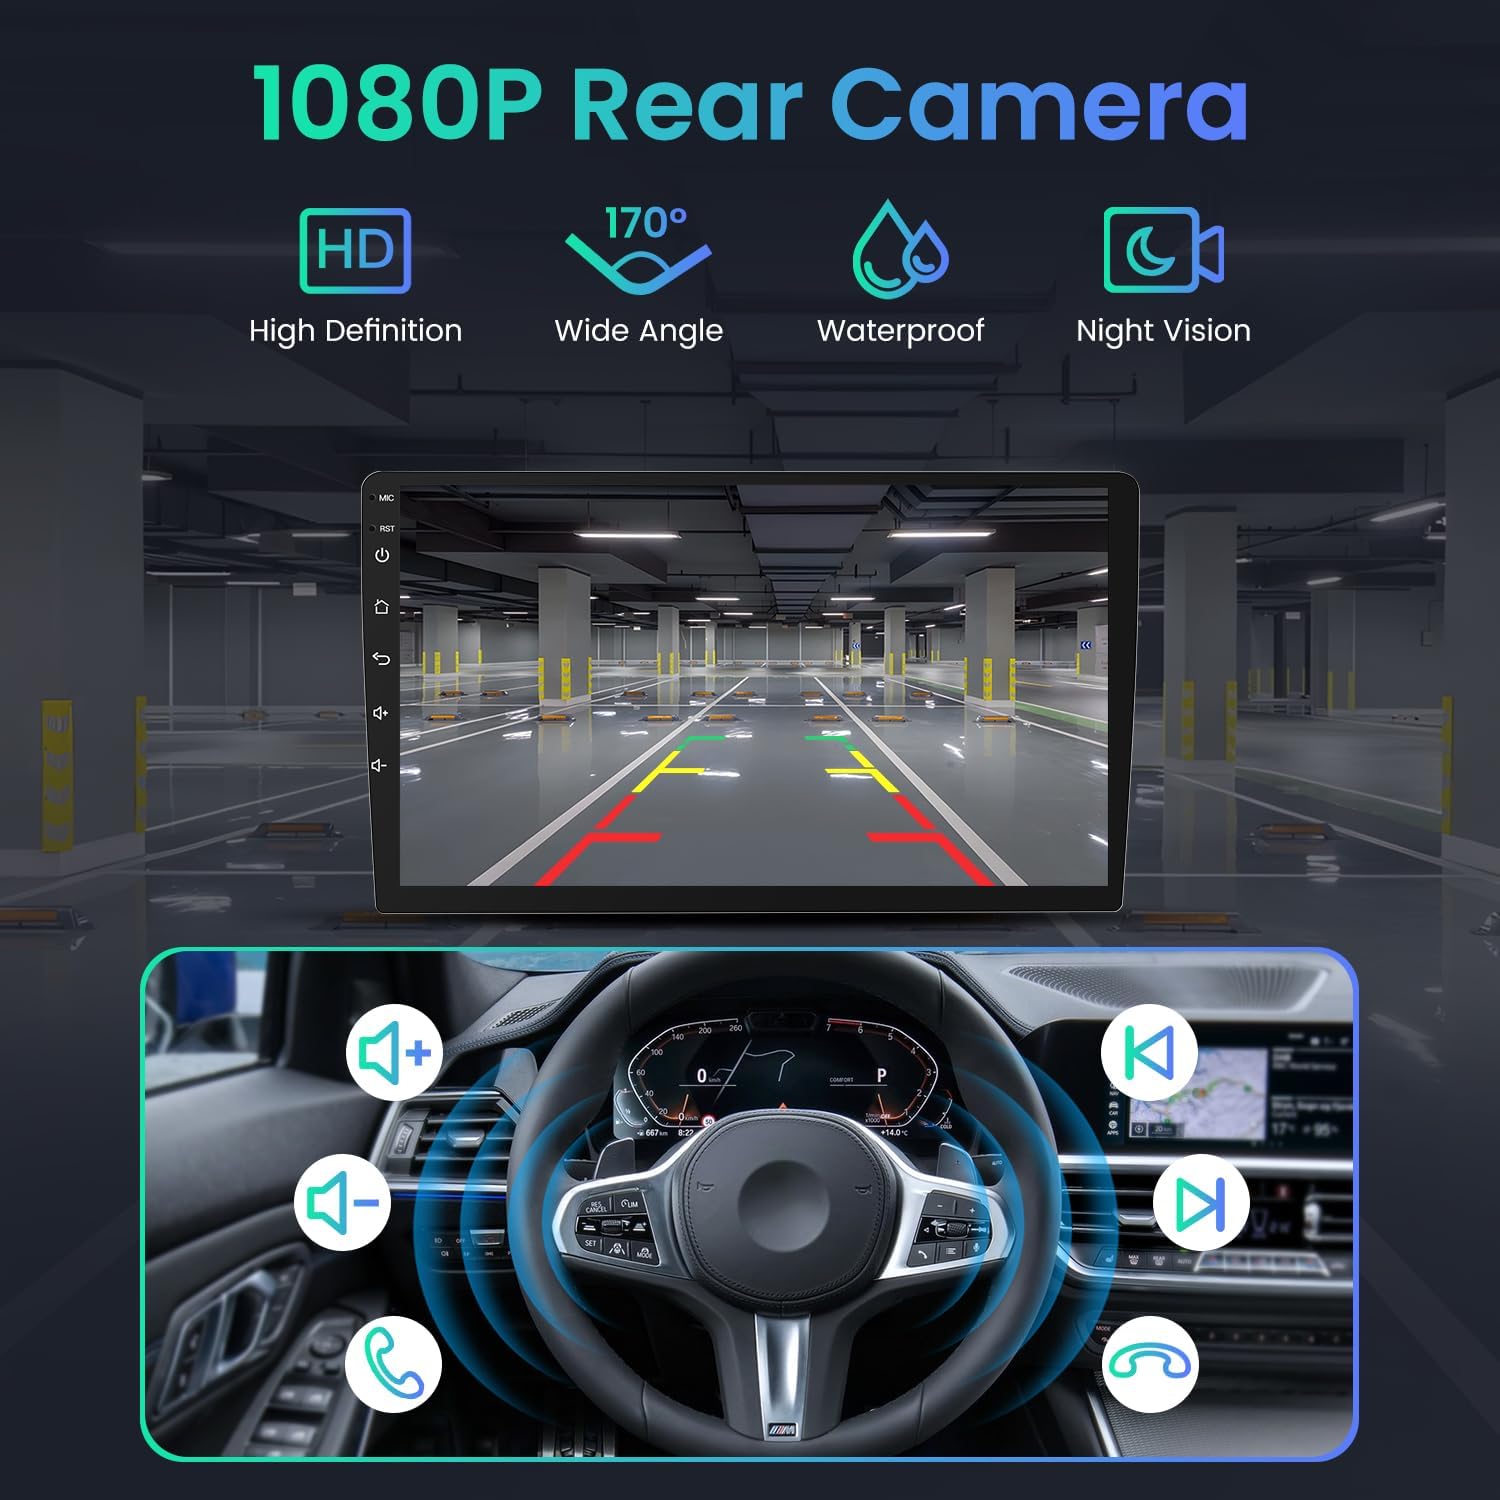
Image: The display showing the 1080P rear camera view, with an inset illustrating the functionality of steering wheel control buttons.
6.10 Mirror Link
Mirror your smartphone screen directly onto the car radio's display, allowing you to view phone content on the larger screen.
- Connection: Follow the instructions in the Mirror Link application on the head unit to connect your Android or iOS device.
6.11 Backup Camera
The included 1080P AHD backup camera provides a clear, wide-angle view when reversing. It features IR night vision and is waterproof.
- Automatic Display: The screen automatically switches to the rear view when the vehicle is put into reverse gear.
6.12 Video Playback
Watch videos on the 10-inch screen. The unit supports 1080P video playback.
Video: Demonstration of the car radio's user interface, showcasing features like split-screen, sound settings, Bluetooth connectivity, CarPlay, GPS navigation, WiFi connection, FM radio, and UI theme customization.
7. Maintenance
- Screen Cleaning: Use a soft, lint-free cloth to clean the touchscreen. Avoid abrasive cleaners.
- Software Updates: Periodically check for software updates through the system settings to ensure optimal performance and access to new features.
- General Care: Keep the unit free from dust and extreme temperatures.
8. Troubleshooting
| Problem | Possible Cause | Solution |
|---|---|---|
| Unit does not power on | Loose power connection, blown fuse, vehicle battery issue. | Check power harness connections. Inspect vehicle fuses. Ensure battery is charged. |
| No sound | Volume muted, incorrect audio source, loose speaker wires. | Check volume and mute settings. Select correct audio source. Verify speaker connections. |
| Bluetooth not connecting | Bluetooth off on phone/unit, device not in pairing mode, interference. | Ensure Bluetooth is enabled on both devices. Put unit in pairing mode. Try restarting both devices. |
| GPS signal lost | GPS antenna obstructed or disconnected. | Ensure GPS antenna has a clear view of the sky and is securely connected. |
| Backup camera not displaying | Camera cable loose, camera faulty, incorrect wiring. | Check camera cable connections. Ensure vehicle is in reverse. Verify camera power. |
If you encounter any issues not listed here, or if the problem persists, please contact customer support.
9. Specifications
| Feature | Detail |
|---|---|
| Operating System | Android 12 |
| RAM | 2GB |
| ROM | 32GB |
| Display Size | 10 Inches |
| Resolution | 1280x800 IPS |
| Bluetooth Version | 5.0 |
| Wi-Fi | 5G |
| Equalizer | 15-band EQ |
| Backup Camera | 1080P AHD, 170° Wide Angle, IR Night Vision, Waterproof |
| GPS Map Type | North America (offline) |
| Connectivity | Bluetooth, USB, CarPlay, Android Auto, Wi-Fi |
| Vehicle Service Type | Car (Nissan Sentra 2013-2017) |
10. Warranty
This product comes with a 1-year manufacturer's warranty from the date of purchase. The warranty covers defects in materials and workmanship under normal use. It does not cover damage caused by improper installation, accident, misuse, abuse, neglect, or unauthorized modification.
11. Support
For technical assistance, troubleshooting, or warranty claims, please contact Jingelsye customer support. Refer to your purchase documentation for specific contact details or visit the official Jingelsye website.


