Antinsky Rapido Hotend 2 HF V2.0
Phaetus Rapido Hotend 2 HF V2.0 Instruction Manual
Model: Rapido Hotend 2 HF V2.0 (104NT 280°C)
1. Introduction
This manual provides detailed instructions for the installation, operation, and maintenance of the Phaetus Rapido Hotend 2 HF V2.0. This high-performance hotend is designed for 3D printers, offering features such as superior thermal isolation, efficient heating, and high-speed printing capabilities. Please read this manual thoroughly before use to ensure proper functionality and longevity of the product.

Image 1.1: Phaetus Rapido Hotend 2 HF V2.0 assembly.
2. Key Features
- Superior Thermal Isolation: The heatbreak design minimizes heat creep, reducing the risk of filament clogging and ensuring consistent extrusion.
- Enhanced Wear Resistance: Constructed for durability, capable of printing fiber-filled filaments with extended lifespan.
- Efficient Heating Unit: A rectangular ceramic heating unit provides rapid and reliable heating, reaching 200°C in approximately 35 seconds, with a maximum printing temperature of 350°C.
- High-Speed Printing: The heater-block features an extended heating area, supporting volumetric flow rates up to 36 mm³/s for faster printing.
- Detachable Temperature Sensor: Equipped with a replaceable 104NT temperature sensor, suitable for high-temperature printing applications.
- One-Handed Nozzle Change: Titanium-alloy screws create a rigid connection between the heater-block and heatsink, allowing for convenient nozzle changes without requiring two hands.
- Adjustable Flow Rate: Easily switch between high-flow and ultra-high-flow configurations using the copper-nickel-plated nut adapter to optimize for different printing needs.
- Nozzle Compatibility: Designed to accommodate various nozzle types for diverse printing requirements.
3. What's in the Box
The Phaetus Rapido Hotend 2 HF V2.0 package includes the following components:
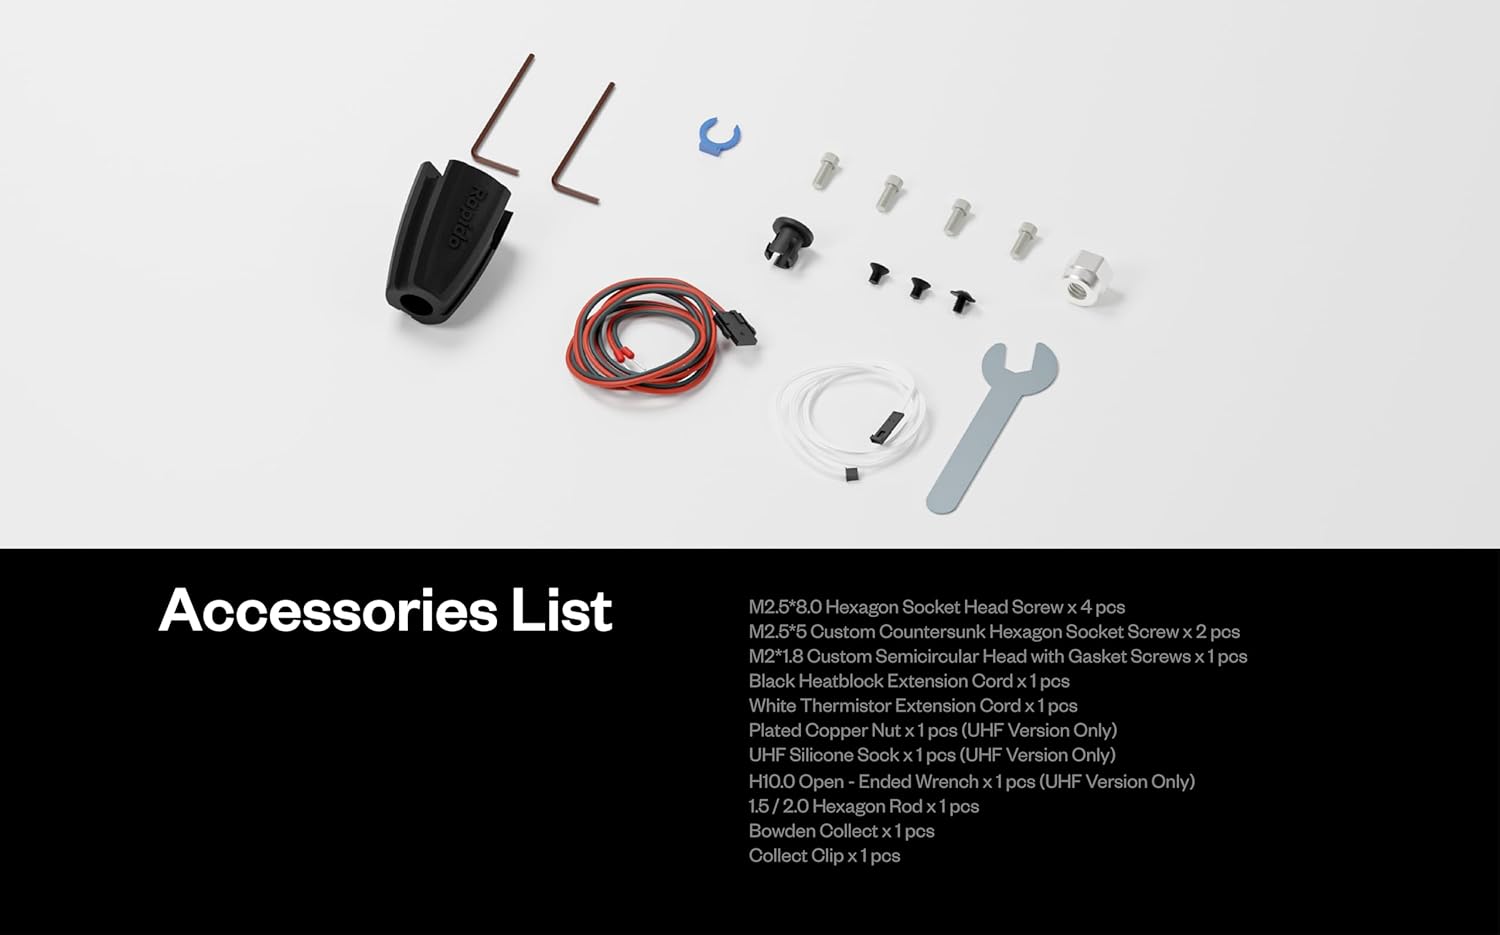
Image 3.1: Included accessories for the Rapido Hotend 2 HF V2.0.
- Phaetus Rapido Hotend 2 HF V2.0 (assembled)
- M2.5*8.0 Hexagon Socket Head Screws (4 pcs)
- M2.5*5 Custom Countersunk Hexagon Socket Screws (2 pcs)
- M2*1.8 Custom Semicircular Head with Gasket Screws (1 pc)
- Black Heatblock Extension Cord (1 pc)
- White Thermistor Extension Cord (1 pc)
- 1.5 / 2.0 Hexagon Rod (1 pc)
- Bowden Collet (1 pc)
- Collet Clip (1 pc)
Note: Additional items like Plated Copper Nut, UHF Silicone Sock, and Open-Ended Wrench are included with UHF versions only.
4. Setup and Installation
4.1 General Assembly
The Rapido Hotend 2 HF V2.0 features a new cable tie structure for the wiring harness, designed to simplify installation and reduce potential damage. The heating unit is secured by a metal dome, facilitating maintenance and upgrades.
4.2 Nozzle Installation/Change
The hotend is designed for convenient one-handed nozzle changes. The titanium-alloy screws provide a rigid coupling between the heater-block and heatsink, allowing for secure nozzle replacement without requiring additional tools to hold the block.

Image 4.1: Illustration of the one-handed nozzle change feature.
- Ensure the hotend is at a safe temperature (e.g., 200°C for PLA) to prevent damage during removal.
- Using a wrench, carefully unscrew the existing nozzle while holding the hotend assembly.
- Screw in the new nozzle by hand until finger-tight.
- Gently tighten the nozzle with a wrench, ensuring it is snug but not overtightened. Refer to your 3D printer's specific torque recommendations if available.
5. Operation
5.1 Heating Performance
The integrated ceramic heating unit allows for rapid temperature attainment. The hotend can reach 200°C in approximately 35 seconds and supports a maximum printing temperature of 350°C. This enables compatibility with a wide range of filaments, including those requiring higher processing temperatures.

Image 5.1: Diagram of the high-efficiency ceramic heating unit.
5.2 High-Speed Printing
The redesigned heater-block features an extended heating zone, facilitating high volumetric flow rates up to 36 mm³/s. This capability allows for significantly increased printing speeds, optimizing the performance of compatible 3D printers.

Image 5.2: Visual representation of the hotend's high-speed printing capability.
5.3 Flow Rate Adjustment
The hotend can be configured for either high-flow or ultra-high-flow printing by utilizing the copper-nickel-plated nut adapter. This allows users to select the optimal flow rate based on the specific requirements of their 3D model and desired print speed.
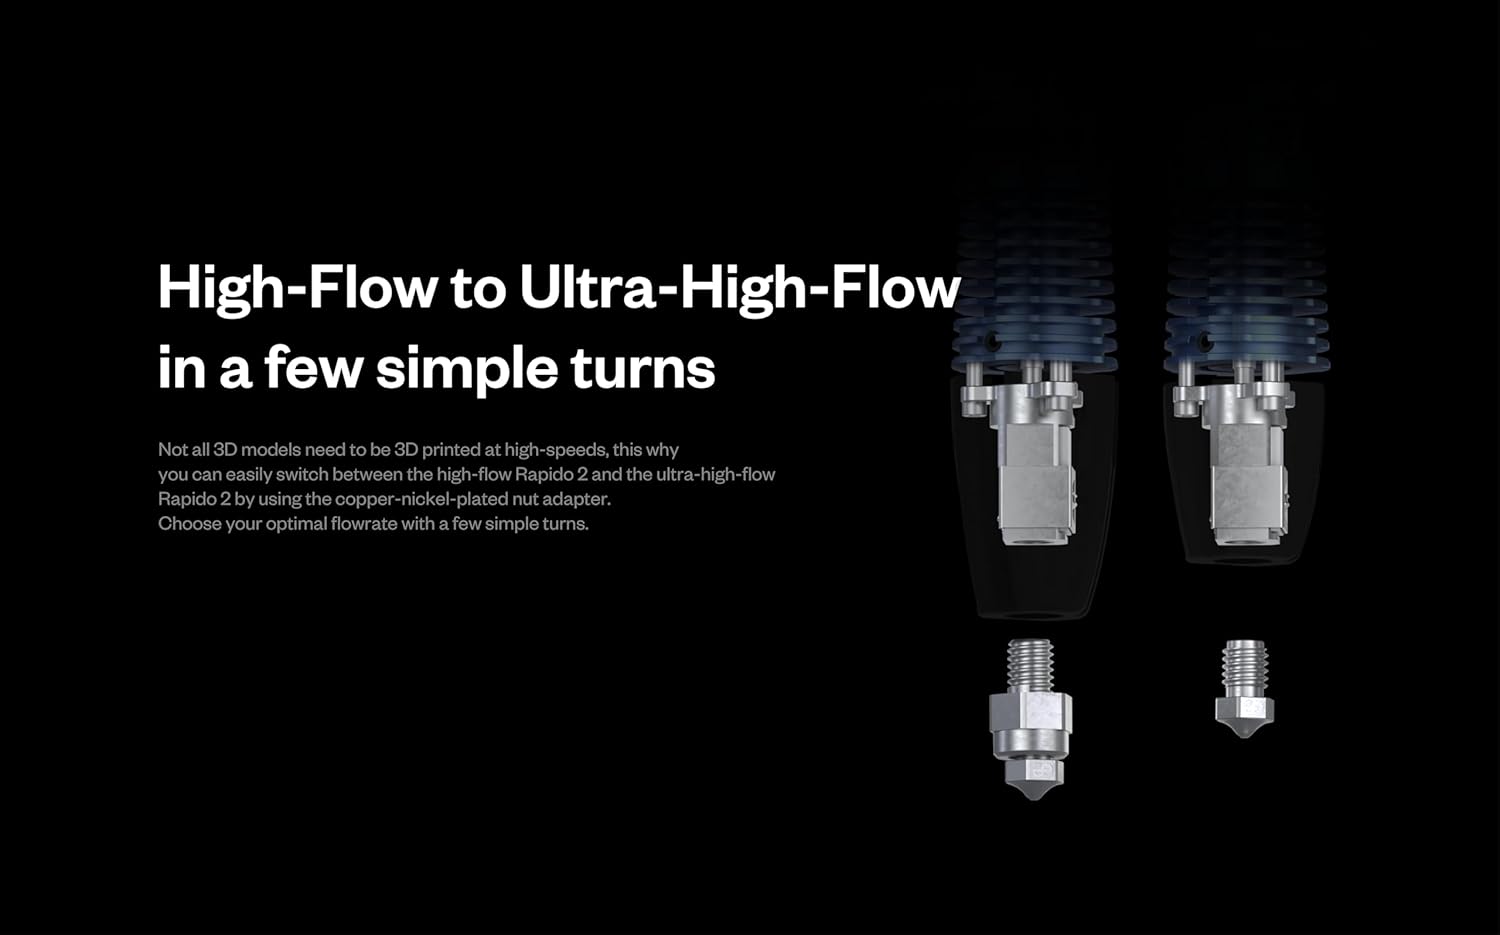
Image 5.3: Comparison of high-flow and ultra-high-flow configurations.
5.4 Nozzle Selection
The Rapido Hotend 2 HF V2.0 is compatible with various nozzle types, allowing users to choose the most suitable nozzle for their specific printing tasks, such as different material types or desired print resolutions.

Image 5.4: Example of different nozzle types compatible with the hotend.
6. Maintenance
6.1 Cleaning the Hotend
Regular cleaning of the nozzle and heater-block area is recommended to prevent filament buildup and ensure optimal performance. Ensure the hotend is cooled before cleaning. Use appropriate tools to gently remove any plastic residue.
6.2 Heatbreak Inspection
The hotend features superior thermal isolation in its heatbreak. Periodically inspect the heatbreak for any signs of damage or wear that could compromise its thermal performance. Proper thermal isolation is crucial to prevent heat creep and filament clogging.

Image 6.1: Illustration of the heatbreak's thermal isolation properties.
6.3 Temperature Sensor Replacement
The 104NT temperature sensor is detachable and can be replaced if necessary. This allows for easy maintenance or upgrades to meet specific temperature sensing requirements.

Image 6.2: Close-up of the detachable 104NT temperature sensor.
7. Troubleshooting
7.1 Filament Clogging
- Issue: Filament is not extruding or extruding inconsistently.
- Possible Causes: Heat creep, debris in the nozzle, incorrect temperature settings.
- Solutions:
- Verify that the hotend fan is operating correctly to ensure proper cooling of the heatsink.
- Perform a cold pull to clear any debris from the nozzle.
- Check and adjust printing temperatures according to filament manufacturer specifications.
7.2 Temperature Fluctuations
- Issue: Hotend temperature is unstable or inaccurate.
- Possible Causes: Loose thermistor connection, damaged thermistor, PID tuning required.
- Solutions:
- Inspect the thermistor wiring for secure connections.
- If the thermistor is damaged, replace it with a new 104NT sensor.
- Perform a PID auto-tune on your 3D printer's firmware to optimize temperature control.
7.3 Difficulty with Nozzle Changes
- Issue: Nozzle is difficult to remove or install.
- Possible Causes: Overtightened nozzle, filament residue, cold hotend.
- Solutions:
- Ensure the hotend is heated to a safe temperature (e.g., 200°C) before attempting to change the nozzle.
- Avoid overtightening nozzles during installation to prevent stripping threads or making future removal difficult.
- Clean any filament residue from the nozzle threads and heater-block.
8. Technical Specifications
| Feature | Specification |
|---|---|
| Model Number | 104NT 280°C |
| Maximum Printing Temperature | 350°C |
| Filament Diameter | 1.75mm |
| Volumetric Flow Rate | Up to 36 mm³/s |
| Heating Unit Type | Rectangular Ceramic |
| Temperature Sensor Type | 104NT (Detachable) |
| Manufacturer | Phaetus |
| Package Dimensions | 4.37 x 2.99 x 2.05 inches |
| Item Weight | 5.29 ounces |
9. Warranty and Support
9.1 Warranty Information
For specific warranty terms and conditions, please refer to the documentation provided with your purchase or contact the seller directly. Warranty coverage typically addresses manufacturing defects under normal use.
9.2 Customer Support
Should you encounter any issues or require assistance with your Phaetus Rapido Hotend 2 HF V2.0, please contact the retailer or manufacturer's customer support. Provide your purchase details and a clear description of the problem for efficient service.
Ask a question about this manual
Ask about setup, troubleshooting, compatibility, parts, safety, or missing instructions. Manuals+ will review the question and use this page’s manual context to help answer it.