1. Product Overview
This manual provides instructions for the TRYX Panorama 360 ARGB SE All-in-One (AIO) liquid CPU cooler and the ROTA SL ARGB 3-in-1 120mm case fan bundle. This system is designed to provide efficient cooling for your CPU while offering extensive visual customization through its integrated curved screen and ARGB lighting.

Image 1.1: Overview of the TRYX Panorama 360 ARGB SE AIO and ROTA SL ARGB Case Fan Bundle components.
Key Features:
- Rotatable 6.67'' Curved AMOLED Screen: Features a 60Hz refresh rate, 2K display, and 400nit brightness for a clear visual experience. The screen is rotatable for flexible orientation.
- 3D Anamorphic Effect: Enhances content depth, supporting custom-formatted 3D videos for a naked-eye 3D visual experience. Includes preloaded "Waterfall" 3D animation.
- ASETEK Cooling Solution (Adela): Provides a 280W TDP cooling capacity, suitable for CPU-intensive tasks and gaming, ensuring stable performance.
- KANALI Software Customization: Allows customization of the AIO cooler display with instant content switching, split-screen display, and system information monitoring. Supports various media formats (PNG/JPG/GIF/MP4/AVI up to 1080P, 500MB).
- ROTA SL ARGB Case Fans: Features Gen2 ARGB lighting, magnetic cable connections, and contact point transmission for simplified installation and cable management.
2. Package Contents
Verify that all components are present in the package before proceeding with installation.
- TRYX Panorama 360 ARGB SE 360mm AIO Liquid Cooler (Radiator, Pump/Block with Curved Screen, Tubing)
- 3x TRYX ROTA SL ARGB 120mm Case Fans
- Mounting Hardware for various CPU sockets (Intel/AMD)
- Fan Screws
- Thermal Paste
- Cables (USB, ARGB, Fan Power)
- User Manual (this document)
3. Installation Guide
3.1. Pre-Installation Checklist
- Ensure your PC case has adequate space for a 360mm radiator.
- Identify your CPU socket type (e.g., Intel LGA1700/1200/115X, AMD AM5/AM4) and select the corresponding mounting hardware.
- Gather necessary tools: Phillips head screwdriver, cleaning cloth, isopropyl alcohol (for CPU cleaning).
- Power off your computer and disconnect all cables.
3.2. CPU Block and Screen Module Installation
- Prepare your CPU socket by installing the correct backplate and standoffs according to your motherboard's instructions.
- Apply a small amount of thermal paste to the center of your CPU's integrated heat spreader (IHS).
- Carefully place the pump/cold plate assembly onto the CPU, aligning the mounting holes.
- Secure the pump/cold plate with the provided thumb screws, tightening them in a diagonal pattern until snug. Do not overtighten.
- The display module is rotatable. Adjust its orientation as desired. Ensure the four screws are evenly tightened during installation to prevent screen sagging.

Image 3.1: Illustration of the rotatable display module. Ensure even tightening of screws during installation.

Image 3.2: Exploded view of the Asetek Adela liquid cooling solution components.
3.3. Radiator and Fan Installation
- Attach the three ROTA SL ARGB 120mm fans to the radiator using the longer fan screws. Ensure the fan airflow direction is correct for your case's cooling strategy (typically pushing air through the radiator).
- Mount the radiator assembly to your PC case. Common locations include the top or front panel.
- Connect the ROTA SL ARGB fans. These fans feature contact point transmission and magnetic cables for simplified wiring. Align the contact points between fans and use the magnetic cable to connect the fan chain to your fan controller or motherboard.

Image 3.3: Magnetic cable connection for simplified fan wiring and control.

Image 3.4: Contact point transmission ensures stable power and speed regulation between fans, reducing visible wiring.
3.4. Cable Connections
- Connect the pump power cable to an available CPU_FAN or AIO_PUMP header on your motherboard.
- Connect the ARGB cable from the pump/screen module to a 5V ARGB header on your motherboard or a compatible ARGB controller.
- Connect the USB cable from the pump/screen module to an internal USB 2.0 header on your motherboard. This is required for KANALI software functionality.
- Connect the magnetic fan cable to your fan controller or motherboard fan header.
4. Operating Instructions
4.1. KANALI Software Installation and Setup
To unlock the full potential of your TRYX Panorama SE AIO, download and install the latest version of the KANALI software from the official TRYX website. The software allows for display customization, system monitoring, and ARGB control.

Image 4.1: Overview of the KANALI software interface for customization and control.
4.2. Display Customization
- Instant Screen Content Switching: Use KANALI to quickly change the content displayed on the 6.67-inch curved AMOLED screen.
- Split-Screen Display: Configure the screen to show multiple pieces of information simultaneously, such as system statistics and custom media.
- Custom Content Library: Upload your own images (PNG/JPG), GIFs, and videos (MP4/AVI up to 1080P, 500MB) to personalize the display.
- 3D Anamorphic Effects: Access a library of preloaded 3D animations, including the "Waterfall" mode, for enhanced visual depth.
- Filters and Hardware Tags: Apply visual filters and display hardware information tags directly on the screen.
- Near Zero Resource Usage: The display operates independently with its own 4-core CPU, 2GB RAM, and 8GB storage, minimizing impact on your PC's resources.

Image 4.2: KANALI software demonstrating Split Screen Mode for displaying multiple data points.

Image 4.3: The Custom Content Library within KANALI, allowing users to upload personal media.

Image 4.4: Options for customizable filters and hardware tag display on the screen.

Image 4.5: Diagram illustrating the independent processing unit of the display, ensuring minimal system resource usage.
4.3. ARGB Lighting Control
The KANALI software also provides control over the Gen2 ARGB lighting of the ROTA SL fans and the AIO pump head. Customize lighting effects, colors, and synchronization to match your system's aesthetic.
5. Maintenance
- Dust Cleaning: Regularly clean dust from the radiator fins and fan blades using compressed air or a soft brush. Ensure fans are not spinning during cleaning.
- Cable Connections: Periodically check all cable connections (power, ARGB, USB) to ensure they are secure.
- Liquid Loop: The AIO liquid cooler is a closed-loop system and does not require refilling or maintenance of the coolant. Do not attempt to open the pump or radiator.
- Screen Cleaning: Use a soft, lint-free cloth to gently wipe the curved screen. Avoid harsh chemicals or abrasive materials.
6. Troubleshooting
6.1. Common Issues and Solutions
| Issue | Possible Cause | Solution |
|---|---|---|
| No Display on Screen | USB cable not connected or loose. KANALI software not installed or running. | Ensure the USB 2.0 cable from the pump is securely connected to the motherboard. Install and run the KANALI software. Check power connections. |
| Fans/ARGB Not Lighting Up | ARGB cable not connected or loose. Magnetic fan connections not secure. KANALI software not controlling ARGB. | Verify the 5V ARGB cable is connected to the motherboard/controller. Ensure fans are properly connected via magnetic contact points. Check ARGB settings in KANALI software. |
| High CPU Temperatures | Pump not running. Insufficient thermal paste. Radiator airflow obstructed. Fans not spinning or spinning too slowly. | Check pump power connection and ensure it's running (you might feel slight vibration). Reapply thermal paste if necessary. Clean radiator fins. Check fan connections and speeds in BIOS/KANALI. |
| Screen Sagging | Unevenly tightened screws on the display module. | Loosen and then evenly tighten the four screws securing the display module. |
7. Specifications
| Feature | Detail |
|---|---|
| Model | TRYX Panorama 360 ARGB SE AIO, TRYX ROTA SL ARGB 3in1 120mm Case Fan |
| Cooling Method | Liquid (AIO) |
| Radiator Size | 360mm |
| TDP Cooling Capacity | Up to 280W |
| Screen Type | 6.67-inch Curved AMOLED |
| Screen Resolution | 2K |
| Screen Refresh Rate | 60Hz |
| Screen Brightness | 400 nit |
| Fan Size | 120mm |
| Fan Speed | 500-1850 RPM ±10% |
| Fan Airflow | 65.64 CFM (Max) |
| Fan Static Pressure | 2.49 mmAq (Max) |
| Fan Noise Level | 28.87 dB(A) (Low Noise Operation) |
| Fan Bearing Type | FDB (Fluid Dynamic Bearing) |
| Materials | Aluminum, Copper, Plastic |
| Power Connector Type | 4-Pin |
| Wattage | 280 watts |

Image 7.1: Detailed fan performance specifications including noise, static pressure, airflow, and RPM.
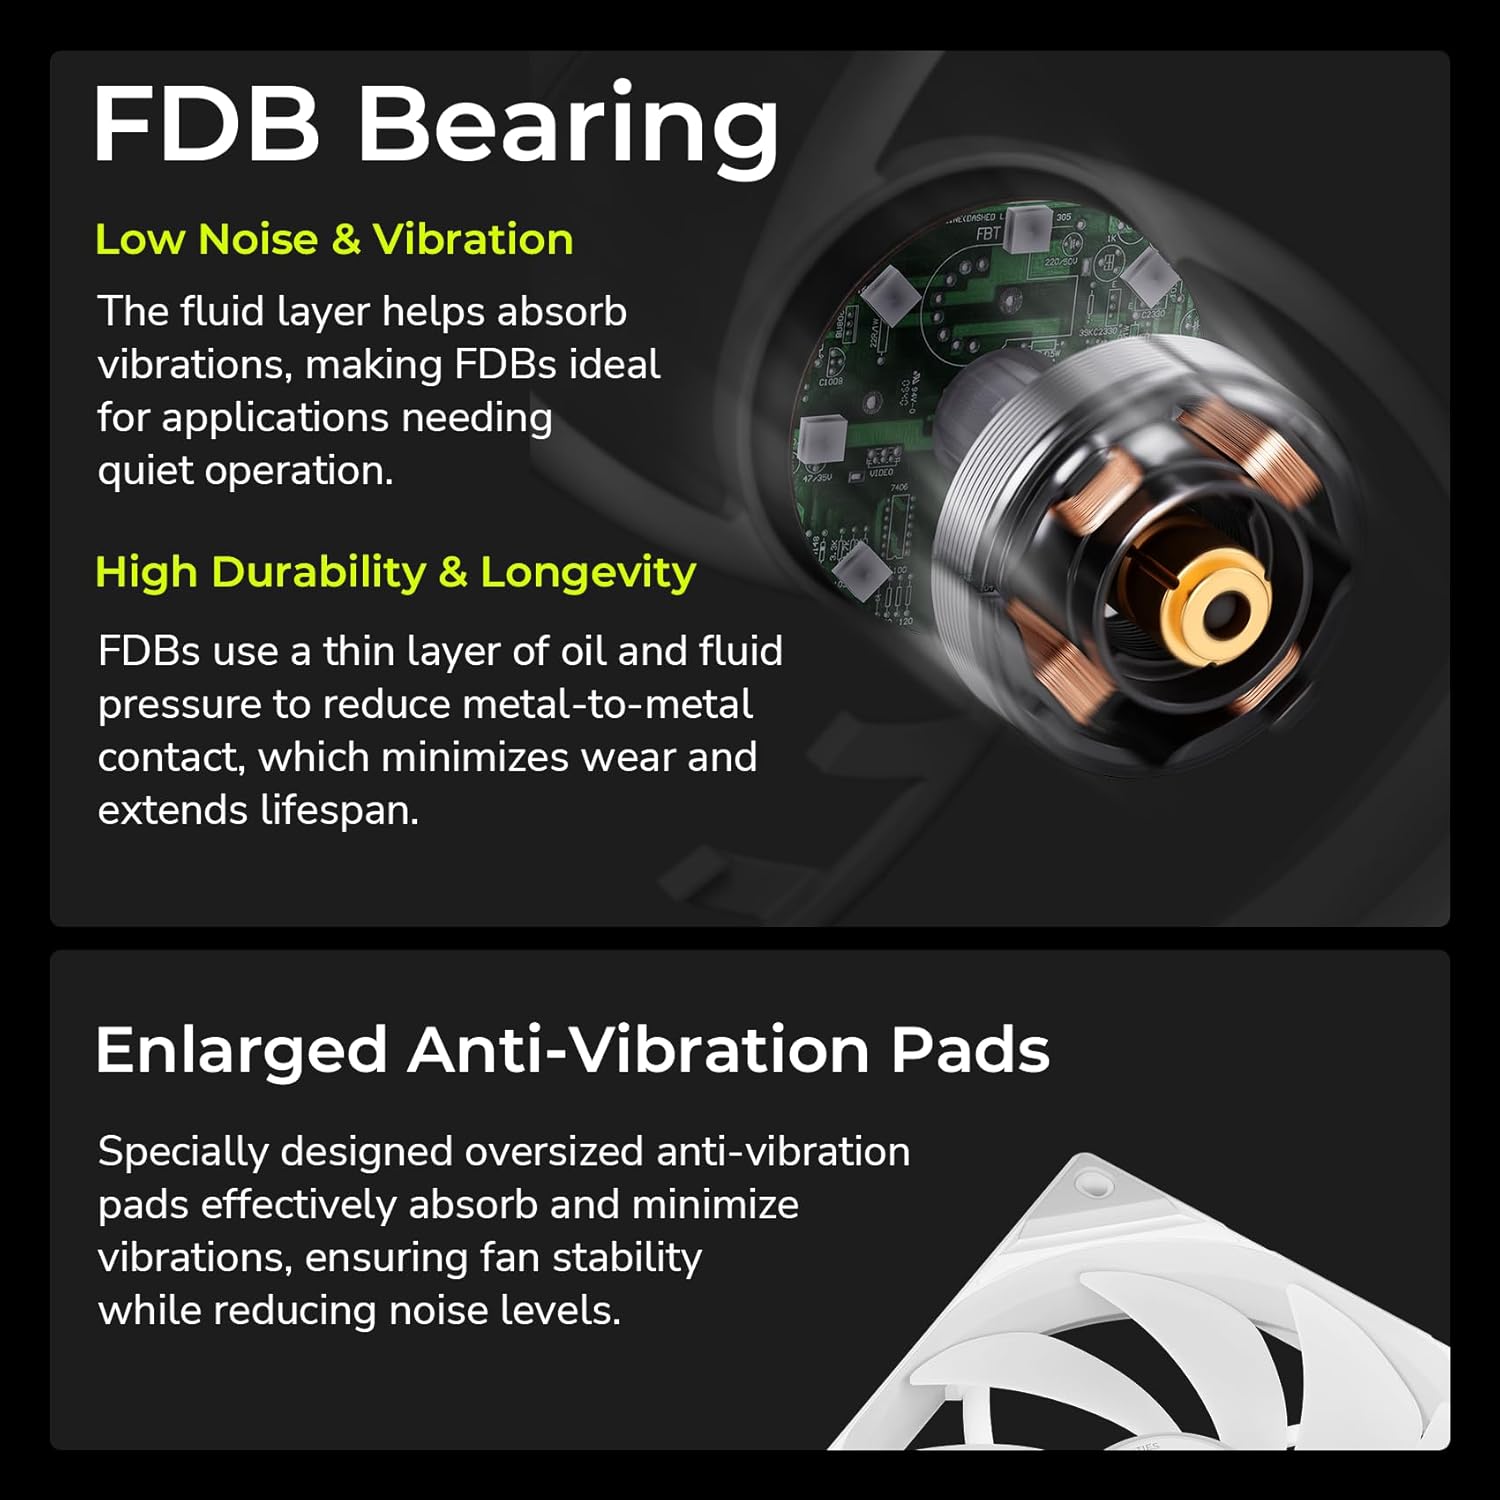
Image 7.2: Explanation of Fluid Dynamic Bearing (FDB) technology and enlarged anti-vibration pads for quiet and durable operation.
8. Warranty and Support
For warranty information, please refer to the official TRYX website or contact your retailer.
The KANALI software includes a built-in support window for direct assistance. Ensure you have the latest version of the KANALI software installed for access to this feature.

Image 8.1: The built-in support window within the KANALI software for user assistance.


