1. Introduction
This user manual provides comprehensive instructions for the setup, operation, maintenance, and troubleshooting of your KOORUI 27" 4K QD-Mini LED Gaming Monitor (Model S2741LM). Please read this manual thoroughly before using the product to ensure proper functionality and to maximize your gaming and viewing experience.

Figure 1.1: Front view of the KOORUI 27" 4K QD-Mini LED Gaming Monitor.
2. Key Features
- Stunning Visual Fidelity: Experience cinematic clarity with 1152 individually controlled Mini LED zones and 3840×2160 resolution. Features 300,000:1 static contrast and VESA DisplayHDR 1400 certification for deep blacks and dazzling highlights.
- One-click Dual-Mode Gaming Dominance: Seamlessly switch between 4K@160Hz for high-resolution gaming or FHD@320Hz for competitive esports. Equipped with 1ms response time and Adaptive Sync Premium to eliminate tearing and ensure smooth visuals.
- Professional Color Accuracy: Factory-calibrated with ΔE=0.55, ensuring accuracy across 98% DCI-P3 (movies), 99% Adobe RGB (design), and 100% sRGB color spaces. Ideal for content creation and gaming requiring true-to-life colors.
- Ergonomic Freedom: The fully adjustable stand offers 130mm height adjustment, ±90° swivel, tilt, and 100×100mm VESA compatibility, allowing for optimal viewing comfort.
- Ultimate Connectivity: Features 2x HDMI 2.1 (48Gbps) for 4K 160Hz console gaming, 1x DisplayPort 1.4 for PC 2K 200Hz, 2x USB-A + 1x USB-B hubs for peripherals, and a 90W Type-C port for charging and 4K video transmission.

Figure 2.1: Overview of key gaming features including Adaptive Sync, Crosshair, Refresh Rate, and Display Mode.

Figure 2.2: Illustrates the monitor's ability to switch between UHD 160Hz for stunning visuals and FHD 320Hz for ultra-smooth performance.
3. Setup Instructions
3.1 Package Contents
Before proceeding with the setup, please verify that all items are present in the package:
- KOORUI 27" 4K QD-Mini LED Gaming Monitor
- Monitor Stand (Base and Neck)
- Power Cable
- HDMI Cable
- DisplayPort Cable
- USB-B to USB-A Cable
- User Manual (this document)
- Screws for stand assembly (if applicable)
3.2 Assembling the Stand
- Carefully remove the monitor and stand components from the packaging. Place the monitor face down on a soft, clean surface to prevent scratches.
- Attach the stand neck to the monitor's VESA mounting area. Secure it with the provided screws.
- Connect the stand base to the stand neck. Tighten the thumb screw or screws at the bottom of the base to secure it firmly.
- Carefully lift the assembled monitor and place it on a stable, flat surface.
3.3 Connecting Cables
Refer to the port diagram below for connection points.

Figure 3.1: Rear view of the monitor showing dimensions and available ports.
- Power Connection: Connect the power cable to the monitor's power input and then to a power outlet.
- Video Input:
- For 4K 160Hz, use an HDMI 2.1 cable to connect to your console or PC.
- For 2K 200Hz (PC), use a DisplayPort 1.4 cable to connect to your PC.
- For 4K video and 90W charging from a compatible laptop/device, use a USB Type-C cable.
- USB Hub: Connect the USB-B to USB-A cable from the monitor to your computer to enable the monitor's USB-A ports for peripherals.
- Audio Output: Connect headphones or external speakers to the 3.5mm audio jack if desired.
3.4 Initial Power On
Press the power button located on the monitor (usually at the back or bottom right). The monitor will power on and display the input source. If no signal is detected, ensure your source device is on and correctly connected.
4. Operating the Monitor
4.1 On-Screen Display (OSD) Navigation
The monitor features a joystick or button controls, typically located on the back or bottom, to navigate the OSD menu. Press the joystick/button to open the OSD menu. Use the joystick to move up/down/left/right to select options and confirm choices.
4.2 Picture Settings
Within the OSD, you can adjust various picture settings:
- Brightness/Contrast: Adjust the overall luminance and contrast ratio.
- Color Temperature: Select predefined color temperatures (e.g., Warm, Cool, User) or customize RGB values.
- Gamma: Adjust gamma correction for image brightness and contrast.
- HDR Mode: Enable or disable HDR (High Dynamic Range) settings.
- Picture Mode: Choose from various preset modes (e.g., Standard, Game, Movie, Text) optimized for different content.
4.3 Gaming Features
- Refresh Rate: The monitor supports 160Hz at 4K UHD and 320Hz at FHD. This can be set via your connected device's display settings.
- Response Time: The 1ms response time is inherent to the panel. Overdrive settings may be available in the OSD to further optimize.
- Adaptive Sync Premium: Enable this feature in the OSD to synchronize the monitor's refresh rate with your GPU's frame rate, eliminating screen tearing and stuttering.
- Dual-Mode Switching: The monitor supports a "One-click Dual-Mode" for quick switching between 4K@160Hz and FHD@320Hz. Refer to the OSD for this specific function.
- Crosshair/Display Mode: Some monitors offer on-screen crosshairs or specific display modes (e.g., FPS, RTS) for gaming. Check your OSD for these options.

Figure 4.1: Demonstrates the visual improvement with Adaptive Sync technology enabled, eliminating screen tearing and stutter.
4.4 Input Source Selection
Use the OSD menu to manually select the desired input source (HDMI 1, HDMI 2, DisplayPort, Type-C). The monitor may automatically detect an active input, but manual selection is useful when multiple sources are connected.
4.5 Ergonomic Adjustments
The monitor stand allows for various adjustments to optimize your viewing comfort:
- Height Adjustment: Adjust the monitor's height by gently pushing or pulling the monitor up or down along the stand.
- Swivel: Rotate the monitor horizontally (left/right) on its base.
- Tilt: Adjust the monitor's vertical angle (forward/backward).
- Pivot: Rotate the monitor 90 degrees for portrait mode (if supported by the stand and your graphics card settings).
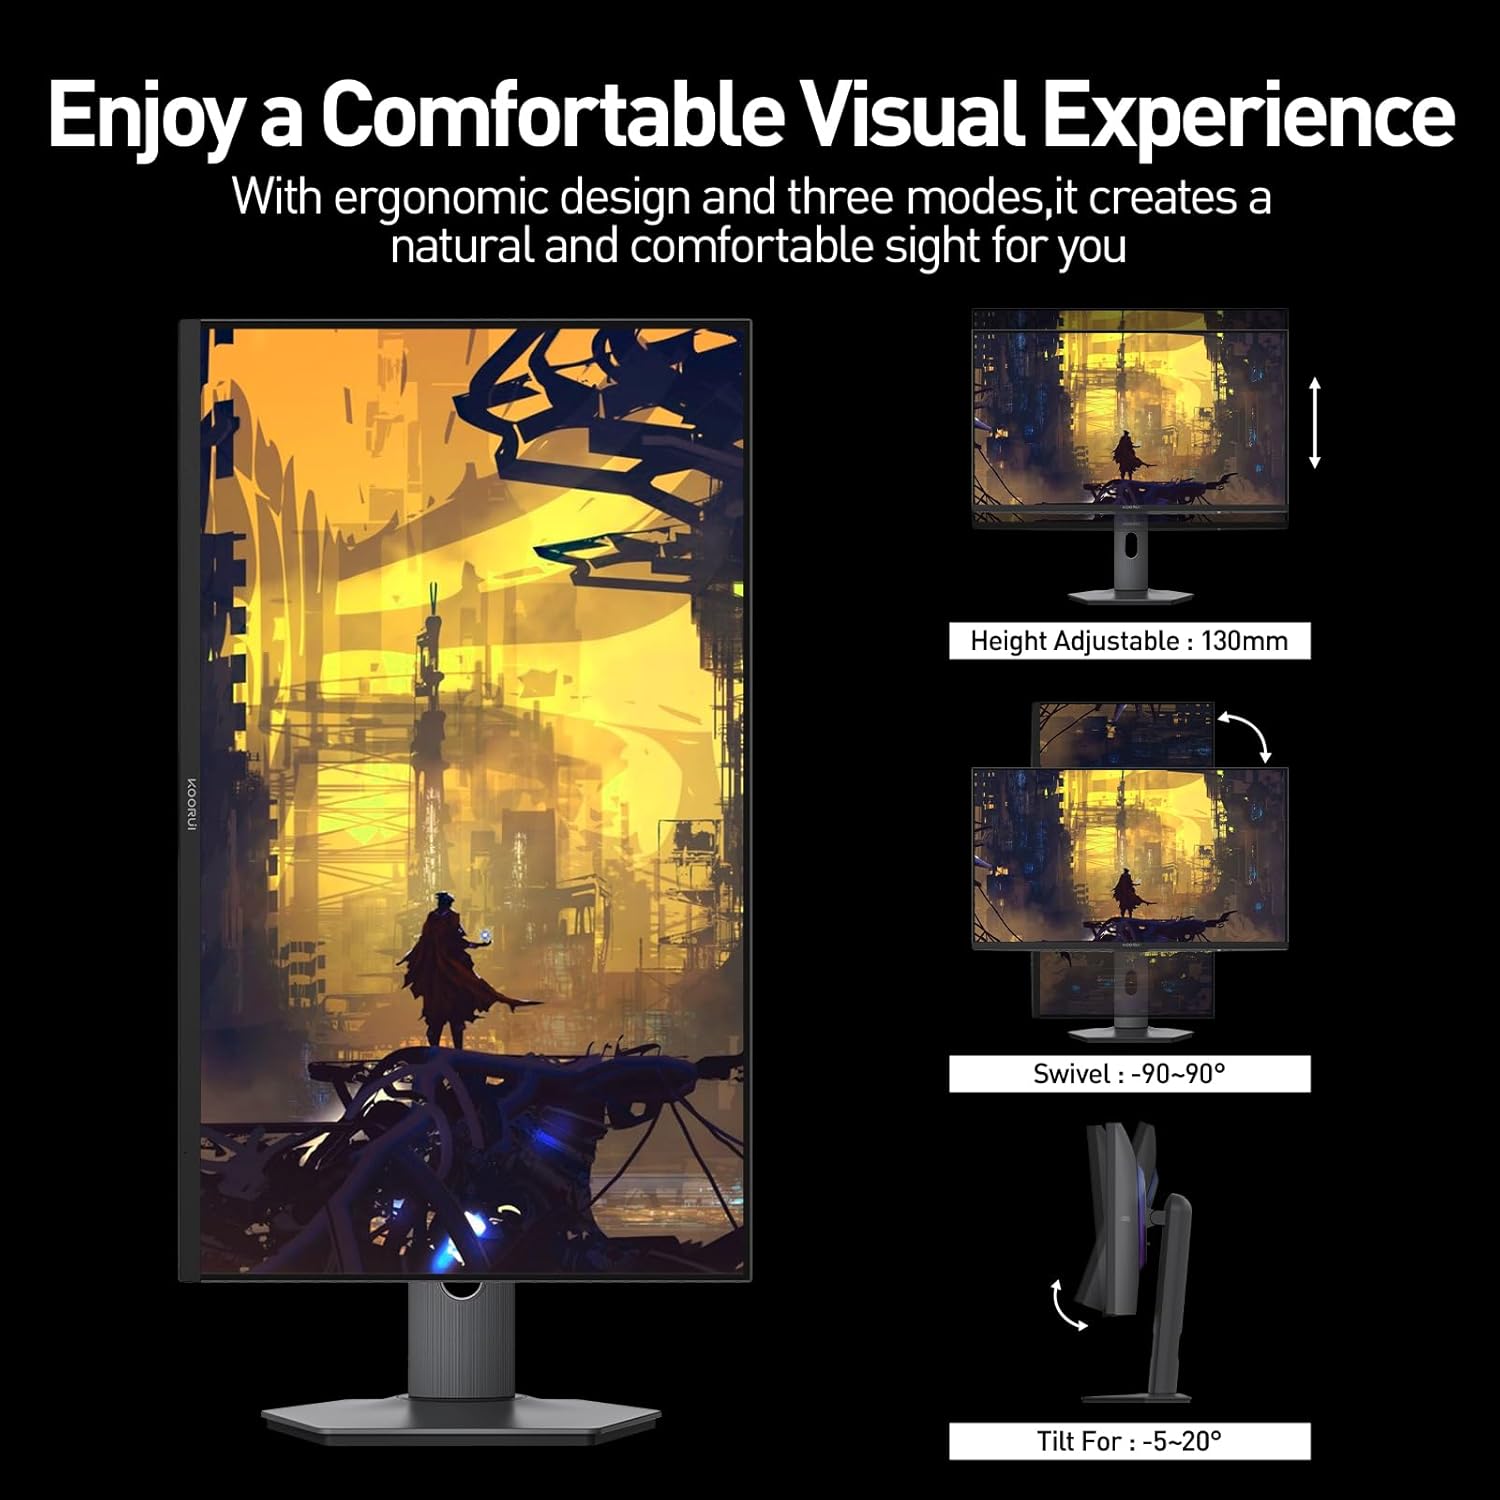
Figure 4.2: Illustrates the height, swivel, and tilt adjustments available with the ergonomic stand.
5. Maintenance
5.1 Cleaning the Monitor
- Always power off the monitor and unplug the power cable before cleaning.
- Use a soft, lint-free cloth (microfiber is recommended) to gently wipe the screen. For stubborn smudges, lightly dampen the cloth with water or a non-ammonia, non-alcohol based screen cleaner. Do not spray cleaner directly onto the screen.
- Wipe the monitor casing with a soft, dry cloth. Avoid using abrasive cleaners or solvents.
5.2 Storage
If storing the monitor for an extended period, disconnect all cables and pack it in its original packaging or a suitable protective box to prevent dust accumulation and physical damage. Store in a cool, dry place.
6. Troubleshooting
| Problem | Possible Cause | Solution |
|---|---|---|
| No power / Power LED off | Power cable disconnected; Power outlet issue. | Ensure power cable is securely connected to monitor and outlet. Test outlet with another device. |
| No signal / "No Input" message | Incorrect input source selected; Video cable disconnected; Source device off. | Select correct input source via OSD. Check video cable connections. Ensure source device (PC/console) is powered on. |
| Flickering or distorted image | Loose video cable; Incorrect resolution/refresh rate; Graphics driver issue. | Reseat video cable. Adjust resolution/refresh rate in source device settings. Update graphics drivers. |
| Adaptive Sync not working | Feature not enabled; Incompatible GPU/driver; Cable issue. | Enable Adaptive Sync in monitor OSD and graphics card control panel. Ensure GPU supports Adaptive Sync. Use a certified DisplayPort or HDMI 2.1 cable. |
| Dead pixel(s) | Manufacturing defect. | Refer to KOORUI's pixel policy. Minor pixel anomalies are common in LCD/LED panels and may not be covered under warranty. |
7. Specifications
| Feature | Detail |
|---|---|
| Brand | KOORUI |
| Model Number | S2741LM |
| Screen Size | 27 Inches |
| Panel Type | QD-Mini LED |
| Resolution | 3840 x 2160 (4K UHD) |
| Aspect Ratio | 16:9 |
| Refresh Rate | 160Hz (UHD), 320Hz (FHD) |
| Response Time | 1ms |
| Color Gamut | 98% DCI-P3, 99% Adobe RGB, 100% sRGB |
| HDR Support | VESA DisplayHDR 1400 |
| Contrast Ratio | 300,000:1 (Static) |
| Connectivity | 2x HDMI 2.1, 1x DisplayPort 1.4, 1x USB Type-C (90W PD), 2x USB-A, 1x USB-B, 1x Audio Out |
| Ergonomics | Height, Swivel, Tilt Adjustable; VESA 100x100mm |
| Product Dimensions | 21 x 11 x 14 inches |
| Item Weight | 22.2 pounds |
| Screen Surface | Matte |
8. Warranty and Support
KOORUI products are designed and manufactured to the highest quality standards. For information regarding warranty coverage, technical support, or service inquiries, please refer to the warranty card included with your product or visit the official KOORUI website. Please have your model number (S2741LM) and purchase information ready when contacting support.
For the latest support information and FAQs, you may also visit the KOORUI store on Amazon: KOORUI Amazon Store.


