1. Introduction
The Thermaltake AW420 Liquid Cooler is an all-in-one (AIO) liquid cooling solution engineered for high-performance workstation processors. It is compatible with Intel LGA 4677 and AMD sTR5/SP6 platforms, providing efficient thermal management for demanding tasks such as 3D rendering and AI computing. This cooler features a 420mm radiator, three 140mm TOUGHFAN PROs, and a nickel-plated copper water block for optimal heat dissipation.

Image 1.1: Overview of the Thermaltake AW420 AIO Liquid Cooler.
The AW420 is designed for reliability and quiet operation, integrating the pump into the radiator to minimize noise. Its all-black aesthetic ensures it blends seamlessly into various workstation and conventional chassis designs.
2. Safety Information
Please read and understand all safety instructions before installing or operating the Thermaltake AW420 Liquid Cooler. Failure to follow these instructions may result in product damage, personal injury, or voiding your warranty.
- Electrical Safety: Ensure your system is powered off and unplugged from the wall outlet before installation. Avoid contact with electrical components while the system is powered.
- Liquid Handling: The cooler contains a sealed liquid loop. Do not attempt to open or modify the cooler, as this may cause leaks and damage to your system.
- Static Discharge: Always ground yourself before handling internal PC components to prevent electrostatic discharge (ESD) damage.
- Sharp Edges: Be cautious of sharp edges on computer cases and cooler components during installation.
- Ventilation: Ensure adequate airflow within your PC case to prevent overheating.
- Children and Pets: Keep packaging materials and small components away from children and pets.
3. Package Contents
Verify that all components are present in your package before beginning installation:
- Thermaltake AW420 AIO Liquid Cooler (Radiator with integrated pump, tubing, and water block)
- 3 x 140mm TOUGHFAN PRO PWM Fans
- Mounting hardware for Intel LGA 4677 sockets
- Mounting hardware for AMD sTR5/SP6 sockets
- Thermal paste (pre-applied or in a tube)
- Fan splitter cable (if applicable)
- User Manual (this document)

Image 3.1: The AW420 radiator with three 140mm TOUGHFAN PRO fans.
4. Setup and Installation
This section outlines the general steps for installing your Thermaltake AW420 Liquid Cooler. Specific motherboard and case layouts may vary, so always refer to your motherboard and PC case manuals for detailed instructions.
4.1. Prepare Your System
- Power off your computer and unplug it from the power outlet.
- Open your PC case and remove any existing CPU cooler. Clean any old thermal paste from the CPU surface using isopropyl alcohol.
4.2. Install Radiator and Fans
- Attach the three 140mm TOUGHFAN PROs to the 420mm radiator using the provided screws. Ensure the fan airflow direction is appropriate for your case (typically exhausting air out of the case).
- Mount the assembled radiator and fans to an available 420mm mounting location in your PC case (e.g., top, front). Secure with the appropriate screws.

Image 4.1: AW420 Liquid Cooler installed in a typical PC case configuration.
4.3. Install Water Block
- Select the correct mounting brackets for your CPU socket (Intel LGA 4677 or AMD sTR5/SP6).
- Attach the chosen brackets to the water block.
- If thermal paste is not pre-applied, apply a small amount (pea-sized dot) to the center of your CPU's integrated heat spreader (IHS).
- Carefully place the water block onto the CPU, aligning it with the mounting holes.
- Secure the water block to the motherboard using the provided screws, tightening them in a diagonal pattern until snug. Do not overtighten.

Image 4.2: Mounting hardware for Intel LGA 4677 and AMD sTR5/SP6 sockets.

Image 4.3: Detail of the water block base and tubing connections.
4.4. Connect Cables
- Connect the 4-pin PWM fan cables from the TOUGHFAN PROs to your motherboard's CPU_FAN or AIO_PUMP headers, or use the provided fan splitter cable if necessary.
- Connect the pump's power cable (typically a 4-pin connector) to a dedicated AIO_PUMP or CPU_OPT header on your motherboard. Ensure the pump receives full power for optimal performance.
4.5. Final Checks
- Double-check all connections and ensure no cables are interfering with fan blades or other components.
- Close your PC case.
- Reconnect power and boot your system. Monitor CPU temperatures during initial operation.
5. Operating Instructions
The Thermaltake AW420 Liquid Cooler operates automatically once installed and connected correctly. The TOUGHFAN PROs utilize PWM (Pulse Width Modulation) control, allowing your motherboard to dynamically adjust fan speeds based on CPU temperature, optimizing for both cooling performance and noise levels.
- Fan Control: Fan speeds range from 500 to 2000 RPM. You can typically adjust fan curves in your motherboard's BIOS/UEFI settings or through motherboard utility software to customize performance.
- Pump Operation: The integrated pump operates at up to 4000 RPM, ensuring consistent coolant circulation. It is recommended to set the pump header to run at 100% speed in your BIOS/UEFI for optimal cooling performance and longevity.

Image 5.1: TOUGHFAN PROs designed for high static pressure and airflow.
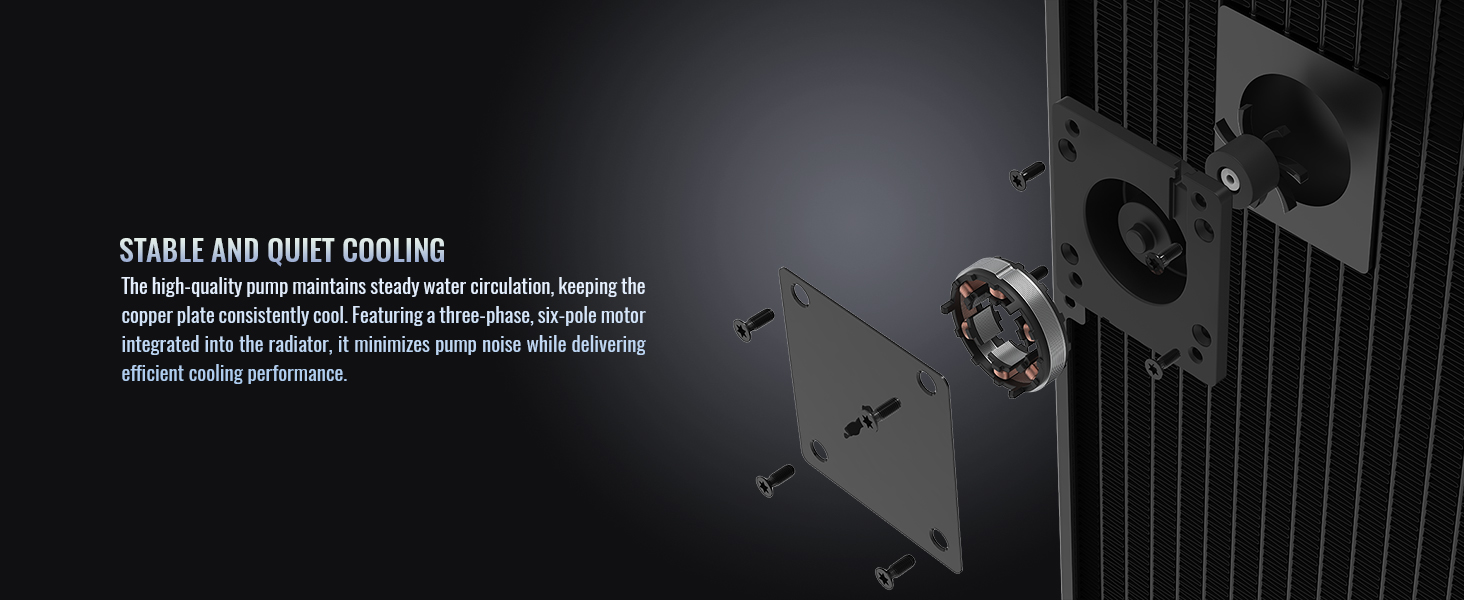
Image 5.2: Internal view of the radiator-integrated pump for stable and quiet cooling.
6. Maintenance
The Thermaltake AW420 Liquid Cooler is a closed-loop system, requiring minimal maintenance. However, periodic cleaning can help maintain optimal performance.
- Dust Removal: Every 3-6 months, or as needed, power off your system and use compressed air to clean dust from the radiator fins and fan blades. Ensure fans are held stationary while cleaning to prevent damage.
- Visual Inspection: Periodically inspect the tubing and connections for any signs of wear, kinks, or leaks. While rare in AIOs, early detection can prevent potential issues.
- Thermal Paste: The thermal paste applied between the water block and CPU typically lasts for several years. If you notice a significant increase in CPU temperatures over time, consider reapplying fresh thermal paste.
7. Troubleshooting
If you encounter issues with your Thermaltake AW420 Liquid Cooler, refer to the following common troubleshooting steps:
- High CPU Temperatures:
- Ensure the water block is securely mounted and making good contact with the CPU.
- Verify that the pump is running (you may feel a slight vibration or hear a faint hum). Check its power connection.
- Confirm that all fans are spinning and connected correctly.
- Clean any dust buildup from the radiator fins.
- Check BIOS/UEFI settings to ensure fan and pump speeds are set appropriately.
- Excessive Noise:
- Identify if the noise is coming from the fans or the pump.
- For fan noise, adjust fan curves in BIOS/UEFI to lower RPMs at idle or low loads.
- Ensure no cables are hitting fan blades.
- If pump noise is excessive, ensure the pump is receiving stable power. Slight gurgling sounds upon initial startup are normal as air bubbles settle.
- No Power/Fans Not Spinning:
- Check all power connections to the fans and pump.
- Ensure the motherboard headers are enabled and configured correctly in BIOS/UEFI.
If problems persist, please contact Thermaltake customer support.
8. Specifications

Image 8.1: Underside view of the AW420 radiator.
| Feature | Detail |
|---|---|
| Brand | Thermaltake |
| Model Number | CL-W445-PL14BL-A |
| Cooling Method | Liquid |
| Radiator Size | 420mm |
| Fan Type | 3 x 140mm TOUGHFAN PRO PWM |
| Fan Speed | 500~2000 RPM |
| Air Flow Capacity | 119.6 CFM |
| Static Pressure | 3.57 mm-H2O |
| Noise Level | 31.6 Decibels (Max) |
| Water Block Material | Nickel-Plated Copper |
| Pump Speed | Up to 4000 RPM |
| Power Connector Type | 4-Pin |
| Voltage | 12 Volts |
| Wattage | 16.56 watts |
| Compatible Devices | Desktop |
| CPU Socket Compatibility | Intel LGA 4677, AMD sTR5/SP6 |
9. Warranty Information
The Thermaltake AW420 Liquid Cooler comes with a 3-Year Manufacturer Warranty. This warranty covers defects in materials and workmanship under normal use. For specific terms and conditions, please refer to the warranty card included with your product or visit the official Thermaltake website.
Proof of purchase is required for all warranty claims.
10. Support
For technical assistance, warranty claims, or additional product information, please contact Thermaltake customer support through their official channels.
- Official Website: Visit the Thermaltake Store for support resources, FAQs, and contact information.
- Online Resources: Check the product page on the Thermaltake website for updated drivers, software, and additional guides.