Product Overview
The DEWENWILS Outdoor Motion Sensor Light Switch is a wireless kit designed to automate lighting based on motion detection. It consists of a detachable motion sensor and a receiver, offering flexible installation and control for various outdoor and indoor lighting applications. This system is ideal for enhancing convenience and energy efficiency in areas such as patios, garages, driveways, and porches.
Key features include a wide 240° sensing angle, up to 50ft detection range, adjustable sensing modes (PIR, NTM, D2D, RND), and an IP65 weatherproof rating for the sensor. The system operates wirelessly, eliminating the need for complex wiring, and offers an adjustable auto-off delay for energy saving.

Image: The DEWENWILS Outdoor Motion Sensor Light Switch kit, showing the motion sensor unit and the wired receiver module.
Package Contents
Upon opening the package, verify that all components are present and undamaged.
- 1 x Wireless Motion Sensor (Transmitter)
- 1 x Receiver Module
- Mounting Screws and Anchors
- Instruction Manual (this document)
Note: 3 x AAA batteries for the motion sensor are not included and must be purchased separately.
Specifications
| Parameter | Value |
|---|---|
| Model Number | WLS01+MST01 |
| Operating Voltage | 120 Volts AC |
| Current Rating | 15 Amps / 1875 Watts (Max) |
| Motion Sensor Detection Range | Up to 50 ft (adjustable 10-60 ft) |
| Motion Sensor Sensing Angle | 240° (160° vertical, 180° horizontal adjustable) |
| Wireless RF Range | Up to 100 ft (line of sight) |
| Time Delay Adjustment | 10 seconds to 30 minutes |
| Motion Sensor Power Source | 3 x AAA Batteries (not included) |
| Receiver Power Source | AC 100-125V |
| IP Rating (Sensor & Receiver) | IP65 Weatherproof |
| Material | Plastic |
| Dimensions (Product) | 6.1 x 4.53 x 3.54 inches |
Safety Information
Please read and understand all safety instructions before installation and operation. Failure to follow these instructions may result in electric shock, fire, or serious injury.
- WARNING: To avoid fire, shock, or death, turn off power at the circuit breaker or fuse box and test that the power is off before wiring.
- Installation should be performed by a qualified electrician if you are unsure about electrical wiring.
- Do not exceed the maximum electrical ratings of 15 Amps or 1875 Watts.
- Ensure the motion sensor is installed in a location where it is protected from direct impact and extreme temperatures.
- Keep batteries out of reach of children. Dispose of used batteries properly according to local regulations.
Setup and Installation
1. Motion Sensor Battery Installation
- Rotate the battery cover at the bottom of the motion sensor to "unlock" and remove it.
- Take out the black battery holder. Insert 3 new AAA NiMH batteries into the holder, ensuring correct polarity (+/-).
- Insert the loaded battery holder back into the battery box.
- Insert the battery cover and rotate it to "lock".

Image: Step-by-step guide for installing AAA batteries into the motion sensor unit.
2. Motion Sensor Mounting
The motion sensor can be mounted on a wall or other suitable surface using the included bracket and screws. Choose a location that provides the desired detection coverage and is within 100 feet of the receiver.
- Use the included screws to secure the transmitter mounting bracket to the desired location.
- Install the sensor onto the fixed bracket.
- Adjust the sensor's angle:
- Vertically: Adjust the sensor up and down (up to 160°) to cover the required detection area.
- Horizontally: Adjust the sensor left and right (up to 180°) to fine-tune the detection zone.

Image: Visual guide demonstrating how to mount the motion sensor and adjust its vertical and horizontal angles for optimal coverage.

Image: Detailed steps for securing the mounting bracket and attaching the sensor, including angle adjustment.
3. Receiver Wiring and Installation
The receiver module connects between your power source (AC 100-125V) and the lighting fixture you wish to control. It is compatible with standard weatherproof or electrical junction boxes.
- Turn off power at the circuit breaker before beginning any wiring.
- Connect the receiver's wires as follows:
- Black wire (L) from receiver to Live (L) wire from power input.
- White wire (N) from receiver to Neutral (N) wire from power input.
- Red wire (L) from receiver to Live (L) wire of the lighting fixture.
- Blue wire (N) from receiver to Neutral (N) wire of the lighting fixture.
- Ensure proper grounding if applicable (Green wire from power input to ground).
- Secure the receiver within a suitable junction box, ensuring all connections are tight and insulated.
- Once wiring is complete, restore power at the circuit breaker.

Image: Diagram illustrating the wiring connections for the receiver module, showing input from power and output to light fixtures, along with product dimensions.

Image: A detailed diagram showing how to install the DEWENWILS receiver between the power source and the lighting fixture, highlighting the maximum power rating.
Operating Instructions
The motion sensor features several adjustable settings to customize its operation.
Adjustable Knobs on Motion Sensor

Image: Close-up view of the motion sensor unit, highlighting the Function knob switch, Delay knob switch, and Sensitivity knob switch.
- Function Knob Switch: Selects the operating mode.
- Delay Knob Switch: Adjusts the time the light stays on after motion is detected.
- Sensitivity Knob Switch: Adjusts the detection range of the motion sensor.
Operating Modes
The motion sensor offers four distinct operating modes, selectable via the Function knob:
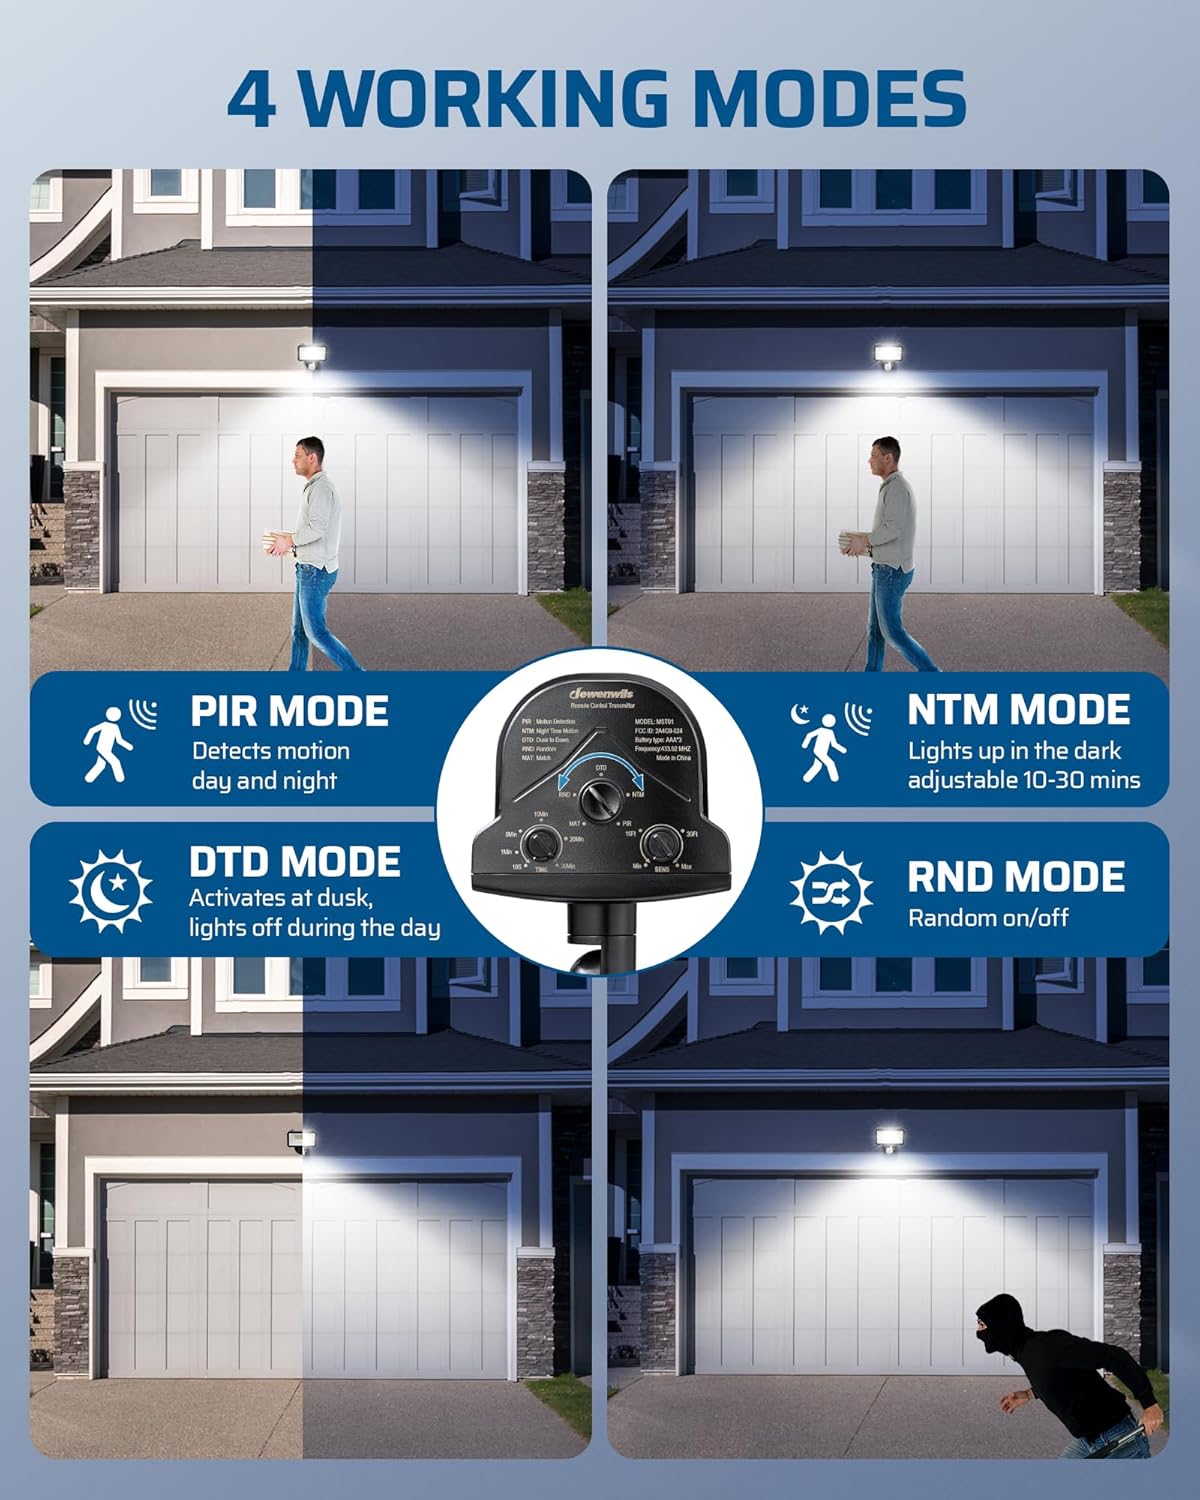
Image: Visual representation of the four operating modes: PIR (motion detection day and night), NTM (lights up in the dark, adjustable 10-30 mins), D2D (activates at dusk, lights off during the day), and RND (random on/off).
- PIR Mode (Motion Detection):
In this mode, the sensor detects motion both during the day and at night. The light will turn on when motion is detected and stay on for the set delay time.

Image: Illustration of PIR mode, showing the sensor detecting movement during both day and night, activating the light.
- NTM Mode (Night Time Motion):
The sensor detects activity when the ambient light reaches a certain activation brightness in the evening. The light will only turn on with motion detection during low-light conditions and stay on for the set delay time (adjustable 10-30 minutes).

Image: Illustration of NTM mode, where the sensor activates lights based on motion only during night time or low-light conditions.
- D2D Mode (Dusk to Dawn):
In this mode, the product stays off during the day and automatically turns on when it detects sufficient darkness at dusk. The light will remain on until dawn, regardless of motion.

Image: Illustration of D2D mode, showing the light off during the day and automatically turning on at dusk.
- RND Mode (Random On/Off):
This mode provides a random on/off function, simulating occupancy for security purposes. The light will turn on and off at irregular intervals.

Image: Illustration of RND mode, depicting the light turning on and off randomly, useful for deterring intruders.
Adjusting Detection Range and Time Delay

Image: Diagram showing the adjustable sensing range (10-60ft), the four sensing modes, and the adjustable motion status delay (10s to 30min).
- Sensing Range (Sensitivity Knob): Rotate the sensitivity knob to adjust the detection range from 10 feet to 60 feet. A higher setting increases the detection distance.
- Time Delay (Delay Knob): Rotate the delay knob to set how long the light remains on after motion is no longer detected. Options typically range from 10 seconds to 30 minutes. This feature helps conserve energy.
Maintenance
- Cleaning: Periodically wipe the motion sensor lens and housing with a soft, damp cloth to remove dust and debris. Do not use abrasive cleaners or solvents.
- Battery Replacement: When the motion sensor's performance degrades (e.g., reduced detection range or inconsistent operation), replace the 3 AAA batteries. Always use fresh, high-quality batteries.
- Inspection: Regularly inspect the wiring connections of the receiver for any signs of wear, corrosion, or damage. Ensure the sensor's mounting is secure.
- Weather Protection: Although the sensor and receiver are IP65 weatherproof, ensure they are not submerged in water or exposed to extreme conditions beyond their rating.
Troubleshooting
| Problem | Possible Cause | Solution |
|---|---|---|
| Light does not turn on with motion. |
|
|
| Light stays on continuously. |
|
|
| Light turns on randomly. |
|
|
| Short detection range. |
|
|
Warranty and Support
DEWENWILS products are designed and manufactured to the highest quality standards. For warranty information, technical support, or customer service inquiries, please contact DEWENWILS directly.
Visit the official DEWENWILS store for more information: DEWENWILS Store
Please have your model number (WLS01+MST01) and purchase date available when contacting support.