1. Introduction
Thank you for choosing the ZZA 34-inch Ultrawide Curved Gaming Monitor. This manual provides essential information for setting up, operating, and maintaining your monitor. Please read this manual thoroughly before use to ensure proper functionality and to prevent damage.
This monitor features a 34-inch WQHD (3440x1440) curved display with a 1500R curvature, a 165Hz refresh rate, and a 1ms response time, designed to deliver an immersive gaming and viewing experience. It supports FreeSync and HDR10 for enhanced visual performance.
2. Safety Information
Observe the following safety precautions to ensure safe operation and prolong the life of your monitor:
- Do not expose the monitor to rain, moisture, or extreme temperatures.
- Ensure proper ventilation around the monitor. Do not block ventilation openings.
- Use only the power adapter supplied with the monitor.
- Avoid placing heavy objects on the power cord.
- Disconnect the power plug from the outlet if the monitor will not be used for an extended period.
- Do not attempt to service the monitor yourself. Refer all servicing to qualified personnel.
- Keep the monitor away from strong magnetic fields.
3. Package Contents
Please check the contents of your package. If any items are missing or damaged, contact your retailer.
- ZZA 34-inch Ultrawide Curved Gaming Monitor
- Monitor Stand (Base and Neck)
- Power Adapter and Power Cable
- HDMI Cable
- DisplayPort (DP) Cable
- User Manual (this document)
- Mounting Screws (for stand assembly)
4. Setup
4.1 Assembling the Stand
- Carefully remove the monitor from its packaging, keeping it protected on a soft, flat surface.
- Attach the stand neck to the monitor's rear panel. Ensure it clicks securely into place or is fastened with the provided screws.
- Connect the stand base to the stand neck, securing it with the thumb screw or screws provided.
- Place the assembled monitor on a stable, level desk.

Image: Rear view of the ZZA monitor, illustrating the stand attachment point and various input ports.
4.2 Wall Mounting (Optional)
The monitor supports VESA 75x75mm wall mounts. To wall mount the monitor:
- Remove the stand from the monitor if it is already attached.
- Attach your VESA-compatible wall mount bracket to the monitor using the appropriate screws.
- Follow the instructions provided with your wall mount for secure installation.
4.3 Connecting Cables
Connect the necessary cables to your monitor and computer:
- Power Cable: Connect the power adapter to the monitor's DC IN 12V port, then plug the power cable into a power outlet.
- Video Cable:
- For optimal performance (165Hz, WQHD), use the supplied DisplayPort (DP) cable to connect the monitor to your computer's graphics card.
- Alternatively, use an HDMI cable. Note that HDMI may support up to 100Hz at WQHD resolution, depending on the HDMI version.
- Audio Out: Connect external speakers or headphones to the 3.5mm Audio Out port if desired.

Image: Detailed view of the monitor's connectivity ports.
4.4 Initial Power On
After connecting all cables, press the power button on the monitor. The monitor should power on and display an image from your connected computer. If no image appears, ensure your computer is on and the correct input source is selected on the monitor.
5. Operating the Monitor
5.1 On-Screen Display (OSD) Controls
The monitor features intuitive OSD controls, typically located on the rear or bottom right of the monitor. These controls allow you to navigate menus and adjust settings.
- Power Button: Turns the monitor on or off.
- Joystick/Buttons: Used to navigate the OSD menu, select options, and confirm settings.
5.2 Adjusting Display Settings
Access the OSD menu to customize your viewing experience:
- Brightness/Contrast: Adjust the overall luminance and contrast levels.
- Color Settings: Modify color temperature, gamma, and individual RGB values.
- Input Source: Manually select between HDMI and DisplayPort inputs.
- Refresh Rate: Ensure your computer's display settings are configured to 165Hz for the smoothest experience. The monitor will automatically detect the highest supported refresh rate.
- FreeSync/Adaptive Sync: Enable this feature in the OSD and your graphics card settings to synchronize the monitor's refresh rate with your GPU's frame rate, reducing screen tearing and stuttering.
- HDR10: Enable HDR in the OSD and your operating system's display settings for compatible content.
- Eye Care Mode: Activate low blue light or flicker-free modes to reduce eye strain during prolonged use.

Image: Overview of the monitor's core features and specifications.
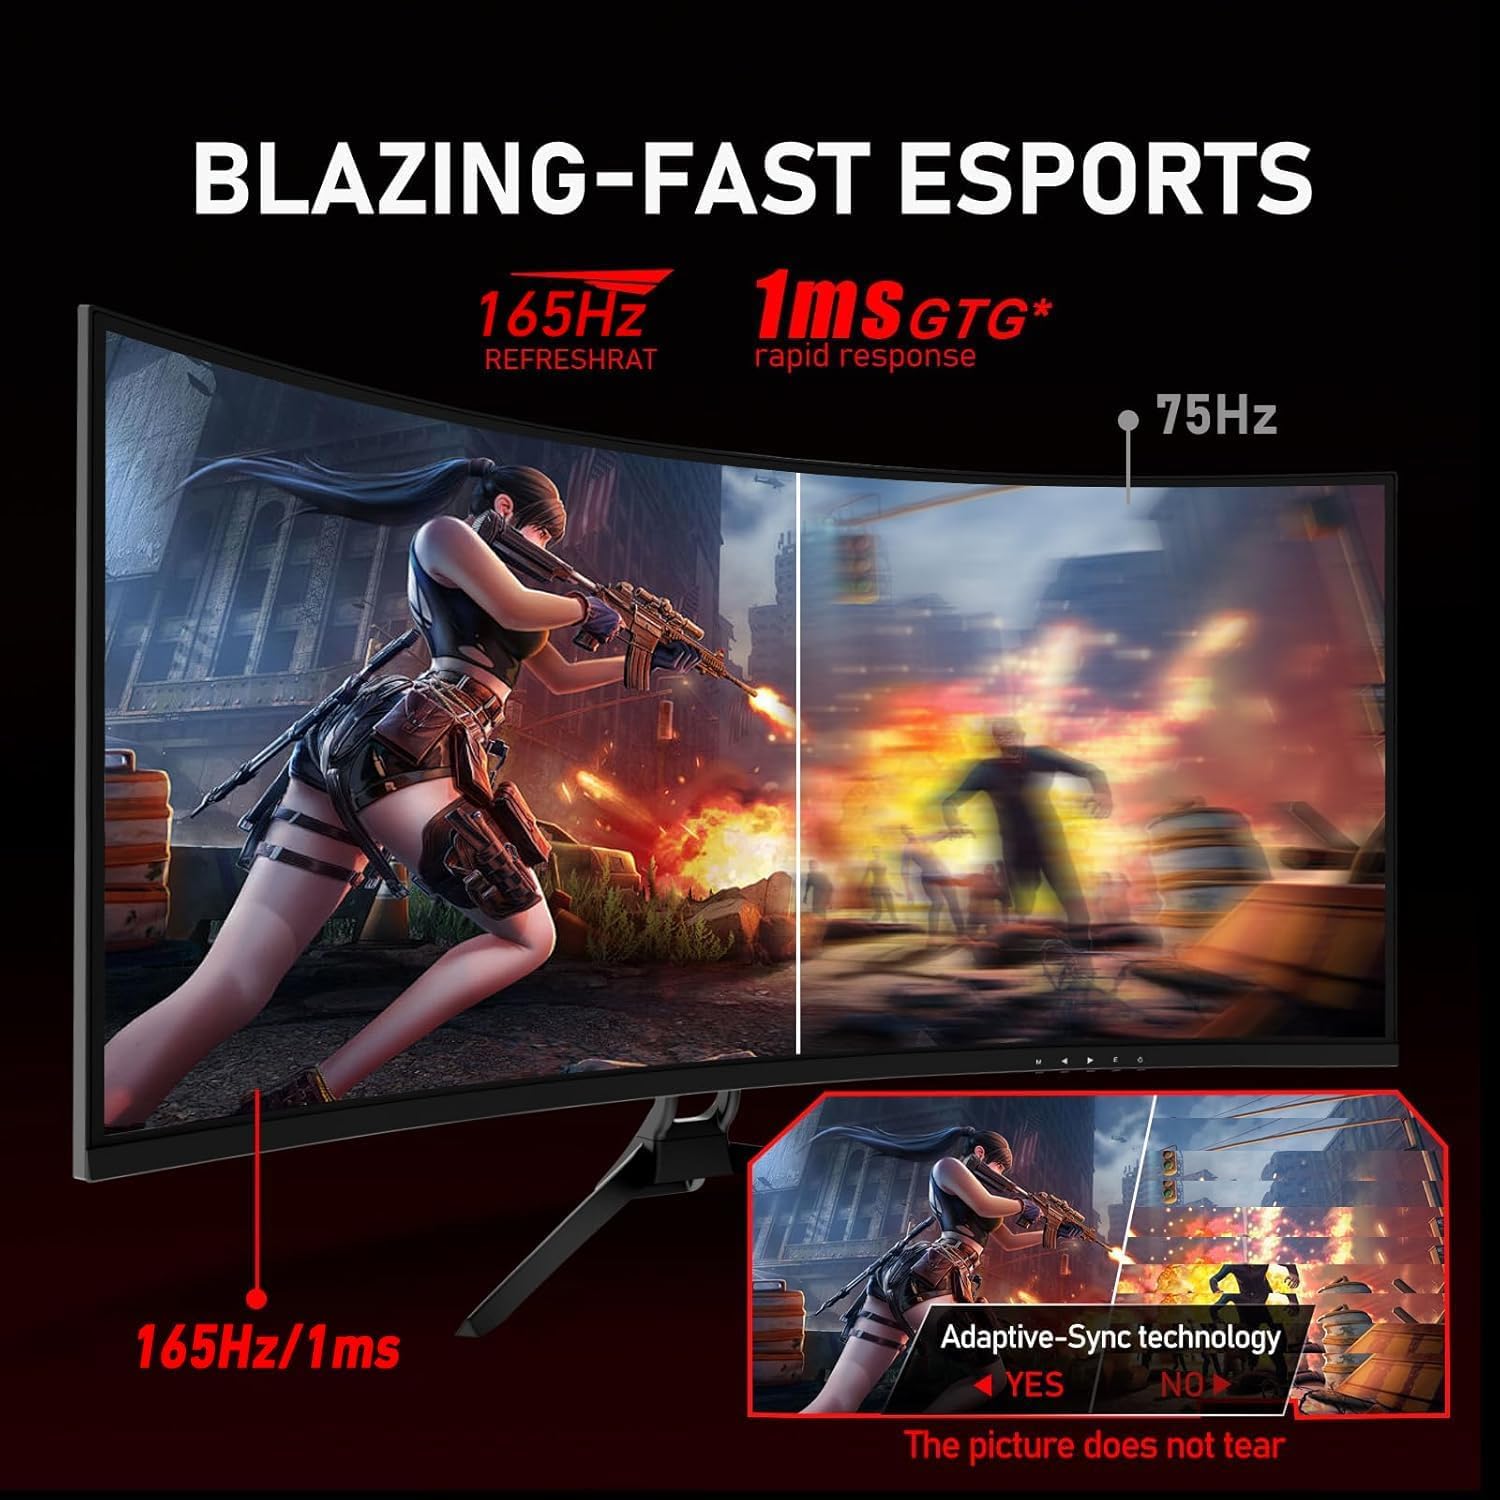
Image: Visual representation of the 165Hz refresh rate and 1ms response time benefits, including Adaptive-Sync.
6. Maintenance
6.1 Cleaning the Monitor
- Always unplug the monitor from the power outlet before cleaning.
- Use a soft, lint-free cloth lightly dampened with water or a mild, non-abrasive screen cleaner.
- Do not spray cleaner directly onto the screen. Apply it to the cloth first.
- Avoid using harsh chemicals, abrasive pads, or solvents, as these can damage the screen or casing.
7. Troubleshooting
If you encounter issues with your monitor, refer to the following common problems and solutions:
| Problem | Possible Cause / Solution |
|---|---|
| No Power |
|
| No Signal / Blank Screen |
|
| Flickering / Distorted Image |
|
| Incorrect Resolution / Aspect Ratio |
|
8. Specifications
Detailed technical specifications for the ZZA 34-inch Ultrawide Curved Gaming Monitor (Model Z34H):
| Feature | Description |
|---|---|
| Model Number | Z34H |
| Screen Size | 34 Inches |
| Panel Type | VA (Vertical Alignment) |
| Curvature | 1500R |
| Resolution | WQHD 3440x1440 |
| Aspect Ratio | 21:9 |
| Refresh Rate | 165Hz |
| Response Time | 1ms (GTG) |
| Brightness | 250 cd/m² (typical) |
| Contrast Ratio | 4000:1 (typical) |
| Color Support | 1.07 billion colors, 99% sRGB |
| HDR Support | HDR10 |
| Adaptive Sync | FreeSync compatible |
| Connectivity | 2x HDMI, 2x DisplayPort, 1x Audio Out, 1x DC IN 12V |
| VESA Mount Compatibility | 75x75mm |
| Tilt Angle | -5° to 20° |
| Product Dimensions (with stand) | 33 x 17 x 6 inches (approx.) |
| Item Weight | 14.82 pounds |

Image: Visual comparison of FHD and WQHD resolutions on the 34-inch ultrawide display.
9. Warranty Information
ZZA monitors are covered by a limited warranty from the date of purchase. This warranty covers manufacturing defects and workmanship under normal use. Please retain your proof of purchase for warranty claims.
The warranty does not cover damage caused by:
- Accident, misuse, abuse, neglect, or improper installation.
- Natural disasters or acts of God.
- Unauthorized repairs or modifications.
- Power surges or incorrect voltage application.
For specific warranty terms and conditions, please refer to the warranty card included with your product or visit the official ZZA website.
10. Customer Support
If you require further assistance or have questions not covered in this manual, please contact ZZA customer support:
- Email: support@zza.com (example email, please refer to actual product documentation for correct contact)
- Website: Visit the official ZZA website for FAQs, driver downloads, and additional support resources.
When contacting support, please have your monitor model number (Z34H) and purchase information ready.


