1. Introduction
The AUTOPHIX 5900P+ is an advanced diagnostic scan tool designed for BMW, MINI, and Rolls-Royce vehicles. It provides comprehensive system diagnostics and essential maintenance functions to help users identify and resolve vehicle issues efficiently. This manual provides detailed instructions for setting up, operating, and maintaining your device.
Key Features:
- All-System Diagnostics: Scans engine, ABS, airbags (SRS), transmission, and other key systems for early detection of problems.
- Essential Maintenance Functions: Includes oil service reset, Electronic Parking Brake (EPB) calibration, Condition Based Service (CBS) resets, and battery registration.
- Battery Registration: Critical for optimal charging and lifespan after new battery installation in compatible BMW vehicles.
- Universal OBD2 Compatibility: Functions as a standard OBD2 scanner for 12V vehicles (US after 1996, most European since 2002, Asian from 2008).
- User-Friendly Interface: Features a 2.4-inch TFT color LCD screen and intuitive menu navigation.
- Lifetime Free Updates: Ensures ongoing compatibility with new vehicle models and software enhancements.
2. Setup
2.1 Unboxing and Components
Upon opening the package, ensure all components are present:
- 1 x AUTOPHIX 5900P+ BMW Scanner
- 1 x Protective bag
- 1 x USB cable (for software updates and printing reports)
- 1 x User manual

Figure 2.1: The AUTOPHIX 5900P+ diagnostic tool, ready for use.
2.2 Connecting the Device to Your Vehicle
The AUTOPHIX 5900P+ connects to your vehicle's On-Board Diagnostics II (OBD2) port. This port is typically located under the dashboard on the driver's side.
- Locate the 16-pin OBD2 port in your vehicle.
- Plug the diagnostic tool's connector firmly into the OBD2 port.
- The device will power on automatically once connected to the vehicle's battery.

Figure 2.2: Connecting the AUTOPHIX 5900P+ to the vehicle's OBD2 port.
3. Operating Instructions
The AUTOPHIX 5900P+ features a user-friendly interface with a 2.4-inch TFT color LCD screen and navigation buttons. The main menu provides access to various diagnostic and service functions.
3.1 Main Menu Navigation
Use the directional buttons (up, down, left, right) to navigate through the menu options. Press the 'OK' button to confirm a selection and 'ESC' to return to the previous screen.
Video 3.1: Demonstration of the AUTOPHIX 5900P+ menu navigation and function selection, including OBDII diagnostics, BMW-specific functions, and various resets.
3.2 OBDII Functions (Universal)
For general vehicle diagnostics, select the 'OBDII' option from the main menu. This allows you to:
- Read/Clear Engine Error Codes: Quickly identify and clear Diagnostic Trouble Codes (DTCs) related to the Check Engine Light.
- Check I/M Readiness: Verify if your vehicle is ready for emissions testing.
- Monitor Live Sensor Data: View real-time data from various engine sensors.
- Test Battery Voltage: Assess the current voltage of your vehicle's battery.

Figure 3.1: The AUTOPHIX 5900P+ screen showing various advanced OBD2 functions.
3.3 BMW/MINI/Rolls-Royce Specific Diagnostics
Select 'For BMW' from the main menu to access advanced diagnostic functions tailored for BMW Group vehicles. The tool will guide you through selecting the vehicle series and chassis to perform a full system scan.
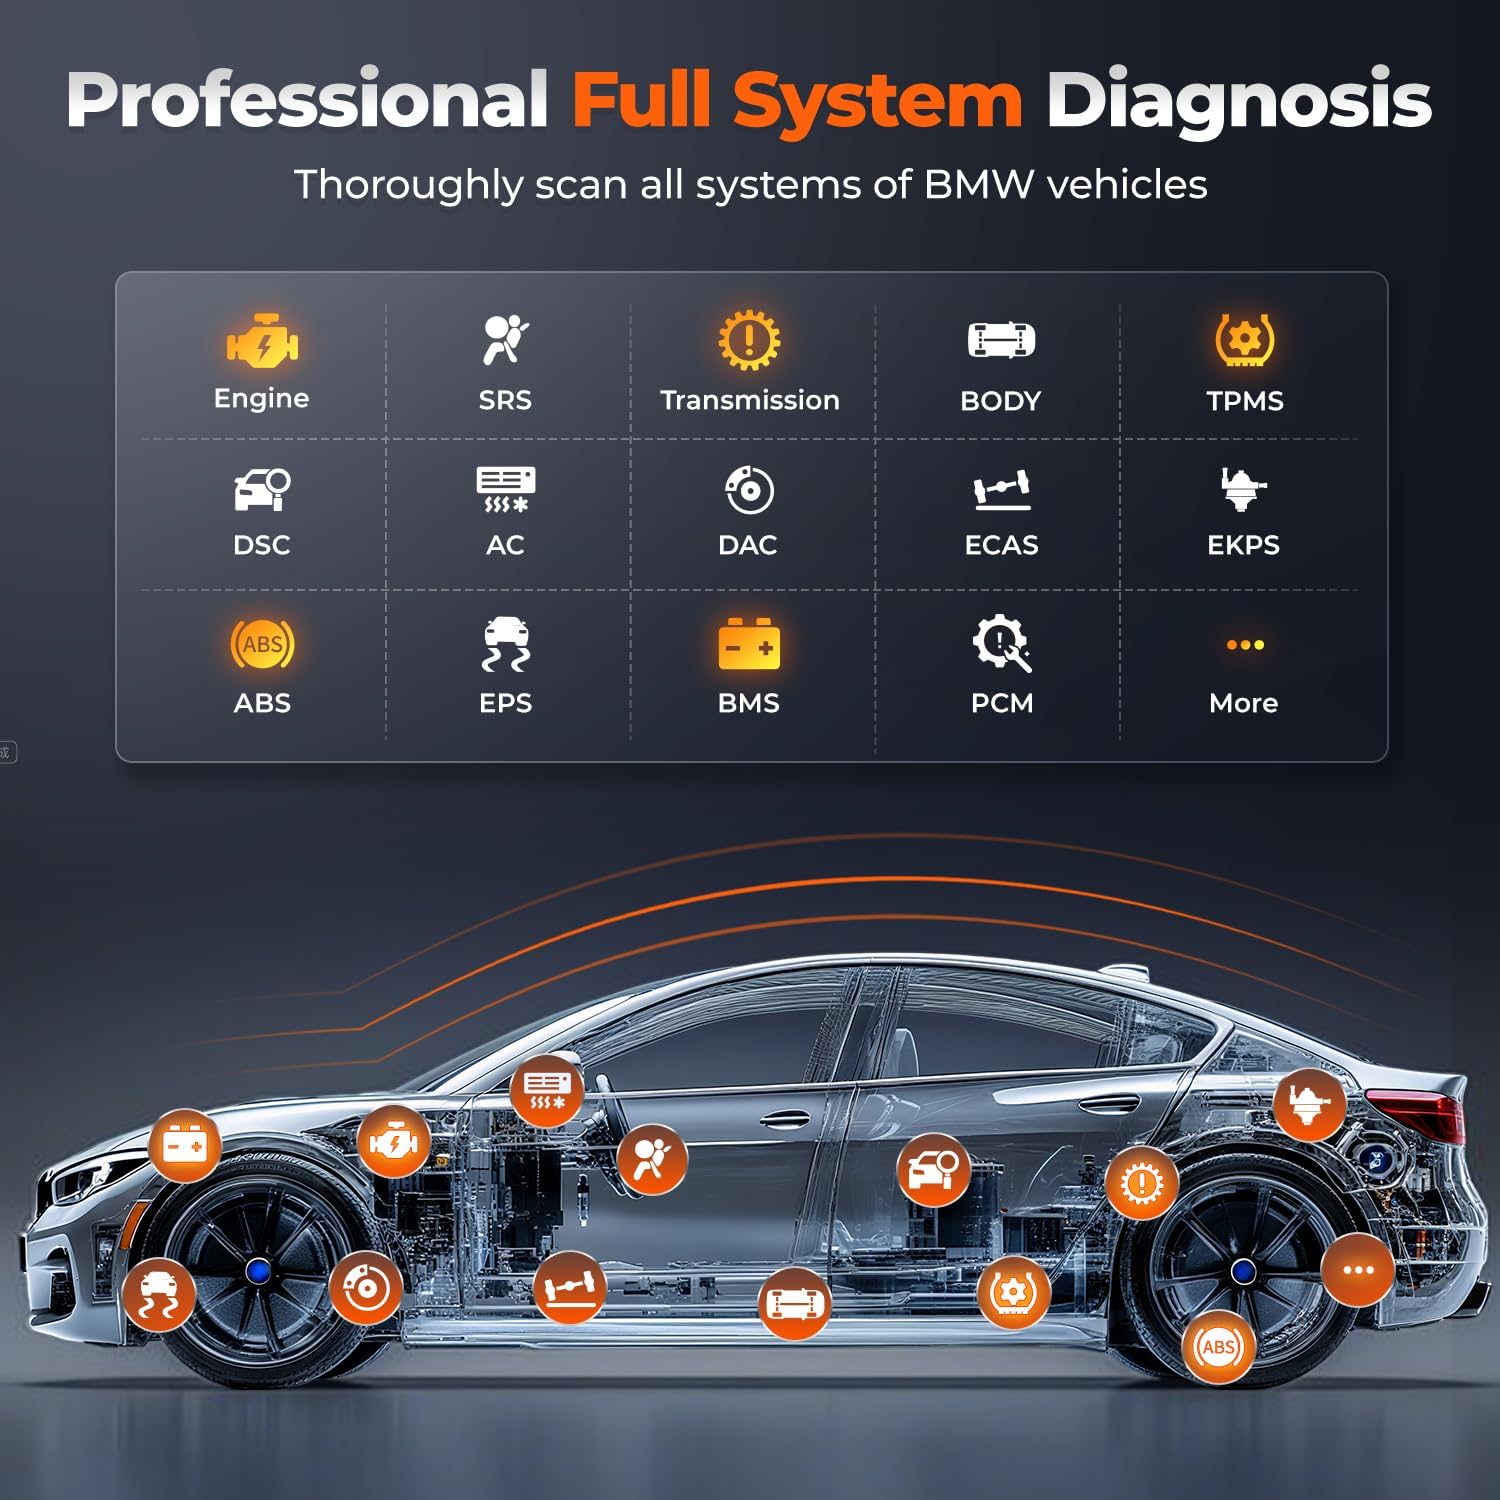
Figure 3.2: Visual representation of the AUTOPHIX 5900P+ performing a full system diagnosis on a BMW vehicle, highlighting various diagnostic points.
4. Maintenance Functions
The AUTOPHIX 5900P+ offers several essential maintenance functions to help keep your BMW, MINI, or Rolls-Royce in optimal condition.
4.1 Oil Service Reset
After an oil change, the tool can reset the oil service indicator. Follow the on-screen prompts to complete the reset. Ensure the ignition is off for 10 seconds before turning it on to proceed with the reset.
4.2 Battery Registration
When replacing the battery in compatible BMW Group vehicles (typically models from 2002-2004 onwards with Intelligent Battery Sensors), it is crucial to register the new battery. This ensures the vehicle's charging system adapts correctly to the new battery's specifications, preventing premature failure.
- Replace the old battery with a new one of the original or same type.
- Turn the ignition ON (engine OFF).
- Navigate to 'Special Functions' and select 'Battery Management'.
- Follow the on-screen instructions to register the new battery.

Figure 4.1: The Battery Management screen on the AUTOPHIX 5900P+.

Figure 4.2: Visual guide for the battery registration process.
Note:
- This tool registers new batteries for same-specification replacements only.
- It does not perform battery programming/coding, which is only needed when changing battery type or size.
4.3 EPB (Electronic Parking Brake) Reset
The EPB reset function is used to safely open and close the electronic parking brake calipers for brake pad replacement. Follow the on-screen instructions carefully to avoid damage.
4.4 CBS (Condition Based Service) Resets
The CBS system monitors various service items and indicates when maintenance is due. The 5900P+ can reset these indicators after the corresponding service has been performed.
4.5 Throttle Matching (ETC Reset)
This function allows for throttle body adaptation reset, which can be necessary after cleaning or replacing the throttle body, or after certain engine repairs.
5. Troubleshooting
The AUTOPHIX 5900P+ is designed to assist in diagnosing vehicle issues. If you encounter a fault code, the tool will display it, allowing you to research the specific problem.
5.1 Reading and Clearing Fault Codes
- Connect the tool to your vehicle and navigate to the diagnostic menu for your vehicle type (OBDII or For BMW).
- Select 'Read Fault Codes' to view any stored Diagnostic Trouble Codes (DTCs).
- Once the underlying issue has been repaired, select 'Erase Fault Codes' to clear the codes from the vehicle's system.
Important:
- Fault codes can only be cleared after the vehicle issue is repaired. This scanner does not repair vehicle issues.
- For new F and G chassis BMW vehicles, engine, AT, ABS fault codes may not be deletable due to new OBD standards.
6. Specifications
| Specification | Value |
|---|---|
| Brand | AUTOPHIX |
| Power Source | Vehicle Battery |
| Product Dimensions (L x W x H) | 9.45" x 7.09" x 1.57" |
| Operating System | Windows (for software updates) |
| Screen Size | 2.4 Inches |
| Included Components | 1 x AUTOPHIX 5900P+ BMW Scanner, 1 x Protective bag, 1 x USB cable, 1 x User manual |
7. Warranty and Support
7.1 Warranty Information
The AUTOPHIX 5900P+ comes with a two-year warranty from the date of purchase. Please retain your proof of purchase for warranty claims.
7.2 Customer Support
For any issues, questions, or to confirm vehicle compatibility, please contact AUTOPHIX customer support:
- Email: autophix@163.com
- Contact directly via Amazon MESSAGE.
When contacting support, please provide your car's brand, model, year, and a detailed description of the issue you are experiencing.
7.3 Software Updates
The AUTOPHIX 5900P+ offers lifetime free software updates to ensure compatibility with new models and to fix software bugs. Use the provided USB cable to connect the device to a computer for updates. Instructions for updating the software can be found on the AUTOPHIX official website or in the detailed user manual.

Figure 7.1: Connecting the AUTOPHIX 5900P+ to a computer for software updates.